Before we get started, have you tried our new Python Code Assistant? It's like having an expert coder at your fingertips. Check it out!
In this tutorial, you will learn how you can hide data into images with Python using OpenCV and NumPy libraries. This is called Steganography.
Table of content:
- What is Steganography?
- What is the Least Significant Bit?
- Getting Started
- Hiding Files Inside Images
- Running the Code
- Conclusion
What is Steganography?
Steganography is the practice of hiding a file, message, image, or video within another file, message, image, or video. The word Steganography is derived from the Greek words "steganos" (meaning hidden or covered) and "graphe" (meaning writing).
Hackers often use it to hide secret messages or data within media files such as images, videos, or audio files. Even though there are many legitimate uses for Steganography, such as watermarking, malware programmers have also been found to use it to obscure the transmission of malicious code.
In this tutorial, we will write Python code to hide text messages using Least Significant Bit.
What is the Least Significant Bit?
Least Significant Bit (LSB) is a technique in which the last bit of each pixel is modified and replaced with the data bit. This method only works on Lossless-compression images, which means the files are stored in a compressed format. However, this compression does not result in the data being lost or modified. PNG, TIFF, and BMP are examples of lossless-compression image file formats.
As you may already know, an image consists of several pixels, each containing three values (Red, Green, and Blue); these values range from 0 to 255. In other words, they are 8-bit values. For example, a value of 225 is 11100001 in binary, and so on.
To simplify the process, let's take an example of how this technique works; say I want to hide the message "hi" in a 4x3 image. Here are the example image pixel values:
[[(225, 12, 99), (155, 2, 50), (99, 51, 15), (15, 55, 22)],
[(155, 61, 87), (63, 30, 17), (1, 55, 19), (99, 81, 66)],
[(219, 77, 91), (69, 39, 50), (18, 200, 33), (25, 54, 190)]]
By looking at the ASCII Table, we can convert the "hi" message into decimal values and then into binary:
0110100 0110101Now, we iterate over the pixel values one by one; after converting them to binary, we replace each least significant bit with that message bit sequentially. 225 is 11100001, we replace the last bit (highlighted), the bit in the right (1), with the first data bit (0), which results in 11100000, meaning it's 224 now.
After that, we go to the next value, which is 00001100, and replace the last bit with the following data bit (1), and so on until the data is completely encoded.
This will only modify the pixel values by +1 or -1, which is not visually noticeable. You can also use 2-Least Significant Bits, which will change the pixel values by a range of -3 to +3.
Here are the resulting pixel values (you can check them on your own):
[[(224, 13, 99), (154, 3, 50), (98, 50, 15), (15, 54, 23)],
[(154, 61, 87), (63, 30, 17), (1, 55, 19), (99, 81, 66)],
[(219, 77, 91), (69, 39, 50), (18, 200, 33), (25, 54, 190)]]
You can also use the three or four least significant bits when the data you want to hide is a little bigger and won't fit your image if you use only the least significant bit. In the upcoming sections, we will add an option to use any number of bits you want.
Related: How to Use Hashing Algorithms in Python.
Getting Started
Now that we understand the technique we are going to use, let's dive into the Python implementation; we are going to use OpenCV to manipulate the image, you can use any other imaging library you want (such as PIL):
pip3 install opencv-python numpyOpen up a new Python file and follow along:
import cv2
import numpy as np
Get: Build 35+ Ethical Hacking Scripts & Tools with Python Book
Handy Function to Convert Data into Binary
Let's start by implementing a function to convert any type of data into binary, and we will use this to convert the secret data and pixel values to binary in the encoding and decoding phases:
def to_bin(data):
    """Convert `data` to binary format as string"""
    if isinstance(data, str):
        return ''.join([ format(ord(i), "08b") for i in data ])
    elif isinstance(data, bytes):
        return ''.join([ format(i, "08b") for i in data ])
    elif isinstance(data, np.ndarray):
        return [ format(i, "08b") for i in data ]
    elif isinstance(data, int) or isinstance(data, np.uint8):
        return format(data, "08b")
    else:
        raise TypeError("Type not supported.")
Hiding Text Inside the Image
The below function will be responsible for hiding text data inside images:
def encode(image_name, secret_data):
    # read the image
    image = cv2.imread(image_name)
    # maximum bytes to encode
    n_bytes = image.shape[0] * image.shape[1] * 3 // 8
    print("[*] Maximum bytes to encode:", n_bytes)
    if len(secret_data) > n_bytes:
        raise ValueError("[!] Insufficient bytes, need bigger image or less data.")
    print("[*] Encoding data...")
    # add stopping criteria
    secret_data += "====="
    data_index = 0
    # convert data to binary
    binary_secret_data = to_bin(secret_data)
    # size of data to hide
    data_len = len(binary_secret_data)
    for row in image:
        for pixel in row:
            # convert RGB values to binary format
            r, g, b = to_bin(pixel)
            # modify the least significant bit only if there is still data to store
            if data_index < data_len:
                # least significant red pixel bit
                pixel[0] = int(r[:-1] + binary_secret_data[data_index], 2)
                data_index += 1
            if data_index < data_len:
                # least significant green pixel bit
                pixel[1] = int(g[:-1] + binary_secret_data[data_index], 2)
                data_index += 1
            if data_index < data_len:
                # least significant blue pixel bit
                pixel[2] = int(b[:-1] + binary_secret_data[data_index], 2)
                data_index += 1
            # if data is encoded, just break out of the loop
            if data_index >= data_len:
                break
    return image
Here is what the encode() function does:
- Reads the image using
cv2.imread()function. - Counts the maximum bytes available to encode the data.
- Checks whether we can encode all the data into the image.
- Adds stopping criteria, which will be an indicator for the decoder to stop decoding whenever it sees this (feel free to implement a better and more efficient one).
- Finally, it modifies the last bit of each pixel and replaces it with the data bit.
Extracting Text from the Image
Now here is the decoder function:
def decode(image_name):
    print("[+] Decoding...")
    # read the image
    image = cv2.imread(image_name)
    binary_data = ""
    for row in image:
        for pixel in row:
            r, g, b = to_bin(pixel)
            binary_data += r[-1]
            binary_data += g[-1]
            binary_data += b[-1]
    # split by 8-bits
    all_bytes = [ binary_data[i: i+8] for i in range(0, len(binary_data), 8) ]
    # convert from bits to characters
    decoded_data = ""
    for byte in all_bytes:
        decoded_data += chr(int(byte, 2))
        if decoded_data[-5:] == "=====":
            break
    return decoded_data[:-5]
We read the image and then get the last bits of every image pixel. After that, we keep decoding until we see the stopping criteria we used during encoding.
Let's use these functions:
if __name__ == "__main__":
    input_image = "image.PNG"
    output_image = "encoded_image.PNG"
    secret_data = "This is a top secret message."
    # encode the data into the image
    encoded_image = encode(image_name=input_image, secret_data=secret_data)
    # save the output image (encoded image)
    cv2.imwrite(output_image, encoded_image)
    # decode the secret data from the image
    decoded_data = decode(output_image)
    print("[+] Decoded data:", decoded_data)
I have an example PNG image here; use whatever picture you want. Just make sure it is a Lossless-compression image format such as PNG, as discussed earlier.
The above code will take image.PNG image, encode secret_data string into it and save it into encoded_image.PNG. After that, we use the decode() function that loads the new image and decodes the hidden message in it.
After the execution of the script, it will write another file "encoded_image.PNG" with precisely the same image looking but with secret data encoded in it. Here is the output:
[*] Maximum bytes to encode: 125028
[*] Encoding data...
[+] Decoding...
[+] Decoded data: This is a top secret message.
So we can decode about 122KB (125028 bytes) on this particular image. This will vary from one image to another based on its resolution size.
Related: Build 35+ Ethical Hacking Scripts & Tools with Python Book
Hiding Files Inside Images
In this section, we will make another script that is more advanced than the previous one, which has the following additional features:
- The above code only hides text data, so we'll be adding the ability to hide any binary data type, such as audio files, PDF documents, or even images!
- If the data we want to hide is bigger than an eighth of the image, we cannot hide it! Therefore, we add the possibility of hiding the two, three, or four least significant bits in the image.
To get started, we import the necessary libraries and the to_bin() function as before:
import cv2
import numpy as np
import os

def to_bin(data):
    """Convert `data` to binary format as string"""
    if isinstance(data, str):
        return ''.join([ format(ord(i), "08b") for i in data ])
    elif isinstance(data, bytes):
        return ''.join([ format(i, "08b") for i in data ])
    elif isinstance(data, np.ndarray):
        return [ format(i, "08b") for i in data ]
    elif isinstance(data, int) or isinstance(data, np.uint8):
        return format(data, "08b")
    else:
        raise TypeError("Type not supported.")
Now let's make the new encode() function:
def encode(image_name, secret_data, n_bits=2):
    # read the image
    image = cv2.imread(image_name)
    # maximum bytes to encode
    n_bytes = image.shape[0] * image.shape[1] * 3 * n_bits // 8
    print("[*] Maximum bytes to encode:", n_bytes)
    print("[*] Data size:", len(secret_data))
    if len(secret_data) > n_bytes:
        raise ValueError(f"[!] Insufficient bytes ({len(secret_data)}), need bigger image or less data.")
    print("[*] Encoding data...")
    # add stopping criteria
    if isinstance(secret_data, str):
        secret_data += "====="
    elif isinstance(secret_data, bytes):
        secret_data += b"====="
    data_index = 0
    # convert data to binary
    binary_secret_data = to_bin(secret_data)
    # size of data to hide
    data_len = len(binary_secret_data)
    for bit in range(1, n_bits+1):
        for row in image:
            for pixel in row:
                # convert RGB values to binary format
                r, g, b = to_bin(pixel)
                # modify the least significant bit only if there is still data to store
                if data_index < data_len:
                    if bit == 1:
                        # least significant red pixel bit
                        pixel[0] = int(r[:-bit] + binary_secret_data[data_index], 2)
                    elif bit > 1:
                        # replace the `bit` least significant bit of the red pixel with the data bit
                        pixel[0] = int(r[:-bit] + binary_secret_data[data_index] + r[-bit+1:], 2)
                    data_index += 1
                if data_index < data_len:
                    if bit == 1:
                        # least significant green pixel bit
                        pixel[1] = int(g[:-bit] + binary_secret_data[data_index], 2)
                    elif bit > 1:
                        # replace the `bit` least significant bit of the green pixel with the data bit
                        pixel[1] = int(g[:-bit] + binary_secret_data[data_index] + g[-bit+1:], 2)
                    data_index += 1
                if data_index < data_len:
                    if bit == 1:
                        # least significant blue pixel bit
                        pixel[2] = int(b[:-bit] + binary_secret_data[data_index], 2)
                    elif bit > 1:
                        # replace the `bit` least significant bit of the blue pixel with the data bit
                        pixel[2] = int(b[:-bit] + binary_secret_data[data_index] + b[-bit+1:], 2)
                    data_index += 1
                # if data is encoded, just break out of the loop
                if data_index >= data_len:
                    break
    return image
This time, secret_data can be an str (hiding text) or bytes (hiding any binary data).
Besides that, we wrap the encoding with another for loop iterating n_bits times. The default n_bits parameter is set to 2, meaning we encode the data in the two least significant bits of each pixel, and we will pass command-line arguments to this parameter. It can be as low as 1 (won't encode much data) or as high as 6, but the resulting image will look different and a bit noisy.
For the decoding part, it's the same as before, but we add the in_bytes boolean parameter to indicate whether it's binary data. If it is so, then we use bytearray() instead of a regular string to construct our decoded data:
def decode(image_name, n_bits=1, in_bytes=False):
    print("[+] Decoding...")
    # read the image
    image = cv2.imread(image_name)
    binary_data = ""
    for bit in range(1, n_bits+1):
        for row in image:
            for pixel in row:
                r, g, b = to_bin(pixel)
                binary_data += r[-bit]
                binary_data += g[-bit]
                binary_data += b[-bit]
    # split by 8-bits
    all_bytes = [ binary_data[i: i+8] for i in range(0, len(binary_data), 8) ]
    # convert from bits to characters
    if in_bytes:
        # if the data we'll decode is binary data,
        # we initialize bytearray instead of string
        decoded_data = bytearray()
        for byte in all_bytes:
            # append the data after converting from binary
            decoded_data.append(int(byte, 2))
            if decoded_data[-5:] == b"=====":
                # exit out of the loop if we find the stopping criteria
                break
    else:
        decoded_data = ""
        for byte in all_bytes:
            decoded_data += chr(int(byte, 2))
            if decoded_data[-5:] == "=====":
                break
    return decoded_data[:-5]
Next, we use the argparse module to parse command-line arguments to pass to the encode() and decode() functions:
if __name__ == "__main__":
    import argparse
    parser = argparse.ArgumentParser(description="Steganography encoder/decoder, this Python scripts encode data within images.")
    parser.add_argument("-t", "--text", help="The text data to encode into the image, this only should be specified for encoding")
    parser.add_argument("-f", "--file", help="The file to hide into the image, this only should be specified while encoding")
    parser.add_argument("-e", "--encode", help="Encode the following image")
    parser.add_argument("-d", "--decode", help="Decode the following image")
    parser.add_argument("-b", "--n-bits", help="The number of least significant bits of the image to encode", type=int, default=2)
    # parse the args
    args = parser.parse_args()
    if args.encode:
        # if the encode argument is specified
        if args.text:
            secret_data = args.text
        elif args.file:
            with open(args.file, "rb") as f:
                secret_data = f.read()
        input_image = args.encode
        # split the absolute path and the file
        path, file = os.path.split(input_image)
        # split the filename and the image extension
        filename, ext = file.split(".")
        output_image = os.path.join(path, f"{filename}_encoded.{ext}")
        # encode the data into the image
        encoded_image = encode(image_name=input_image, secret_data=secret_data, n_bits=args.n_bits)
        # save the output image (encoded image)
        cv2.imwrite(output_image, encoded_image)
        print("[+] Saved encoded image.")
    if args.decode:
        input_image = args.decode
        if args.file:
            # decode the secret data from the image and write it to file
            decoded_data = decode(input_image, n_bits=args.n_bits, in_bytes=True)
            with open(args.file, "wb") as f:
                f.write(decoded_data)
            print(f"[+] File decoded, {args.file} is saved successfully.")
        else:
            # decode the secret data from the image and print it in the console
            decoded_data = decode(input_image, n_bits=args.n_bits)
            print("[+] Decoded data:", decoded_data)
Note: You can always check the complete code here.
Here we added five arguments to pass:
-tor--text: If we want to encode text into an image, then this is the parameter we pass to do so.-for--file: If we want to encode files instead of text, we pass this argument along with the file path.-eor--encode: The image we want to hide our data into.-dor--decode: The image we want to extract data from.-bor--n-bits: The number of least significant bits to use. If you have larger data, then make sure to increase this parameter. I do not suggest being higher than 4, as the image will look scandalous and too apparent that something is going wrong with the image.
Get Our Ethical Hacking with Python EBook
Master Ethical Hacking with Python by building 35+ Tools from scratch. Get your copy now!
Download EBookRunning the Code
Let's run our code. Now I have the same image (image.PNG) as before:
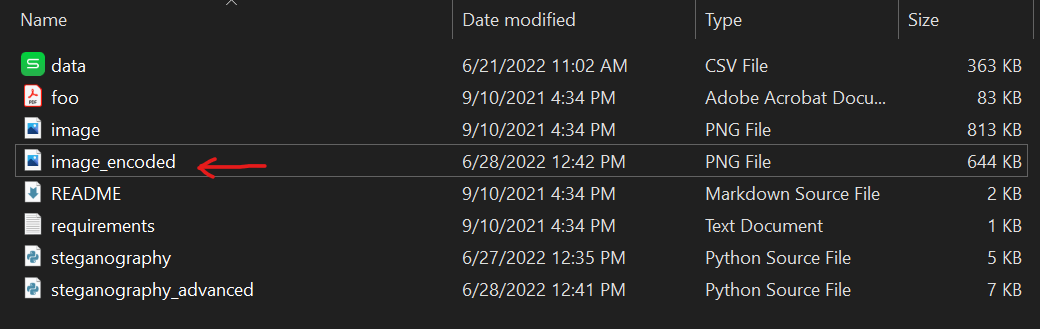
 Let's try to hide the
 data.csv file into it:
$ python steganography_advanced.py -e image.PNG -f data.csv -b 1We pass the image using the -e parameter, and the file we want to hide using the -f parameter. I also specified the number of least significant bits to be one. Unfortunately, see the output:
[*] Maximum bytes to encode: 125028
[*] Data size: 370758
Traceback (most recent call last):
  File "E:\repos\pythoncode-tutorials\ethical-hacking\steganography\steganography_advanced.py", line 135, in <module>
    encoded_image = encode(image_name=input_image, secret_data=secret_data, n_bits=args.n_bits)
  File "E:\repos\pythoncode-tutorials\ethical-hacking\steganography\steganography_advanced.py", line 27, in encode
    raise ValueError(f"[!] Insufficient bytes ({len(secret_data)}), need bigger image or less data.")
ValueError: [!] Insufficient bytes (370758), need bigger image or less data.
This error is totally expected since using only one bit on each pixel value won't be sufficient to hide the entire 363KB file. Therefore, let's increase the number of bits (-b parameter):
$ python steganography_advanced.py -e image.PNG -f data.csv -b 2

[*] Maximum bytes to encode: 250057
[*] Data size: 370758
Traceback (most recent call last):
  File "E:\repos\pythoncode-tutorials\ethical-hacking\steganography\steganography_advanced.py", line 135, in <module>
    encoded_image = encode(image_name=input_image, secret_data=secret_data, n_bits=args.n_bits)
  File "E:\repos\pythoncode-tutorials\ethical-hacking\steganography\steganography_advanced.py", line 27, in encode
    raise ValueError(f"[!] Insufficient bytes ({len(secret_data)}), need bigger image or less data.")
ValueError: [!] Insufficient bytes (370758), need bigger image or less data.
Two bits is still not enough. The maximum bytes to encode is 250KB, and we need around 370KB. Increasing to 3:
$ python steganography_advanced.py -e image.PNG -f data.csv -b 3

[*] Maximum bytes to encode: 375086
[*] Data size: 370758
[*] Encoding data...
[+] Saved encoded image.
You'll see now the data.csv is successfully encoded into a new image_encoded.PNG and it appeared in the current directory:
 Let's extract the data from the
 image_encoded.PNG now:
$ python steganography_advanced.py -d image_encoded.PNG -f data_decoded.csv -b 3
[+] Decoding...
[+] File decoded, data_decoded.csv is saved successfully.
Amazing! This time I have passed the encoded image to the -d parameter. I have also passed data_decoded.csv to -f for the resulting filename to write. Let's recheck our directory:
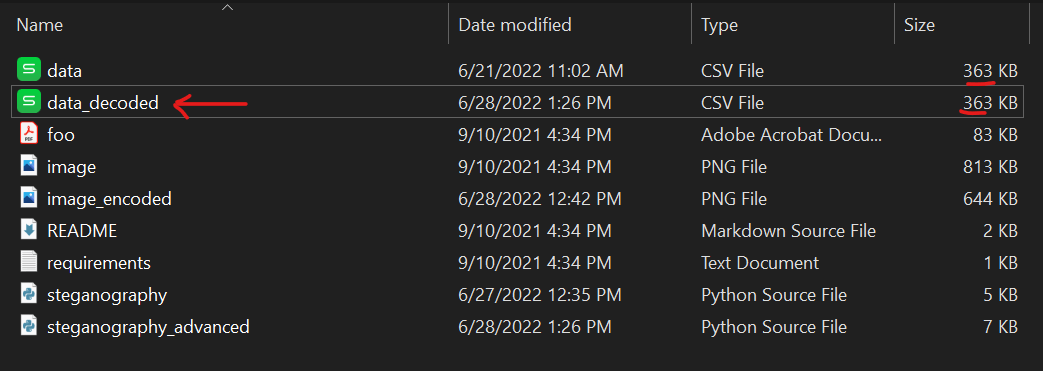 As you can see, the new file appeared identical to the original. Note that you must set the same
 -b parameter when encoding and decoding.
I emphasize that you only increase the -b parameter when necessary (i.e., when the data is big). I have tried to hide a larger file (over 700KB) into the same image, and the minimum allowed least significant bit was 6. Here's what the resulting encoded image looks like:
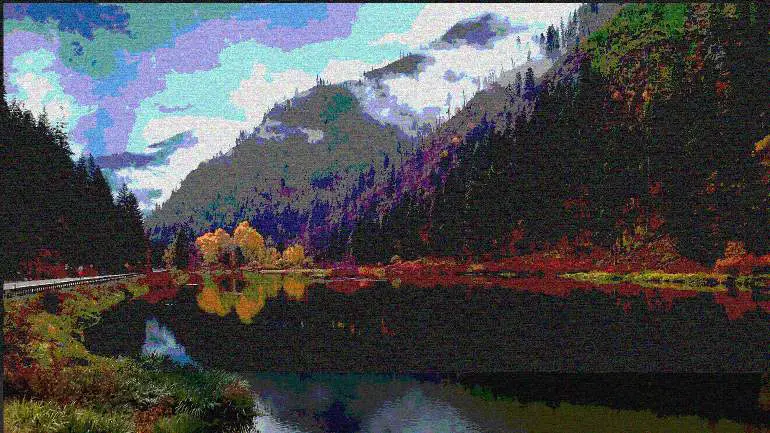 So there is clearly something wrong with the image, as the pixel values change in the range of -64 and +64, so that's a lot.
Conclusion
Awesome! You just learned how you can implement Steganography in Python on your own!
As you may notice, the resulting image will look exactly the same as the original image only when the number of least significant bits (-b parameter) is low such as one or two. So whenever a person sees the image, they won't be able to detect whether there is hidden data within it.
If the data you want to hide is big, then make sure you take a high-resolution image instead of increasing the -b parameter to a higher number than 4 because it will be so evident that there is something wrong with the picture.
Also, if you're familiar with Linux commands, you can also perform Steganography using standard Linux commands.
Here are some ideas and challenges you can do:
- Encrypting the data before encoding it in the image (this is often used in Steganography).
- Experiment with different images and data formats.
- Encode a massive amount of data in videos instead of images (you can do this with OpenCV as videos are just sequences of photos).
Finally, we have an Ethical Hacking with Python Ebook, where we build 35+ hacking tools and scripts! Make sure to check it out if you're interested.
Learn also: How to Extract Image Metadata in Python.
Happy Coding ♥
Ready for more? Dive deeper into coding with our AI-powered Code Explainer. Don't miss it!
View Full Code Assist My Coding


Got a coding query or need some guidance before you comment? Check out this Python Code Assistant for expert advice and handy tips. It's like having a coding tutor right in your fingertips!