Before we get started, have you tried our new Python Code Assistant? It's like having an expert coder at your fingertips. Check it out!
Have you ever wanted to quickly build your Python application into a single Windows .exe file? or do you want to bundle a large Python project into a single executable package? In this tutorial, you will learn to use the PyInstaller package for that.
PyInstaller freezes Python applications into stand-alone executables under Windows, GNU/Linux, Mac OS X, FreeBSD, Solaris and AIX. The user can run and execute the resulting packaged application without installing a Python interpreter or any modules. It supports Python 2.7 and Python 3.4+ and successfully bundles the major and famous Python packages such as numpy, PyQT, Django, and more.
PyInstaller isn't cross-compiler, which means if you want to make a Windows executable (.exe), you need to run PyInstaller on Windows, and if you want a GNU/Linux app, you run it on Linux, and so on.
Pyinstaller analyzes your code to discover every other module and library your script is using to execute, and then it collects copies of all those files and puts them with your script in a single folder (or a single executable).
Read Also: How to Make a Process Monitor in Python.
Alright, it is pretty simple to install it:
pip3 install pyinstallerTo get started, I will use an example Python file from writing a keylogger tutorial to show you exactly how you can use Pyinstaller.
So, to run it, you need to be in the same directory of the Python file you wanna build and write the following:
pyinstaller keylogger.pyThis will build keylogger.py file in a couple of seconds; here are my resulting folders:
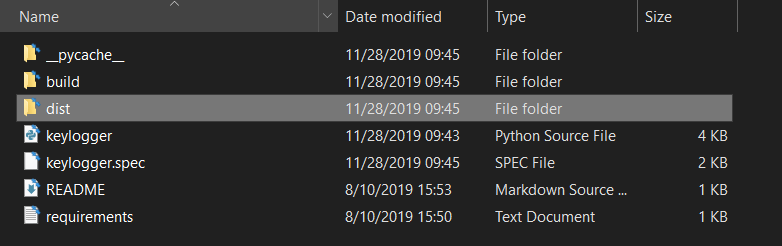
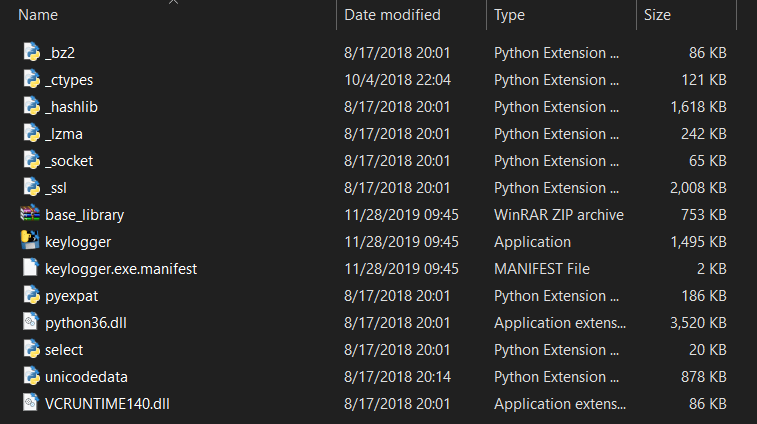
As you can see, two new folders appeared ("build" and "dist"); you'll find most of the metadata and log files into the build folder. As a result, we're more interested in the dist folder. After opening it up, you'll see something like this:
Get: Build 35+ Ethical Hacking Scripts & Tools with Python Book
This packaged all the required dependencies into a single folder, to execute this in any Windows machine (since I built it on Windows), you need to move this entire folder and right-click keylogger.exe.
If you build non-GUI applications such as this example, you'll notice that once you execute the file, a console window will appear for standard I/O, you can disable this using --noconsole, --windowed or -w parameter.
If you want to bundle everything on a single executable, you can also do that by --onefile or -F parameter which creates a one-file bundled executable.
Let's combine these two and see:
pyinstaller --noconsole --onefile keylogger.pyThis will build an executable that doesn't show any console window:
![]() A 5.5MB single executable .exe file, the file size will differ depending on the required dependencies to build this application. When I execute this, nothing happens; it is a stealthy application. I can only monitor it in the task manager:
A 5.5MB single executable .exe file, the file size will differ depending on the required dependencies to build this application. When I execute this, nothing happens; it is a stealthy application. I can only monitor it in the task manager:
![]() You can also change the icon of the executable using
You can also change the icon of the executable using -i or --icon parameter, which requires a .ico, .exe or .icns file that applies its icon to this resulting Windows or Mac OS X executable.
Also, you can use some Windows-specific options, such as -m or --manifest, which accepts a MANIFEST file that describes the package contents of a Windows software application.
Additional Parameters
Here are some additional parameters you might find useful:
-nor--name: Set the bundle executable's name. This provides a way to personalize the generated executable file.$ pyinstaller --name my_keylogger keylogger.py-cor--clean: Clean the Pyinstaller cache and remove temporary files before building. This can be helpful to avoid any potential issues and ensure a fresh build environment.$ pyinstaller --clean keylogger.py-uor--upx: Whether to use the UPX packet to compress the executable. This basically compresses the generated executable, reducing its file size and potentially making it load faster when executed.$ pyinstaller --upx -F keylogger.py-
-xor--exclude-module: Exclude a specific module from being bundled.$ pyinstaller --exclude-module unnecessary_module keylogger.py --additional-hooks-dir: Add a directory to look for additional hooks. In the context of PyInstaller, "hooks" refer to scripts that help PyInstaller understand and bundle additional dependencies or modules that your Python script may rely on. These hooks instruct PyInstaller on handling specific libraries, packages, or modules during the bundling process.$ pyinstaller --additional-hooks-dir=/path/to/hooks keylogger.py-por--hidden-import: Explicitly specify additional modules to be included.$ pyinstaller --hidden-import=extra_module keylogger.py--specpath: Specify the directory to store the generated spec file.$ pyinstaller --specpath=/path/to/specs keylogger.py--log-level: Set the level of detail in build-time console messages. Using--log-levellets you adjust the verbosity of the console messages during the PyInstaller build, making it easier to focus on essential information or gather more details for debugging purposes, depending on your needs.$ pyinstaller --log-level=DEBUG keylogger.py-dor--debug: Produce additional debugging information.$ pyinstaller --debug keylogger.py
Remember to adapt these parameters based on your specific needs and the requirements of your Python application. Also, please note that with PyInstaller, you're in control. You can add as many parameters as you need to shape your executable—change its name with --name, hide the console with --noconsole, or give it flair with the --icon (all in one run). Mix and match for a personalized build that suits your Python app perfectly.
Here's a final example:
$ pyinstaller --noconsole --name my_keylogger --icon=icon.ico keylogger.pyAlright, we're done with this tutorial, use --help parameter to see various other parameters that we didn't discuss and their explanations, or you can check PyInstaller's official documentation for more detailed information.
Learn also: How to Assemble, Disassemble, and Emulate Machine Code using Python.
Happy Building ♥
Just finished the article? Why not take your Python skills a notch higher with our Python Code Assistant? Check it out!


Got a coding query or need some guidance before you comment? Check out this Python Code Assistant for expert advice and handy tips. It's like having a coding tutor right in your fingertips!