Before we get started, have you tried our new Python Code Assistant? It's like having an expert coder at your fingertips. Check it out!
Gmail is by far the most popular mail service nowadays. Individuals and organizations use it. Many of its features are enhanced with AI, including its security (and detection of fraudulent emails) and its suggestions when writing emails.
In the previous tutorials, we explained how you could send emails and read emails with Python. If you didn't read them yet, I highly recommend you check them out.
While the previous tutorials were on using the IMAP/SMTP protocols directly, in this one, we will be using Google's API to send and read emails; by doing so, we can use features that are specific to Google Mail, for example; add labels to some emails, mark emails as unread/read and so on.
For this guide, we will explore some of the main features of the Gmail API, and we will write several Python scripts that can send emails, search for emails, delete, and mark them as read or unread. They'll be used as follows:
$ python send_emails.py destination@gmail.com "Subject" "Message body" --files file1.txt file2.pdf file3.png
$ python read_emails.py "search query"
$ python delete_emails.py "search query"
$ python mark_emails.py --read "search query"
$ python mark_emails.py --unread "search query"
Here is the table of contents:
- Enabling Gmail API
- Sending Emails
- Searching for Emails
- Reading Emails
- Marking Emails as Read
- Marking Emails as Unread
- Deleting Emails
To get started, let's install the necessary dependencies:
$ pip3 install --upgrade google-api-python-client google-auth-httplib2 google-auth-oauthlibEnabling Gmail API
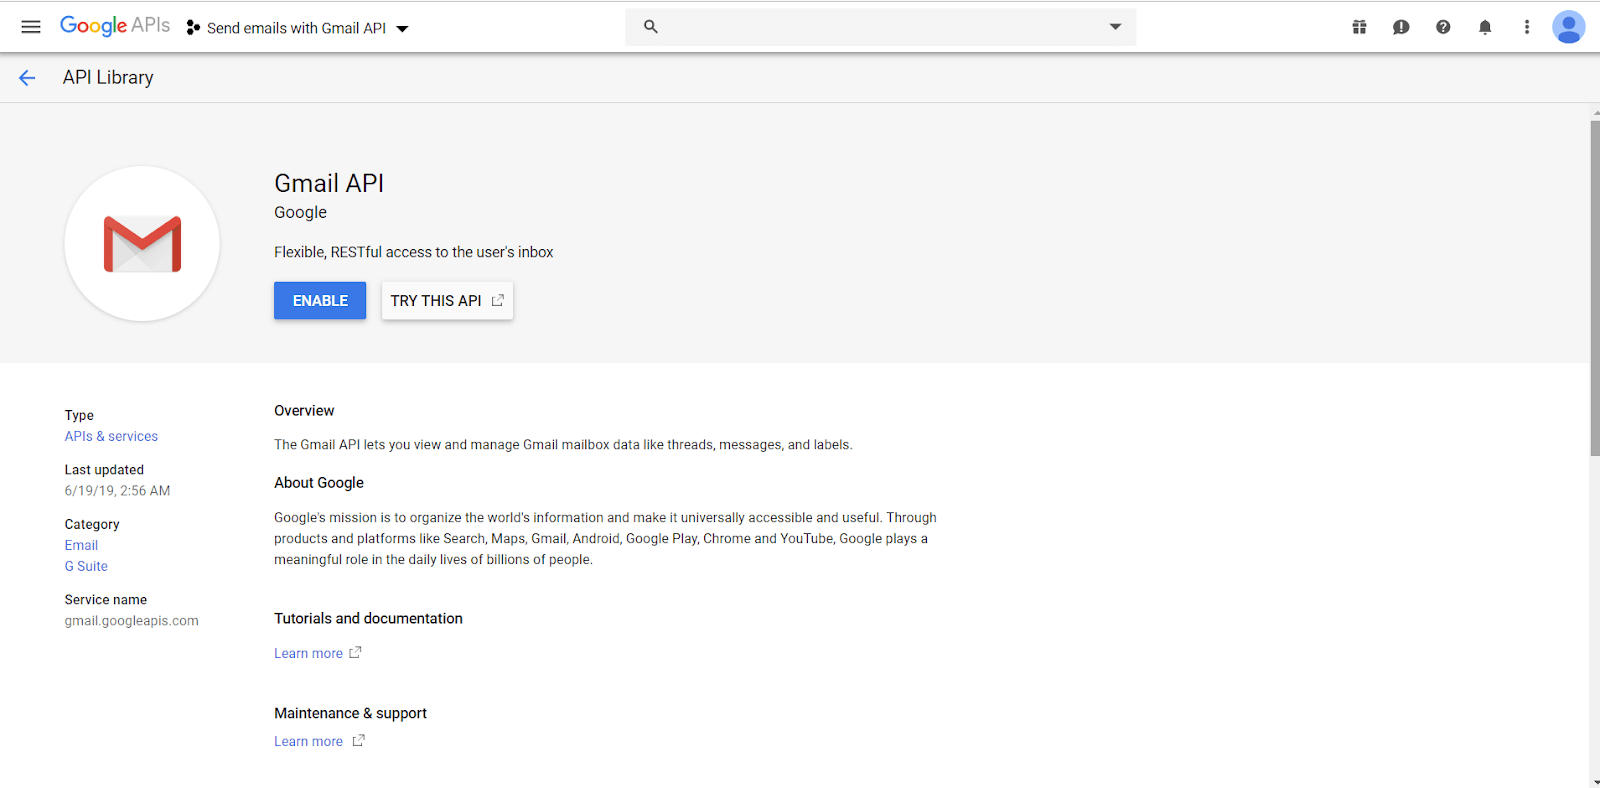
To use the Gmail API, we need a token to connect to Gmail's API. We can get one from the Google APIs' dashboard.
We first enable the Google mail API, head to the dashboard, and use the search bar to search for Gmail API, click on it, and then enable:
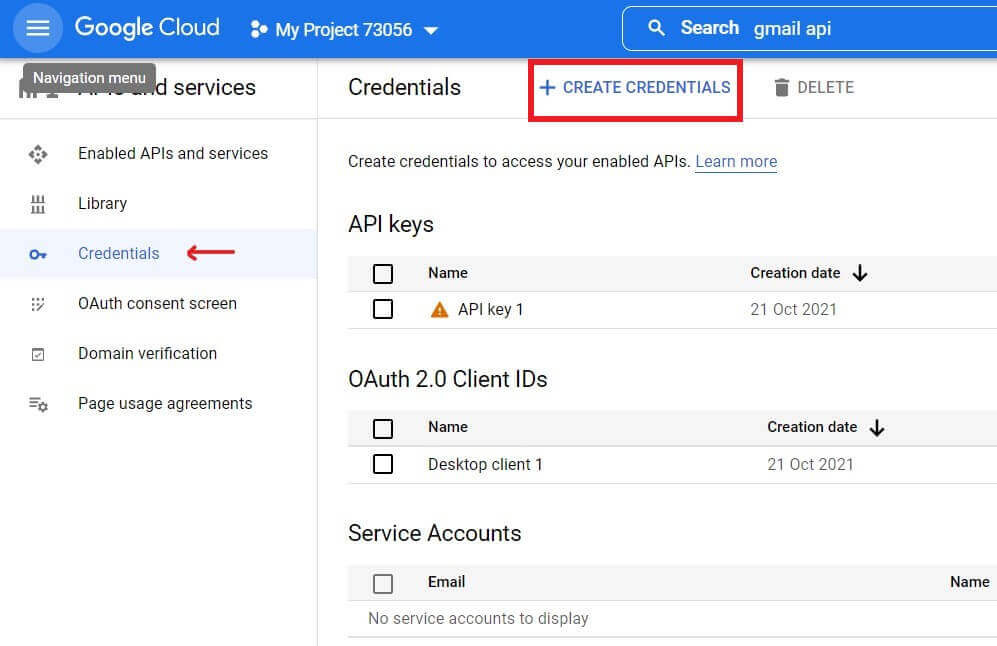
We then create an OAuth 2.0 client ID by creating credentials (by heading to the Create Credentials button):
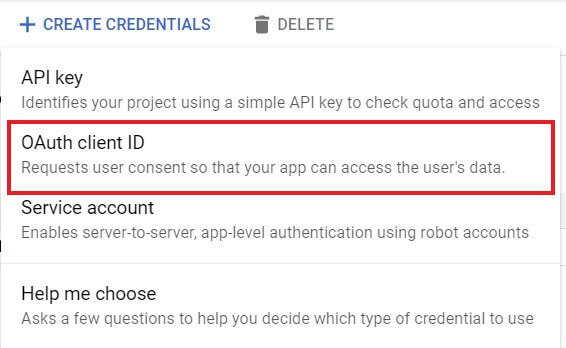
Click on Create Credentials, and then choose OAuth client ID from the dropdown menu:
You'll be headed to this page:
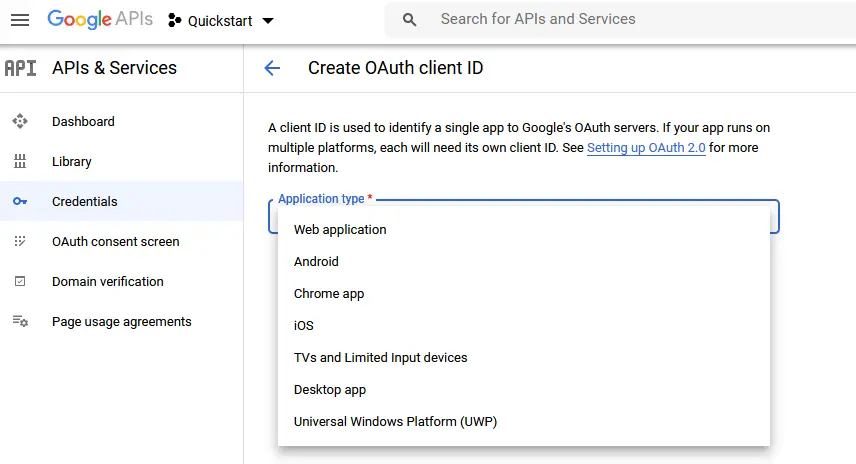 Select Desktop App as the Application type and proceed. You'll see a window like this:
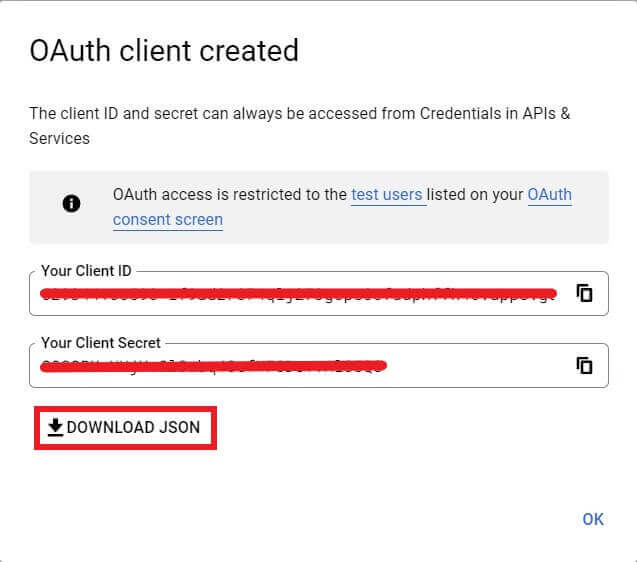
Go ahead and click on DOWNLOAD JSON; it will download a long-named JSON file. Rename it to credentials.json and put it in the current directory of the project.
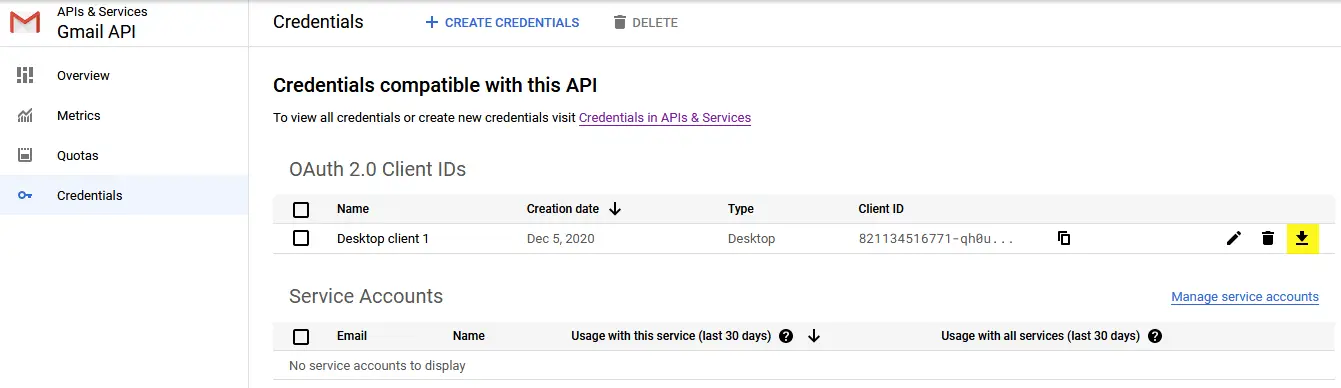
Alternatively, if you missed that window, you can click on that download icon button at the right of the page:
Note: If this is the first time you use Google APIs, you may need to simply create an OAuth Consent screen and add your email as a testing user.
Now we're done with setting up the API, let's start by importing the necessary modules:
import os
import pickle
# Gmail API utils
from googleapiclient.discovery import build
from google_auth_oauthlib.flow import InstalledAppFlow
from google.auth.transport.requests import Request
# for encoding/decoding messages in base64
from base64 import urlsafe_b64decode, urlsafe_b64encode
# for dealing with attachement MIME types
from email.mime.text import MIMEText
from email.mime.multipart import MIMEMultipart
from email.mime.image import MIMEImage
from email.mime.audio import MIMEAudio
from email.mime.base import MIMEBase
from mimetypes import guess_type as guess_mime_type

# Request all access (permission to read/send/receive emails, manage the inbox, and more)
SCOPES = ['https://mail.google.com/']
our_email = 'your_gmail@gmail.com'
Obviously, you need to change our_email to your address. Make sure you use the email you created the API auth with.
First of all, let's make a function that loads the credentials.json, does the authentication with Gmail API and returns a service object that can be used later in all of our upcoming functions:
def gmail_authenticate():
    creds = None
    # the file token.pickle stores the user's access and refresh tokens, and is
    # created automatically when the authorization flow completes for the first time
    if os.path.exists("token.pickle"):
        with open("token.pickle", "rb") as token:
            creds = pickle.load(token)
    # if there are no (valid) credentials availablle, let the user log in.
    if not creds or not creds.valid:
        if creds and creds.expired and creds.refresh_token:
            creds.refresh(Request())
        else:
            flow = InstalledAppFlow.from_client_secrets_file('credentials.json', SCOPES)
            creds = flow.run_local_server(port=0)
        # save the credentials for the next run
        with open("token.pickle", "wb") as token:
            pickle.dump(creds, token)
    return build('gmail', 'v1', credentials=creds)

# get the Gmail API service
service = gmail_authenticate()
You should see this familiar if you have already used a Google API before, such as Google Drive API; it is basically reading the credentials.json and saving it to token.pickle file after authenticating with Google in your browser, we save the token, so the second time we run the code, we shouldn't authenticate again.
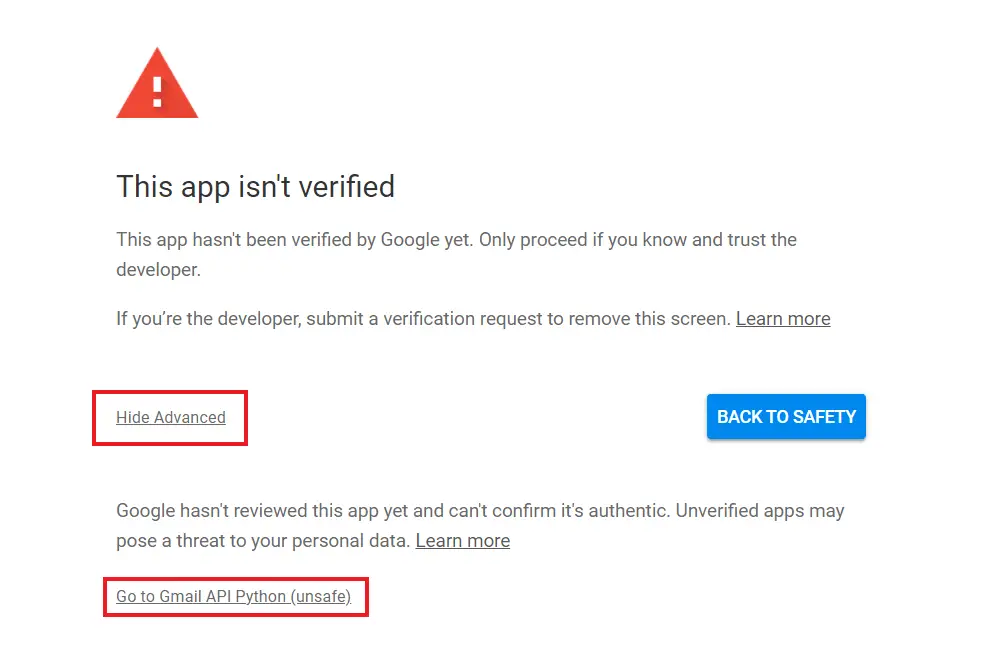
This will prompt you in your default browser to accept the permissions required for this app. If you see a window that indicates the app isn't verified, you may just want to head to Advanced and click on go to Gmail API Python (unsafe):
Sending Emails
First, let's start with the function that sends emails; we know that emails can contain attachments, so we will define a function that adds an attachment to a message. A message is an instance of MIMEMultipart (or MIMEText, if it doesn't contain attachments):
# Adds the attachment with the given filename to the given message
def add_attachment(message, filename):
    content_type, encoding = guess_mime_type(filename)
    if content_type is None or encoding is not None:
        content_type = 'application/octet-stream'
    main_type, sub_type = content_type.split('/', 1)
    if main_type == 'text':
        fp = open(filename, 'rb')
        msg = MIMEText(fp.read().decode(), _subtype=sub_type)
        fp.close()
    elif main_type == 'image':
        fp = open(filename, 'rb')
        msg = MIMEImage(fp.read(), _subtype=sub_type)
        fp.close()
    elif main_type == 'audio':
        fp = open(filename, 'rb')
        msg = MIMEAudio(fp.read(), _subtype=sub_type)
        fp.close()
    else:
        fp = open(filename, 'rb')
        msg = MIMEBase(main_type, sub_type)
        msg.set_payload(fp.read())
        fp.close()
    filename = os.path.basename(filename)
    msg.add_header('Content-Disposition', 'attachment', filename=filename)
    message.attach(msg)
Second, we write a function that takes some message parameters, builds, and returns an email message:
def build_message(destination, obj, body, attachments=[]):
    if not attachments: # no attachments given
        message = MIMEText(body)
        message['to'] = destination
        message['from'] = our_email
        message['subject'] = obj
    else:
        message = MIMEMultipart()
        message['to'] = destination
        message['from'] = our_email
        message['subject'] = obj
        message.attach(MIMEText(body))
        for filename in attachments:
            add_attachment(message, filename)
    return {'raw': urlsafe_b64encode(message.as_bytes()).decode()}
And finally, we make a function that takes message parameters, and uses the Google mail API to send a message constructed with the build_message() we previously defined:
def send_message(service, destination, obj, body, attachments=[]):
    return service.users().messages().send(
      userId="me",
      body=build_message(destination, obj, body, attachments)
    ).execute()
That's it for sending messages. Let's use the function to send an example email:
# test send email
send_message(service, "destination@domain.com", "This is a subject",
            "This is the body of the email", ["test.txt", "anyfile.png"])
Put your email as the destination address and real paths to files, and you'll see that the message is indeed sent!
Learn also: How to Send Emails in Python using smtplib.
Searching for Emails
def search_messages(service, query):
    result = service.users().messages().list(userId='me',q=query).execute()
    messages = [ ]
    if 'messages' in result:
        messages.extend(result['messages'])
    while 'nextPageToken' in result:
        page_token = result['nextPageToken']
        result = service.users().messages().list(userId='me',q=query, pageToken=page_token).execute()
        if 'messages' in result:
            messages.extend(result['messages'])
    return messages
We had to retrieve the messages page by page because they are paginated. This function would return the IDs of the emails that match the query. We will use it for the delete, mark as read, mark as unread, and search features. The good news is that you can use Gmail search operators such as from, to, subject, filename, before and after (for dates), and many more. Check this page for more info.
Reading Emails
In this section, we'll make Python code that takes a search query as input and reads all the matched emails; printing email basic information (To, From addresses, Subject and Date) and plain/text parts.
We'll also create a folder for each email based on the subject and download text/html content as well as any file that is attached to the email and saves it in the folder created.
Before we dive into the function that reads emails given a search query, we gonna define two utility functions that we'll use:
# utility functions
def get_size_format(b, factor=1024, suffix="B"):
    """
    Scale bytes to its proper byte format
    e.g:
        1253656 => '1.20MB'
        1253656678 => '1.17GB'
    """
    for unit in ["", "K", "M", "G", "T", "P", "E", "Z"]:
        if b < factor:
            return f"{b:.2f}{unit}{suffix}"
        b /= factor
    return f"{b:.2f}Y{suffix}"


def clean(text):
    # clean text for creating a folder
    return "".join(c if c.isalnum() else "_" for c in text)
The get_size_format() function will just print bytes in a nice format (grabbed from this tutorial), and we gonna need the clean() function to make a folder name that doesn't contain spaces and special characters.
Next, let's define a function that parses the content of an email partition:
def parse_parts(service, parts, folder_name, message):
    """
    Utility function that parses the content of an email partition
    """
    if parts:
        for part in parts:
            filename = part.get("filename")
            mimeType = part.get("mimeType")
            body = part.get("body")
            data = body.get("data")
            file_size = body.get("size")
            part_headers = part.get("headers")
            if part.get("parts"):
                # recursively call this function when we see that a part
                # has parts inside
                parse_parts(service, part.get("parts"), folder_name, message)
            if mimeType == "text/plain":
                # if the email part is text plain
                if data:
                    text = urlsafe_b64decode(data).decode()
                    print(text)
            elif mimeType == "text/html":
                # if the email part is an HTML content
                # save the HTML file and optionally open it in the browser
                if not filename:
                    filename = "index.html"
                filepath = os.path.join(folder_name, filename)
                print("Saving HTML to", filepath)
                with open(filepath, "wb") as f:
                    f.write(urlsafe_b64decode(data))
            else:
                # attachment other than a plain text or HTML
                for part_header in part_headers:
                    part_header_name = part_header.get("name")
                    part_header_value = part_header.get("value")
                    if part_header_name == "Content-Disposition":
                        if "attachment" in part_header_value:
                            # we get the attachment ID
                            # and make another request to get the attachment itself
                            print("Saving the file:", filename, "size:", get_size_format(file_size))
                            attachment_id = body.get("attachmentId")
                            attachment = service.users().messages() \
                                        .attachments().get(id=attachment_id, userId='me', messageId=message['id']).execute()
                            data = attachment.get("data")
                            filepath = os.path.join(folder_name, filename)
                            if data:
                                with open(filepath, "wb") as f:
                                    f.write(urlsafe_b64decode(data))
Now, let's write our main function for reading an email:
def read_message(service, message):
    """
    This function takes Gmail API `service` and the given `message_id` and does the following:
        - Downloads the content of the email
        - Prints email basic information (To, From, Subject & Date) and plain/text parts
        - Creates a folder for each email based on the subject
        - Downloads text/html content (if available) and saves it under the folder created as index.html
        - Downloads any file that is attached to the email and saves it in the folder created
    """
    msg = service.users().messages().get(userId='me', id=message['id'], format='full').execute()
    # parts can be the message body, or attachments
    payload = msg['payload']
    headers = payload.get("headers")
    parts = payload.get("parts")
    folder_name = "email"
    has_subject = False
    if headers:
        # this section prints email basic info & creates a folder for the email
        for header in headers:
            name = header.get("name")
            value = header.get("value")
            if name.lower() == 'from':
                # we print the From address
                print("From:", value)
            if name.lower() == "to":
                # we print the To address
                print("To:", value)
            if name.lower() == "subject":
                # make our boolean True, the email has "subject"
                has_subject = True
                # make a directory with the name of the subject
                folder_name = clean(value)
                # we will also handle emails with the same subject name
                folder_counter = 0
                while os.path.isdir(folder_name):
                    folder_counter += 1
                    # we have the same folder name, add a number next to it
                    if folder_name[-1].isdigit() and folder_name[-2] == "_":
                        folder_name = f"{folder_name[:-2]}_{folder_counter}"
                    elif folder_name[-2:].isdigit() and folder_name[-3] == "_":
                        folder_name = f"{folder_name[:-3]}_{folder_counter}"
                    else:
                        folder_name = f"{folder_name}_{folder_counter}"
                os.mkdir(folder_name)
                print("Subject:", value)
            if name.lower() == "date":
                # we print the date when the message was sent
                print("Date:", value)
    if not has_subject:
        # if the email does not have a subject, then make a folder with "email" name
        # since folders are created based on subjects
        if not os.path.isdir(folder_name):
            os.mkdir(folder_name)
    parse_parts(service, parts, folder_name, message)
    print("="*50)
Since the previously defined function search_messages() returns a list of IDs of matched emails, the read_message() downloads the content of the email and does what's already mentioned above.
The read_message() function uses parse_parts() to parse different email partitions, if it's a text/plain, then we just decode it and print it to the screen; if it's a text/html, then we simply save it in that folder created with the name index.html, and if it's a file (attachment), then we download the attachment by its attachment_id and save it under the created folder.
Also, if two emails have the same Subject, then we need to add a simple counter to the name of the folder, and that's what we did with folder_counter.
Let's use this in action:
# get emails that match the query you specify
results = search_messages(service, "Python Code")
print(f"Found {len(results)} results.")
# for each email matched, read it (output plain/text to console & save HTML and attachments)
for msg in results:
    read_message(service, msg)
This will download and parse all emails that contain the Python Code keyword. Here is a part of the output:
Found 19 results.
==================================================
From: Python Code <email@domain.com>
To: "email@gmail.com" <email@gmail.com>
Subject: How to Play and Record Audio in Python
Date: Fri, 21 Feb 2020 09:24:58 +0000
Hello !
I have no doubt that you already encountered with an application that uses sound (either recording or playing) and you know how useful is that !
<...SNIPPED..>
Saving HTML to How_to_Play_and_Record_Audio_in_Python\index.html
==================================================
From: Python Code <email@domain.com>
To: "email@gmail.com" <email@gmail.com>
Subject: Brute-Forcing FTP Servers in Python
Date: Tue, 25 Feb 2020 21:31:09 +0000
Hello,
A brute-force attack consists of an attack that submits many passwords with the hope of guessing correctly.
<...SNIPPED...>
Saving HTML to Brute_Forcing_FTP_Servers_in_Python_1\index.html
==================================================
<...SNIPPED...>You'll also see folders created in your current directory for each email matched:
Inside each folder is its corresponding HTML version of the email and any attachments, if available.
You can use advanced filters in the search_messages() function. For example, if you want to get emails that contain a PDF attachment, you can use search_messages(service, "filename: pdf"). Again, check this page for advanced filtering.
Related: How to Read Emails in Python using imaplib.
Marking Emails as Read
def mark_as_read(service, query):
    messages_to_mark = search_messages(service, query)
    print(f"Matched emails: {len(messages_to_mark)}")
    return service.users().messages().batchModify(
      userId='me',
      body={
          'ids': [ msg['id'] for msg in messages_to_mark ],
          'removeLabelIds': ['UNREAD']
      }
    ).execute()
We use the batchModify() method, and we set removeLabelIds to ["UNREAD"] in the body parameter to remove the unread label from the matched emails.
For example, let's mark all Google emails as read:
mark_as_read(service, "Google")Marking Emails as Unread
Marking messages as unread can be done in a similar manner, this time by adding the label ["UNREAD"]:
def mark_as_unread(service, query):
    messages_to_mark = search_messages(service, query)
    print(f"Matched emails: {len(messages_to_mark)}")
    # add the label UNREAD to each of the search results
    return service.users().messages().batchModify(
        userId='me',
        body={
            'ids': [ msg['id'] for msg in messages_to_mark ],
            'addLabelIds': ['UNREAD']
        }
    ).execute()
Example run:
# make unread emails from email@domain.com
mark_as_unread(service, "from: email@domain.com")
Deleting Emails
Now, for the deleting messages feature:
def delete_messages(service, query):
    messages_to_delete = search_messages(service, query)
    # it's possible to delete a single message with the delete API, like this:
    # service.users().messages().delete(userId='me', id=msg['id'])
    # but it's also possible to delete all the selected messages with one query, batchDelete
    return service.users().messages().batchDelete(
      userId='me',
      body={
          'ids': [ msg['id'] for msg in messages_to_delete]
      }
    ).execute()
This time we use the batchDelete() method to delete all matched emails, let's, for example, delete all Google Alerts emails:
delete_messages(service, "Google Alerts")Related: How to Delete Emails in Python using imaplib.
Conclusion
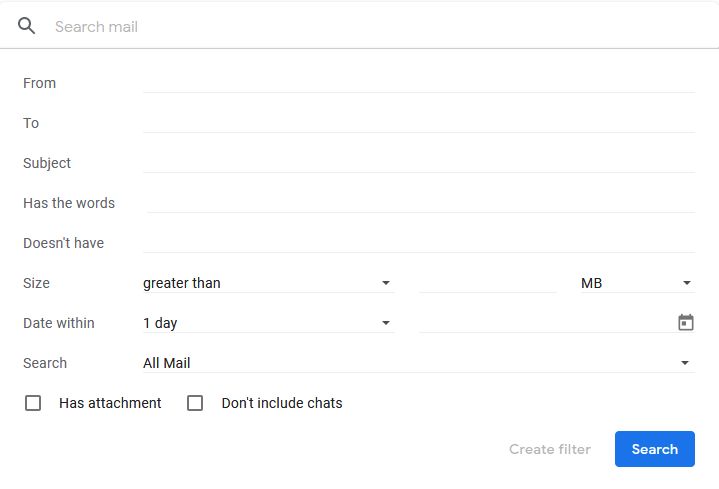
Gmail queries support filters that can be used to select specific messages. Some of these filters are shown below, and this is a dialog that is shown when searching for emails; we can fill it and get the corresponding search query:
Gmail not only offers a great and friendly user interface, with many features for demanding users, but it also offers a powerful API for developers to use and interact with Gmail. We conclude that manipulating emails from Google mail programmatically is very straightforward.
If you want to know more about the API, I encourage you to check the official Gmail API page.
Finally, I've created Python scripts for each task we did in this tutorial; please check this page for the full code.
Below are some of the Google API tutorials:
- How to Extract Google Trends Data in Python.
- How to Use Google Drive API in Python.
- How to Extract YouTube Data using YouTube API in Python.
- How to Use Google Custom Search Engine API in Python.
Happy Coding ♥
Liked what you read? You'll love what you can learn from our AI-powered Code Explainer. Check it out!
View Full Code Assist My Coding


Got a coding query or need some guidance before you comment? Check out this Python Code Assistant for expert advice and handy tips. It's like having a coding tutor right in your fingertips!