Confused by complex code? Let our AI-powered Code Explainer demystify it for you. Try it out!
Using the Twitter API, we can build bots to help us automate the Twitter experience. This is especially helpful if you have an audience and want to automate tasks like posting tweets regularly without actively doing it yourself.
In this article, I will teach you how to build a simple Twitter (X) bot using Tweepy. We will host it on Render.com as a Cron Job and set it to run every hour.
You can check the full source code here.
What We're Going to Build
In this tutorial, we will build a Twitter bot that automatically tweets for us. This bot will tweet random dog facts every hour. The dog facts will come from this API endpoint.
The Twitter bot is limited only to tweeting. It does not like posts, share, DM, or do anything else besides tweeting. However, you are free to add these functionalities if you'd like to. You can either directly send requests to Twitter's endpoints or use Tweepy, like what we will do in this tutorial. You can read Tweepy's docs or Twitter Dev Documentation for more details.
Prerequisites
Make sure you have the following before proceeding:
- Python 3 installed on your computer
- Bot's Twitter Account (create a new Twitter account for the bot) - NOTE: It's important that you Label this account as 'Automated' or specify in its Bio that it's a bot.
- Twitter Dev Account to access the Twitter API.
- A Project in your Twitter Dev Portal.
- A new App under that Twitter Dev Project.
- Render.com account to host the bot (Optional: You can choose other providers as well)
Initialize a New Project
To begin with, create a new directory and initialize a Python virtual environment:
$ mkdir dog_facts_tweeter_bot
$ cd dog_facts_tweeter_bot

$ python3 -m venv tweeter_bot_venv

# Activate the virtual environment:
# - MacOS/Linux
$ source tweeter_bot_venv/bin/activate
# - Windows
$ tweeter_bot_venv\Scripts\activate
Save the API Keys and Access Tokens as Environment Variables
Go to your Twitter Dev Portal. Choose the project that holds the App you created for this tutorial.
Then, navigate to your App's keys and tokens tab and generate new pairs if you don't have them yet or generate new ones if you misplaced your existing tokens. We don't need the Bearer Token for this tutorial:
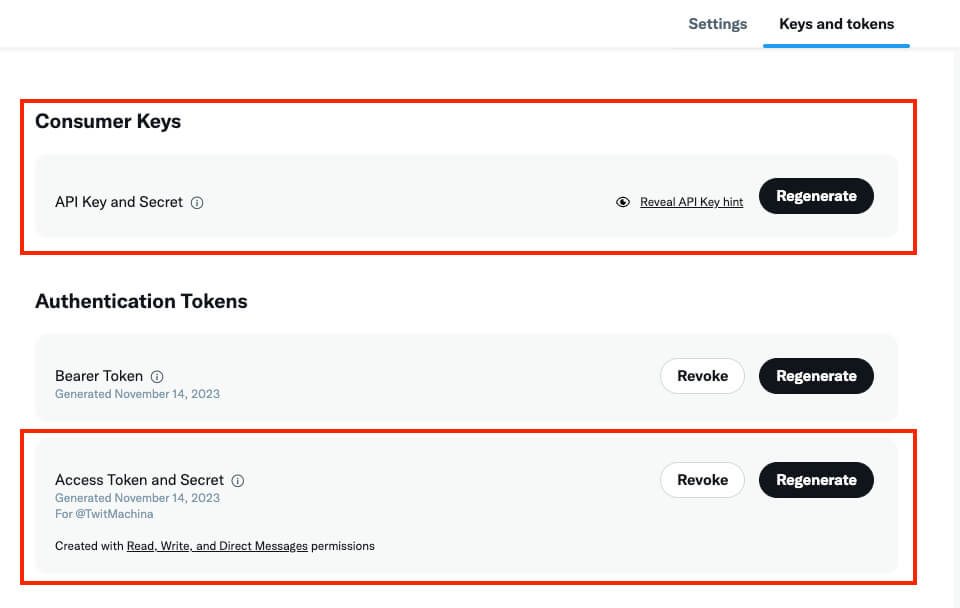 On your project, create a
 .env file and save your tokens there:
# Consumer Keys > API Key and Secret
API_KEY=<your-API-key>
API_SECRET=<your-API-secret>

# Authentication Tokens > Access Token and Secret
ACCESS_TOKEN=<your-access-token>
ACCESS_TOKEN_SECRET=<your-access-token-secret>
Initializing Git
Since we will push this later to GitHub to host our bot, we need to initialize Git in this project.
First, create a .gitignore file and paste the following:
__pycache__
.env
Then, initialize git and commit everything to the local repo.
$ git init
$ git add .
$ git commit -m 'initial commit'
Install the Dependencies
Make sure you already have a virtual environment running. If so, install the dependencies:
$ pip install tweepy, requests, python-envCoding the Bot
Create a new file and name it tweet.py.
Open up this Python file in your code editor and import the following packages:
import os
import tweepy
import requests
from dotenv import load_dotenv
Before we proceed, let us first understand the Twitter API.
The Standard v1.1 Twitter API was launched in 2012 and allowed devs to post, interact, and retrieve data from Twitter. Recently, there have been major changes in the Twitter API, which gave rise to the release of Twitter API v2. The Twitter API v2 includes a modern foundation and advanced features.
Like other APIs, the Twitter API requires you to authenticate yourself on every request. There are 3 authentication methods Twitter uses:
- OAuth 1.0a User Context
- OAuth 2.0 App Only
- OAuth 2.0 Authorization Code with PKCE
Depending on what you're trying to achieve, different endpoints of the Twitter API require different authentication methods.
Since we're limiting ourselves to just building a bot tweeting dog facts, we will only need the endpoint to post tweets.
The endpoint for this is https://api.twitter.com/2/tweets. This endpoint is part of the Twitter API v2 and requires either the OAuth 2.0 Authorization Code with PKCE or the OAuth 1.0a.
We will use the OAuth 1.0a for this tutorial since the OAuth 2.0 Authorization Code with PKCE requires more setup, which we don't necessarily need in this scenario.
That's why we only took the API Keys and Access tokens from the Twitter dev portal earlier. This is because OAuth 1.0a only requires these keys.
So, to continue, load the API keys and access tokens you saved in the .env file earlier into the scope of this module using the load_dotenv() function:
load_dotenv()

API_KEY = os.getenv("API_KEY")
API_SECRET = os.getenv("API_SECRET")
ACCESS_TOKEN = os.getenv("ACCESS_TOKEN")
ACCESS_TOKEN_SECRET = os.getenv("ACCESS_TOKEN_SECRET")
Next, create an instance of the tweepy.Client() class and pass these API keys and access tokens. We will use the instance of this class to interact with the Twitter API so that we don't have to manually do that (which is such a tedious task):
client = tweepy.Client(
    consumer_key=API_KEY,
    consumer_secret=API_SECRET,
    access_token=ACCESS_TOKEN,
    access_token_secret=ACCESS_TOKEN_SECRET
)
Programmatically Post a Tweet
Probably the most important part of this article. With tweepy, we can easily do this in a few lines of code:
def tweet_dog_fact(tweepy_client):
   dog_facts_api = 'http://dog-api.kinduff.com/api/facts'

   print('fetching dog facts...')
   res = requests.get(dog_facts_api)

   print('tweeting a dog fact...')
   tweet_text = res.json()['facts'][0]
   tweepy_client.create_tweet(text=tweet_text)

tweet_dog_fact(client)
Here, we first fetch data from the dog_facts_api to get some dog facts (which we will tweet). Then, using the tweepy.Client.create_tweet() method, we passed the dog fact we fetched as the tweet text we want to post. This method handles the interaction with Twitter's API for us. Lastly, we need to call this tweet_dog_fact() function and pass the client instance we created earlier. This function will run every time we run this tweet.py module.
And that's it!
That's how you can build a simple Twitter bot with Python in less than 30 lines of code. We're now ready to test this code.
Testing the Bot
To test this bot, just run the tweet.py like a regular Python file.
$ python tweet.pyThen, go to your bot's Twitter profile and check for a new Tweet:
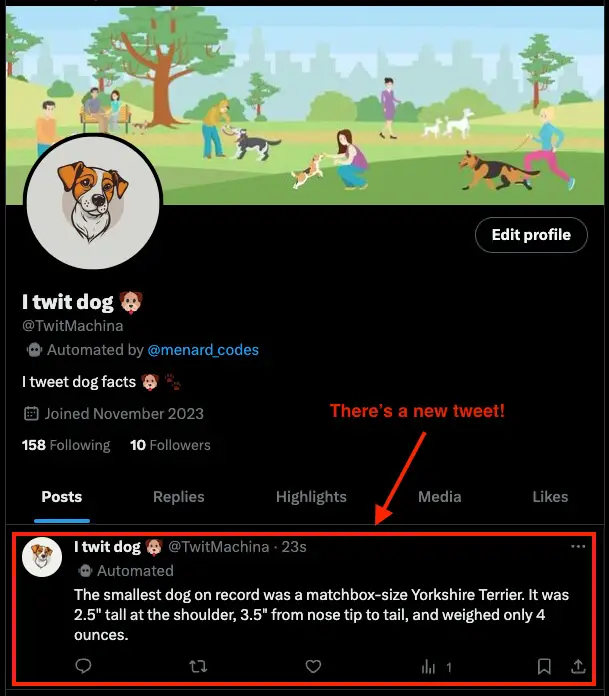
Cool! If everything worked as intended, you should see a similar result.
Hosting the Bot and Automate Tweeting
Now that everything works properly, we must host this bot to work independently and Tweet on our behalf.
But first, commit all the changes we made:
$ git add .
$ git commit -m 'built the twitter bot'
Next, create a new GitHub repo and push this local repo to GitHub.
Now it's time to host it on Render.
Go to your Render dashboard, click on the blue New + button, then select Cron Job. From there, select Build and deploy from a Git repository and click Next. If you connected your Render account with your GitHub profile, you can directly select the repo of your Twitter bot from GitHub to Render. Otherwise, paste your repo's link under the Public Git Repository section.
From there, set up your CRON Job with the following settings:
- Command:
python tweet.py - Optional (Schedule): To specify how frequently you want this bot to run, you can specify a CRON expression. Under Schedule, set the CRON expression to: 0 * * * * (or run every hour). Otherwise, you can leave the default settings, which is set to */5 * * * * (or run every 5 minutes) or specify your own CRON expression.
- Environment Variables: Check for the button that says Advanced, click it, and under the Environment Variables section, enter the environment variables you saved earlier in your
.envfile. Note that you should enter one environment variable per entry:API_KEY=[your-API-key]API_SECRET=[your-API-secret]ACCESS_TOKEN=[your-access-token]ACCESS_TOKEN_SECRET=[your-access-token-secret]
Save all the changes, and you should have a new Cron Job in Render.com. It will run the bot in its first build. This Cron job will be triggered to build and run this bot whenever you push changes to your GitHub repo. Depending on how you set up the CRON expression, it will run the bot every X amount of times (1 hour if you followed along, 5 minutes if you left the default, or whatever you specified as its CRON expression).
You can check if this Cron Job works by either triggering it manually or waiting for its first build (or every run of the bot) and checking your Twitter bot's profile to see if it posted any tweets.
And there you have it! You just built a Twitter bot using Python.
Final Thoughts
In this tutorial, you learned how to build a Twitter bot in Python using Twitter's API via Tweepy. You learned how to set-up your Twitter Developer profile, create a new Project and App, and how to use their API to build a Twitter bot. You also learned how to host this bot to automate Tweeting.
Using the Twitter API, we can programmatically interact with Twitter's platform and automate the Twitter experience. Twitter bots are of great help to automate repetitive tasks such as posting tweets on a regular basis.
You can always check the complete code here.
Learn also: How to Make a Chat Application in Python
Happy coding ♥
Take the stress out of learning Python. Meet our Python Code Assistant – your new coding buddy. Give it a whirl!
View Full Code Understand My Code


Got a coding query or need some guidance before you comment? Check out this Python Code Assistant for expert advice and handy tips. It's like having a coding tutor right in your fingertips!