Want to code faster? Our Python Code Generator lets you create Python scripts with just a few clicks. Try it now!
In the real world, it is rare to train a Convolutional Neural Network (CNN) from scratch, as it is hard to collect a massive dataset to get better performance. Instead, it is common to use a pre-trained network on a large dataset and tune it for your classification problem; this process is called Transfer Learning.
What is Transfer Learning
It is a machine learning method where a model is trained on a task that can be trained (or tuned) for another task; it is very popular nowadays, especially in computer vision and natural language processing problems. Transfer learning is very handy, given the enormous resources required to train deep learning models. Here are the most important benefits of transfer learning:
- Speeds up training time.
- It requires less data.
- Use the state-of-the-art models that are developed by deep learning experts.
For these reasons, it is better to use transfer learning for image classification problems instead of creating your model and training from scratch, models such as ResNet, InceptionV3, Xception, and MobileNet are trained on a massive dataset called ImageNet which contains more than 14 million images that classify 1000 different objects.
Related: How to Perform YOLO Object Detection using OpenCV and PyTorch in Python.
Loading & Preparing the Dataset
We gonna be using the flower photos dataset, which consists of 5 types of flowers (daisy, dandelion, roses, sunflowers and tulips).
After you have everything installed by the following command:
pip3 install tensorflow numpy matplotlibOpen up a new Python file and import the necessary modules:
import tensorflow as tf
from tensorflow.keras.models import Model
from tensorflow.keras.applications import MobileNetV2, ResNet50, InceptionV3 # try to use them and see which is better
from tensorflow.keras.layers import Dense
from tensorflow.keras.callbacks import ModelCheckpoint, TensorBoard
from tensorflow.keras.utils import get_file
from tensorflow.keras.preprocessing.image import ImageDataGenerator
import os
import pathlib
import numpy as np
The dataset comes with inconsistent image sizes, as a result, we gonna need to resize all the images to a shape that is acceptable by MobileNet (the model that we gonna use):
batch_size = 32
# 5 types of flowers
num_classes = 5
# training for 10 epochs
epochs = 10
# size of each image
IMAGE_SHAPE = (224, 224, 3)
Let's load the dataset:
def load_data():
    """This function downloads, extracts, loads, normalizes and one-hot encodes Flower Photos dataset"""
    # download the dataset and extract it
    data_dir = get_file(origin='https://storage.googleapis.com/download.tensorflow.org/example_images/flower_photos.tgz',
                                         fname='flower_photos', untar=True)
    data_dir = pathlib.Path(data_dir)
    # count how many images are there
    image_count = len(list(data_dir.glob('*/*.jpg')))
    print("Number of images:", image_count)
    # get all classes for this dataset (types of flowers) excluding LICENSE file
    CLASS_NAMES = np.array([item.name for item in data_dir.glob('*') if item.name != "LICENSE.txt"])
    # roses = list(data_dir.glob('roses/*'))
    # 20% validation set 80% training set
    image_generator = ImageDataGenerator(rescale=1/255, validation_split=0.2)
    # make the training dataset generator
    train_data_gen = image_generator.flow_from_directory(directory=str(data_dir), batch_size=batch_size,
                                                        classes=list(CLASS_NAMES), target_size=(IMAGE_SHAPE[0], IMAGE_SHAPE[1]),
                                                        shuffle=True, subset="training")
    # make the validation dataset generator
    test_data_gen = image_generator.flow_from_directory(directory=str(data_dir), batch_size=batch_size,
                                                        classes=list(CLASS_NAMES), target_size=(IMAGE_SHAPE[0], IMAGE_SHAPE[1]),
                                                        shuffle=True, subset="validation")
    return train_data_gen, test_data_gen, CLASS_NAMES
The above function downloads and extracts the dataset, and then use the ImageDataGenerator Keras utility class to wrap the dataset in a Python generator (so the images only loads to memory by batches, not in one shot).
After that, we scale and resize the images to a fixed shape and then split the dataset by 80% for training and 20% for validation.
I also encourage you to change this function to use tf.data API instead, the dataset is already in Tensorflow datasets and you can load it as we did in this tutorial.
Mastering YOLO: Build an Automatic Number Plate Recognition System
Building a real-time automatic number plate recognition system using YOLO and OpenCV library in Python
Download EBookConstructing the Model
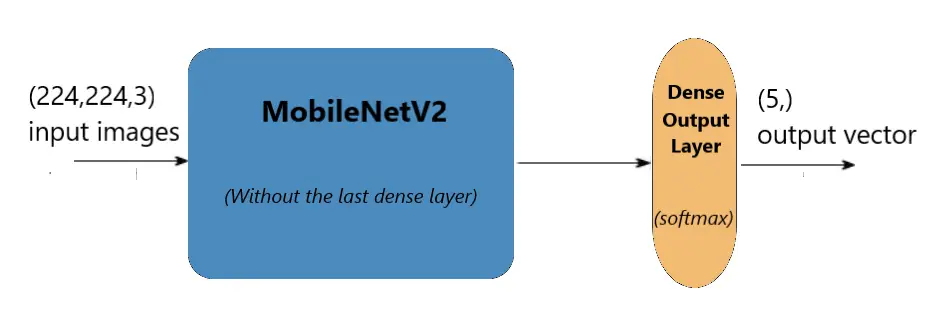
We are going to use the MobileNetV2 model, it is not a very heavy model but does a good job in the training and testing process.
As mentioned earlier, this model is trained to classify different 1000 objects, we need a way to tune this model so it can be suitable for just our flower classification. As a result, we are going to remove that last fully connected layer, and add our own final layer that consists of 5 units with softmax activation function:
def create_model(input_shape):
    # load MobileNetV2
    model = MobileNetV2(input_shape=input_shape)
    # remove the last fully connected layer
    model.layers.pop()
    # freeze all the weights of the model except the last 4 layers
    for layer in model.layers[:-4]:
        layer.trainable = False
    # construct our own fully connected layer for classification
    output = Dense(num_classes, activation="softmax")
    # connect that dense layer to the model
    output = output(model.layers[-1].output)
    model = Model(inputs=model.inputs, outputs=output)
    # print the summary of the model architecture
    model.summary()
    # training the model using adam optimizer
    model.compile(loss="categorical_crossentropy", optimizer="adam", metrics=["accuracy"])
    return model
The above function will first download the model weights (if not available) and then remove the last layer.
After that, we freeze the last layers, that's because it is pre-trained, we don't wanna modify these weights. However, it is a good practice to retrain the last convolutional layer as this dataset is quite similar to the original ImageNet dataset, so we won't ruin the weights (that much).
Finally, we construct our own dense layer that consists of five neurons and connect it to the last layer of the MobileNetV2 model. The following figure demonstrates the architecture:
Note that you can use the TensorFlow hub to load this model very easily, check this link to use their code snippet for creating the model.
Training the Model
Let's use the above two functions to start training:
if __name__ == "__main__":
    # load the data generators
    train_generator, validation_generator, class_names = load_data()
    # constructs the model
    model = create_model(input_shape=IMAGE_SHAPE)
    # model name
    model_name = "MobileNetV2_finetune_last5"
    # some nice callbacks
    tensorboard = TensorBoard(log_dir=os.path.join("logs", model_name))
    checkpoint = ModelCheckpoint(os.path.join("results", f"{model_name}" + "-loss-{val_loss:.2f}.h5"),
                                save_best_only=True,
                                verbose=1)
    # make sure results folder exist
    if not os.path.isdir("results"):
        os.mkdir("results")
    # count number of steps per epoch
    training_steps_per_epoch = np.ceil(train_generator.samples / batch_size)
    validation_steps_per_epoch = np.ceil(validation_generator.samples / batch_size)
    # train using the generators
    model.fit_generator(train_generator, steps_per_epoch=training_steps_per_epoch,
                        validation_data=validation_generator, validation_steps=validation_steps_per_epoch,
                        epochs=epochs, verbose=1, callbacks=[tensorboard, checkpoint])
Nothing fancy here, loading the data, constructing the model, and then using some callbacks for tracking and saving the best models.
As soon as you execute the script, the training process begins, you'll notice that not all weights are being trained:
Total params: 2,264,389
Trainable params: 418,565
Non-trainable params: 1,845,824
It'll take several minutes depending on your hardware.
I used tensorboard to experiment a little bit, for example, I tried freezing all the weights except for the last classification layer, decreasing the optimizer learning rate, used some image flipping, zooming, and general augmentation, here is a screenshot:

MobileNetV2was the model I froze all its weights (except for the last 5 unit dense layer of course).MobileNetV2_augmentationuses some image augmentation.MobileNetV2_finetune_last5the model we're using right now, which does not freeze the last 4 layers of the MobileNetV2 model.MobileNetV2_finetune_last5_less_lrwas dominant for almost 86% accuracy, that's because once you don't freeze the trained weights, you need to decrease the learning rate so you can slowly adjust the weights to your dataset. This was an Adam optimizer with a 0.0005 learning rate.
Note: to modify the learning rate, you can import Adam optimizer from keras.optimizers package, and then compile the model with optimizer=Adam(lr=0.0005) parameter.
Related: Mastering YOLO: Build an Automatic Number Plate Recognition System with OpenCV in Python.
Testing the Model
Now to evaluate our model, we need to load the optimal weights via the model.load_weights() method, you need to choose the weights that has the least loss value, in my case, it's 0.63 loss:
# load the data generators
train_generator, validation_generator, class_names = load_data()
# constructs the model
model = create_model(input_shape=IMAGE_SHAPE)
# load the optimal weights
model.load_weights("results/MobileNetV2_finetune_last5-loss-0.63.h5")
validation_steps_per_epoch = np.ceil(validation_generator.samples / batch_size)
# print the validation loss & accuracy
evaluation = model.evaluate_generator(validation_generator, steps=validation_steps_per_epoch, verbose=1)
print("Val loss:", evaluation[0])
print("Val Accuracy:", evaluation[1])
Make sure to use the optimal weights, the one which has the lower loss and higher accuracy.
Output:
23/23 [==============================] - 4s 178ms/step - loss: 0.6338 - accuracy: 0.8140
Val loss: 0.6337507224601248
Val Accuracy: 0.81395346
Okay, let's visualize a little bit, we are going to plot a complete batch of images with its corresponding predicted and correct labels:
# get a random batch of images
image_batch, label_batch = next(iter(validation_generator))
# turn the original labels into human-readable text
label_batch = [class_names[np.argmax(label_batch[i])] for i in range(batch_size)]
# predict the images on the model
predicted_class_names = model.predict(image_batch)
predicted_ids = [np.argmax(predicted_class_names[i]) for i in range(batch_size)]
# turn the predicted vectors to human readable labels
predicted_class_names = np.array([class_names[id] for id in predicted_ids])
# some nice plotting
plt.figure(figsize=(10,9))
for n in range(30):
    plt.subplot(6,5,n+1)
    plt.subplots_adjust(hspace = 0.3)
    plt.imshow(image_batch[n])
    if predicted_class_names[n] == label_batch[n]:
        color = "blue"
        title = predicted_class_names[n].title()
    else:
        color = "red"
        title = f"{predicted_class_names[n].title()}, correct:{label_batch[n]}"
    plt.title(title, color=color)
    plt.axis('off')
_ = plt.suptitle("Model predictions (blue: correct, red: incorrect)")
plt.show()
Once you run it, you'll get something like this:
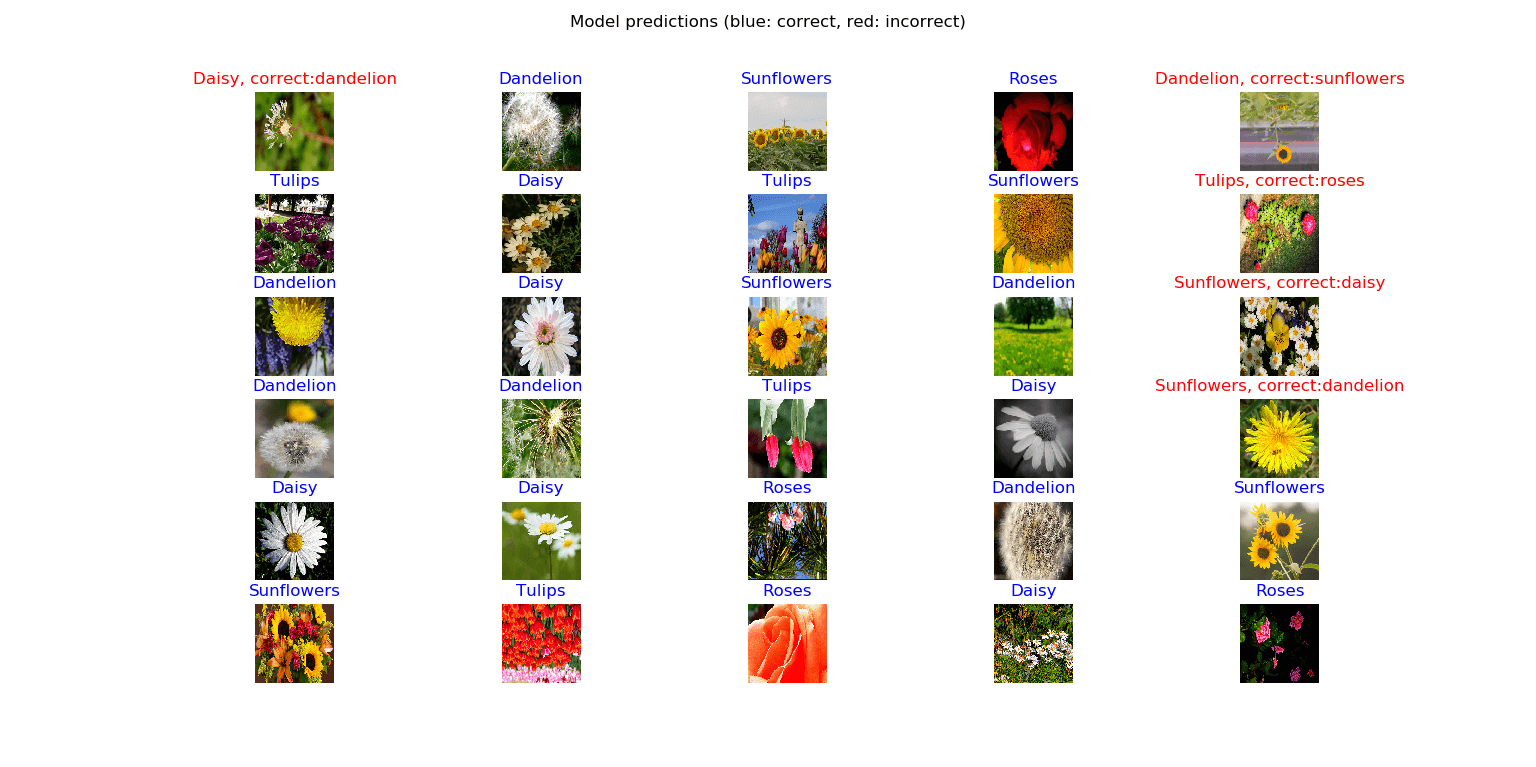
Awesome! As you can see, out of 30 images, 25 were correctly predicted. That's a good result, though, as some flower images are slightly ambiguous.
Conclusion
Alright, that's it. In this tutorial, you discovered how to use transfer learning to quickly develop and use state-of-the-art models using Tensorflow and Keras in Python.
I highly encourage you to use other models that were mentioned above, try to fine-tune them as well, good luck!
Learn More
Even though in the real world it's not suggested to train image classifiers models from scratch (except for different types of images such as human skins, etc.), I have a tutorial that does that, check it out: How to Make an Image Classifier in Python using Keras.
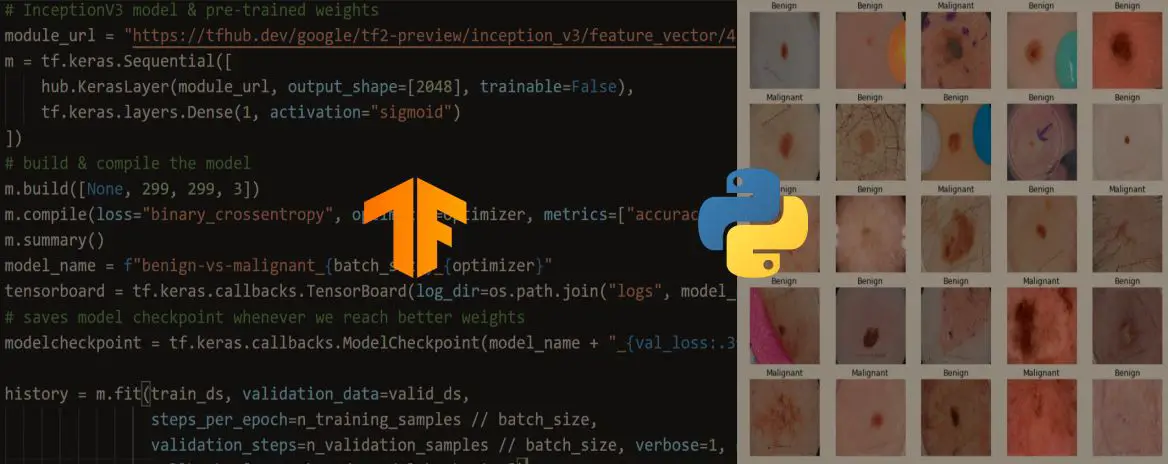
Also, if you're interested in medicine, we have a tutorial in which we used Transfer learning on skin cancer detection using Tensorflow!
Happy Training ♥
Ready for more? Dive deeper into coding with our AI-powered Code Explainer. Don't miss it!
View Full Code Convert My Code


Got a coding query or need some guidance before you comment? Check out this Python Code Assistant for expert advice and handy tips. It's like having a coding tutor right in your fingertips!