Before we get started, have you tried our new Python Code Assistant? It's like having an expert coder at your fingertips. Check it out!
Image classification refers to a process in computer vision that can classify an image according to its visual content. For example, an image classification algorithm can be designed to tell if an image contains a cat or a dog. While detecting an object is trivial for humans, robust image classification is still a challenge in computer vision applications.
In this tutorial, you will learn how to successfully classify images in the CIFAR-10 dataset (which consists of airplanes, dogs, cats, and other 7 objects) using Tensorflow in Python.
Note that there is a difference between image classification and object detection, image classification is about classifying an image into some category, like in this example, the input is an image and the output is a single class label (10 classes). Object detection is about detecting, classifying, and localizing objects in real-world images, one of the main algorithms is YOLO object detection.
It is also important to note that you need to be aware of image captioning, which is generating a text description of an image instead of a single class. Check this tutorial if you're interested in that.
We will preprocess the images and labels, then train a convolutional neural network on all the training samples. The images will need to be normalized and the labels need to be one-hot encoded.
Learn also: How to Perform Image Segmentation using Transformers in Python.
First, let's install the requirements for this project:
pip3 install numpy matplotlib tensorflow==2.0.0 tensorflow_datasetsFor instance, open up an empty python file and call it train.py and follow along. Importing Tensorflow:
from tensorflow.keras.models import Sequential
from tensorflow.keras.layers import Dense, Dropout, Activation, Flatten
from tensorflow.keras.layers import Conv2D, MaxPooling2D
from tensorflow.keras.callbacks import TensorBoard
import tensorflow as tf
import tensorflow_datasets as tfds
import os
As you may expect, we'll be using tf.data API to load CIFAR-10 dataset.
Hyper Parameters
I have experimented with various parameters, and found this as optimal ones:
# hyper-parameters
batch_size = 64
# 10 categories of images (CIFAR-10)
num_classes = 10
# number of training epochs
epochs = 30
num_classes just refers to the number of categories to classify, in this case, CIFAR-10 has only 10 categories of images.
Related: Mastering YOLO: Build an Automatic Number Plate Recognition System with OpenCV in Python.
Understanding and Loading CIFAR-10 Dataset
- The dataset consists of 10 classes of images which its labels ranging from 0 to 9:
- 0: airplane.
- 1: automobile.
- 2: bird.
- 3: cat.
- 4: deer.
- 5: dog.
- 6: frog.
- 7: horse.
- 8: ship.
- 9: truck.
- 50000 samples for training data, and 10000 samples for testing data.
- Each sample is an image of 32x32x3 pixels (width and height of 32 and 3 depth which is RGB values).
Let's load this:
def load_data():
    """
    This function loads CIFAR-10 dataset, and preprocess it
    """
    def preprocess_image(image, label):
        # convert [0, 255] range integers to [0, 1] range floats
        image = tf.image.convert_image_dtype(image, tf.float32)
        return image, label
    # loading the CIFAR-10 dataset, splitted between train and test sets
    ds_train, info = tfds.load("cifar10", with_info=True, split="train", as_supervised=True)
    ds_test = tfds.load("cifar10", split="test", as_supervised=True)
    # repeat dataset forever, shuffle, preprocess, split by batch
    ds_train = ds_train.repeat().shuffle(1024).map(preprocess_image).batch(batch_size)
    ds_test = ds_test.repeat().shuffle(1024).map(preprocess_image).batch(batch_size)
    return ds_train, ds_test, info
This function loads the dataset using Tensorflow Datasets module, we set with_info to True in order to get some information about this dataset, you can print it out and see what different fields and their values are, we'll be using the info for getting the number of samples in training and testing sets.
After that, we:
- Repeat the dataset forever using the repeat() method, this will enable us to generate data samples repeatedly (we'll specify stopping conditions in the training phase).
- Shuffle it.
- Normalize images to be between 0 and 1, this will help the neural network to train much faster, we used the map() method that accepts a callback function that takes the image and label as arguments, we simply used the built-in Tensorflow's convert_image_dtype() method that does that.
- Finally, we batch our dataset by 64 samples using the batch() function, so each time we generate new data points, it'll return 64 images and their 64 labels.
Mastering YOLO: Build an Automatic Number Plate Recognition System
Building a real-time automatic number plate recognition system using YOLO and OpenCV library in Python
Download EBookConstructing the Model
The following model will be used:
def create_model(input_shape):
    # building the model
    model = Sequential()
    model.add(Conv2D(filters=32, kernel_size=(3, 3), padding="same", input_shape=input_shape))
    model.add(Activation("relu"))
    model.add(Conv2D(filters=32, kernel_size=(3, 3), padding="same"))
    model.add(Activation("relu"))
    model.add(MaxPooling2D(pool_size=(2, 2)))
    model.add(Dropout(0.25))
    model.add(Conv2D(filters=64, kernel_size=(3, 3), padding="same"))
    model.add(Activation("relu"))
    model.add(Conv2D(filters=64, kernel_size=(3, 3), padding="same"))
    model.add(Activation("relu"))
    model.add(MaxPooling2D(pool_size=(2, 2)))
    model.add(Dropout(0.25))
    model.add(Conv2D(filters=128, kernel_size=(3, 3), padding="same"))
    model.add(Activation("relu"))
    model.add(Conv2D(filters=128, kernel_size=(3, 3), padding="same"))
    model.add(Activation("relu"))
    model.add(MaxPooling2D(pool_size=(2, 2)))
    model.add(Dropout(0.25))
    # flattening the convolutions
    model.add(Flatten())
    # fully-connected layer
    model.add(Dense(1024))
    model.add(Activation("relu"))
    model.add(Dropout(0.5))
    model.add(Dense(num_classes, activation="softmax"))
    # print the summary of the model architecture
    model.summary()
    # training the model using adam optimizer
    model.compile(loss="sparse_categorical_crossentropy", optimizer="adam", metrics=["accuracy"])
    return model
That's 3 layers of 2 ConvNets with a max-pooling and ReLU activation function and then a fully connected with 1024 units. This is relatively a small model comparing to ResNet50 or Xception which are state-of-the-art. If you feel to use models made by deep learning experts, you need to use transfer learning.
Related: Image Captioning using PyTorch and Transformers in Python.
Training the Model
Now, let's train the model:
if __name__ == "__main__":
    # load the data
    ds_train, ds_test, info = load_data()
    # constructs the model
    model = create_model(input_shape=info.features["image"].shape)
    # some nice callbacks
    logdir = os.path.join("logs", "cifar10-model-v1")
    tensorboard = TensorBoard(log_dir=logdir)
    # make sure results folder exist
    if not os.path.isdir("results"):
        os.mkdir("results")
    # train
    model.fit(ds_train, epochs=epochs, validation_data=ds_test, verbose=1,
              steps_per_epoch=info.splits["train"].num_examples // batch_size,
              validation_steps=info.splits["test"].num_examples // batch_size,
              callbacks=[tensorboard])
    # save the model to disk
    model.save("results/cifar10-model-v1.h5")
After loading the data and creating the model, I used Tensorboard that will be tracking the accuracy and loss in each epoch and providing us with nice visualization.
We will be using the "results" folder to save our models, if you're not sure how you can handle files and directories in Python, check this tutorial.
Since ds_train and ds_test will generate data samples in batches repeatedly, we need to specify the number of steps per epoch, and that's the number of samples divided by the batch size, and it is the same for validation_steps as well.
Run this, it will take several minutes to complete training, depending on your CPU/GPU.
You'll get a similar result to this:
Epoch 1/30
781/781 [==============================] - 20s 26ms/step - loss: 1.6503 - accuracy: 0.3905 - val_loss: 1.2835 - val_accuracy: 0.5238
Epoch 2/30
781/781 [==============================] - 16s 21ms/step - loss: 1.1847 - accuracy: 0.5750 - val_loss: 0.9773 - val_accuracy: 0.6542
All the way to the final epoch:
Epoch 29/30
781/781 [==============================] - 16s 21ms/step - loss: 0.4094 - accuracy: 0.8570 - val_loss: 0.5954 - val_accuracy: 0.8089
Epoch 30/30
781/781 [==============================] - 16s 21ms/step - loss: 0.4130 - accuracy: 0.8563 - val_loss: 0.6128 - val_accuracy: 0.8060
Now to open tensorboard, all you need to do is to type this command in the terminal or the command prompt in the current directory:
tensorboard --logdir="logs"Open up a browser tab and type localhost:6006, you'll be redirected to tensorboard, here is my result:
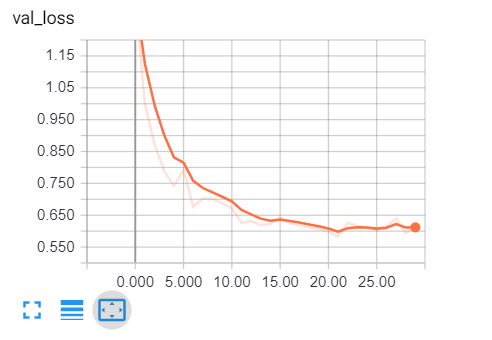
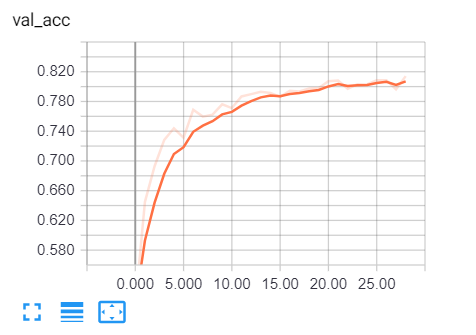
Clearly, we are on the right track, validation loss is decreasing, and the accuracy is increasing all the way to about 81%. That's great!
Testing the Model
Once training is completed, it'll save the final model and weights in the results folder, in that way, we can train only once and make predictions whenever we desire.
Open up a new Python file called test.py and follow along.
Importing necessary utilities:
from train import load_data, batch_size
from tensorflow.keras.models import load_model
import matplotlib.pyplot as plt
import numpy as np
Let's make a Python dictionary that maps each integer value to its corresponding label in the dataset:
# CIFAR-10 classes
categories = {
    0: "airplane",
    1: "automobile",
    2: "bird",
    3: "cat",
    4: "deer",
    5: "dog",
    6: "frog",
    7: "horse",
    8: "ship",
    9: "truck"
}
Loading the test data and the model:
# load the testing set
ds_train, ds_test, info = load_data()
# load the model with final model weights
model = load_model("results/cifar10-model-v1.h5")
Evaluation:
# evaluation
loss, accuracy = model.evaluate(ds_test, steps=info.splits["test"].num_examples // batch_size)
print("Test accuracy:", accuracy*100, "%")
Let's take a random image and make a prediction:
# get prediction for this image
data_sample = next(iter(ds_test))
sample_image = data_sample[0].numpy()[0]
sample_label = categories[data_sample[1].numpy()[0]]
prediction = np.argmax(model.predict(sample_image.reshape(-1, *sample_image.shape))[0])
print("Predicted label:", categories[prediction])
print("True label:", sample_label)
We've used next(iter(ds_test)) to get the next testing batch and then extracted the first image and label in that batch and made predictions on the model, here is the result:
156/156 [==============================] - 3s 20ms/step - loss: 0.6119 - accuracy: 0.8063
Test accuracy: 80.62900900840759 %
Predicted label: frog
True label: frog
The model says it's a frog, let's check it:
# show the image
plt.axis('off')
plt.imshow(sample_image)
plt.show()
Result: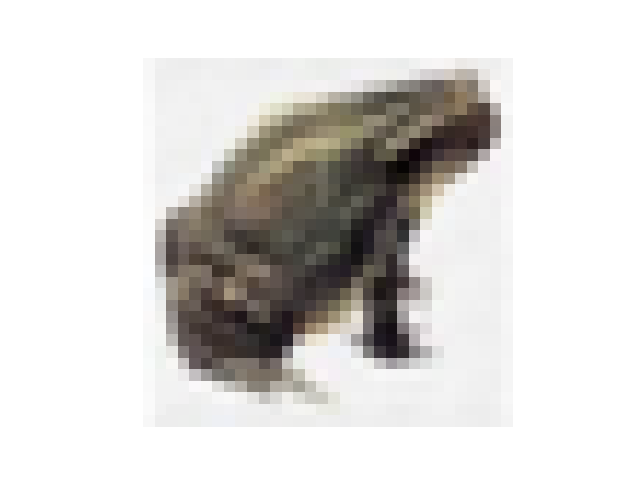 Tiny little frog! The model was right!
Conclusion
Alright, we are done with this tutorial, 81% isn't bad for this little CNN, I highly encourage you to tweak the model or check ResNet50, Xception, or other state-of-the-art models to get higher performance!
If you're not sure how to use these models, I have a tutorial on this: How to Use Transfer Learning for Image Classification using Keras in Python.
You may notice that these images are so simple, 32x32 grid isn't how the real world is, images aren't simple like that, they often contain many objects, complex patterns, and so on. As a result, it is often a common practice to use image segmentation methods such as contour detection, K-Means clustering segmentation, or using transformers before passing to any classification techniques.
Happy Training ♥
Save time and energy with our Python Code Generator. Why start from scratch when you can generate? Give it a try!
View Full Code Explain The Code for Me


Got a coding query or need some guidance before you comment? Check out this Python Code Assistant for expert advice and handy tips. It's like having a coding tutor right in your fingertips!