Kickstart your coding journey with our Python Code Assistant. An AI-powered assistant that's always ready to help. Don't miss out!
![]()
In this tutorial, we will focus on how to perform semantic segmentation using 🤗 Transformers library. By the end of this tutorial, you will have a solid understanding of how to use deep learning-based approaches for image segmentation. You will have the skills to apply these methods to your projects.
Note: The corresponding Colab notebook for this tutorial can be found here.
Image segmentation is a crucial step in computer vision and image processing. It divides an image into multiple segments representing a specific object, background, or region of interest. Image segmentation aims to partition an image into meaningful areas and separate the objects of interest from the background.
A significant benefit of image segmentation is that it allows us to perform various computer vision tasks more efficiently. For example, in object detection, we can use image segmentation to narrow down the region of interest so that the object detector only needs to process the relevant area rather than the entire image. This way, we can save time and computational resources, which often results in improved accuracy.
Another application of image segmentation is background removal. In many computer vision applications, it is desirable to extract objects from their background and operate on them independently. Image segmentation provides a convenient way to divide images into foreground and background segments.
There are several techniques for image segmentation, ranging from threshold-based to K-means clustering to deep learning-based approaches. In this tutorial, we will work with a Segformer, a deep learning-based approach. The Segformer consists of a hierarchical transformer encoder, and the decoder is composed of fully connected layers, which boosts its accuracy.
Related: How to Use K-Means Clustering for Image Segmentation using OpenCV in Python
Types of Image Segmentation
There are three main types of image segmentation: semantic segmentation, instance segmentation, and panoptic segmentation.
Semantic segmentation is used to understand each pixel and categorize every pixel into predefined semantic classes, such as a "person," a "car," a "tree," and so on. Semantic segmentation aims to label each pixel in an image with its semantic meaning and create a segmented image that represents the objects and regions of interest in an image.
Instance segmentation involves classifying pixels into different classes and also differentiating between instances of the same object. For example, if an image contains two cats, each cat would be assigned its own instance label. Thus instance segmentation allows us to get a more detailed understanding of the objects in an image since the model can now also differentiate between individual instances of the same class.
Panoptic segmentation is a combination of semantic and instance segmentation. In this case, all objects are classified, and all instances of each class are segregated as well. It includes classifying the background as well! This results in a comprehensive and complete understanding of the image and therefore is the most general case of segmentation.
Okay, enough with all the talking. Let's dive right into doing image segmentation ourselves!
We first install the transformers library by running the following command.
$ pip install requests Pillow numpy torch torchvision transformersIf you're on Colab, just install transformers:
$ pip install transformersIt's highly recommended you install PyTorch using the official guide. Let's import the various libraries we will be using:
import numpy as np
import torch
import torch.nn.functional as F
from torchvision import transforms
from transformers import pipeline, SegformerImageProcessor, SegformerForSemanticSegmentation
import requests
from PIL import Image
import urllib.parse as parse
import os
Then we make a function to load the image on which we want to perform image segmentation:
# a function to determine whether a string is a URL or not
def is_url(string):
try:
result = parse.urlparse(string)
return all([result.scheme, result.netloc, result.path])
except:
return False
# a function to load an image
def load_image(image_path):
"""Helper function to load images from their URLs or paths."""
if is_url(image_path):
return Image.open(requests.get(image_path, stream=True).raw)
elif os.path.exists(image_path):
return Image.open(image_path)
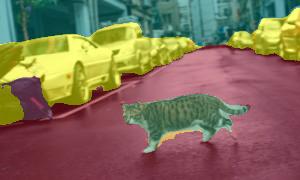
img_path = "https://shorthaircatbreeds.com/wp-content/uploads/2020/06/Urban-cat-crossing-a-road-300x180.jpg"
image = load_image(img_path)
imageThis is the image we will be working with:

Both of the above functions were grabbed from the image captioning tutorial, is_url() checks whether a string is a URL. load_image() will download and load the image if it's a URL and will load it if it's a local path.
# convert PIL Image to pytorch tensors
transform = transforms.ToTensor()
image_tensor = image.convert("RGB")
image_tensor = transform(image_tensor)
We have also converted the PIL image to a PyTorch tensor which we will need in the future.
Now we define some helper functions that will make our lives easier:
def color_palette():
  """Color palette to map each class to its corresponding color."""
  return [[0, 128, 128],
          [255, 170, 0],
          [161, 19, 46],
          [118, 171, 47],
          [255, 255, 0],
          [84, 170, 127],
          [170, 84, 127],
          [33, 138, 200],
          [255, 84, 0]]
The color_palette() function returns a list of colors contained as RGB values. These values represent the color of the segment that we will use.
def overlay_segments(image, seg_mask):
  """Return different segments predicted by the model overlaid on image."""
  H, W = seg_mask.shape
  image_mask = np.zeros((H, W, 3), dtype=np.uint8)
  colors = np.array(color_palette())
  # convert to a pytorch tensor if seg_mask is not one already
  seg_mask = seg_mask if torch.is_tensor(seg_mask) else torch.tensor(seg_mask)
  unique_labels = torch.unique(seg_mask)
  # map each segment label to a unique color
  for i, label in enumerate(unique_labels):
    image_mask[seg_mask == label.item(), :] = colors[i]
  image = np.array(image)
  # percentage of original image in the final overlaid iamge
  img_weight = 0.5
  # overlay input image and the generated segment mask
  img = img_weight * np.array(image) * 255 + (1 - img_weight) * image_mask
  return img.astype(np.uint8)
The overlay_segment() function takes an image and a segmentation mask and returns the mask overlaid on top of the image. It first replaces each class label with the RGB value from the color palette we defined above. It then takes a weighted average of the original image and our segmentation mask.
def replace_label(mask, label):
  """Replace the segment masks values with label."""
  mask = np.array(mask)
  mask[mask == 255] = label
  return mask
Finally, the replace_label() function takes a binary mask and returns a numpy array with label. We use this function to create the complete segmentation mask from individual masks.
Learn also: Real-time Object Tracking with OpenCV and YOLOv8 in Python.
Using Pipeline API
Now the easiest way to solve any task on 🤗 transformers is to use the pipeline() method! Hence we start by loading an image-segmentation pipeline and a custom model we want to load. We then pass our input PIL image to it and get various masks for each class:
# load the entire image segmentation pipeline
img_segmentation_pipeline = pipeline('image-segmentation',
                                     model="nvidia/segformer-b5-finetuned-ade-640-640")
output = img_segmentation_pipeline(image)
outputOutput:
[{'score': None,
  'label': 'building',
  'mask': <PIL.Image.Image image mode=L size=300x180 at 0x7FA03605DDF0>},
 {'score': None,
  'label': 'floor',
  'mask': <PIL.Image.Image image mode=L size=300x180 at 0x7FA03605D7C0>},
 {'score': None,
  'label': 'road',
  'mask': <PIL.Image.Image image mode=L size=300x180 at 0x7FA035F9CF70>},
 {'score': None,
  'label': 'person',
  'mask': <PIL.Image.Image image mode=L size=300x180 at 0x7FA037FA9100>},
 {'score': None,
  'label': 'car',
  'mask': <PIL.Image.Image image mode=L size=300x180 at 0x7FA037FA9370>},
 {'score': None,
  'label': 'plaything',
  'mask': <PIL.Image.Image image mode=L size=300x180 at 0x7FA16A93CD30>},
 {'score': None,
  'label': 'minibike',
  'mask': <PIL.Image.Image image mode=L size=300x180 at 0x7FA036074A30>}]
We can visualize the PIL image mask at index 0 as follows:
output[0]['mask']
Wouldn't it be great if we could visualize the masks for all the classes in one go? Let's do that:
# load the feature extractor (to preprocess images) and the model (to get outputs)
W, H = image.size
segmentation_mask = np.zeros((H, W), dtype=np.uint8)

for i in range(len(output)):
  segmentation_mask += replace_label(output[i]['mask'], i)
After combining the masks, we then display the overlaid segments.
# overlay the predicted segmentation masks on the original image
segmented_img = overlay_segments(image_tensor.permute(1, 2, 0), segmentation_mask)

# convert to PIL Image
Image.fromarray(segmented_img)
Voila! This is the segmented image our model gave us:
Now that we know how to work with a pipeline, let's do some image segmentation without using a pipeline.
Using 🤗 Transformers Custom Models
First, we will load our fine-tuned model and the feature extractor. We're choosing the nvidia/segformer-b5-finetuned-ade-640-640, which is a SegFormer model fine-tuned on the ADE20k image segmentation dataset (more than 20K samples) at the resolution of 640x640. It was introduced By NVIDIA in this paper.
Below is the SegFormer architecture, where the encoder is composed of transformer blocks, and the decoder is simply MLP (Multi-Layer Perceptrons):
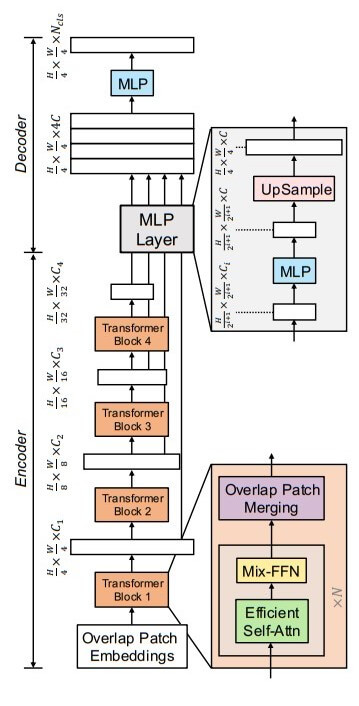 Figure 1: SegFormer Architecture from the official paper.
The feature extractor takes an image and preprocesses it so that we can pass it to our model:
# load the feature extractor (to preprocess images) and the model (to get outputs)
feature_extractor = SegformerImageProcessor.from_pretrained("nvidia/segformer-b5-finetuned-ade-640-640")
model = SegformerForSemanticSegmentation.from_pretrained("nvidia/segformer-b5-finetuned-ade-640-640")
Next, the below code is responsible for performing image segmentation on an image:
def to_tensor(image):
  """Convert PIL Image to pytorch tensor."""
  transform = transforms.ToTensor()
  image_tensor = image.convert("RGB")
  image_tensor = transform(image_tensor)
  return image_tensor

# a function that takes an image and return the segmented image
def get_segmented_image(model, feature_extractor, image_path):
  """Return the predicted segmentation mask for the input image."""
  # load the image
  image = load_image(image_path)
  # preprocess input
  inputs = feature_extractor(images=image, return_tensors="pt")
  # convert to pytorch tensor
  image_tensor = to_tensor(image)
  # pass the processed input to the model
  outputs = model(**inputs)
  print("outputs.logits.shape:", outputs.logits.shape)
  # interpolate output logits to the same shape as the input image
  upsampled_logits = F.interpolate(
      outputs.logits, # tensor to be interpolated
      size=image_tensor.shape[1:], # output size we want
      mode='bilinear', # do bilinear interpolation
      align_corners=False)

  # get the class with max probabilities
  segmentation_mask = upsampled_logits.argmax(dim=1)[0]
  print(f"{segmentation_mask.shape=}")
  # get the segmented image
  segmented_img = overlay_segments(image_tensor.permute(1, 2, 0), segmentation_mask)
  # convert to PIL Image
  return Image.fromarray(segmented_img)
In the get_segmented_image(), we're doing the following:
- We're preprocessing the input image using the
feature_extractor. - We pass the preprocessed pixel values to our model for inference to get the output.
- Then, we interpolate the output segmentation masks to get the same-sized masks as our image using
F.interpolate()PyTorch function. - After that, we assign each pixel value in our masks to a particular class.
- After getting the masks, we then return the overlaid segments.
Let's use the function now:
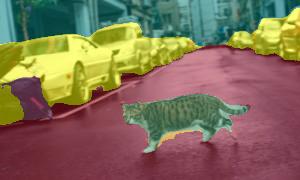
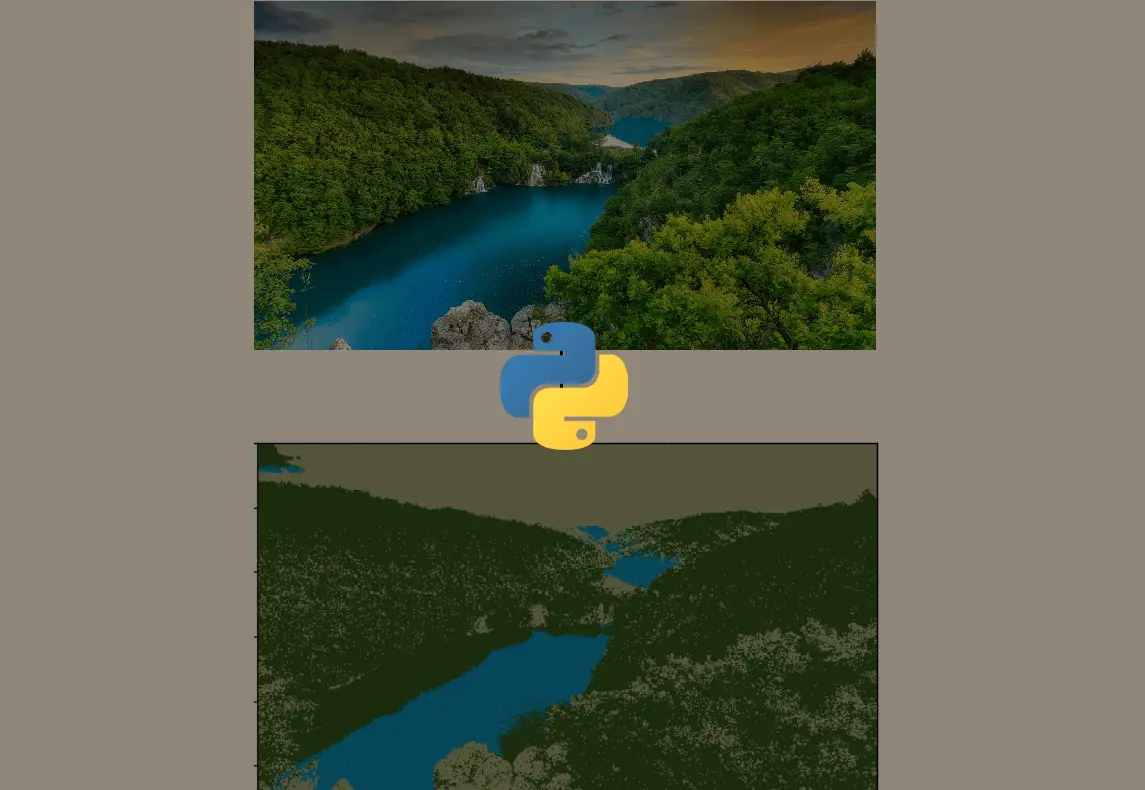
get_segmented_image(model, feature_extractor, "https://shorthaircatbreeds.com/wp-content/uploads/2020/06/Urban-cat-crossing-a-road-300x180.jpg")We get the result as follows:
Another example:
get_segmented_image(model, feature_extractor, "http://images.cocodataset.org/test-stuff2017/000000000001.jpg")Output:
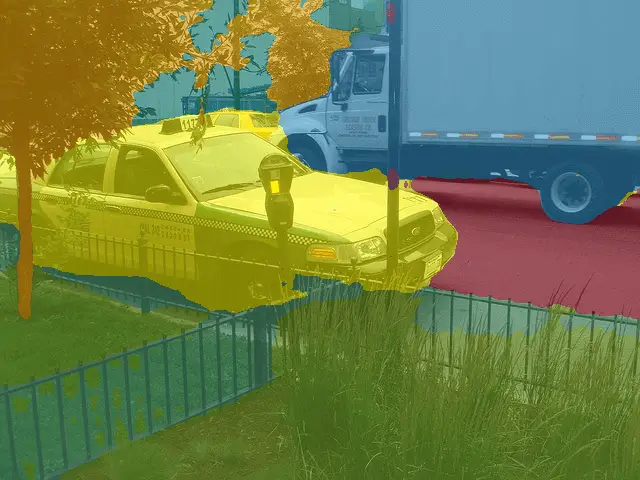
Hurray! Our model is working well. Now you know how to do image segmentation all by yourself. In this tutorial, we used the nvidia/segformer-b5-finetuned-ade-640-640 model from 🤗 Transformers. You can also check out various other image segmentation models at this link.
References & Useful Links
- Fine-Tune a Semantic Segmentation Model with a Custom Dataset
- Image Segmentation - Huggingface
- NVIDIA SegFormer Model Card
- Image source: Shorthair Cat Breeds
For the complete code, check this link.
Learn also: Image Captioning using PyTorch and Transformers in Python.
![]()
Happy learning ♥
Liked what you read? You'll love what you can learn from our AI-powered Code Explainer. Check it out!
View Full Code Convert My Code


Got a coding query or need some guidance before you comment? Check out this Python Code Assistant for expert advice and handy tips. It's like having a coding tutor right in your fingertips!