Before we get started, have you tried our new Python Code Assistant? It's like having an expert coder at your fingertips. Check it out!
Introduction
Have you ever fantasized about having an AI like Jarvis from Iron Man at your disposal, capable of answering any question from whatever you were seeing at the moment or from any image? You could use it to find all the pictures of your adorable pet from your phone gallery, or could even use it to search for that specific photo buried under a mountain of snapshots.
While all this sounds like a lofty aspiration and too good to be true, we are not very far from a future like this. There has been significant progress in the field of AI, especially in multimodality-related works such as combining natural language and vision. In this in-depth tutorial, we are going to explore some of these latest techniques (BLIP, BLIP-2, and GIT) and also see how to implement them in Python.
Table of contents:
Visual Question Answering
Visual Question Answering (or VQA), a fascinating frontier of AI research, engages in addressing open-ended questions about images. This task places a computer in the role of providing a relevant, logical answer to a text-based question about a specific image. This requires a sophisticated understanding of not only visual and language processing, but also common sense knowledge to respond effectively.
Apart from the ones mentioned at the beginning of the article, VQA has a huge number of real-world use cases like assisting visually impaired individuals, image retrieval systems, medical diagnosis, enhancing educational experiences, streamlining video searches, and the list goes on.
Theory
BLIP
BLIP is a Vision-Language Pre-training (VLP) framework, proposed by researchers at Salesforce, that learns from noisy image-text pairs. VLP frameworks allow the unification of Vision and Language, thus allowing a much more comprehensive range of downstream tasks than existing methods. Both BLIP and BLIP-2 are built on the foundation of the Transformer architecture, a popular choice for many natural language processing tasks due to its ability to handle long-range dependencies and its scalability.
The success of BLIP can be attributed to two major components: MED and CapFilt.
Multimodal Mixture of Encoder-Decoder (MED)
The MED model is jointly pre-trained with three vision-language objectives: image-text contrastive learning, image-text matching, and image-conditioned language modeling. The architecture is as follows:
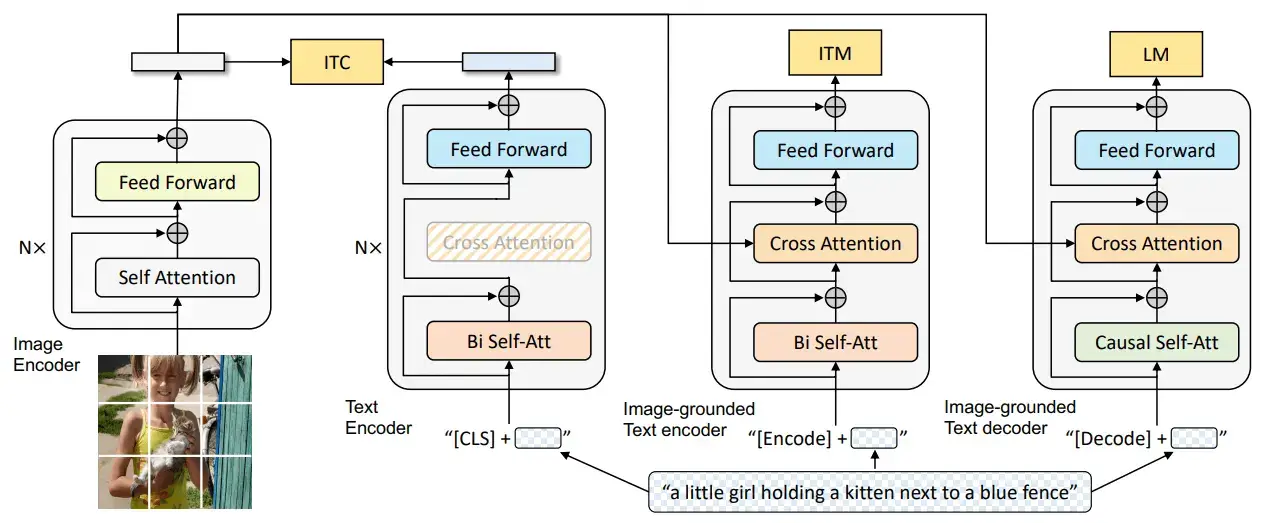
Image from the original BLIP paper.
Note that the same color blocks share the parameters. We have an image encoder (the first model in the diagram) to encode the image into its latent space representation. It is then used to condition the text encoder (the third model in the diagram) and the text decoder (the fourth model in the diagram) on the input image using cross-attention layers. The cross-attention layer allows the models to capture the relationship between the two different sets of data (i.e., the input text and the input image) by attending to the most relevant parts of the context.
This proposed framework can operate in several ways, as follows:
- A unimodal encoder: The second model in the above diagram represents this. Its purpose is to encode the image and the text separately. This part of the framework is activated (and thus trained) using the image-text contrastive learning (ITC) loss. It allows us to encode only the text without looking at the image.
- An image-grounded text encoder: It's the third model in the above diagram. Its purpose is to encode the text with the injection of visual information via the cross-attention layers. This model is trained using the image-text matching (ITM) loss. This model allows us to encode the text depending on the image.
- An image-grounded text decoder: It is the fourth model in the above diagram and is used for decoding the text with the visual information injected via the cross-attention layers. It is learned using language modeling (LM) loss. This lets us decode the text depending on the image.
Captioning and Filtering (CapFilt)
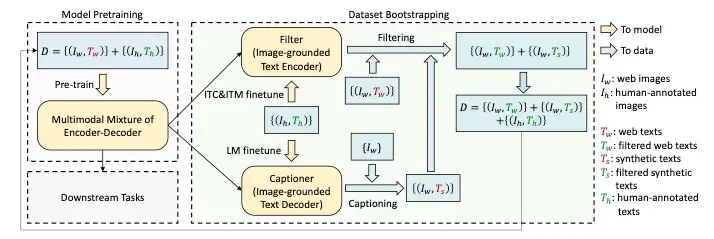
Image from the original BLIP paper.
Since current models require massive amounts of data, it isn't easy to get high-quality data due to high annotation costs. CapFilt is a new method to improve the quality of the text corpus. It introduces two modules both of which are initialized from the same pre-trained objective and fine-tuned individually on the COCO dataset:
- Captioner: It is used to generate captions given the web images. It is an image-grounded text decoder and is fine-tuned with the LM objective to decode texts from given images.
- Filter: It is used to remove noisy image-text pairs. The filter is an image-grounded text encoder and is finetuned with the ITC and ITM objectives to learn whether a text matches an image.
The image captioner generates synthetic captions for the web images and the filter removes noisy texts from both the original web texts and the synthetic texts. A key thing to notice is that the human-labeled captions remain as they are (not filtered) and are assumed to be the ground truth. These filtered image-text pairs along with the human-labeled captions form the new dataset which is then used to pre-train a new model.
Related: Image Captioning using PyTorch and Transformers in Python.
BLIP-2
BLIP-2 is an advanced model proposed for Visual Question Answering designed to improve upon its predecessor, the BLIP model, by incorporating several enhancements.
The BLIP-2 model uses a two-stream architecture where one stream processes the image (like an image encoder) and the other processes the question (like a Large Language Model or an LLM). These two fixed streams of models are then fused to combine the features from the visual and textual inputs using a novel proposed fusion mechanism, named Q-former.
Q-Former
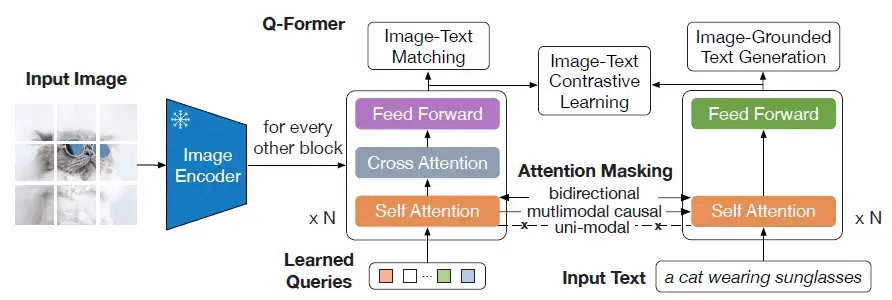 Image from the original BLIP-2 paper
The Q-former consists of two submodules:
- Image transformer: It is the model in the center of the above diagram. It interacts with the frozen image encoder for visual feature extraction. A fixed number of "learnable" queries are given as input to this transformer. These queries interact with each other through the self-attention layers and interact with the image features through the cross-attention layer as shown in the diagram. These queries can also interact with the text simply by sending a concatenation of the learnable queries and text tokens to the self-attention layer.
- Text transformer: It is the model on the right in the above diagram. It acts as both the text decoder and text encoder. The text input to this model can also interact with the learnable queries in the same way mentioned above. Hence both the submodules share the self-attention layers.
The Q-former is trained on a range of objectives:
- Image-text contrastive learning: It helps in maximizing the mutual information we gain from the image and the text features by contrasting the image-text similarity of the positive pairs against the negative pairs.
- Image-grounded text generation: Only the self-attention layer allows the interaction between the learnable image queries and the encoded text. Hence to perform this task, the learnable queries are forced to extract the visual features from the image features given to us by the frozen image encoder. These visual features also capture the information about the text.
- Image-text matching: In this task, the model is required to do a binary classification and tell us if an image-text pair is a positive pair or a negative pair.
There are different attention masks used in the self-attention layer as follows:
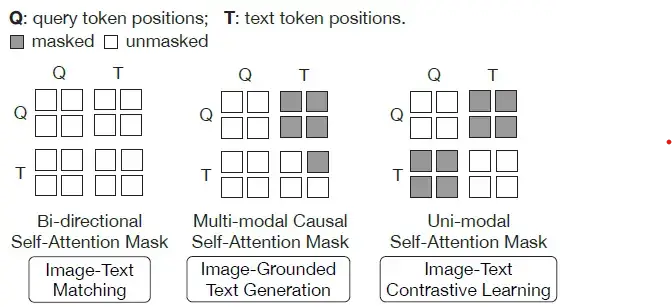
Image from the original BLIP-2 paper
- Bi-directional self-attention mask: It allows both the learnable query tokens and the text tokens to interact with each other.
- Multi-modal causal self-attention mask: It allows the query tokens to interact with one another and allows the text tokens to interact only with the previously predicted text tokens and the query tokens.
- Uni-modal self-attention mask: It allows both the query and text tokens to interact amongst themselves but not with each other.
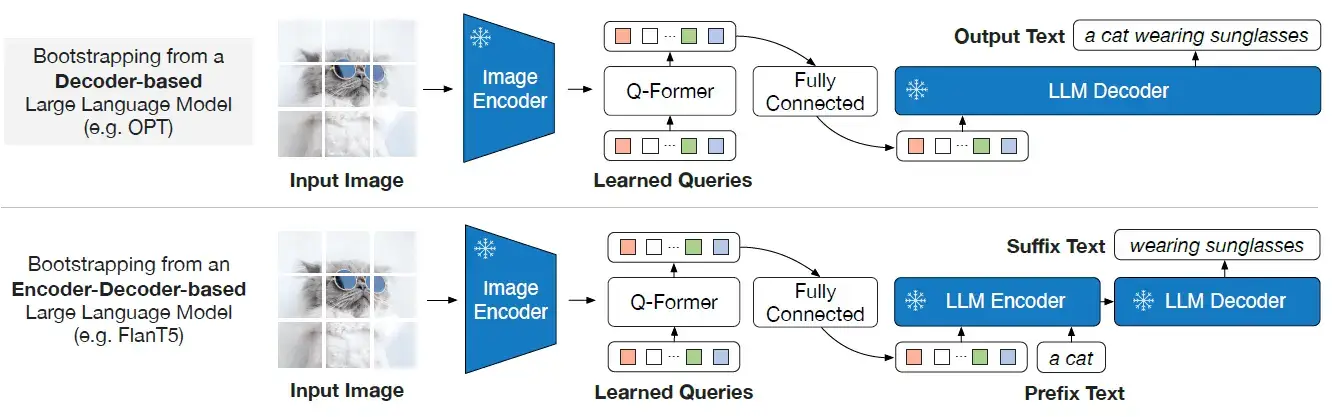
Image from the original BLIP-2 paper
As shown above, in the generative pre-training stage, the Q-Former connects the Image encoder to the LLM. The output query embeddings are prepended to the input text embeddings, functioning as soft visual prompts that condition the LLM on visual representation extracted by the Q-Former. Since output embeddings are limited, this also serves as an information bottleneck that feeds only the most useful information to the LLM while removing any irrelevant information. This reduces the burden of the LLM to learn vision-language alignment, thus mitigating the catastrophic forgetting problem.
Notice in the diagram that to bring the output query embeddings Z into the same text embedding dimension, a linear fully connected layer is used.
The LLM being used here can be of two types:
- Decoder-based LLM: It is pre-trained with language modeling loss where the frozen LLM is tasked to generate the text conditioned on visual representation from Q-Former.
- Encoder-based LLM: It is pre-trained with prefix language modeling loss where the text is split into two parts and the first part along with the visual representation is sent as input to the LLM's encoder. The suffix text is used as a generation target for the LLM's decoder.
GIT
The Generative Image-to-text Transformer (GIT) is another model designed to unify vision-language tasks such as image/video captioning and question answering. It was proposed by a team of researchers at Microsoft. The GIT model is unique in its simplicity, consisting of just one image encoder and one text decoder under a single language modeling task.
The GIT model was trained on a massive dataset of 0.8 billion image-text pairs. This large-scale pre-training data and the model size significantly boost the model's performance. The GIT model has achieved impressive performance on numerous challenging benchmarks, even surpassing human performance on the TextCaps benchmark.
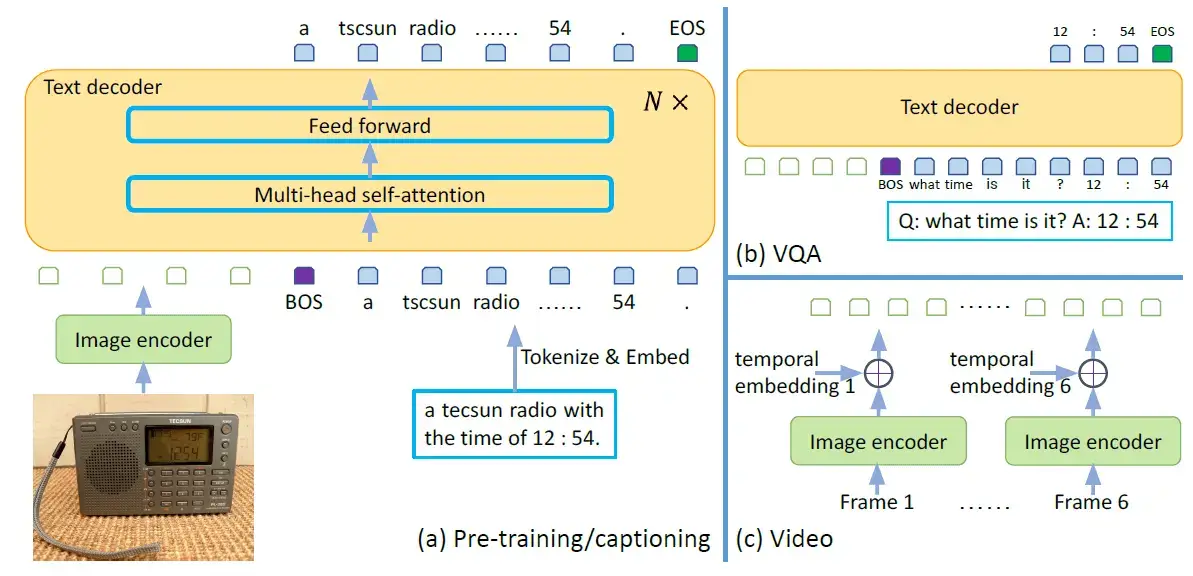 Image from the original GIT paper
The GIT model consists of an image encoder and a text decoder.
- Image encoder: It is initialized as a contrastive pre-trained model, which takes a raw image as input and outputs a compact 2D feature map. This feature map is then flattened into a list of features, which are projected into a certain dimension (D) and fed into the text decoder.
- Text decoder: It is a randomly initialized transformer module tasked with predicting the text description. It consists of multiple transformer blocks, each of which is composed of a self-attention layer and a feed-forward layer. The text is tokenized and embedded into D dimensions, followed by the addition of positional encoding and a layer normalization layer. The image features are concatenated with the text embeddings as input to the transformer module. The text begins with a [BOS] token and is decoded in an auto-regressive way until the [EOS] token or the maximum steps are reached.
The entire model is trained using a language modeling task, where the goal is to predict the next word in a sentence given the previous words.
An important thing to note is that the attention mask is applied such that the text token only depends on the preceding tokens and all image tokens, and image tokens can attend to each other. This is different from a unidirectional attention mask, where not every image token can rely on all other image tokens.
The above figure also illustrates how the GIT model can be used for VQA from videos as well. To do this, we can first pass the different frames of the video through the image encoder to get the different frame embeddings. Then, we can add the temporal embeddings to the frame embeddings to avoid loss of temporal information and pass the final result to the text decoder. Isn’t this great?
Code
Let us now work our way through some code.
Let us begin by first installing the 🤗 Transformers library which has the necessary components required to run the different frameworks:
!pip install -qU transformersBLIP
Next, we import the following libraries.
import requests
from PIL import Image
from transformers import BlipProcessor, BlipForQuestionAnswering
import torch
And finally, we download the image available at the following URL using the requests.get() method and convert it into the PIL Image format:
# load the image we will test BLIP on
img_url = 'https://storage.googleapis.com/sfr-vision-language-research/BLIP/demo.jpg'
image = Image.open(requests.get(img_url, stream=True).raw).convert('RGB')
image
This is how our image looks

Let us now load the processor and the visual question-answering model for BLIP as follows:
# load necessary components: the processor and the model
processor = BlipProcessor.from_pretrained("Salesforce/blip-vqa-base")
model = BlipForQuestionAnswering.from_pretrained("Salesforce/blip-vqa-base")
We will now define a function that takes in the model, the processor, the reference image, and the question that we want to ask and prints the final answer by the VQA model:
def get_answer_blip(model, processor, image, question):
    """Answers the given question and handles all the preprocessing and postprocessing steps"""
    # preprocess the given image and question
    inputs = processor(image, question, return_tensors="pt")
    # generate the answer (get output)
    out = model.generate(**inputs)
    # post-process the output to get human friendly english text
    print(processor.decode(out[0], skip_special_tokens=True))
    return
In the code above, we first preprocess the image and the question and get preprocessed PyTorch tensors called inputs. These tensors are then sent to the model to get the answer. This answer is currently represented by tokens and needs post-processing so that it can be read by humans. In the next step, we do just that.
Now that we have a ready-to-use function that handles all the intricate work, let’s test our model:
# sample question 1
question = "how many dogs are in the picture?"
get_answer_blip(model, processor, image, question)
Output:
1# sample question 2
question = "how will you describe the picture?"
get_answer_blip(model, processor, image, question)Output:
woman and dog# sample question 3
question = "where are they?"
get_answer_blip(model, processor, image, question)Output:
beachThis is perfect! The model works.
Let’s now try implementing this framework ourselves from scratch. Here’s the outline of our approach. We will make separate functions for preprocessing, generating the outputs, and post-processing. Then we will make a ready-to-use function, just like we did before, that utilizes all these previously defined methods.
Let us begin by declaring a class for VQA using BLIP and storing the vision model, text encoder and decoder, and processor through the __init__() method:
class BLIP_VQA:
    """Custom implementation of the BLIP model. The code has been adapted from the official transformers implementation"""
    def __init__(self, vision_model, text_encoder, text_decoder, processor):
        """Initialize various objects"""
        self.vision_model = vision_model
        self.text_encoder = text_encoder
        self.text_decoder = text_decoder
        self.processor = processor
We will now write the preprocess() method which will take the image and the question as input:
    def preprocess(self, img, ques):
        """preprocess the inputs: image, question"""
        # preprocess using the processor
        inputs = self.processor(img, ques, return_tensors='pt')
        # store the pixel values of the image, input IDs (i.e., token IDs) of the question and the attention masks separately
        pixel_values = inputs['pixel_values']
        input_ids = inputs['input_ids']
        attention_mask = inputs['attention_mask']
        return pixel_values, input_ids, attention_mask
In the code above, we can see that the processor, just like before, does all the preprocessing. The inputs object contains the following items: pixel values (pixel values of the image), input IDs (tokens obtained from the tokenization of our question), and attention masks (with 1 activating the value and 0 masking the value). This time instead of just working with the preprocessed dictionary we segregate these different values and return them separately.
Now we will write the main method to generate the outputs. The generate_output() method takes the previously returned values as input:
    def generate_output(self, pixel_values, input_ids, attention_mask):
        """Generates output from the preprocessed input"""
        # get the vision outputs (i.e., the image embeds)
        vision_outputs = self.vision_model(pixel_values=pixel_values)
        img_embeds = vision_outputs[0]
        # create attention mask with 1s on all the image embedding positions
        img_attention_mask = torch.ones(img_embeds.size()[: -1], dtype=torch.long)
        # encode the questions
        question_outputs = self.text_encoder(input_ids=input_ids,
                                             attention_mask=attention_mask,
                                             encoder_hidden_states=img_embeds,
                                             encoder_attention_mask=img_attention_mask,
                                             return_dict=False)
        # create attention mask with 1s on all the question token IDs positions
        question_embeds = question_outputs[0]
        question_attention_mask = torch.ones(question_embeds.size()[:-1], dtype=torch.long)
        # initialize the answers with the beginning-of-sentence IDs (bos ID)
        bos_ids = torch.full((question_embeds.size(0), 1), fill_value=30522)
        # get output from the decoder. These outputs are the generated IDs
        outputs = self.text_decoder.generate(
            input_ids=bos_ids,
            eos_token_id=102,
            pad_token_id=0,
            encoder_hidden_states=question_embeds,
            encoder_attention_mask=question_attention_mask)
        return outputs
We begin by getting the vision outputs (representing the image embeddings) from the pixel values and then create an attention mask for these embeds. Next, we need to do the image-grounded text encoding so we pass the input_ids (a tokenized form of our question), attention_mask (attention mask for our question), image embeddings, and the image attention mask.
The text encoder automatically handles all the self-attention, and the cross-attention layers and gives us the embeddings of the questions. Now to do image-grounded text decoding we create a tensor object with the beginning-of-sentence token ID (it is 30522 in our case) and pass it to the text_decoder.generate() method. Note the end-of-sentence token ID is 102 and the padding token ID is 0. We also pass the image-grounded question embeds and the question attention mask to the decoder to get the image-grounded decoded text.
Next, we write the post-processing method.
    def postprocess(self, outputs):
        """post-process the output generated by the text-decoder"""
        return self.processor.decode(outputs[0], skip_special_tokens=True)
Just like before, the processor handles all the post-processing.
Finally, we write our ready-to-use method called get_answer() which uses all the methods we diligently defined before.
    def get_answer(self, image, ques):
        """Returns human friendly answer to a question"""
        # preprocess
        pixel_values, input_ids, attention_mask = self.preprocess(image, ques)
        # generate output
        outputs = self.generate_output(pixel_values, input_ids, attention_mask)
        # post-process
        answer = self.postprocess(outputs)
        return answer
This method takes the image and question as input and outputs the final answer. It works by chaining the preprocessing, output generation, and post-processing steps.
Let us now test our manually defined model. We first create an instance of the model as follows:
blip_vqa = BLIP_VQA(vision_model=model.vision_model,
                    text_encoder=model.text_encoder,
                    text_decoder=model.text_decoder,
                    processor=processor)
Let’s ask the same question we did before and see if it gives the same answer:
# sample question 1
ques = "how will you describe the picture?"
print(blip_vqa.get_answer(image, ques))
Output:
woman and dogVoila! Our framework works. Let’s test it on a different image.
# load another image to test BLIP
img_url = "https://fastly.picsum.photos/id/11/200/200.jpg?hmac=LBGO0uEpEmAVS8NeUXMqxcIdHGIcu0JiOb5DJr4mtUI"
image = Image.open(requests.get(img_url, stream=True).raw).convert('RGB')
image
This is the image we will now test on.

Let us now do some visual questioning:
# sample question 2
ques = "What is the major color present?"
print(blip_vqa.get_answer(image, ques))
Output:
greenSweet! All this looks pretty good. Time to work with the BLIP-2 model.
BLIP-2
BLIP-2 models are quite large and require your machine and GPU to have 16GB+ of RAM. Despite that, I'm loading the model in torch.float16 and it's taking about 9GB of my GPU VRAM. The bad news is that the free Colab RAM is not enough:
import requests
from PIL import Image
from transformers import Blip2Processor, Blip2ForConditionalGeneration
import torch
import urllib.parse as parse
import os

device = torch.device("cuda", 0)
processor = Blip2Processor.from_pretrained("Salesforce/blip2-opt-2.7b")
# load the model weights in float16 instead of float32
model = Blip2ForConditionalGeneration.from_pretrained("Salesforce/blip2-opt-2.7b", torch_dtype=torch.float16).to(device)I'm loading the 2.7B parameter version of BLIP-2 (Salesforce/blip2-opt-2.7b). There is actually a larger and more accurate one that is Salesforce/blip2-opt-6.7b.
Below are simple helper functions for loading an image:
# a function to determine whether a string is a URL or not
def is_url(string):
    try:
        result = parse.urlparse(string)
        return all([result.scheme, result.netloc, result.path])
    except:
        return False

# a function to load an image
def load_image(image_path):
    if is_url(image_path):
        return Image.open(requests.get(image_path, stream=True).raw)
    elif os.path.exists(image_path):
        return Image.open(image_path)
Let's load this image:
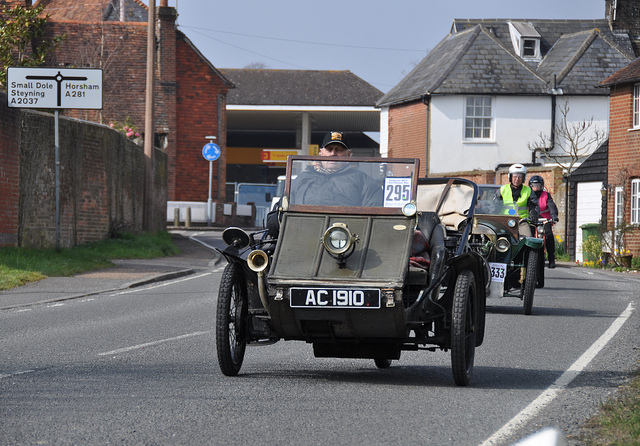
raw_image = load_image("http://images.cocodataset.org/test-stuff2017/000000007226.jpg")Next, preprocessing the image and question. For the question, I'm triggering a text completion instead of a question:
question = "a"
inputs = processor(raw_image, question, return_tensors="pt").to(device, dtype=torch.float16)
We also make sure that the input pixel values and encoded text are in the float16 format. Generating the output:
out = model.generate(**inputs)
print(processor.decode(out[0], skip_special_tokens=True))
Output:
vintage car driving down a streetGood, let's input this generated caption into the model once again:
question = "a vintage car driving down a street"
inputs = processor(raw_image, question, return_tensors="pt").to(device, dtype=torch.float16)
out = model.generate(**inputs)
print(processor.decode(out[0], skip_special_tokens=True))
Output:
with a man in the back seatNow let's prompt a question with the format as suggested by the paper:
question = "Question: What is the estimated year of these cars? Answer:"
inputs = processor(raw_image, question, return_tensors="pt").to(device, dtype=torch.float16)
out = model.generate(**inputs)
print(processor.decode(out[0], skip_special_tokens=True))
Output:
The cars are from the early 1900'sOne more question:
question = "Question: What is the color of the car? Answer:"
inputs = processor(raw_image, question, return_tensors="pt").to(device, dtype=torch.float16)
out = model.generate(**inputs)
print(processor.decode(out[0], skip_special_tokens=True))
Output:
GreenGIT
We first import the following libraries:
from transformers import AutoProcessor, AutoModelForCausalLM
from huggingface_hub import hf_hub_download
from PIL import Image
And we also download an image from the Hugging Face Hub using the hf_hub_download() method and convert it into the PIL Image format like before.
# load the image we will test GIT on
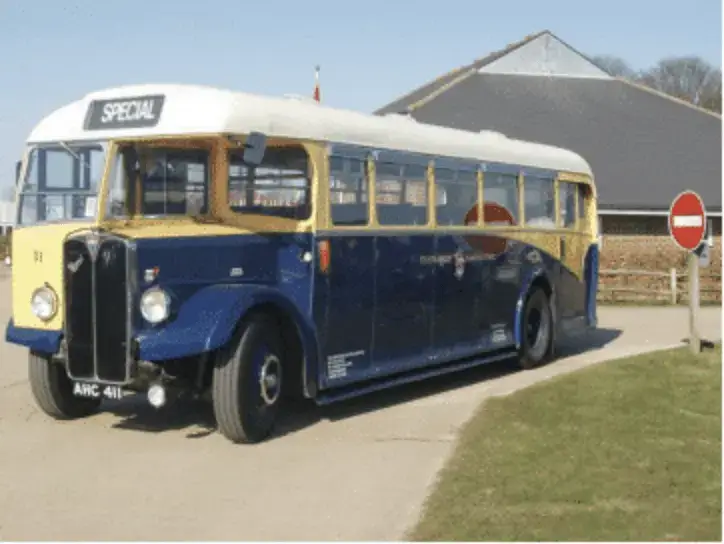
file_path = hf_hub_download(repo_id="nielsr/textvqa-sample", filename="bus.png", repo_type="dataset")
image = Image.open(file_path).convert("RGB")
image
We then load the AutoProcessor and the AutoModelForCausalLM and initialize them with the GIT repository values:
# load necessary components: the processor and the model
processor = AutoProcessor.from_pretrained("microsoft/git-base-textvqa")
model = AutoModelForCausalLM.from_pretrained("microsoft/git-base-textvqa")
Let’s now define a class to do the VQA using the GIT model. Here’s the outline of our approach. We will declare methods for preprocessing, generating, post-processing, and a final ready-to-use method.
Let’s first declare the __init__() method and store the GIT model and the GIT processor in our class:
class GIT_VQA:
    """Custom implementation of the GIT model for Visual Question Answering (VQA) tasks."""
    def __init__(self, model, processor):
        """Initializes the model and the processor."""
        self.model = model
        self.processor = processor
        return
Next, we define the preprocess() method which takes the image and our question as input:
    def preprocess(self, image, question):
        """Preprocesses the inputs: image, question"""
        # process the image to get pixel values
        pixel_values = self.processor(images=image, return_tensors="pt").pixel_values
        # process the question to get input IDs, but do not add special tokens
        input_ids = self.processor(text=question, add_special_tokens=False).input_ids
        # add the CLS token at the beginning of the input_ids and format for model input
        input_ids = [self.processor.tokenizer.cls_token_id] + input_ids
        input_ids = torch.tensor(input_ids).unsqueeze(0)
        return pixel_values, input_ids
We pass the image to the GIT processor and we get the pixel values from it. Note that we have also specified the returned tensors to be in the PyTorch format.
Next, we process the question to get the input IDs (the token IDs of our question). Since we specified add_special_tokens as False, we will need to add the special token ourselves which is exactly the next step we follow. Now we convert our input IDs into a PyTorch tensor and use the unsqueeze() method to add an extra dimension. This extra dimension will be required by the GIT model since it represents the number of batches. Now we return the pixel values and the input IDs.
We will now write the generate() method which takes the output from the previous method as the input.
    def generate(self, pixel_values, input_ids):
        """Generates the output from the preprocessed inputs."""
        # generate output using the model with a maximum length of 50 tokens
        outputs = self.model.generate(pixel_values=pixel_values, input_ids=input_ids, max_length=50)
        return outputs
We use the model.generate() after passing the pixel values and the input IDs to get the outputs. Notice how easy it is to get the outputs with the GIT model. This illustrates the simplicity of the GIT framework compared to BLIP. The output we have is in the tokenized form and needs postprocessing. So let’s quickly write that method:
    def postprocess(self, outputs):
        """Post-processes the output generated by the model."""
        # decode the output, ignoring special tokens
        answer = self.processor.batch_decode(outputs, skip_special_tokens=True)
        return answer
Here we use the processor to do all the post-processing and return the final, English text answer.
Now let’s make our ready-to-use method as follows:
    def get_answer(self, image, question):
        """Returns human friendly answer to a question"""
        # preprocess
        pixel_values, input_ids = self.preprocess(image, question)
        # generate output
        outputs = self.generate(pixel_values, input_ids)
        # post-process
        answer = self.postprocess(outputs)
        return answer
This method takes the image and question as input and outputs the final answer. And just like before it works by chaining the previously defined methods.
Let’s now test our implementation. We’ll first create an instance of the GIT model:
# create a GIT instance
git_vqa = GIT_VQA(model=model, processor=processor)
Let’s now ask the following questions to our model.
# sample question 1
question = "what does the front of the bus say at the top?"
answer = git_vqa.get_answer(image, question)
print(answer)
Output:
['what does the front of the bus say at the top? special']# sample question 2
question = "what are all the colors present on the bus?"
answer = git_vqa.get_answer(image, question)
print(answer)Output:
['what are all the colors present on the bus? unanswerable']The model is unable to list all the colors present on the bus. Let’s test the model on a different image:
# load another image to test BLIP
img_url = "https://fastly.picsum.photos/id/110/500/500.jpg?hmac=wSHhLFNyJ6k3uM94s6etGQ0WWhmwbdUSiZ9ZDL5Hh2Q"
image = Image.open(requests.get(img_url, stream=True).raw).convert('RGB')
image

# sample question 1
question = "Is it night in the image?"
answer = git_vqa.get_answer(image, question)
print(answer)
Output:
['is it night in the image? no']Perfect! The model seems to be working.
Conclusion
In this article, we learned about visual question answering (VQA) and some of the latest models being used in VQA such as BLIP, BLIP-2, and GIT. We also implemented these frameworks ourselves and tested them. Now go ahead and ask tons of questions to these AI models!
You can get the complete code here, or you can check the following Colab notebooks:
Happy learning ♥
References
- BLIP Paper
- BLIP-2 Paper
- GIT Paper
- BLIP Paper explanation by Yannic Kilcher
- BLIP Transformers Implementation
- BLIP VQA Hugging Face
- GIT Transformers Implementation
- GIT - HuggingFace
Take the stress out of learning Python. Meet our Python Code Assistant – your new coding buddy. Give it a whirl!
View Full Code Improve My Code


Got a coding query or need some guidance before you comment? Check out this Python Code Assistant for expert advice and handy tips. It's like having a coding tutor right in your fingertips!