Struggling with multiple programming languages? No worries. Our Code Converter has got you covered. Give it a go!
Table of Contents:
- Introduction
- Project Overview
- Dataset Information
- Prerequisites and Requirements
- Environment Setup
- Dataset Setup
- Understanding the Training Process
- Using the Pothole Detector
- Results and Evaluation
- Tips and Troubleshooting
- Conclusion
Introduction
Potholes are more than just a nuisance on our roads—they are a significant threat to public safety, vehicle integrity, and economic productivity. Every year, poorly maintained roads cause billions of dollars in vehicle damage, contribute to traffic accidents, and strain government infrastructure budgets. Traditional methods of pothole detection rely heavily on manual inspection, which is time-consuming, labor-intensive, and often reactive rather than preventive.
This is where automated pothole detection using computer vision and deep learning comes into play. Modern object detection algorithms like YOLOv5 (You Only Look Once version 5) can build systems that automatically identify potholes from images or video feeds in real-time. Such systems can be deployed on vehicles, drones, or fixed cameras to continuously monitor road conditions, enabling municipalities to prioritize repairs and allocate resources more efficiently.
In this tutorial, you will learn how to train a YOLOv5 model to detect potholes using a labeled dataset, and then deploy this trained model to perform real-time detection on new images. This project is perfect for students, researchers, and engineers interested in computer vision applications for smart cities and infrastructure management.
Project Overview
This project consists of two main components:
- Training Script (
pothole_yolov5_train.py): This script handles the complete training pipeline, including dataset verification, model training, evaluation, and export. It's designed to be beginner-friendly and works seamlessly with NVIDIA GPUs on Windows. You can use Google Colab if you don’t have a GPU. - Detection Script (
pothole_detector.py): A lightweight inference script that uses the trained model to detect potholes in new images. This script provides a simple command-line interface for quick testing and deployment.
Dataset Information
We'll be using the Pothole Detection dataset curated by Atikur Rahman Chitholian, which contains 665 labeled images of roads with potholes. The dataset has been split into:
- Training set: 70% (approximately 465 images)
- Validation set: 20% (approximately 133 images)
- Test set: 10% (approximately 67 images)
Prerequisites and Requirements
Hardware Requirements
- NVIDIA GPU with CUDA support (recommended: GTX 1060 or higher with at least 6GB VRAM)
- At least 8GB RAM (16GB recommended)
- At least 5GB of free disk space for the dataset and model weights
Software Requirements
- Windows 10/11 (the scripts are optimized for Windows, but can be adapted for Linux/Mac)
- Python 3.8 or higher
- NVIDIA GPU drivers (latest version recommended)
- CUDA Toolkit 11.8 or 12.x (will be installed with
PyTorch) - Or, like I said, you can just use Google Colab.
Environment Setup
Setting up a proper Python environment is crucial for avoiding dependency conflicts and ensuring reproducibility. We'll create a virtual environment specifically for this project.
Creating a Virtual Environment
Open Command Prompt or PowerShell and navigate to your project directory:
Create a new virtual environment:
python -m venv pothole_envActivate the virtual environment:
pothole_env\Scripts\activateOnce activated, you should see (pothole_env) at the beginning of your command prompt.
Installing Required Packages
With your virtual environment activated, install the required packages. First, upgrade pip:
python -m pip install --upgrade pipInstall PyTorch with CUDA support. For CUDA 11.8:
pip install torch torchvision torchaudio --index-url https://download.pytorch.org/whl/cu118Note: If you have CUDA 12.x installed, replace cu118 with cu121 in the command above.
Install the remaining packages:
pip install ultralytics opencv-python pillow matplotlib pyyaml pandas seabornAlternatively, if you have the requirements.txt file from the GitHub repository:
pip install -r requirements.txtVerifying GPU Installation
To ensure PyTorch can detect your GPU, run the following in Python:
python
>>> import torch
>>> print(torch.cuda.is_available())
>>> print(torch.cuda.get_device_name(0))
>>> exit()
If the first command returns True and the second command shows your GPU name, you're all set!
Dataset Setup
Downloading the Dataset
Clone or download the GitHub repository containing the dataset and code:
git clone https://github.com/Muhammad-aa/Pothole-Detector.gitAlternatively, download the ZIP file from the repository and extract it to your project directory.
Dataset Structure
The dataset must follow the YOLOv5 format. The expected directory structure is:
dataset/
├── images/
│   ├── train/       # Training images
│   ├── valid/       # Validation images
│   └── test/        # Test images
└── labels/
    ├── train/       # Training labels (.txt files)
    ├── valid/       # Validation labels
    └── test/        # Test labels
Each image in the images/ folder should have a corresponding .txt file in the labels/ folder with the same name.
For example: images/train/image001.jpg → labels/train/image001.txt
Label Format
Each label file contains one line per object (pothole) in the image, formatted as:
class_id x_center y_center width heightWhere all coordinates are normalized (0 to 1) relative to the image dimensions. For this dataset, class_id is always 0 since we only have one class: pothole.
Updating the Dataset Path
In the training script pothole_yolov5_train.py, update the DATASET_PATH variable to point to your dataset location.
Understanding the Training Process
The training script pothole_yolov5_train.py is designed to automate the entire training pipeline. Due to its length, the full code is available in the GitHub repository. However, let's break down what happens during training.
Training Pipeline Overview
The script executes the following steps:
- GPU Verification: Checks if CUDA is available and displays GPU information (name and memory).
- Dataset Verification: Validates the dataset structure, counts images and labels for each split (train/valid/test), and ensures everything is in place.
- Dataset Configuration File: Automatically creates a
dataset.yamlfile that tells YOLOv5 where to find the images and labels, and defines the class names. - Model Training: Loads a pre-trained YOLOv5 model (small, medium, or large) and fine-tunes it on the pothole dataset for the specified number of epochs.
- Model Evaluation: Evaluates the trained model on the validation set and reports metrics like mAP (mean Average Precision), precision, and recall.
- Testing on Sample Images: Runs the model on a few test images and saves the annotated results for visual inspection.
- Model Export: Exports the trained model to ONNX format for deployment in production environments.
Key Training Parameters
The script defines several important parameters that you can adjust based on your hardware and requirements:
IMG_SIZE = 640: The size to which images are resized during training. Larger sizes may improve accuracy but require more memory.BATCH_SIZE = 16: Number of images processed in each training iteration. Reduce this to 8 or 4 if you encounter out-of-memory errors.EPOCHS = 100: Number of complete passes through the training dataset. The script includes early stopping (patience=20), so training will stop if validation performance doesn't improve for 20 consecutive epochs.MODEL_TYPE = 'yolov5s': Model variant to use. Options areyolov5s(small, fastest),yolov5m(medium), oryolov5l(large, most accurate but slowest).DEVICE = 0: Specifies which GPU to use (0 for the first GPU). Set to 'cpu' if you want to train on CPU (not recommended, very slow).
What Happens During Training
When you run the training script, YOLOv5 performs the following:
- Data Augmentation: Applies random transformations (scaling, cropping, flipping, color adjustments) to the training images to make the model more robust.
- Forward Pass: Processes images through the neural network to generate predictions (bounding boxes and class probabilities).
- Loss Calculation: Compares predictions to ground truth labels and calculates a loss value that quantifies how wrong the predictions are.
- Backward Pass: Uses backpropagation to compute gradients and update model weights to minimize the loss.
- Validation: After each epoch, the model is evaluated on the validation set to monitor performance and prevent overfitting.
Training typically takes 15 minutes to 2 hours depending on your GPU, the model size, and the number of epochs. You'll see progress bars and metrics (loss, precision, recall) printed to the console.
Output and Model Weights
After training completes, the script saves several outputs:
- Best Model Weights: The model with the best validation performance is saved to
run/pothole_detection/train/weights/best.pt. - Last Model Weights: The model from the final epoch is saved to
pothole_detection/train/weights/last.pt(useful for resuming training). - Training Plots: Graphs showing loss curves, precision-recall curves, and confusion matrices are saved in the
pothole_detection/train/directory. - Test Results: Annotated test images are saved to
pothole_detection/test_results/. - Exported Model: The model is also exported to ONNX format for deployment.
Running the Training Script
To start training, simply run:
python pothole_yolov5_train.pyMake sure your virtual environment is activated and you've updated the DATASET_PATH in the script before running.
Tip: If you need to stop training early, press Ctrl+C. You can resume later by uncommenting the resume_training() function at the bottom of the script.
Using the Pothole Detector
Once training is complete, you can use the pothole_detector.py script to detect potholes in new images. This script is lightweight and easy to use, making it perfect for quick testing or deployment.
Understanding the Detection Script
The detection script is included below. Here's what each part does:
import argparse
from ultralytics import YOLO
import cv2

def detect_pothole(image_path, model_path='best.pt', save_output=False, show_result=False):
    """
    Detect potholes in an image using YOLO model

    Args:
        image_path (str): Path to the input image
        model_path (str): Path to the YOLO model file (.pt)
        save_output (bool): Whether to save the output image
        show_result (bool): Whether to display the result
    """
    try:
        # Load the model
        print(f"Loading model from: {model_path}")
        model = YOLO(model_path)

        # Perform detection
        print(f"Processing image: {image_path}")
        results = model(image_path)

        # Get the first result
        result = results[0]

        # Show the result if requested
        if show_result:
            result.show()
            print("Displaying result window. Close it to continue...")

        # Save the result if requested
        if save_output:
            # Generate output filename
            import os
            base_name = os.path.basename(image_path)
            name, ext = os.path.splitext(base_name)
            output_path = f"{name}_detected{ext}"

            # Save the annotated image
            result.save(filename=output_path)
            print(f"Result saved to: {output_path}")

        # Print detection summary
        if hasattr(result, 'boxes') and result.boxes is not None:
            num_detections = len(result.boxes)
            print(f"\nDetection Summary:")
            print(f"- Found {num_detections} pothole(s)")

            # Print confidence scores for each detection
            if num_detections > 0:
                print("- Confidence scores:")
                for i, box in enumerate(result.boxes):
                    conf = box.conf[0].item()
                    print(f"  Pothole {i+1}: {conf:.2%}")
        else:
            print("No potholes detected.")

        return result

    except Exception as e:
        print(f"Error during detection: {e}")
        return None

def main():
    # Set up argument parser
    parser = argparse.ArgumentParser(description='Detect potholes in images using YOLO')
    parser.add_argument('image', type=str, help='Path to the input image')
    parser.add_argument('--model', '-m', type=str, default='best.pt',
                        help='Path to the model file (default: best.pt)')
    parser.add_argument('--save', '-s', action='store_true',
                        help='Save the output image with detections')
    parser.add_argument('--show', action='store_true',
                        help='Display the result image')
    parser.add_argument('--output', '-o', type=str,
                        help='Custom output filename (default: [input_name]_detected.[ext])')

    args = parser.parse_args()

    # Call the detection function
    detect_pothole(
        image_path=args.image,
        model_path=args.model,
        save_output=args.save or args.output is not None,
        show_result=args.show
    )

if __name__ == "__main__":
    main()
Code Explanation
Function: detect_pothole() This is the core function that handles pothole detection. It takes the following parameters:
image_path: Path to the input image you want to analyze.model_path: Path to the trained model file (best.ptby default).save_output: Boolean flag to save the annotated output image.show_result: Boolean flag to display the result in a window.
The function loads the model using the YOLO() class from the Ultralytics library, runs inference on the provided image, and processes the results. If detections are found, it prints a summary including the number of potholes detected and their confidence scores.
Function: main() This function sets up the command-line interface using Python's argparse module. It defines the following arguments:
image: Required positional argument for the path to the input image.--modelor-m: Optional argument to specify a custom model path (default :best.pt).--saveor-s: Flag to save the output image with detections drawn on it.--show: Flag to display the result image in a pop-up window.--outputor-o: Optional argument to specify a custom output filename.
Running the Detection Script
Note: If you do not want to train the model by yourself, you can simply use the model I already trained (best.pt) along with the pothole_detector.py script. Put them in the same directory.
Basic usage (detect and print results):
python pothole_detector.py path/to/your/image.jpgDetect and save the output image:
python pothole_detector.py path/to/your/image.jpg --saveDetect and display the result:
python pothole_detector.py path/to/your/image.jpg --showUse a custom model:
python pothole_detector.py path/to/your/image.jpg --model pothole_detection/train/weights/best.pt --saveNote: Make sure the best.pt file is in the same directory as the script, or provide the full path using the --model argument.
Results and Evaluation
This section showcases the performance of the trained model on test images. The model was trained for 100 epochs using the YOLOv5s architecture.
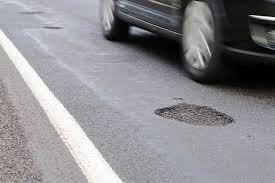
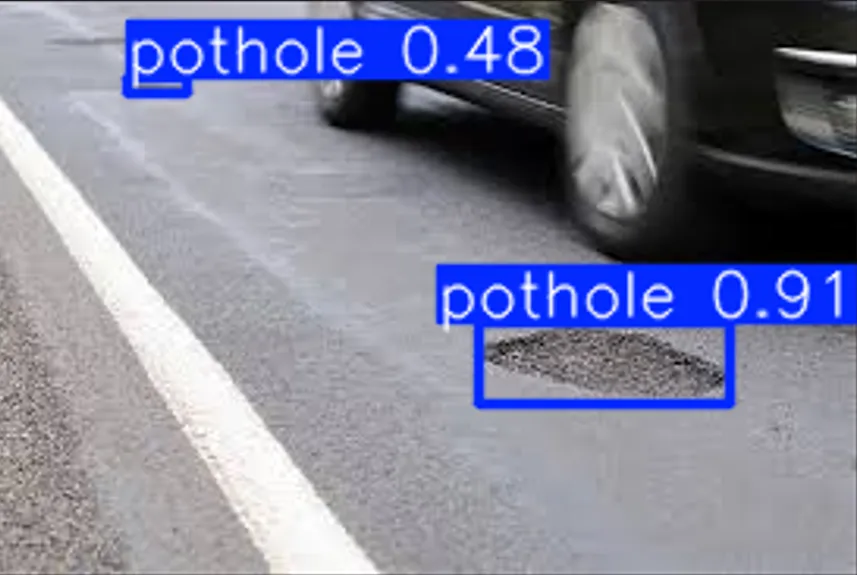
Test 1
Image before Pothole Detection:
After Pothole Detection:
Terminal result:
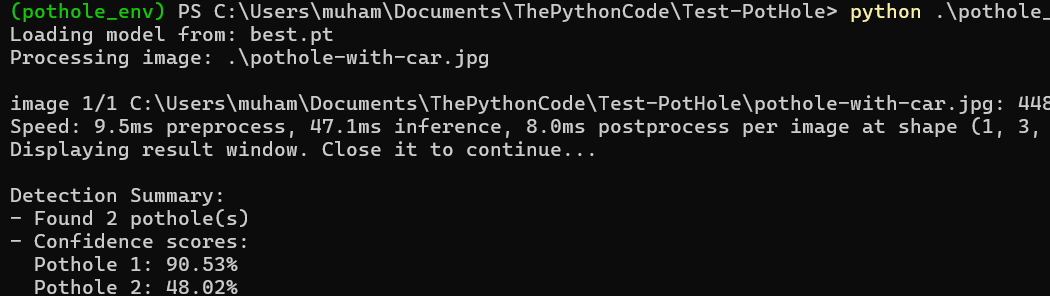
(pothole_env) PS C:\Users\muham\Documents\ThePythonCode\Test-Pothole> python .\pothole_
Loading model from: best.pt
Processing image: .\pothole-with-car.jpg

image 1/1 C:\Users\muham\Documents\ThePythonCode\Test-Pothole\pothole-with-car.jpg: 448
Speed: 9.5ms preprocess, 47.1ms inference, 8.0ms postprocess per image at shape (1, 3,
Displaying result window. Close it to continue...

Detection Summary:
- Found 2 pothole(s)
- Confidence scores:
  Pothole 1: 90.53%
  Pothole 2: 48.02%
We can see that two Potholes were discovered along with their confidence scores.
Test 2
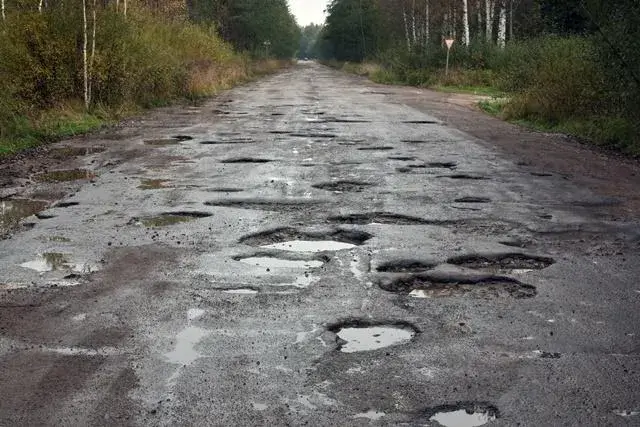
Now, we’ll try with an image that has many potholes to see how the model will perform.
Before Detection:
After Detection:
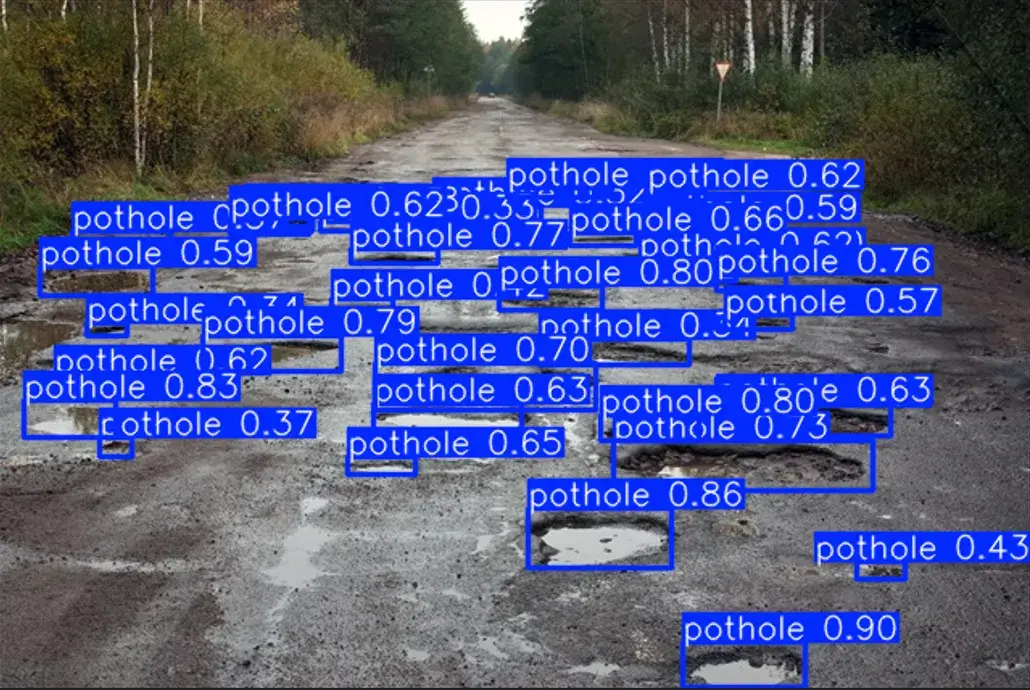 Terminal Result:
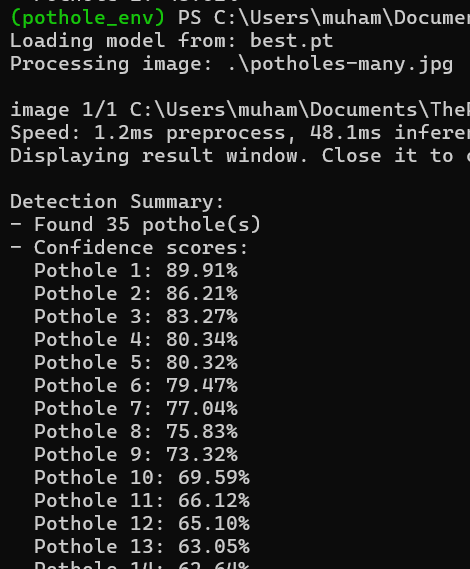
(pothole_env) PS C:\Users\muham\Documents
Loading model from: best.pt
Processing image: .\potholes-many.jpg

image 1/1 C:\Users\muham\Documents\The
Speed: 1.2ms preprocess, 48.1ms inferen
Displaying result window. Close it to

Detection Summary:
- Found 35 pothole(s)
- Confidence scores:
  Pothole 1: 89.91%
  Pothole 2: 86.21%
  Pothole 3: 83.27%
  Pothole 4: 80.34%
  Pothole 5: 80.32%
  Pothole 6: 79.47%
  Pothole 7: 77.04%
  Pothole 8: 75.83%
  Pothole 9: 73.32%
  Pothole 10: 69.59%
  Pothole 11: 66.12%
  Pothole 12: 65.10%
  Pothole 13: 63.05%
  ...
We can see that the model found 35 potholes and ranked them according to their confidence scores.
The results demonstrate that the model can effectively detect potholes in various road conditions, lighting scenarios, and camera angles. The confidence scores indicate how certain the model is about each detection.
Tips and Troubleshooting
Common Issues
Out of Memory Errors If you encounter CUDA out-of-memory errors during training, try reducing the batch size:
BATCH_SIZE = 8 # or even 4 for GPUs with limited memoryTraining Too Slow If training is taking too long, consider:
- Using a smaller model (
yolov5nfor nano, even faster thanyolov5s) - Reducing the number of epochs
- Ensuring your GPU drivers and CUDA toolkit are up to date
Model Not Loading If the detection script can't find the model, check:
- The path to
best.ptis correct - You've completed the training process and the
best.ptfile exists
Improving Model Performance
- More Data: Adding more labeled images, especially from diverse conditions, can significantly improve accuracy.
- Larger Model: Try using
yolov5moryolov5lfor better accuracy at the cost of speed. - Hyperparameter Tuning: Experiment with learning rate, image size, and augmentation settings.
- Longer Training: If the model hasn't converged (loss still decreasing), increase the number of epochs.
Conclusion
Congratulations! You've successfully trained and deployed a pothole detection model using YOLOv5. This project shows the power of deep learning in solving real-world infrastructure problems.
Resources:
- YOLOv5 Documentation: https://docs.ultralytics.com/yolov5/
- Original Dataset: https://public.roboflow.ai/object-detection/pothole
Happy coding!
Ready for more? Dive deeper into coding with our AI-powered Code Explainer. Don't miss it!
View Full Code Transform My Code


Got a coding query or need some guidance before you comment? Check out this Python Code Assistant for expert advice and handy tips. It's like having a coding tutor right in your fingertips!