Kickstart your coding journey with our Python Code Assistant. An AI-powered assistant that's always ready to help. Don't miss out!
Introduction
In this tutorial, we'll walk through the process of creating a Pacman game from scratch using Python and the Pygame library. Pacman is a classic arcade game loved by many, and recreating it can be a fun and educational project to sharpen your programming skills.
Throughout this guide, we'll cover everything you need to know, from setting up the game environment to implementing player controls, enemy behaviors, scoring mechanics, and more. By the end of this tutorial, you'll have a fully functional Pacman game you can play and share with others.
Table of Contents:
- Introduction
- Installation and Setup
- Creating Game Characters
- Creating Game Components
- Making the Game World
- Running the Game
- Conclusion
Installation and Setup
Let's start by making sure Pygame is installed on your computer, head to your terminal and install pygame module using pip.
>> pip install pygameAfter that, create a directory for the game and create the following .py file inside it; settings.py, animation.py, display.py, main.py, pac.py, ghost.py, cell.py, berry.py, and world.py. Here's the assets we're going to use in this game, by the way:
 Now, we can start coding. Let's define our game variables and useful external functions in
 settings.py:
# settings.py
MAP = [
    ['1','1','1','1','1','1','1','1','1','1','1','1','1','1','1','1','1','1','1'],
    ['1',' ',' ',' ',' ',' ',' ',' ',' ',' ',' ',' ',' ',' ',' ',' ',' ',' ','1'],
    ['1','B','1','1',' ','1','1','1',' ','1',' ','1','1','1',' ','1','1','B','1'],
    ['1',' ',' ',' ',' ','1',' ',' ',' ','1',' ',' ',' ','1',' ',' ',' ',' ','1'],
    ['1','1',' ','1',' ','1',' ','1',' ','1',' ','1',' ','1',' ','1',' ','1','1'],
    ['1',' ',' ','1',' ',' ',' ','1',' ',' ',' ','1',' ',' ',' ','1',' ',' ','1'],
    ['1',' ','1','1','1','1',' ','1','1','1','1','1',' ','1','1','1','1',' ','1'],
    ['1',' ',' ',' ',' ',' ',' ',' ',' ','r',' ',' ',' ',' ',' ',' ',' ',' ','1'],
    ['1','1',' ','1','1','1',' ','1','1','-','1','1',' ','1','1','1',' ','1','1'],
    [' ',' ',' ',' ',' ','1',' ','1','s','p','o','1',' ','1',' ',' ',' ',' ',' '],
    ['1','1',' ','1',' ','1',' ','1','1','1','1','1',' ','1',' ','1',' ','1','1'],
    ['1',' ',' ','1',' ',' ',' ',' ',' ',' ',' ',' ',' ',' ',' ','1',' ',' ','1'],
    ['1',' ','1','1','1','1',' ','1','1','1','1','1',' ','1','1','1','1',' ','1'],
    ['1',' ',' ',' ',' ',' ',' ',' ',' ',' ',' ',' ',' ',' ',' ',' ',' ',' ','1'],
    ['1','1','1',' ','1','1','1',' ','1','1','1',' ','1','1','1',' ','1','1','1'],
    ['1',' ',' ',' ','1',' ',' ',' ',' ','P',' ',' ',' ',' ','1',' ',' ',' ','1'],
    ['1','B','1',' ','1',' ','1',' ','1','1','1',' ','1',' ','1',' ','1','B','1'],
    ['1',' ','1',' ',' ',' ','1',' ',' ',' ',' ',' ','1',' ',' ',' ','1',' ','1'],
    ['1',' ','1','1','1',' ','1','1','1',' ','1','1','1',' ','1','1','1',' ','1'],
    ['1',' ',' ',' ',' ',' ',' ',' ',' ',' ',' ',' ',' ',' ',' ',' ',' ',' ','1'],
    ['1','1','1','1','1','1','1','1','1','1','1','1','1','1','1','1','1','1','1']
]
BOARD_RATIO = (len(MAP[0]), len(MAP))
CHAR_SIZE = 32
WIDTH, HEIGHT = (BOARD_RATIO[0] * CHAR_SIZE, BOARD_RATIO[1] * CHAR_SIZE)
NAV_HEIGHT = 64
PLAYER_SPEED = CHAR_SIZE // 4
GHOST_SPEED = 4
Next, let's make a class responsible for accessing the sprites or the images we will use. In animation.py, import the pygame and the walk from the os module. Then, define a function called import_sprites():
# animation.py
from os import walk
import pygame
def import_sprite(path):
    surface_list = []
    for _, __, img_file in walk(path):
        for image in img_file:
            full_path = f"{path}/{image}"
            img_surface = pygame.image.load(full_path).convert_alpha()
            surface_list.append(img_surface)
    return surface_list
The import_sprite() function takes one argument, path, which is the directory path where the sprite images are located. The surface_list is an empty list that will hold the loaded image surfaces.
The os.walk(path) is used to traverse the directory specified by the path and returns a generator that yields a tuple for each directory it visits. We use _ and __ as throwaway variables to denote the current directory path and its subdirectories. img_file is a list of filenames in the current directory.
For each image filename in img_file, the full path to the image file is constructed by combining the path with an image. The pygame.image.load() function is then used to load the image from this full path into an image surface (img_surface). The .convert_alpha() method converts the image to a format that is optimized for display on the screen with per-pixel transparency, then the loaded image surface (img_surface) is then appended to the surface_list.
Let's create another code that will display the game information. In display.py create a class named Display:
# display.py
import pygame
from settings import WIDTH, HEIGHT, CHAR_SIZE
pygame.font.init()

class Display:
    def __init__(self, screen):
        self.screen = screen
        self.font = pygame.font.SysFont("ubuntumono", CHAR_SIZE)
        self.game_over_font = pygame.font.SysFont("dejavusansmono", 48)
        self.text_color = pygame.Color("crimson")

    def show_life(self, life):
        img_path = "assets/life/life.png"
        life_image = pygame.image.load(img_path)
        life_image = pygame.transform.scale(life_image, (CHAR_SIZE, CHAR_SIZE))
        life_x = CHAR_SIZE // 2
        if life != 0:
            for life in range(life):
                self.screen.blit(life_image, (life_x, HEIGHT + (CHAR_SIZE // 2)))
                life_x += CHAR_SIZE

    def show_level(self, level):
        level_x = WIDTH // 3
        level = self.font.render(f'Level {level}', True, self.text_color)
        self.screen.blit(level, (level_x, (HEIGHT + (CHAR_SIZE // 2))))

    def show_score(self, score):
        score_x = WIDTH // 3
        score = self.font.render(f'{score}', True, self.text_color)
        self.screen.blit(score, (score_x * 2, (HEIGHT + (CHAR_SIZE // 2))))

    # add game over message
    def game_over(self):
        message = self.game_over_font.render(f'GAME OVER!!', True, pygame.Color("chartreuse"))
        instruction = self.font.render(f'Press "R" to Restart', True, pygame.Color("aqua"))
        self.screen.blit(message, ((WIDTH // 4), (HEIGHT // 3)))
        self.screen.blit(instruction, ((WIDTH // 4), (HEIGHT // 2)))
The Display class will render on our game screen the info, such as the player's remaining life (show_life), current level (show_level), and the player's current score (show_score).
Creating Game Characters
The Pacman Game has 2 different character types: the 4 ghosts and Pacman itself. For that, we are going to make 2 different classes for both character type:
# ghost.py
import pygame
import random
import time
from settings import WIDTH, CHAR_SIZE, GHOST_SPEED

class Ghost(pygame.sprite.Sprite):
    def __init__(self, row, col, color):
        super().__init__()
        self.abs_x = (row * CHAR_SIZE)
        self.abs_y = (col * CHAR_SIZE)
        self.rect = pygame.Rect(self.abs_x, self.abs_y, CHAR_SIZE, CHAR_SIZE)
        self.move_speed = GHOST_SPEED
        self.color = pygame.Color(color)
        self.move_directions = [(-1,0), (0,-1), (1,0), (0,1)]
        self.moving_dir = "up"
        self.img_path = f'assets/ghosts/{color}/'
        self.img_name = f'{self.moving_dir}.png'
        self.image = pygame.image.load(self.img_path + self.img_name)
        self.image = pygame.transform.scale(self.image, (CHAR_SIZE, CHAR_SIZE))
        self.rect = self.image.get_rect(topleft = (self.abs_x, self.abs_y))
        self.mask = pygame.mask.from_surface(self.image)
        self.directions = {'left': (-self.move_speed, 0), 'right': (self.move_speed, 0), 'up': (0, -self.move_speed), 'down': (0, self.move_speed)}
        self.keys = ['left', 'right', 'up', 'down']
        self.direction = (0, 0)

    def move_to_start_pos(self):
        self.rect.x = self.abs_x
        self.rect.y = self.abs_y

    def is_collide(self, x, y, walls_collide_list):
        tmp_rect = self.rect.move(x, y)
        if tmp_rect.collidelist(walls_collide_list) == -1:
            return False
        return True
In ghost.py, create the Ghost class. The Ghost class in Python uses the Pygame library to create a sprite representing a ghost character in a game.
The constructor (__init__) initializes the ghost with its starting position (row, col) and color (color). abs_x and abs_y store the absolute pixel position of the ghost based on its row and column multiplied by CHAR_SIZE. The rect defines the rectangular area occupied by the ghost on the screen using pygame. Rect. The move_directions is a list of tuples representing possible movement directions (left, up, right, down). The moving_dir initializes the ghost's movement direction as "up". The img_path and img_name specify the path to the ghost's image file (img_name is based on moving_dir). The image loads the ghost's image and scales it to CHAR_SIZE using pygame.image.load() and pygame.transform.scale(). The mask creates a collision mask for the ghost's image using pygame.mask.from_surface().
The move_to_start_pos() set the ghost's position back to its initial coordinates (abs_x, abs_y). The is_collide(x, y, walls_collide_list) checks if the ghost collides with any walls based on a temporary movement (x, y).
Let's add 2 more methods inside our Ghost class for animating and updating the ghost and its position:
# ghost.py
    def _animate(self):
        self.img_name = f'{self.moving_dir}.png'
        self.image = pygame.image.load(self.img_path + self.img_name)
        self.image = pygame.transform.scale(self.image, (CHAR_SIZE, CHAR_SIZE))
        self.rect = self.image.get_rect(topleft=(self.rect.x, self.rect.y))

    def update(self, walls_collide_list):
        # ghost movement
        available_moves = []
        for key in self.keys:
            if not self.is_collide(*self.directions[key], walls_collide_list):
                available_moves.append(key)
        randomizing = False if len(available_moves) <= 2 and self.direction != (0,0) else True
        # 60% chance of randomizing ghost move
        if randomizing and random.randrange( 0,100 ) <= 60:
            self.moving_dir = random.choice(available_moves)
            self.direction = self.directions[self.moving_dir]
        if not self.is_collide(*self.direction, walls_collide_list):
            self.rect.move_ip(self.direction)
        else:
            self.direction = (0,0)
        # teleporting to the other side of the map
        if self.rect.right <= 0:
            self.rect.x = WIDTH
        elif self.rect.left >= WIDTH:
            self.rect.x = 0
        self._animate()
The _animate() updates the ghost's image (image) based on its current movement direction (moving_dir). The update(walls_collide_list) updates the ghost's position and behavior based on collision with walls (walls_collide_list). It checks available movement directions (available_moves) by iterating through self.keys (['left', 'right', 'up', 'down']) and determining if they do not cause a collision. It randomizes the self.moving_dir if available moves are limited or randomly chosen. Then moves the ghost (self.rect.move_ip(self. direction)) if the movement direction is valid. It handles teleportation to the opposite side of the screen if the ghost reaches the screen boundary.
Let's create a pac.py file now:
# pac.py
import pygame
from settings import CHAR_SIZE, PLAYER_SPEED
from animation import import_sprite

class Pac(pygame.sprite.Sprite):
    def __init__(self, row, col):
        super().__init__()
        self.abs_x = (row * CHAR_SIZE)
        self.abs_y = (col * CHAR_SIZE)
        # pac animation
        self._import_character_assets()
        self.frame_index = 0
        self.animation_speed = 0.5
        self.image = self.animations["idle"][self.frame_index]
        self.rect = self.image.get_rect(topleft = (self.abs_x, self.abs_y))
        self.mask = pygame.mask.from_surface(self.image)
        self.pac_speed = PLAYER_SPEED
        self.immune_time = 0
        self.immune = False
        self.directions = {'left': (-PLAYER_SPEED, 0), 'right': (PLAYER_SPEED, 0), 'up': (0, -PLAYER_SPEED), 'down': (0, PLAYER_SPEED)}
        self.keys = {'left': pygame.K_LEFT, 'right': pygame.K_RIGHT, 'up': pygame.K_UP, 'down': pygame.K_DOWN}
        self.direction = (0, 0)
        # pac status
        self.status = "idle"
        self.life = 3
        self.pac_score = 0

    # gets all the image needed for animating specific player action
    def _import_character_assets(self):
        character_path = "assets/pac/"
        self.animations = {
            "up": [],
            "down": [],
            "left": [],
            "right": [],
            "idle": [],
            "power_up": []
        }
        for animation in self.animations.keys():
            full_path = character_path + animation
            self.animations[animation] = import_sprite(full_path)

    def _is_collide(self, x, y):
        tmp_rect = self.rect.move(x, y)
        if tmp_rect.collidelist(self.walls_collide_list) == -1:
            return False
        return True
In pac.py, create another class named Pac. The __init__ initializes the Pacman's position (abs_x, abs_y) based on row and column values, along with animation-related attributes.
The _import_character_assets() load Pacman's animations. The status initializes Pacman's status, which is idle as default, the life count (life), and the score (pac_score).
The _import_character_assets() method imports Pacman's animation sprites from specified directories (assets/pac/) for various actions (up, down, left, right, idle, power_up). The walls_collide_list checks if Pacman collides with walls after a specified movement (x, y).
# pac.py
    def move_to_start_pos(self):
        self.rect.x = self.abs_x
        self.rect.y = self.abs_y

    # update with sprite/sheets
    def animate(self, pressed_key, walls_collide_list):
        animation = self.animations[self.status]
        # loop over frame index
        self.frame_index += self.animation_speed
        if self.frame_index >= len(animation):
            self.frame_index = 0
        image = animation[int(self.frame_index)]
        self.image = pygame.transform.scale(image, (CHAR_SIZE, CHAR_SIZE))
        self.walls_collide_list = walls_collide_list
        for key, key_value in self.keys.items():
            if pressed_key[key_value] and not self._is_collide(*self.directions[key]):
                self.direction = self.directions[key]
                self.status = key if not self.immune else "power_up"
                break
        if not self._is_collide(*self.direction):
            self.rect.move_ip(self.direction)
            self.status = self.status if not self.immune else "power_up"
        if self._is_collide(*self.direction):
            self.status = "idle" if not self.immune else "power_up"

    def update(self):
        # Timer based from FPS count
        self.immune = True if self.immune_time > 0 else False
        self.immune_time -= 1 if self.immune_time > 0 else 0
        self.rect = self.image.get_rect(topleft=(self.rect.x, self.rect.y))
The move_to_start_pos() resets Pacman's position to its initial coordinates. The animate(pressed_key, walls_collide_list) manages Pacman's animation based on pressed keys and collision detection with walls, then updates Pacman's status and position based on movement direction and collisions. In the update() method, the immune manages Pacman's immunity state based on a timer (immune_time) and updates Pacman's position rect based on its image.
Creating Game Components
Now that we have game characters, let's create classes for game components. In this game, we need a Berry class, which represents the game objectives, and a Cell class, which will serve as walls in our game.
Here's our short code for the Berry class:
# berry.py
import pygame
from settings import CHAR_SIZE, PLAYER_SPEED

class Berry(pygame.sprite.Sprite):
    def __init__(self, row, col, size, is_power_up = False):
        super().__init__()
        self.power_up = is_power_up
        self.size = size
        self.color = pygame.Color("violetred")
        self.thickness = size
        self.abs_x = (row * CHAR_SIZE) + (CHAR_SIZE // 2)
        self.abs_y = (col * CHAR_SIZE) + (CHAR_SIZE // 2)
        # temporary rect for colliderect-checking
        self.rect = pygame.Rect(self.abs_x,self.abs_y, self.size * 2, self.size * 2)

    def update(self, screen):
        self.rect = pygame.draw.circle(screen, self.color, (self.abs_x, self.abs_y), self.size, self.thickness)
And here's our short code for the Cell class.
# cell.py
import pygame

class Cell(pygame.sprite.Sprite):
    def __init__(self, row, col, length, width):
        super().__init__()
        self.width = length
        self.height = width
        self.id = (row, col)
        self.abs_x = row * self.width
        self.abs_y = col * self.height
        self.rect = pygame.Rect(self.abs_x,self.abs_y,self.width,self.height)
        self.occupying_piece = None

    def update(self, screen):
        pygame.draw.rect(screen, pygame.Color("blue2"), self.rect)
Making the Game World
Now that we have game characters, components, and certain requirements, we can start connecting and using all of them. In world.py create a class and name it World. This class will serve as the game world.
import pygame
import time
from settings import HEIGHT, WIDTH, NAV_HEIGHT, CHAR_SIZE, MAP, PLAYER_SPEED
from pac import Pac
from cell import Cell
from berry import Berry
from ghost import Ghost
from display import Display

class World:
    def __init__(self, screen):
        self.screen = screen
        self.player = pygame.sprite.GroupSingle()
        self.ghosts = pygame.sprite.Group()
        self.walls = pygame.sprite.Group()
        self.berries = pygame.sprite.Group()
        self.display = Display(self.screen)
        self.game_over = False
        self.reset_pos = False
        self.player_score = 0
        self.game_level = 1
        self._generate_world()
The World class initializes the game world with the provided Pygame screen (screen). Then, it creates sprite groups (player, ghosts, walls, berries) to manage game entities. The self.display will be instantiated to Display object/s for rendering game information on the screen. Then it calls _generate_world() to populate the game world with entities based on a predefined map (MAP).
Now, let's add more methods for making our game world, making new levels, and restarting the game:
    # create and add player to the screen
    def _generate_world(self):
        # renders obstacle from the MAP table
        for y_index, col in enumerate(MAP):
            for x_index, char in enumerate(col):
                if char == "1":	# for walls
                    self.walls.add(Cell(x_index, y_index, CHAR_SIZE, CHAR_SIZE))
                elif char == " ":	 # for paths to be filled with berries
                    self.berries.add(Berry(x_index, y_index, CHAR_SIZE // 4))
                elif char == "B":	# for big berries
                    self.berries.add(Berry(x_index, y_index, CHAR_SIZE // 2, is_power_up=True))
                # for Ghosts's starting position
                elif char == "s":
                    self.ghosts.add(Ghost(x_index, y_index, "skyblue"))
                elif char == "p":
                    self.ghosts.add(Ghost(x_index, y_index, "pink"))
                elif char == "o":
                    self.ghosts.add(Ghost(x_index, y_index, "orange"))
                elif char == "r":
                    self.ghosts.add(Ghost(x_index, y_index, "red"))

                elif char == "P":	# for PacMan's starting position
                    self.player.add(Pac(x_index, y_index))

        self.walls_collide_list = [wall.rect for wall in self.walls.sprites()]
    def generate_new_level(self):
        for y_index, col in enumerate(MAP):
            for x_index, char in enumerate(col):
                if char == " ":	 # for paths to be filled with berries
                    self.berries.add(Berry(x_index, y_index, CHAR_SIZE // 4))
                elif char == "B":	# for big berries
                    self.berries.add(Berry(x_index, y_index, CHAR_SIZE // 2, is_power_up=True))
        time.sleep(2)

    def restart_level(self):
        self.berries.empty()
        [ghost.move_to_start_pos() for ghost in self.ghosts.sprites()]
        self.game_level = 1
        self.player.sprite.pac_score = 0
        self.player.sprite.life = 3
        self.player.sprite.move_to_start_pos()
        self.player.sprite.direction = (0, 0)
        self.player.sprite.status = "idle"
        self.generate_new_level()
The _generate_world() populates the game world based on a predefined map (MAP). It adds walls, small berries, large berries (with power-up), ghosts, and the player (Pacman) to their respective sprite groups (walls, berries, ghosts, player) based on characters in MAP. The walls_collide_list creates a list containing rectangles of wall sprites for collision detection.
The generate_new_level() regenerates berries (small and large with power-up) on the map to create a new game level. It pauses the game briefly to allow for a smooth transition to the new level.
The restart_level() resets the current game level to its initial state after the player loses a life or restarts the game. It removes all berries from the level and adds new ones, resets ghost positions, and resets player attributes (score, life, position, status).
Now, let's also add a method called _dashboard, which will be responsible for rendering the game information on the screen.
    # displays nav
    def _dashboard(self):
        nav = pygame.Rect(0, HEIGHT, WIDTH, NAV_HEIGHT)
        pygame.draw.rect(self.screen, pygame.Color("cornsilk4"), nav)

        self.display.show_life(self.player.sprite.life)
        self.display.show_level(self.game_level)
        self.display.show_score(self.player.sprite.pac_score)
Add another method to the World class, and name it _check_game_state:
    def _check_game_state(self):
        # checks if game over
        if self.player.sprite.life == 0:
            self.game_over = True
        # generates new level
        if len(self.berries) == 0 and self.player.sprite.life > 0:
            self.game_level += 1
            for ghost in self.ghosts.sprites():
                ghost.move_speed += self.game_level
                ghost.move_to_start_pos()
            self.player.sprite.move_to_start_pos()
            self.player.sprite.direction = (0, 0)
            self.player.sprite.status = "idle"
            self.generate_new_level()
The _check_game_state method verifies if the player's remaining lives (self.player.sprite.life) have reached zero. If the player has no remaining lives (life == 0), set self.game_over to True, indicating that the game is over. If all berries (len(self.berries) == 0) have been collected and the player still has lives remaining (self.player.sprite.life > 0), increments the game_level by one (self.game_level += 1), indicating progression to the next level. The movement speed of ghosts increases (ghost.move_speed) based on the current game level and resets the positions of ghosts and the player to their starting positions (move_to_start_pos()). It generates a new level by regenerating berries using generate_new_level().
And for the final method for our World class, let's create the update method. The update method manages player movement and interactions with game objects.
    def update(self):
        if not self.game_over:
            # player movement
            pressed_key = pygame.key.get_pressed()
            self.player.sprite.animate(pressed_key, self.walls_collide_list)
            # teleporting to the other side of the map
            if self.player.sprite.rect.right <= 0:
                self.player.sprite.rect.x = WIDTH
            elif self.player.sprite.rect.left >= WIDTH:
                self.player.sprite.rect.x = 0
            # PacMan eating-berry effect
            for berry in self.berries.sprites():
                if self.player.sprite.rect.colliderect(berry.rect):
                    if berry.power_up:
                        self.player.sprite.immune_time = 150 # Timer based from FPS count
                        self.player.sprite.pac_score += 50
                    else:
                        self.player.sprite.pac_score += 10
                    berry.kill()
            # PacMan bumping into ghosts
            for ghost in self.ghosts.sprites():
                if self.player.sprite.rect.colliderect(ghost.rect):
                    if not self.player.sprite.immune:
                        time.sleep(2)
                        self.player.sprite.life -= 1
                        self.reset_pos = True
                        break
                    else:
                        ghost.move_to_start_pos()
                        self.player.sprite.pac_score += 100
        self._check_game_state()
        # rendering
        [wall.update(self.screen) for wall in self.walls.sprites()]
        [berry.update(self.screen) for berry in self.berries.sprites()]
        [ghost.update(self.walls_collide_list) for ghost in self.ghosts.sprites()]
        self.ghosts.draw(self.screen)
        self.player.update()
        self.player.draw(self.screen)
        self.display.game_over() if self.game_over else None
        self._dashboard()
        # reset Pac and Ghosts position after PacMan get captured
        if self.reset_pos and not self.game_over:
            [ghost.move_to_start_pos() for ghost in self.ghosts.sprites()]
            self.player.sprite.move_to_start_pos()
            self.player.sprite.status = "idle"
            self.player.sprite.direction = (0,0)
            self.reset_pos = False
        # for restart button
        if self.game_over:
            pressed_key = pygame.key.get_pressed()
            if pressed_key[pygame.K_r]:
                self.game_over = False
                self.restart_level()
It checks to ensure the player sprite remains within the screen boundaries, teleporting the player to the opposite side if they reach the left or right edges for a wrap-around effect (self.player.sprite.rect.right <= 0 or self.player.sprite.rect.left >= WIDTH).
During each update cycle, the method also detects interactions between the player sprite and berry sprites (self.berries.sprites()). If a collision occurs (self.player.sprite.rect.colliderect(berry.rect)), the player's score (pac_score) is updated based on the berry type (small or large with power-up), and the berry sprite is removed from the berries group using berry.kill().
Similarly, collisions between the player sprite and ghost sprites (self.ghosts.sprites()) are monitored. It handles these interactions based on the player's immunity state (self.player.sprite.immune). If the player is not immune, their life count (self.player.sprite.life) is reduced, triggering a respawn (self.reset_pos = True). If immune, the ghost's position resets, and the player's score increases.
To manage game state transitions, the update method calls _check_game_state() to determine if the game is over or if the level has been completed based on player actions. Rendering updates are then performed by iterating and updating wall sprites, berry sprites, and ghost sprites on the game screen.
The method also updates and draws the player sprite (self.player) on the screen.
Lastly, the update method handles user interface updates by displaying a game over the message (self.display.game_over()) when the game ends and updating the dashboard (_dashboard()) to show critical game information such as score, remaining lives, and level. If the game is over and the player presses the restart key (pygame.K_r), the game state is reset by restarting the game level (self.restart_level()).
Running the Game
To run our game, let's create our last class, which is the Main class. This class simply runs the game.
import pygame, sys
from settings import WIDTH, HEIGHT, NAV_HEIGHT
from world import World
pygame.init()
screen = pygame.display.set_mode((WIDTH, HEIGHT + NAV_HEIGHT))
pygame.display.set_caption("PacMan")
class Main:
def __init__(self, screen):
self.screen = screen
self.FPS = pygame.time.Clock()
def main(self):
world = World(self.screen)
while True:
self.screen.fill("black")
for event in pygame.event.get():
if event.type == pygame.QUIT:
pygame.quit()
sys.exit()
world.update()
pygame.display.update()
self.FPS.tick(30)
if __name__ == "__main__":
play = Main(screen)
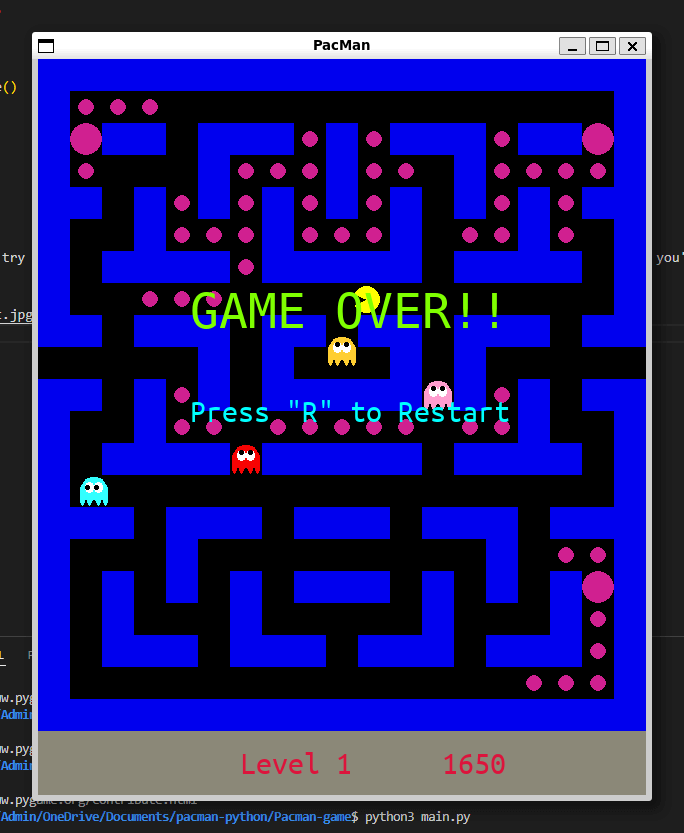
play.main()And now, we are done coding!! To try our game, simply run python main.py or python3 main.py on yout terminal once you're inside our project directory. Here are some game snapshots:


Conclusion
In conclusion, creating a Pacman game in Python is not only a rewarding project but also a great way to explore game development concepts and enhance your programming abilities. Through this tutorial, you've learned how to use Python and Pygame to build a game that captures the essence of the classic Pacman experience. By implementing player controls, enemy AI, collision detection, and scoring mechanics, you've gained practical insights into game development techniques that can be applied to other projects.
You can check the complete code here.
Here are some relevant game development tutorials:
- How to Build a Sudoku Game with Python
- How to Create a Space Invaders Game in Python
- How to Create a Pong Game in Python
- How to Create a Platformer Game in Python
- How to Make a Snake Game in Python
- How to Make a Chess Game with Pygame in Python
Happy coding ♥
Save time and energy with our Python Code Generator. Why start from scratch when you can generate? Give it a try!
View Full Code Create Code for Me


Got a coding query or need some guidance before you comment? Check out this Python Code Assistant for expert advice and handy tips. It's like having a coding tutor right in your fingertips!