Step up your coding game with AI-powered Code Explainer. Get insights like never before!
Platformer games have been a beloved genre for decades, offering exciting challenges and nostalgic gameplay. In this tutorial, we will guide you through the process of building your very own platformer game using the PyGame library in Python.
Whether you’re a beginner looking to dive into game development or an experienced programmer wanting to explore Pygame, this tutorial will provide you with the knowledge and skills needed to bring your platformer game ideas to life.
Throughout this tutorial, we will cover the essential components of a platformer game, including:
- Installation and Setup
- Adding Basic Game Components
- The Game Loop
- The Game World
- World Components: Tile Blocks, Goal and Traps
- Adding Player
- Applying the Game Objectives
- Conclusion
We’ll guide you through the step-by-step process, explaining the code and concepts behind each feature.
By the end of this tutorial, you’ll have a game that you can proudly share with others and further customize to your liking. So, without further ado, let’s get started.
Installations and Setups
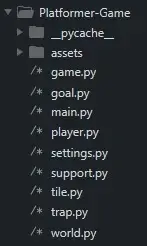
To set up a development environment for a Pygame project called "Platformer-Game", perform the following steps:
- Ensure Python and Pygame are installed on your device. You can download both from their official websites or install them using the commands
pip install pygamefor Pygame andsudo apt install pythonfor Linux and Mac. - Create a game directory named
Platformer-Game. - Within this directory, create the Python files required for the game development:
game.py,goal.py,main.py,player.py,settings.py,support.py,tile.py,trap.py, andworld.py.
Now the next thing we need is the game assets, which are the media files we’re gonna use for the game animation. In this game, we’re gonna use pictures for animation of goal points, lives (heart), the player character (for running, jumping, falling, idle, and for winning/losing state), terrain (for background and terrain blocks), and game trap. Here is the file structure for our game assets:
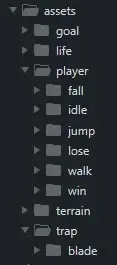
And then, here’s our file structure inside the game directory:
Each of the sub-folder (such as goal, life, fall, idle, etc.) on the picture above will contain sprite sheets or a series of pictures for a specific animation. For the game assets of the game, you can use my game assets by downloading them here.
Adding Basic Game Components
Now that we have the packages and files needed for the game, we can start coding. Let’s first add basic configurations in settings.py that we need for the game, such as the WIDTH and HEIGHT of the game window, and the tile_size or the size of blocks and other objects in the game. We also configure in world_map the map or the game obstacle of the game world.
With this map, you can customize and create different world obstacles by using the same legends we have below. If you are confused, here’s the definition of each character: a. " " - blank b. "X" - blocks c. "s" - saw/blades (traps) d. "P" - Player e. "G" - Goal/point to reach in order to finish the game quest:
# settings.py
world_map = [
    '                                                                  ',
    '                                                                  ',
    '                t  t                                              ',
    '        X     XXXXXXXXXs                   XX   X                 ',
    ' tXXXt     XX         XX                XXXX tt XX                ',
    ' XX XX                                      XXXXX                 ',
    '          Xt    t           t  t   X                            G ',
    '        XXXXXX  XXXXs    XXXXXXXXXXX  XX              tt t     XXX',
    ' P   XX  X XX X  X XXXt     X XX  XX  XXX  XXXXXXXXs  XXXXXX      ',
    'XXXXXXX  X  X X  X  XXXXXXXXX XX  XX  XXX  XX XX XXXXXXX  X       ',
]

tile_size = 50
WIDTH, HEIGHT = 1000, len(world_map) * tile_size
Let’s also create a function for loading the sprites or sprite sheets for animating the objects in our game. In support.py, create a function and call it import_sprite():
# support.py
from os import walk
import pygame

def import_sprite(path):
    surface_list = []
    for _, __, img_file in walk(path):
        for image in img_file:
            full_path = f"{path}/{image}"
            img_surface = pygame.image.load(full_path).convert_alpha()
            surface_list.append(img_surface)
    return surface_list
The import_sprite() function loads all the images in a directory and returns a list of surfaces from the given directory which can be used for drawing and animating the game’s graphics.
The function uses the os.walk() function to iterate over the files in the specified directory. For each file, it creates a full path by concatenating the directory path and the file name. Next, the code loads the image using pygame.image.load() and converts it to an alpha surface using convert_alpha(). The resulting surface is then appended to the surface_list. This process is repeated for each file in the directory. Once all the surfaces have been imported, the surface_list is returned from the function.
The Game Loop
Let’s create our first class in main.py and name it the Platformer class. The Platformer class is responsible for running the game, managing the game loop, handling events, and updating the game world:
# main.py
import pygame, sys
from settings import *
from world import World

pygame.init()

screen = pygame.display.set_mode((WIDTH, HEIGHT))
pygame.display.set_caption("Platformer")

class Platformer:
    def __init__(self, screen, width, height):
        self.screen = screen
        self.clock = pygame.time.Clock()
        self.player_event = False
        self.bg_img = pygame.image.load('assets/terrain/bg.jpg')
        self.bg_img = pygame.transform.scale(self.bg_img, (width, height))

    def main(self):
        world = World(world_map, self.screen)
        while True:
            self.screen.blit(self.bg_img, (0, 0))
            for event in pygame.event.get():
                if event.type == pygame.QUIT:
                    pygame.quit()
                    sys.exit()
                elif event.type == pygame.KEYDOWN:
                    if event.key == pygame.K_LEFT:
                        self.player_event = "left"
                    if event.key == pygame.K_RIGHT:
                        self.player_event = "right"
                    if event.key == pygame.K_SPACE:
                        self.player_event = "space"
                elif event.type == pygame.KEYUP:
                    self.player_event = False
            world.update(self.player_event)
            pygame.display.update()
            self.clock.tick(60)

if __name__ == "__main__":
    play = Platformer(screen, WIDTH, HEIGHT)
    play.main()
A Pygame window is created using the pygame.display.set_mode() function, with the dimensions specified by the WIDTH and HEIGHT constants and set the caption of the window to "Platformer" using pygame.display.set_caption().
Next, The Platformer class has an __init__() method that initializes various attributes and also loads and scales a background image from the "assets/terrain/bg.jpg" file.
The main() method is where the game loop resides. It creates an instance of the World class, passing the world_map and screen as parameters. The game loop runs indefinitely until the window is closed.
Within the game loop, the background image is drawn onto the screen using screen.blit(). The loop then iterates through the events obtained from pygame.event.get(). For KEYDOWN events, the code checks which key was pressed. If it’s the left arrow key, the player_event is set to "left". If it’s the right arrow key, the player_event is set to "right". If it’s the space key, the player_event is set to "space". For KEYUP events, the player_event is set to False, stopping the current event.
The world.update() method is then called with the current player_event value, allowing the game world to update based on player input. After that, the screen is updated with pygame.display.update() to draw the changes, and the game clock is ticked with self.clock.tick(60) to regulate the frame rate to 60 FPS.
The Game World
Next, we are creating the World class we imported and used in the Main class earlier. The World class is responsible for creating and managing the game world and the game objects and it also handles the interactions of the game objects with the player:
# world.py
import pygame
from settings import tile_size, WIDTH
from tile import Tile
from trap import Trap
from goal import Goal
from player import Player
from game import Game

class World:
    def __init__(self, world_data, screen):
        self.screen = screen
        self.world_data = world_data
        self._setup_world(world_data)
        self.world_shift = 0
        self.current_x = 0
        self.gravity = 0.7
        self.game = Game(self.screen)
We start by importing things we’re gonna use for the game. We create the Tile, Trap, Goal, Player, and Game classes shortly soon. In the World class, we take world_data and screen as an argument. The world_data will be the world_map we created earlier in settings.py and the screen is our game window, so we can directly draw the animations in the game window. The world_shift and the current_x variables are for scrolling the background, to allow the player to walk continuously without getting out of sight in the game screen. The gravity contains the intensity of the downforce pull and game contains the rules and objectives of the game.
World Setup
Now let’s add a new function that creates the whole obstacle out of the world_data, let’s name our new function _setup_world():
# world.py
    # generates the world
    def _setup_world(self, layout):
        self.tiles = pygame.sprite.Group()
        self.traps = pygame.sprite.Group()
        self.player = pygame.sprite.GroupSingle()
        self.goal = pygame.sprite.GroupSingle()
        for row_index, row in enumerate(layout):
            for col_index, cell in enumerate(row):
                x, y = col_index * tile_size, row_index * tile_size
                if cell == "X":
                    tile = Tile((x, y), tile_size)
                    self.tiles.add(tile)
                elif cell == "t":
                    tile = Trap((x + (tile_size // 4), y + (tile_size // 4)), tile_size // 2)
                    self.traps.add(tile)
                elif cell == "P":
                    player_sprite = Player((x, y))
                    self.player.add(player_sprite)
                elif cell == "G":
                    goal_sprite = Goal((x, y), tile_size)
                    self.goal.add(goal_sprite)
The _setup_world() method is a helper function called within the __init__() method to configure the game world based on the provided layout parameter. The method initializes several sprite groups, including tiles, traps, player, and goal, which will hold instances of different game objects.
Next, the method iterates over the provided layout to traverse each row and column. For each cell in the layout, specific actions are taken based on its value. If the cell is "X", a Tile instance is created at the corresponding position and added to the tiles sprite group. If the cell is "s", a Trap instance is created and added to the traps sprite group. If the cell is "P", a Player instance is created and added to the player sprite group. Finally, if the cell is "G", a Goal instance is created and added to the goal sprite group.
Adding World Features
Let’s add another two functions inside the World class, one for handling the world scroll while the player is walking and one for adding game gravity:
# world.py
    # world scroll when the player is walking towards left/right
    def _scroll_x(self):
        player = self.player.sprite
        player_x = player.rect.centerx
        direction_x = player.direction.x
        if player_x < WIDTH // 3 and direction_x < 0:
            self.world_shift = 8
            player.speed = 0
        elif player_x > WIDTH - (WIDTH // 3) and direction_x > 0:
            self.world_shift = -8
            player.speed = 0
        else:
            self.world_shift = 0
            player.speed = 3
    # add gravity for player to fall
    def _apply_gravity(self, player):
        player.direction.y += self.gravity
        player.rect.y += player.direction.y
The _scroll_x() method is responsible for controlling the horizontal scrolling of the game world based on the player’s position and direction. To determine if scrolling is necessary, the method checks the player’s position relative to the screen width (WIDTH). If the player is on the left side of the screen (player_x < WIDTH // 3) and moving toward the left (direction_x < 0), the world_shift attribute is set to a positive value (8). Additionally, the player’s speed is set to 0, effectively pausing their movement. Similarly, if the player is on the right side of the screen (player_x > WIDTH - (WIDTH // 3)) and moving toward the right (direction_x > 0), the world_shift attribute is set to a negative value (-8). This results in the game world shifting in the opposite direction, giving the impression of the player moving forward. Again, the player’s speed is set to 0 to halt their movement. In all other cases, where the player is within the middle section of the screen, neither scrolling nor speed adjustments occur. The world_shift attribute is set to 0, indicating no horizontal shift, and the player’s speed is set to 3, allowing them to move freely within the game world.
Moving on to the _apply_gravity() method, its purpose is to apply gravity to the player's sprite. The player’s direction.y attribute is increased by the gravity value (self.gravity), causing the player to gradually fall downward. Additionally, the player’s rect.y attribute is updated by adding the value of player.direction.y, ensuring the player’s visual representation reflects the change in their position caused by gravity.
Moving and Handling Collisions
Collisions are important in this game because they enable interactions between game objects, such as the player character and obstacles or enemies. They ensure proper gameplay mechanics, allowing for obstacle avoidance, enemy interactions, and accurate detection of game progression or failure. Let’s start by creating a function that handles collision horizontally:
# world.py
    # prevents player to pass through objects horizontally
    def _horizontal_movement_collision(self):
        player = self.player.sprite
        player.rect.x += player.direction.x * player.speed
        for sprite in self.tiles.sprites():
            if sprite.rect.colliderect(player.rect):
                # checks if moving towards left
                if player.direction.x < 0:
                    player.rect.left = sprite.rect.right
                    player.on_left = True
                    self.current_x = player.rect.left
                # checks if moving towards right
                elif player.direction.x > 0:
                    player.rect.right = sprite.rect.left
                    player.on_right = True
                    self.current_x = player.rect.right
        if player.on_left and (player.rect.left < self.current_x or player.direction.x >= 0):
            player.on_left = False
        if player.on_right and (player.rect.right > self.current_x or player.direction.x <= 0):
            player.on_right = False
The _horizontal_movement_collision() method handles collisions between the player and tiles in the game world when moving horizontally. The player’s position is updated horizontally based on their direction (player.direction.x) and speed (player.speed).
Next, a loop iterates over the tiles sprite group, which contains tile objects representing the game environment. For each sprite (tile) in the group, the method checks if its rectangle (sprite.rect) intersects with the player’s rectangle (player.rect) using the colliderect() method.
If a collision is detected, the method determines the direction of the player’s movement. If the player is moving toward the left (player.direction.x < 0), their left side is aligned with the right side of the tile (player.rect.left = sprite.rect.right). Additionally, a flag (player.on_left) is set to indicate that the player is touching a tile on their left side, and the current_x position is updated accordingly. Similarly, if the player is moving toward the right (player.direction.x > 0), their right side is aligned with the left side of the tile (player.rect.right = sprite.rect.left). The player.on_right flag is set, and the current_x position is updated.
After handling the collisions, there are additional checks to update the player.on_left and player.on_right flags. If the player was previously on the left side of a tile (player.on_left is True), but their current position is no longer to the left of the current_x position or their movement direction is not towards the left, the player.on_left flag is set to False. The same applies to updating the player.on_right flag.
Next, let’s add another function for handling collisions vertically. Below the function for horizontal collisions, let’s create another function and let’s name it _vertical_movement_collision():
# world.py
    # prevents player to pass through objects vertically
    def _vertical_movement_collision(self):
        player = self.player.sprite
        self._apply_gravity(player)
        for sprite in self.tiles.sprites():
            if sprite.rect.colliderect(player.rect):
                # checks if moving towards bottom
                if player.direction.y > 0:
                    player.rect.bottom = sprite.rect.top
                    player.direction.y = 0
                    player.on_ground = True
                # checks if moving towards up
                elif player.direction.y < 0:
                    player.rect.top = sprite.rect.bottom
                    player.direction.y = 0
                    player.on_ceiling = True
        if player.on_ground and player.direction.y < 0 or player.direction.y > 1:
            player.on_ground = False
        if player.on_ceiling and player.direction.y > 0:
            player.on_ceiling = False
The _vertical_movement_collision() method handles collisions between the player and tiles in the game world when moving vertically, it is the same as the previous method.
Handling World Traps
Add another method to the World class and call it _handle_traps(), this function will be responsible for giving the consequences of running through or simply touching the traps:
# world.py
    # add consequences when player run through traps
    def _handle_traps(self):
        player = self.player.sprite
        for sprite in self.traps.sprites():
            if sprite.rect.colliderect(player.rect):
                if player.direction.x < 0 or player.direction.y > 0:
                    player.rect.x += tile_size
                elif player.direction.x > 0 or player.direction.y > 0:
                    player.rect.x -= tile_size
                player.life -= 1
The method begins by iterating over the traps sprite group, which contains trap objects in the game environment. For each sprite (trap) in the group, the method checks if its rectangle (sprite.rect) intersects with the player’s rectangle (player.rect) using the colliderect() method.
If a collision is detected, the method checks the direction of the player’s movement. If the player is moving towards the left (player.direction.x < 0) or downwards (player.direction.y > 0), their position is adjusted to move them to the right by one tile’s width (player.rect.x += tile_size). This prevents the player from continuously colliding with the trap and potentially getting stuck. And similarly, for the right direction. This adjustment helps avoid continuous collisions and potential issues.
After the position adjustment, the player’s life is decreased by 1 (player.life -= 1). This represents a penalty or damage inflicted by the trap, reducing the player’s life or health.
Updating the World Changes
Now we have all the changes and actions ready on the line, it’s about time to add a method that updates the whole game world from the changes the user committed:
# world.py
    # updating the game world from all changes committed
    def update(self, player_event):
        # for tile
        self.tiles.update(self.world_shift)
        self.tiles.draw(self.screen)
        # for trap
        self.traps.update(self.world_shift)
        self.traps.draw(self.screen)
        # for goal
        self.goal.update(self.world_shift)
        self.goal.draw(self.screen)
        self._scroll_x()
        # for player
        self._horizontal_movement_collision()
        self._vertical_movement_collision()
        self._handle_traps()
        self.player.update(player_event)
        self.game.show_life(self.player.sprite)
        self.player.draw(self.screen)
        self.game.game_state(self.player.sprite, self.goal.sprite)
The _handle_traps() method is invoked to detect and respond to collisions between the player and trap objects. It adjusts the player’s position and applies penalties or damage as necessary.
The player’s update() method is called that handles the player’s movement and animation based on the provided input. The show_life() method of the Game class is called to display the player’s remaining life or health on the screen, using the player sprite as a reference. The player sprite is drawn on the screen to display it visually in the game world.
Finally, the self.game.game_state() method is called to determine and handle the current game state based on the player’s position and interaction with the goal object.
World Components: Tile Blocks, Goal and Traps
The World class handles the game world perfectly. Now let’s create some more classes for every game object we have in the game.
Let’s create the Tile class in tile.py for the representation of game blocks:
# tile.py
import pygame

class Tile(pygame.sprite.Sprite):
    def __init__(self, pos, size):
        super().__init__()
        img_path = 'assets/terrain/stone.jpg'
        self.image = pygame.image.load(img_path)
        self.image = pygame.transform.scale(self.image, (size, size))
        self.rect = self.image.get_rect(topleft=pos)

    # update object position due to world scroll
    def update(self, x_shift):
        self.rect.x += x_shift
The Tile class has an __init__() method that takes in two parameters: pos (position) and size (size of the tile). We define the image path for the tile as 'assets/terrain/stone.jpg'. The image for the tile is loaded using pygame.image.load() and assigned to the image attribute. The loaded image is scaled to the specified size using pygame.transform.scale() and stored as the new value of the image attribute.
The Tile.rect attribute is set to the rectangle bounding the image using get_rect() with the topleft parameter set to pos.
The update() method is defined to handle the updating of the tile’s position when the world scrolls.
Let’s create another class for the game object, in goal.py create a new class named Goal.
# goal.py
import pygame

class Goal(pygame.sprite.Sprite):
    def __init__(self, pos, size):
        super().__init__()
        img_path = 'assets/goal/gate.png'
        self.image = pygame.image.load(img_path)
        self.image = pygame.transform.scale(self.image, (size, size))
        self.rect = self.image.get_rect(topleft = pos)

    # update object position due to world scroll
    def update(self, x_shift):
        self.rect.x += x_shift
As you notice, our code with the Tile class and Goal class is similar and the image is the only different thing they possess, it is because they act similarly in the game.
Create another game object class in trap.py and name it Trap class. This class is responsible for animating and handling the game traps:
# trap.py
import pygame
from support import import_sprite

class Trap(pygame.sprite.Sprite):
    def __init__(self, pos, size):
        super().__init__()
        self.blade_img = import_sprite("assets/trap/blade")
        self.frame_index = 0
        self.animation_delay = 3
        self.image = self.blade_img[self.frame_index]
        self.image = pygame.transform.scale(self.image, (size, size))
        self.mask = pygame.mask.from_surface(self.image)
        self.rect = self.image.get_rect(topleft = pos)

    # adds the spinning effect to the Blade trap
    def _animate(self):
        sprites = self.blade_img
        sprite_index = (self.frame_index // self.animation_delay) % len(sprites)
        self.image = sprites[sprite_index]
        self.frame_index += 1
        self.rect = self.image.get_rect(topleft=(self.rect.x, self.rect.y))
        self.mask = pygame.mask.from_surface(self.image)
        if self.frame_index // self.animation_delay > len(sprites):
            self.frame_index = 0

    # update object position due to world scroll
    def update(self, x_shift):
        self._animate()
        self.rect.x += x_shift
The code of our Trap class is similar to the Block class and Goal class, except it has an _animate() method. As you remember from the beginning, we create the import_sprite() function which imports all the image files in a directory and returns all of them as a list of image surfaces, and we’re going to use it to load all the images inside the assets/trap/blade directory.
The _animate() method is defined to add a spinning effect to the blade trap. It cycles through the sprite images in blade_img based on the frame_index and updates the image, rect, and mask attributes accordingly. If the animation has completed a full cycle, the frame_index is reset to 0.
Adding Player
Now that our game world has objects the player character can interact with, we can start now adding the player character to our game, in player.py create a new class named Player which is a subclass of pygame.sprite.Sprite that represents the player character in the game world:
# player.py
import pygame
from support import import_sprite

class Player(pygame.sprite.Sprite):
    def __init__(self, pos):
        super().__init__()
        self._import_character_assets()
        self.frame_index = 0
        self.animation_speed = 0.15
        self.image = self.animations["idle"][self.frame_index]
        self.rect = self.image.get_rect(topleft=pos)
        self.mask = pygame.mask.from_surface(self.image)
        # player movement
        self.direction = pygame.math.Vector2(0, 0)
        self.speed = 5
        self.jump_move = -16
        # player status
        self.life = 5
        self.game_over = False
        self.win = False
        self.status = "idle"
        self.facing_right = True
        self.on_ground = False
        self.on_ceiling = False
        self.on_left = False
        self.on_right = False

    # gets all the image needed for animating specific player action
    def _import_character_assets(self):
        character_path = "assets/player/"
        self.animations = {"idle": [], "walk": [],
            "jump": [], "fall": [], "lose": [], "win": []}
        for animation in self.animations.keys():
            full_path = character_path + animation
            self.animations[animation] = import_sprite(full_path)
Within the __init__() method; The _import_character_assets method is called to import and store the sprite images for the player’s animations from different directories based on the animation type. The frame_index attribute is initialized to 0, representing the current frame of the animation. The animation_speed attribute is set to 0.15, indicating the time between each animation frame change. The self.image attribute is assigned the initial image from the "idle" animation in the animations dictionary based on the frame_index. The rect attribute is set to the rectangle bounding the image using get_rect() with the topleft parameter set to the provided pos. The mask attribute is created using pygame.mask.from_surface to define the pixel-level collision detection for the player.
The Player class also defines various attributes for player movement and status. The direction attribute is a pygame.math.Vector2 object representing the player’s movement direction. The speed attribute is set to 5, indicating the player’s movement speed. The jump_move attribute is set to -16, representing the vertical movement when the player jumps. The life attribute is set to 5, indicating the player’s remaining life or health. The game_over attribute is initially set to False, representing whether the game is over or not. The win attribute is initially set to False also, indicating whether the player has achieved victory. The status attribute is set to "idle", representing the current animation status of the player. The facing_right attribute is initially set to True, indicating the player is facing right. The on_ground, on_ceiling, on_left, and on_right attributes are initially set to False, representing the player’s contact with the ground, ceiling, left side, and right side, respectively.
Animating the Player
For each activity the player is doing, whether walking, jumping, or just simply standing, we have plenty of animation for every activity or action the player does. Same as how we animate the blade in the Trap class, we’ll use similar logic to render and animate our player character to the game:
# player.py
    # animates the player actions
    def _animate(self):
        animation = self.animations[self.status]
        # loop over frame index
        self.frame_index += self.animation_speed
        if self.frame_index >= len(animation):
            self.frame_index = 0
        image = animation[int(self.frame_index)]
        image = pygame.transform.scale(image, (35, 50))
        if self.facing_right:
            self.image = image
        else:
            flipped_image = pygame.transform.flip(image, True, False)
            self.image = flipped_image
        # set the rect
        if self.on_ground and self.on_right:
            self.rect = self.image.get_rect(bottomright = self.rect.bottomright)
        elif self.on_ground and self.on_left:
            self.rect = self.image.get_rect(bottomleft = self.rect.bottomleft)
        elif self.on_ground:
            self.rect = self.image.get_rect(midbottom = self.rect.midbottom)
        elif self.on_ceiling and self.on_right:
            self.rect = self.image.get_rect(topright = self.rect.topright)
        elif self.on_ceiling and self.on_left:
            self.rect = self.image.get_rect(bottomleft = self.rect.topleft)
        elif self.on_ceiling:
            self.rect = self.image.get_rect(midtop = self.rect.midtop)
The _animate() method is responsible for animating the player character by cycling through the frames of the current animation. It starts by retrieving the animation corresponding to the player’s current status from the animations dictionary using self.status. Next, the frame_index is incremented by self.animation_speed, which represents the speed at which the animation frames change. If the frame_index exceeds the length of the animation frames, it is reset to 0 to loop back to the first frame. The current frame image is then retrieved from the animation based on the integer value of self.frame_index. The image is scaled to a size of (35, 50) using pygame.transform.scale(). Depending on the player’s facing_right attribute, the image is assigned directly to self.image if the player is facing right. Otherwise, if the player is facing left, the image is horizontally flipped using pygame.transform.flip() and assigned to self.image.
The subsequent block of code sets the rect attribute of the player based on their current state. The position and orientation of the player’s rectangle (self.rect) are adjusted depending on whether the player is on the ground or the ceiling, and whether they are on the left or right side. The specific rect assignment varies based on combinations of the on_ground, on_ceiling, on_left, and on_right attributes of the player.
Adding Player abilities
The player is supposed to walk and jump whether left or right in order to play the game. Let’s add another two functions for moving and jumping, let’s name them _get_input() and _jump().
# player.py
    # checks if the player is moving towards left or right or not moving
    def _get_input(self, player_event):
        if player_event != False:
            if player_event == "right":
                self.direction.x = 1
                self.facing_right = True
            elif player_event == "left":
                self.direction.x = -1
                self.facing_right = False
        else:
            self.direction.x = 0

    def _jump(self):
        self.direction.y = self.jump_move
The _get_input() method takes player_event as a parameter, which represents the input event or action from the player. If player_event is not False (meaning an input event has occurred), then if player_event is equal to "right", it sets the x component of the player’s direction vector to 1, indicating movement to the right. It also sets the facing_right attribute to True to indicate that the player is facing right.
If player_event is equal to "left", it sets the x component of the player’s direction vector to -1, indicating movement to the left. It sets the facing_right attribute to False to indicate that the player is facing left. If player_event is False (no input event), the x component of the player’s direction vector is set to 0, indicating no horizontal movement.
The _jump() method is responsible for initiating a jump for the player. It sets the y component of the player’s direction vector to the value of self.jump_move, which represents the vertical movement when the player jumps.
Identifying Player Activities
# player.py
    # identifies player action
    def _get_status(self):
        if self.direction.y < 0:
            self.status = "jump"
        elif self.direction.y > 1:
            self.status = "fall"
        elif self.direction.x != 0:
            self.status = "walk"
        else:
            self.status = "idle"
The _get_status() function identifies the proper animation for different player actions by looking at the player sprite’s changes in x and y coordinates by looking at their vector in the direction attribute. If the self.direction.y is less than 0, the player is jumping so we will set the self.status to "jump". Vice-versa, if the self.direction.y is bigger than 1, meaning the player is falling. And if self.direction.x is not 0, meaning the player is moving, so we set the self.status to "walk". Finally, if none of the conditions above are true, we’ll set the self.status to "idle" as the default animation when no player action is detected.
Updating the Player
# player.py
    # update the player's state
    def update(self, player_event):
        self._get_status()
        if self.life > 0 and not self.game_over:
            if player_event == "space" and self.on_ground:
                self._jump()
            else:
                self._get_input(player_event)
        elif self.game_over and self.win:
            self.direction.x = 0
            self.status = "win"
        else:
            self.direction.x = 0
            self.status = "lose"
        self._animate()
The update() method starts by calling the _get_status() method to update the player’s status based on its current state.
If the player’s life is greater than 0 and the game is not over, further actions are evaluated based on the player_event input. If the player_event is "space" (indicating a jump input) and the player is currently on the ground, the _jump() method is called to initiate a jump. If the player_event is not "space" or the player is not on the ground, the _get_input() method is called to handle the input and update the player’s movement accordingly.
If the game is over and the player has won (game_over is True and win is True), the player’s horizontal movement is set to 0, and the player’s status is set to "win". If the game is over and the player has lost (game_over is True and win is False), the player’s horizontal movement is set to 0 and the player’s status is set to "lose". The _animate() method is called to update the player’s animation.
Applying the Game Objectives
For the last class we needed for the game, create another class in game.py and name it Game. It is responsible for keeping track of the game’s current state, whether the game is finished or not, and if the player wins or loses:
# game.py
import pygame
from settings import HEIGHT, WIDTH

pygame.font.init()

class Game:
    def __init__(self, screen):
        self.screen = screen
        self.font = pygame.font.SysFont("impact", 70)
        self.message_color = pygame.Color("darkorange")
Adding Game Indicators
We’re adding several functions in the Game class that might help the user to identify the latest state of the game.
Let’s create first a simple function for displaying the remaining life or health of the player on the game screen:
# game.py
    def show_life(self, player):
        life_size = 30
        img_path = "assets/life/life.png"
        life_image = pygame.image.load(img_path)
        life_image = pygame.transform.scale(life_image, (life_size, life_size))
        # life_rect = life_image.get_rect(topleft = pos)
        indent = 0
        for life in range(player.life):
            indent += life_size
            self.screen.blit(life_image, (indent, life_size))
Within the show_life() method, the life_size variable is set to 30, indicating the size of the life indicator image. The life image ("assets/life/life.png") is loaded using pygame.image.load() and scaled to life_size and then stored in the life_image variable.
A variable named indent is initialized to 0. This variable represents the horizontal position where each life indicator will be displayed on the screen. A loop is performed based on the remaining life count stored in player.life.
Within each iteration of the loop, the indent value is incremented by life_size, ensuring that each life indicator is displayed next to the previous one. The life_image is displayed on the screen using the screen.blit() method, with the life_image as the image to be displayed and the (indent, life_size) coordinates representing the position of the life indicator.
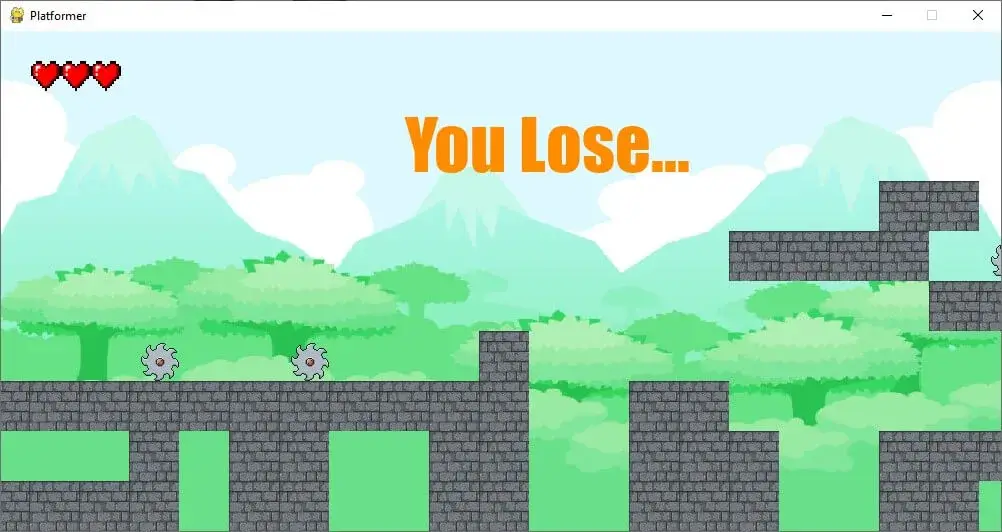
Let’s also add functions for returning messages depending on the game state. Create _game_lose() and _game_win() methods inside the Game class:
# game.py
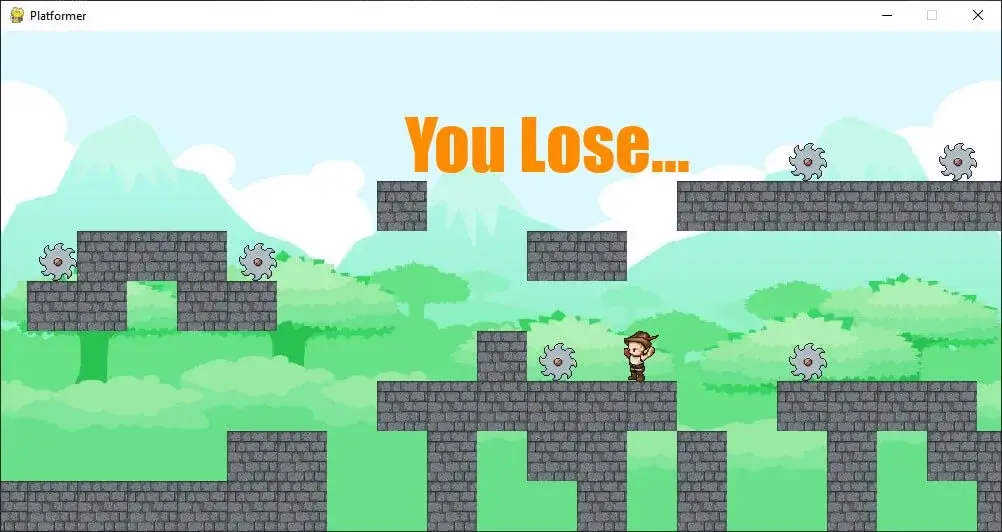
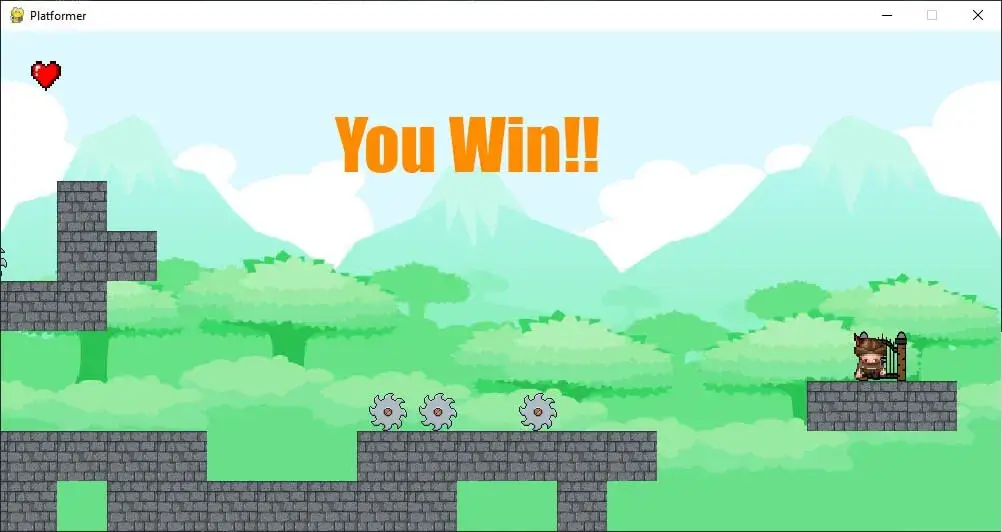
# if player ran out of life or fell below the platform
def _game_lose(self, player):
player.game_over = True
message = self.font.render('You Lose...', True, self.message_color)
self.screen.blit(message,(WIDTH // 3 + 70, 70))
# if player reach the goal
def _game_win(self, player):
player.game_over = True
player.win = True
message = self.font.render('You Win!!', True, self.message_color)
self.screen.blit(message,(WIDTH // 3, 70))Game Checking
Let’s create another function that analyzes the current game state. Create another method in the Game class and name it the game_state() method:
# game.py
    # checks if the game is over or not, and if win or lose
    def game_state(self, player, goal):
        if player.life <= 0 or player.rect.y >= HEIGHT:
            self._game_lose(player)
        elif player.rect.colliderect(goal.rect):
            self._game_win(player)
The game_state() method takes two parameters: player representing the player object and goal representing the goal object in the game.
If the player’s remaining life (player.life) is less than or equal to 0 or the player’s vertical position (player.rect.y) is greater than or equal to the height of the screen (HEIGHT) (this statement is true when the player fell below the obstacles), it indicates that the game is over and the player has lost. In this case, the _game_lose() method is called to handle the game over state.
If the player’s rectangle (player.rect) collides with the goal’s rectangle (goal.rect), it indicates that the player has reached the goal and won the game. In this case, the _game_win() method is called to handle the game over state. If none of the above conditions are met, indicating that the game is still ongoing, the game_state() method does nothing.
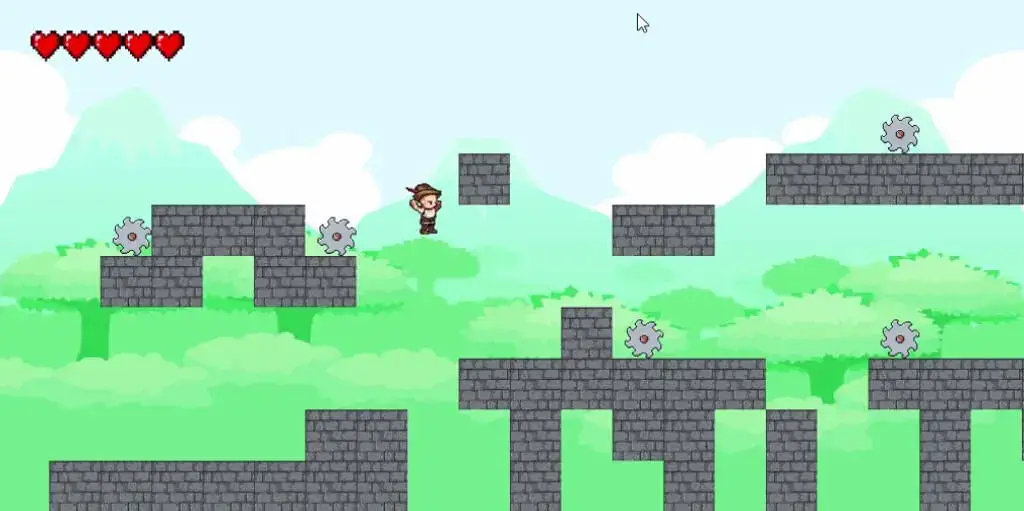
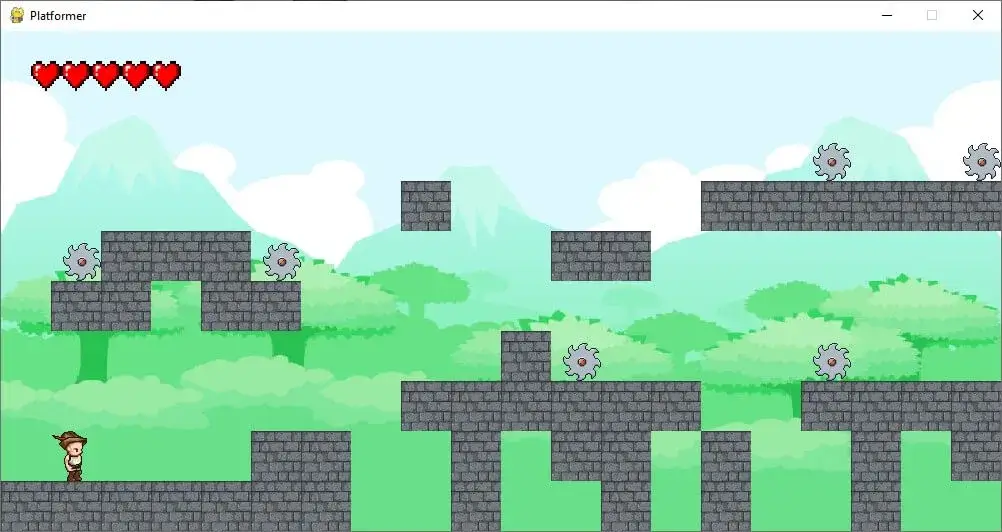
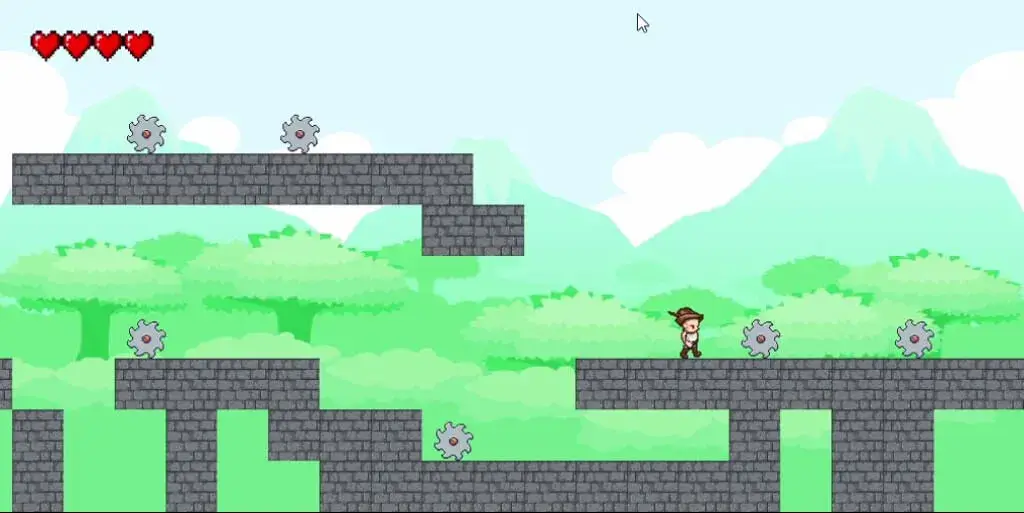
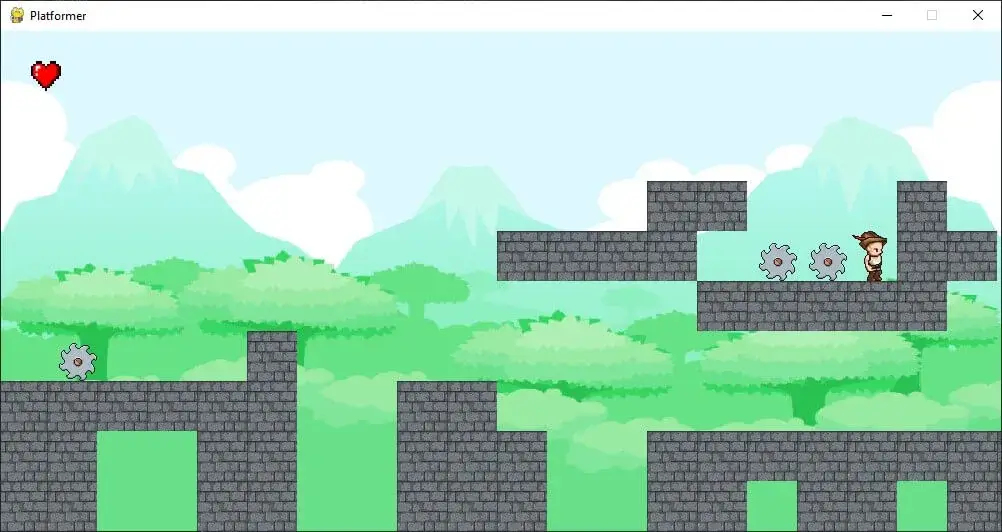
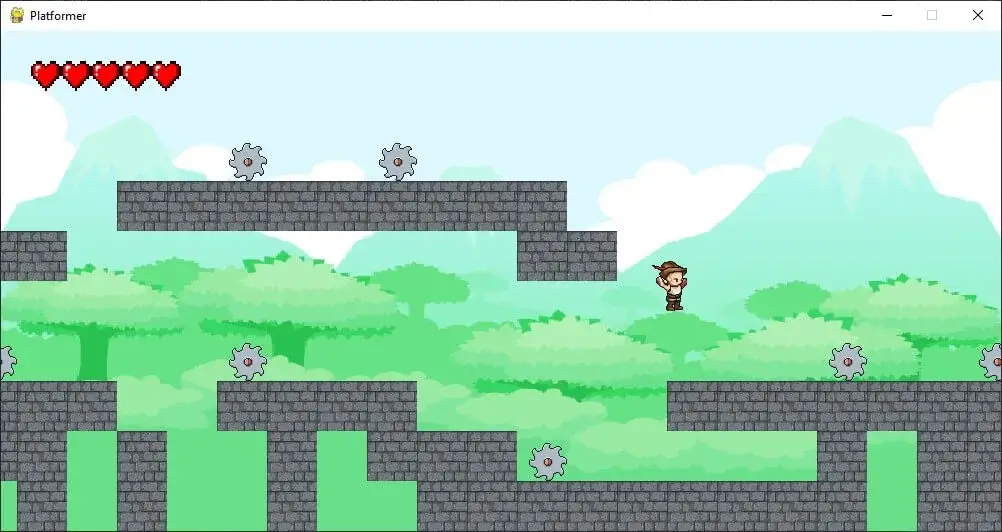
And now, we are done coding our platformer game. To try and test our game, Open your terminal and go to our directory folder, "Platformer-Game". Once we’re inside the directory, enter python main.py to run the game. Here are some of the game’s snapshots:
 Conclusion
Here's a video showing the game:
In conclusion, this tutorial has covered the creation of a platformer game using Python’s Pygame library. We explored the different components of the game, including the player’s character, world objects, animations, collisions, and game states. By following this tutorial, you have learned how to develop a basic platformer game from scratch, understanding key concepts such as sprite handling, input handling, gravity, scrolling, and win/lose conditions.
With the knowledge gained from this tutorial, you can further enhance and customize your platformer game by adding new features, levels, or mechanics. Pygame provides a versatile framework for game development, allowing you to unleash your creativity and build engaging experiences. Feel free to explore additional Pygame functionalities, such as sound effects, level design, or enemy AI, to take your game to the next level. I hope this tutorial has been a helpful resource on your journey to creating a platformer game with Pygame.
Check the complete code here.
Here are some related game development tutorials:
- How to Make a Chess Game with Pygame in Python
- How to Make a Checkers Game with Pygame in Python
- How to Build a Tic Tac Toe Game in Python
- How to Make a Tetris Game using PyGame in Python
- How to Create a Hangman Game using PyGame in Python
- How to Make a Maze Game in Python
Happy coding ♥
Just finished the article? Why not take your Python skills a notch higher with our Python Code Assistant? Check it out!
View Full Code Assist My Coding


Got a coding query or need some guidance before you comment? Check out this Python Code Assistant for expert advice and handy tips. It's like having a coding tutor right in your fingertips!