Unlock the secrets of your code with our AI-powered Code Explainer. Take a look!
Maze games have been a popular genre for decades, challenging players to navigate through intricate labyrinths while avoiding obstacles and searching for the exit. With Python's versatility and the power of the Pygame library, we can bring this classic gaming experience to life.
Throughout this tutorial, we'll cover the fundamentals of maze generation, player movement, collision detection, game logic, and more. By the end, you'll have a fully functional maze game that you can customize and expand upon to create your own unique gaming experience.
Whether you're a beginner or an experienced Python developer, this tutorial will provide step-by-step guidance to help you understand the game development process and unleash your creativity. Get ready to dive into the world of game development and create a captivating maze game that will challenge and entertain players. Throughout this article, we will cover various aspects of the game development process, including:
- Installation and Setup
- Creating Grid Cell
- Constructing the Maze
- Adding Player
- Adding Game Attributes
- Adding Game Timer
- Running the whole Game
Installation and Setup
Let's start by making sure that Python is installed on our computer. You can download Python from their official website. Once Python is installed, we need to install the Pygame library:
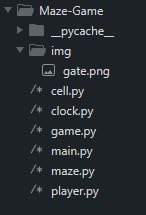
$ pip install pygameNext, create a new folder and name it Maze-Game. Inside our main directory, we need to create several Python files: main.py, game.py, clock.py, maze.py, cell.py, and player.py.
Also, create another folder inside our game directory and name it img which we'll use to store the images we're using for the game. We're using only one picture for this game, which is a picture of a gate that serves as the goal point for the player to reach in order to win the game. You can provide yours or download and use mine here.
Now that we have certain files created, our game directory should look like this:
After having all the required files created, we can start coding.
Creating Grid Cell
We're gonna use grids to draw the maze for our game, so the first thing we're adding to the game is the Cell class that represents a single cell within the grid and holds essential information about its state, such as its position, neighbors, and whether it contains walls or pathways:
# cell.py
import pygame
from random import choice

class Cell:
    def __init__(self, x, y, thickness):
        self.x, self.y = x, y
        self.thickness = thickness
        self.walls = {'top': True, 'right': True, 'bottom': True, 'left': True}
        self.visited = False
When an instance of the Cell class is created, the __init__() method is called. This special method serves as a constructor and takes three parameters: x, y, and thickness. These parameters define the position and thickness of the wall per cell within the maze. Within the constructor, the walls attribute is initialized as a dictionary with keys representing the directions (top, right, bottom, and left) and values set to True. This indicates that all walls surrounding the cell are initially present. The visited attribute is set to False, allowing us to keep track of whether the cell has been visited during maze generation or traversal.
Now let's create another method for the Cell class, the draw() method. This method is responsible for creating and adding walls for each cell.
The draw() method within the Cell class plays a crucial role in visually rendering the walls of a cell using the Pygame library. This method takes two parameters: sc, representing the Pygame screen object, and tile, which determines the size of each cell in pixels:
# cell.py
class Cell:
    ...
    # draw grid cell walls
    def draw(self, sc, tile):
        x, y = self.x * tile, self.y * tile
        if self.walls['top']:
            pygame.draw.line(sc, pygame.Color('darkgreen'), (x, y), (x + tile, y), self.thickness)
        if self.walls['right']:
            pygame.draw.line(sc, pygame.Color('darkgreen'), (x + tile, y), (x + tile, y + tile), self.thickness)
        if self.walls['bottom']:
            pygame.draw.line(sc, pygame.Color('darkgreen'), (x + tile, y + tile), (x , y + tile), self.thickness)
        if self.walls['left']:
            pygame.draw.line(sc, pygame.Color('darkgreen'), (x, y + tile), (x, y), self.thickness)
To begin, the method calculates the screen coordinates of the top-left corner of the cell based on its x and y positions and the tile size, making walls for each cell accurately positioned within the maze. Then, we go through each wall - the top, right, bottom, and left - and check if it exists by peeking into the self.walls dictionary. If a wall is present (True), then it will draw the wall. We use the pygame.draw.line() function to bring those walls to life. We pick a cool 'darkgreen' color and set the thickness of the wall to self.thickness. This way, the walls will stand out and make an impact.
Let's add two more methods for the Cell class, the check_cell() and the check_neighbors() methods, they help us check and find neighboring cells in our maze:
# cell.py

class Cell:
    ...
    # checks if cell does exist and returns it if it does
    def check_cell(self, x, y, cols, rows, grid_cells):
        find_index = lambda x, y: x + y * cols
        if x < 0 or x > cols - 1 or y < 0 or y > rows - 1:
            return False
        return grid_cells[find_index(x, y)]

    # checking cell neighbors of current cell if visited (carved) or not
    def check_neighbors(self, cols, rows, grid_cells):
        neighbors = []
        top = self.check_cell(self.x, self.y - 1, cols, rows, grid_cells)
        right = self.check_cell(self.x + 1, self.y, cols, rows, grid_cells)
        bottom = self.check_cell(self.x, self.y + 1, cols, rows, grid_cells)
        left = self.check_cell(self.x - 1, self.y, cols, rows, grid_cells)
        if top and not top.visited:
            neighbors.append(top)
        if right and not right.visited:
            neighbors.append(right)
        if bottom and not bottom.visited:
            neighbors.append(bottom)
        if left and not left.visited:
            neighbors.append(left)
        return choice(neighbors) if neighbors else False
The check_cell() function is like our detective. It takes in the coordinates x and y, the number of columns and rows in the grid, and the grid_cells list that holds all the cells. Its job is to check if the cell at the given coordinates actually exists. It uses a lambda function called find_index to convert the 2D coordinates into a 1D index to access the cell in the grid_cells list. If the coordinates are out of bounds (i.e., the cell doesn't exist), it returns False. Otherwise, it returns the cell itself.
The check_neighbors() function looks for neighboring cells that haven't been visited yet. It takes in the number of columns and rows in the grid and the grid_cells list. It starts by creating an empty list called neighbors to store the neighboring cells. Next, it checks the cells in four directions: top, right, bottom, and left. It uses the check_cell() function to determine if the neighboring cell exists and if it has been visited. If a neighboring cell exists and hasn't been visited, it adds it to the neighbors list. Finally, it randomly selects a cell from the neighbors list using the random.choice() function. If there are no available neighbors, it returns False.
Constructing the Maze
Now, that we have a class for creating cells, let's create another class for making the maze. In maze.py, create a new class and name it Maze:
# maze.py
import pygame
from cell import Cell

class Maze:
    def __init__(self, cols, rows):
        self.cols = cols
        self.rows = rows
        self.thickness = 4
        self.grid_cells = [Cell(col, row, self.thickness) for row in range(self.rows) for col in range(self.cols)]
The __init__() method contains all the attributes we need for the Maze class. The cols and rows defines how many columns and rows our grid gonna have. The method also sets the thickness attribute to 4, which represents the thickness of the walls between the cells in the maze. You can adjust this value to modify the appearance of the maze walls. The grid_cells attribute is created as a list comprehension. It creates a list of Cell objects by iterating over each row and column in the maze. Each Cell object is instantiated with its respective col, row, and thickness values.
Since we already had a grid of cells from the grid_cells list, we can carve now a path to each cell in order to create the maze. To carve the maze, we're using the remove_walls() method that is responsible for removing the walls between two adjacent cells in the maze:
# maze.py

class Maze:
    ...
    # carve grid cell walls
    def remove_walls(self, current, next):
        dx = current.x - next.x
        if dx == 1:
            current.walls['left'] = False
            next.walls['right'] = False
        elif dx == -1:
            current.walls['right'] = False
            next.walls['left'] = False
        dy = current.y - next.y
        if dy == 1:
            current.walls['top'] = False
            next.walls['bottom'] = False
        elif dy == -1:
            current.walls['bottom'] = False
            next.walls['top'] = False
It takes two parameters: current and next, which represent the current cell and the neighboring cell respectively.
To determine which walls to remove, the function calculates the differences in the x and y coordinates between the current and next cells. These differences are stored in the variables dx and dy respectively. If dx is equal to 1, it means that the next cell is to the left of the current cell. In this case, the left wall of the current cell (current.walls['left']) is set to False, indicating that the left wall is removed. Similarly, the right wall of the next cell (next.walls['right']) is set to False, removing the right wall between the two cells. If dx is equal to -1, it means that the next cell is to the right of the current cell. In this case, the right wall of the current cell and the left wall of the next cell are removed, resulting to carve a path little by little. Similarly, the function checks the dy coordinate differences. If dy is equal to 1, it means that the next cell is above the current cell. The top wall of the current cell is removed, as well as the bottom wall of the next cell. If dy is equal to -1, the bottom wall of the current cell and the top wall of the next cell is removed.
And to create the maze, we're using the generate_maze() method in the Maze class that is responsible for generating the maze using the Recursive Backtracking algorithm:
# maze.py

class Maze:
    ...
    # generates maze
    def generate_maze(self):
        current_cell = self.grid_cells[0]
        array = []
        break_count = 1
        while break_count != len(self.grid_cells):
            current_cell.visited = True
            next_cell = current_cell.check_neighbors(self.cols, self.rows, self.grid_cells)
            if next_cell:
                next_cell.visited = True
                break_count += 1
                array.append(current_cell)
                self.remove_walls(current_cell, next_cell)
                current_cell = next_cell
            elif array:
                current_cell = array.pop()
        return self.grid_cells
It starts by setting the initial cell as the current_cell, which is the first cell in the grid_cells list. The algorithm uses a while loop that continues until the break_count is equal to the total number of cells in the maze. Inside the loop, the current_cell is marked as visited, and the algorithm checks for an unvisited neighboring cell using the check_neighbors() method of the Cell class. If a valid neighboring cell (next_cell) is found, it is marked as visited, the wall between the current_cell and next_cell is removed, and the next_cell becomes the new current_cell. If no valid neighboring cell is found and there are cells in the array, backtracking occurs by setting the current_cell to the most recently added cell in the array. Once the loop completes, the maze generation is finished, and the grid_cells list is returned. This list represents the fully generated maze, where each cell is marked as visited or unvisited.
Adding Player
Next, we're creating the Player class in the player.py that is responsible for managing the player's character in the game:
# player.py
import pygame

class Player:
    def __init__(self, x, y):
        self.x = int(x)
        self.y = int(y)
        self.player_size = 10
        self.rect = pygame.Rect(self.x, self.y, self.player_size, self.player_size)
        self.color = (250, 120, 60)
        self.velX = 0
        self.velY = 0
        self.left_pressed = False
        self.right_pressed = False
        self.up_pressed = False
        self.down_pressed = False
        self.speed = 4
In the __init__() method, the player's initial position is set based on the x and y coordinates passed as arguments. The player_size attribute is set to 10, representing the size of the player's character.
A pygame.Rect object is created using the player's position and size that is used for collision detection and positioning of the player's character on the game screen and is stored in the self.rect attribute.
The color attribute is set to (250, 120, 60), representing the RGB values of the player's character color. The attributes velX and velY represent the player's velocity in the horizontal and vertical directions respectively. They are initially set to 0.
The boolean attributes left_pressed, right_pressed, up_pressed, and down_pressed are used to track whether the corresponding movement keys (left, right, up, down) are currently being pressed or not. They are all initially set to False. The speed attribute is set to 4, representing the speed at which the player's character moves in the game.
Let's create two functions in the Player class and name them get_current_cell() and check_move() for handling the movements of the player:
# player.py
class Player:
    ...
    # get current cell position of the player
    def get_current_cell(self, x, y, grid_cells):
        for cell in grid_cells:
            if cell.x == x and cell.y == y:
                return cell

    # stops player to pass through walls
    def check_move(self, tile, grid_cells, thickness):
        current_cell_x, current_cell_y = self.x // tile, self.y // tile
        current_cell = self.get_current_cell(current_cell_x, current_cell_y, grid_cells)
        current_cell_abs_x, current_cell_abs_y = current_cell_x * tile, current_cell_y * tile
        if self.left_pressed:
            if current_cell.walls['left']:
                if self.x <= current_cell_abs_x + thickness:
                    self.left_pressed = False
        if self.right_pressed:
            if current_cell.walls['right']:
                if self.x >= current_cell_abs_x + tile - (self.player_size + thickness):
                    self.right_pressed = False
        if self.up_pressed:
            if current_cell.walls['top']:
                if self.y <= current_cell_abs_y + thickness:
                    self.up_pressed = False
        if self.down_pressed:
            if current_cell.walls['bottom']:
                if self.y >= current_cell_abs_y + tile - (self.player_size + thickness):
                    self.down_pressed = False
The get_current_cell() method takes the player's current position (x and y coordinates) and the grid_cells list as parameters. It iterates through the grid_cells list and checks if any cell's x and y coordinates match the player's position. If a match is found, the corresponding cell object is returned.
The check_move() method is responsible for checking if the player's movement is allowed based on the walls of the current cell they are in. It takes parameters such as tile (cell size), grid_cells, and thickness (wall thickness).
First, the method calculates the current cell position of the player by dividing the player's coordinates (x and y) by the tile size. This determines which cell the player is currently in. Then, it retrieves the corresponding current_cell object using the get_current_cell() method. Next, the method calculates the absolute position of the current cell (current_cell_abs_x and current_cell_abs_y) by multiplying the current cell position by the tile size. For each movement direction (left, right, up, down), the method checks if the player's movement is blocked by the walls of the current cell. If the corresponding movement key is pressed and the wall in that direction exists (current_cell.walls['left'], current_cell.walls['right'], etc.), the method further checks if the player's position is near the wall (within a certain threshold defined by thickness). If so, it prevents the movement by setting the corresponding movement flag (self.left_pressed, self.right_pressed, etc.) to False.
By implementing these methods, the Player class ensures that the player's character moves within the boundaries of the maze and cannot pass through walls, providing collision detection and movement restriction functionality.
Now that we can move without the player passing through the walls, the next thing we need is to draw the player into the game window. We have another two functions for the Player class, the draw() function for drawing the player on its current position and the update() function to update the player's position while moving:
# player.py
class Player:
    ...
    # drawing player to the screen
    def draw(self, screen):
        pygame.draw.rect(screen, self.color, self.rect)

    # updates player position while moving
    def update(self):
        self.velX = 0
        self.velY = 0
        if self.left_pressed and not self.right_pressed:
            self.velX = -self.speed
        if self.right_pressed and not self.left_pressed:
            self.velX = self.speed
        if self.up_pressed and not self.down_pressed:
            self.velY = -self.speed
        if self.down_pressed and not self.up_pressed:
            self.velY = self.speed
        self.x += self.velX
        self.y += self.velY
        self.rect = pygame.Rect(int(self.x), int(self.y), self.player_size, self.player_size)
The draw() method takes a screen parameter, which represents the game screen or surface. Using pygame.draw.rect, it draws a rectangle representing the player's character on the specified screen. The rectangle is drawn with the self.color and dimensions defined by self.rect.
The update() method starts by resetting the player's velocity in both the horizontal and vertical directions (self.velX and self.velY) to zero. The method then checks the state of movement input flags to determine the direction of movement. If the left arrow key is pressed (self.left_pressed is True) and the right arrow key is not pressed (self.right_pressed is False), the player's horizontal velocity (self.velX) is set to a negative value (-self.speed). Similarly, if the right arrow key is pressed and the left arrow key is not pressed, the horizontal velocity is set to a positive value (self.speed).
This logic ensures that the player can only move horizontally in one direction at a time. The same logic is applied to the vertical movement. If the up arrow key is pressed and the down arrow key is not, the player's vertical velocity (self.velY) is set to a negative value (-self.speed). If the down arrow key is pressed and the up arrow key is not, the vertical velocity is set to a positive value (self.speed). This ensures that the player can only move vertically in one direction at a time.
After determining the velocities, the player's position is updated by adding the horizontal velocity to the current x position (self.x) and the vertical velocity to the current y position (self.y). Finally, the player character is redrawn using pygame.Rect object, which is created using the updated position, player size (self.player_size), and it is assigned to self.rect.
Adding Game Attributes
Now that we have the two most important objects for our game (the maze and the player), we can now start applying some game rules. The Game class represents the main game logic and functionality of the Maze Game. It encapsulates the rules of the game, adding a winning message (once the player solved the Maze) and a goal point or a finish line:
# game.py
import pygame

pygame.font.init()

class Game:
    def __init__(self, goal_cell, tile):
        self.font = pygame.font.SysFont("impact", 35)
        self.message_color = pygame.Color("darkorange")
        self.goal_cell = goal_cell
        self.tile = tile

    # add goal point for player to reach
    def add_goal_point(self, screen):
        # adding gate for the goal point
        img_path = 'img/gate.png'
        img = pygame.image.load(img_path)
        img = pygame.transform.scale(img, (self.tile, self.tile))
        screen.blit(img, (self.goal_cell.x * self.tile, self.goal_cell.y * self.tile))

    # winning message
    def message(self):
        msg = self.font.render('You Win!!', True, self.message_color)
        return msg

    # checks if player reached the goal point
    def is_game_over(self, player):
        goal_cell_abs_x, goal_cell_abs_y = self.goal_cell.x * self.tile, self.goal_cell.y * self.tile
        if player.x >= goal_cell_abs_x and player.y >= goal_cell_abs_y:
            return True
        else:
            return False
The add_goal_point() method is responsible for adding a goal point for the player to reach in the game. First, the code specifies the image path for the gate image and is constructed dynamically using a string and assumes that the gate image is located in the "img" directory and named "gate.png". Make sure to adjust the path and image name accordingly to match your file structure.
The code then loads the gate image using pygame.image.load(img_path). Next, the code scales the loaded image to match the size of a single grid cell (tile) in the game. This is achieved using pygame.transform.scale, which takes the loaded image and the desired dimensions as arguments. In this case, the dimensions are specified as (self.tile, self.tile), indicating that the image should be scaled to have a width and height equal to self.tile. Adjust this scaling factor as needed to match the desired size of the gate image on the screen.
Finally, the scaled gate image is drawn on the screen using screen.blit(img, (self.goal_cell.x * self.tile, self.goal_cell.y * self.tile)). The blit() function in Pygame is used to draw one Surface onto another. In this case, it takes the gate image img and specifies the position where it should be drawn on the screen. The position is determined by the x and y coordinates of the goal_cell (representing the grid cell where the goal point is located) multiplied by self.tile, which gives the pixel coordinates corresponding to the top-left corner of the grid cell.
The message() function only returns the winning message once was called.
The is_game_over() method is responsible for checking if the player has reached the goal point in the game. First, the code calculates the absolute pixel coordinates of the goal cell by multiplying the x and y coordinates of the goal_cell with self.tile. This determines the top-left corner of the goal cell on the screen. Next, the method compares the player's current x and y coordinates with the goal cell's absolute coordinates. If both the player's x coordinate is greater than or equal to the goal cell's absolute x coordinate, and the player's y coordinate is greater than or equal to the goal cell's absolute y coordinate, it means that the player has reached or surpassed the goal cell. And if the player has reached the goal point, the method returns True, indicating that the game is over. Otherwise, it returns False, indicating that the game is still ongoing.
Adding Game Timer
Let's add some accessories to the game: A timer to measure how long it takes for the player to solve the maze. The Clock class is responsible for managing the game timer functionality in the Maze Game:
# clock.py
import pygame, time

pygame.font.init()

class Clock:
    def __init__(self):
        self.start_time = None
        self.elapsed_time = 0
        self.font = pygame.font.SysFont("monospace", 35)
        self.message_color = pygame.Color("yellow")

    # Start the timer
    def start_timer(self):
        self.start_time = time.time()

    # Update the timer
    def update_timer(self):
        if self.start_time is not None:
            self.elapsed_time = time.time() - self.start_time

    # Display the timer
    def display_timer(self):
        secs = int(self.elapsed_time % 60)
        mins = int(self.elapsed_time / 60)
        my_time = self.font.render(f"{mins:02}:{secs:02}", True, self.message_color)
        return my_time

    # Stop the timer
    def stop_timer(self):
        self.start_time = None
The Clock class contains several attributes. The start_time attribute is initially set to None and will store the starting time of the timer. The elapsed_time attribute is set to 0 and will keep track of the elapsed time since the timer started. The font attribute holds a font object from the pygame module, which will be used for rendering the timer text. The message_color attribute determines the color of the timer text.
The start_timer method sets the start_time attribute to the current time, effectively starting the timer. The update_timer() method calculates the elapsed time by subtracting the start_time from the current time. It is intended to be called within the game loop to keep the timer up to date.
The display_timer() method formats the elapsed time into minutes and seconds and renders it using the specified font and color. We format our my_time in mins and secs to render it in the more analog type of timer. The formatted time is returned as a surface object, which can then be displayed on the screen. This method is responsible for visually displaying the timer to the player.
Lastly, the stop_timer() method resets the start_time attribute to None, effectively stopping the timer.
By utilizing the Clock class and its methods, we can easily implement and display a timer in the Maze Game. Players will be able to track the time it takes them to complete the maze, adding an exciting element to the gameplay.
Running the Whole Game
The last thing we need is to run all of the code we did into one game. The Main class will serve as the main class to run our game by containing the game loop to present, update the screen according to current events, and control our game:
# main.py
import pygame, sys
from maze import Maze
from player import Player
from game import Game
from clock import Clock

pygame.init()
pygame.font.init()

class Main():
    def __init__(self, screen):
        self.screen = screen
        self.font = pygame.font.SysFont("impact", 30)
        self.message_color = pygame.Color("cyan")
        self.running = True
        self.game_over = False
        self.FPS = pygame.time.Clock()
Here we start by importing Python modules such as pygame and sys, and also import the Python classes we did earlier.
Let's add the instructions() method to the main class which simply adds instructions for the game:
# main.py
class Main():
    ...
    def instructions(self):
        instructions1 = self.font.render('Use', True, self.message_color)
        instructions2 = self.font.render('Arrow Keys', True, self.message_color)
        instructions3 = self.font.render('to Move', True, self.message_color)
        self.screen.blit(instructions1,(655,300))
        self.screen.blit(instructions2,(610,331))
        self.screen.blit(instructions3,(630,362))
As you notice, I create three different variables to deliver one message, we'll add the message in the sidebar we'll do later and a one-line message will result to go beyond the screen.
Let's create another function and name it _draw() that draws all of the configurations we add to the game screen such as the maze, the player character, the clock, etc:
    # draws all configs; maze, player, instructions, and time
    def _draw(self, maze, tile, player, game, clock):
        # draw maze
        [cell.draw(self.screen, tile) for cell in maze.grid_cells]
        # add a goal point to reach
        game.add_goal_point(self.screen)
        # draw every player movement
        player.draw(self.screen)
        player.update()
        # instructions, clock, winning message
        self.instructions()
        if self.game_over:
            clock.stop_timer()
            self.screen.blit(game.message(),(610,120))
        else:
            clock.update_timer()
        self.screen.blit(clock.display_timer(), (625,200))
        pygame.display.flip()
The _draw() method is responsible for rendering various game elements onto the screen. Firstly, the maze is drawn by iterating over each cell in the maze.grid_cells list and calling the draw() method on each cell object, passing the screen and tile parameters. This step visualizes the maze structure.
Next, the goal point for the player to reach is added to the screen by invoking the add_goal_point() method of the game object, passing the screen as an argument. The player's movement is then updated by calling the draw() method on the player object, followed by the update() method. This ensures that the player's position is rendered correctly on the screen based on their movement. Additionally, instructions for the game are displayed by calling the instructions() method, which likely shows information or guidance to the player.
If the game is over, as indicated by the self.game_over flag, the timer is stopped by invoking the stop_timer() method of the clock object. A winning message is also displayed on the screen using the message() method. Otherwise, the timer is updated by calling clock.update_timer(). The elapsed time is then rendered on the screen using clock.display_timer(). Finally, the changes made to the screen are updated and displayed using pygame.display.flip(), allowing the updated game elements to become visible to the player.
And for the last and final touch, we're adding the main() method which contains the main loop of the game. It's also responsible for getting clicks and releasing key events for playing the game:
# main.py
class Main():
    ...
    # main game loop
    def main(self, frame_size, tile):
        cols, rows = frame_size[0] // tile, frame_size[-1] // tile
        maze = Maze(cols, rows)
        game = Game(maze.grid_cells[-1], tile)
        player = Player(tile // 3, tile // 3)
        clock = Clock()
        maze.generate_maze()
        clock.start_timer()
        while self.running:
            self.screen.fill("gray")
            self.screen.fill( pygame.Color("darkslategray"), (603, 0, 752, 752))
            for event in pygame.event.get():
                if event.type == pygame.QUIT:
                    pygame.quit()
                    sys.exit()
            # if keys were pressed still
            if event.type == pygame.KEYDOWN:
                if not self.game_over:
                    if event.key == pygame.K_LEFT:
                        player.left_pressed = True
                    if event.key == pygame.K_RIGHT:
                        player.right_pressed = True
                    if event.key == pygame.K_UP:
                        player.up_pressed = True
                    if event.key == pygame.K_DOWN:
                        player.down_pressed = True
                    player.check_move(tile, maze.grid_cells, maze.thickness)
            # if pressed key released
            if event.type == pygame.KEYUP:
                if not self.game_over:
                    if event.key == pygame.K_LEFT:
                        player.left_pressed = False
                    if event.key == pygame.K_RIGHT:
                        player.right_pressed = False
                    if event.key == pygame.K_UP:
                        player.up_pressed = False
                    if event.key == pygame.K_DOWN:
                        player.down_pressed = False
                    player.check_move(tile, maze.grid_cells, maze.thickness)
            if game.is_game_over(player):
                self.game_over = True
                player.left_pressed = False
                player.right_pressed = False
                player.up_pressed = False
                player.down_pressed = False
            self._draw(maze, tile, player, game, clock)
            self.FPS.tick(60)
First, the method initializes the necessary variables and objects required for the game. It creates instances of the Maze, Game, Player, and Clock classes, passing appropriate parameters. The maze is then generated using the generate_maze() method, and the timer is started with the clock.start_timer() method.
Inside the main game loop, several actions are performed. First, the screen is cleared by filling it with the color "gray". Additionally, a sidebar or background area is filled with the color "darkslategray". The loop then iterates over the events received from the event queue using pygame.event.get().
If the event type is pygame.QUIT, indicating that the player closed the game window, the game is terminated. If a key is pressed (pygame.KEYDOWN event), the player's movement direction is updated based on the pressed key, such as left, right, up, or down. The player.check_move() method is called to ensure the player does not pass through walls.
When a key is released (pygame.KEYUP event), the player's movement direction is adjusted accordingly. The game.is_game_over() method is called to check if the player has reached the goal. If so, the game over the state is set to True, and the player's movement is stopped by resetting the movement direction flags.
The _draw() method is then invoked to render the maze, player, instructions, and timer on the screen. If the game is over, the timer is stopped using the clock.stop_timer() , and a winning message is displayed on the screen. Otherwise, the timer is updated using the update_timer() method.
And now we are doing the coding. We can start trying the game by adding the following code below to the main.py below the Main class:
# main.py
if __name__ == "__main__":
window_size = (602, 602)
screen = (window_size[0] + 150, window_size[-1])
tile_size = 30
screen = pygame.display.set_mode(screen)
pygame.display.set_caption("Maze")
game = Main(screen)
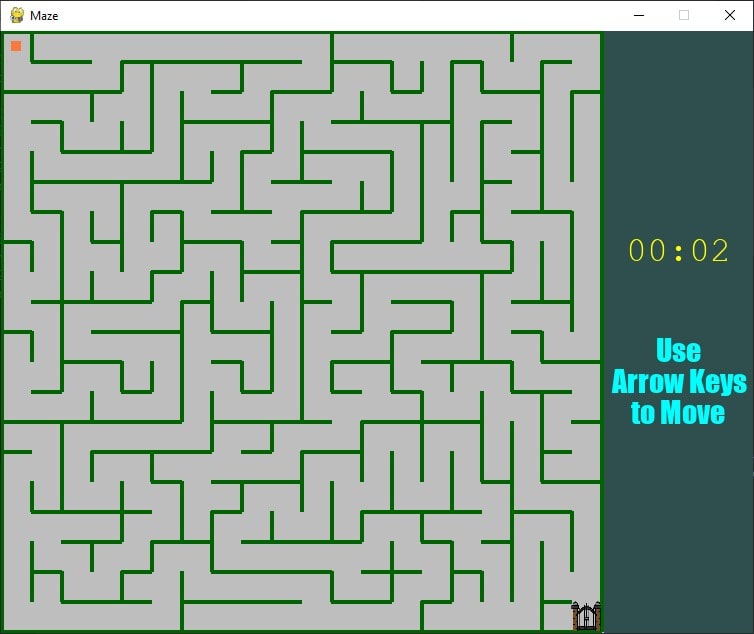
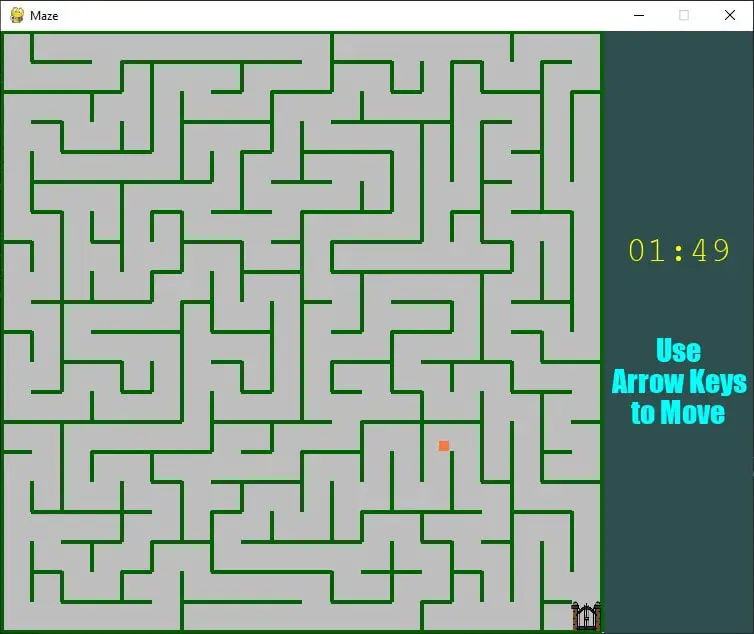
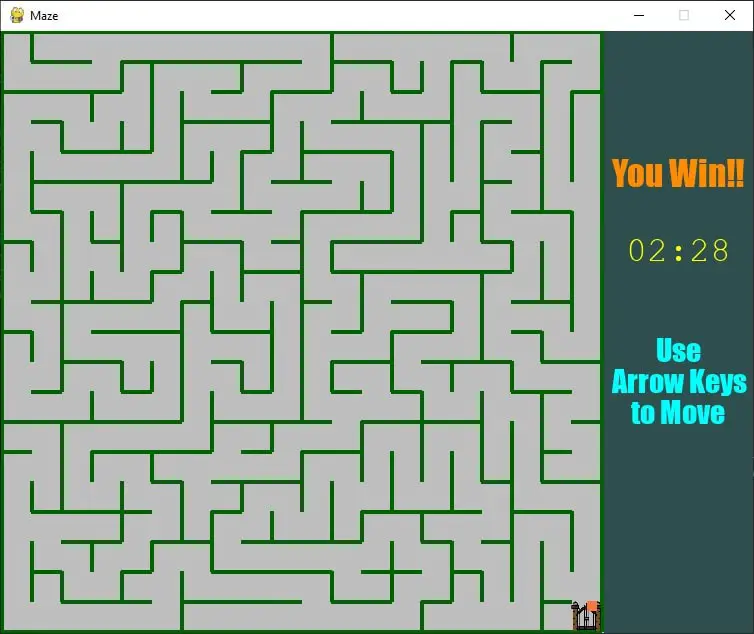
game.main(window_size, tile_size)Here are some of the Game snapshots:
Here's a video of me playing the game:
Throughout this article, we've delved into the key components that make this maze game a thrilling experience. From the maze generation algorithm that ensures each playthrough is unique, to the player's movement mechanics that require careful maneuvering, every aspect has been meticulously crafted to provide an immersive and enjoyable gameplay experience.
The integration of features such as the player's ability to interact with the maze walls, the inclusion of a goal point to strive for, and the incorporation of a timer to track progress add depth and excitement to the gameplay. Additionally, the captivating visuals and intuitive controls enhance the overall immersion and make the maze game a delight to play.
By understanding the inner workings of the maze game, you now have the knowledge to create your own unique twists and variations. Whether you want to introduce additional challenges, create different maze styles, or add power-ups and obstacles, the possibilities for customization and expansion are endless.
You can get the complete code here.
Here are some other games we've built with Pygame:
- How to Make a Chess Game with Pygame in Python
- How to Make a Checkers Game with Pygame in Python
- How to Build a Tic Tac Toe Game in Python
- How to Make a Tetris Game using PyGame in Python
- How to Create a Hangman Game using PyGame in Python
- How to Make a Drawing Program in Python
- How to Create a Slide Puzzle Game in Python
Happy coding ♥
Ready for more? Dive deeper into coding with our AI-powered Code Explainer. Don't miss it!
View Full Code Understand My Code


Got a coding query or need some guidance before you comment? Check out this Python Code Assistant for expert advice and handy tips. It's like having a coding tutor right in your fingertips!