Kickstart your coding journey with our Python Code Assistant. An AI-powered assistant that's always ready to help. Don't miss out!
In this tutorial, we will make a simple drawing program in Python using PyGame. We will utilize the buttons we have made in an earlier article to make it possible to switch colors and change the brush size; we'll also implement a saving feature.
As always, we start with the imports. Because we use PyGame, we also have to keep in mind to install it first with the following command:
$ pip install pygameWe also import sys to correctly kill the process and ctypes to enable dpi awareness so our window will look sharper, it's totally optional:
# Imports
import sys
import pygame
import ctypes

# Increas Dots Per inch so it looks sharper
ctypes.windll.shcore.SetProcessDpiAwareness(True)
Related: How to Make a File Explorer using Tkinter in Python.
Pygame Configuration
We continue with the pygame configuration. To use the module, we have to initialize it. We set an fps variable that will be later supplied to the pygame.time.clock.tick() method to restrain the max amount of frames per second.
After that, we make the object for that, and then we declare the starting width and height. We will funnel these values to the pygame.display.set_mode() function, but we will also set its mode flag to pygame.RESIZEABLE so the window can be resized at any time.
Last but not least, we import a font to be used in our buttons:
# Pygame Configuration
pygame.init()
fps = 300
fpsClock = pygame.time.Clock()
width, height = 640, 480
screen = pygame.display.set_mode((width, height), pygame.RESIZABLE)
font = pygame.font.SysFont('Arial', 20)
Variables
Now we make some variables to use later. We start with a list called objects where we store the buttons. Then we set the initial brush color in an RGB fashion.
After that, we set the initial brushSize and how many pixels the brush increases or decreases when we press the respective button.
In the end, we define the dimensions of our canvas, and this is the area where we will be able to draw:
# Variables
# Our Buttons will append themself to this list
objects = []
# Initial color
drawColor = [0, 0, 0]
# Initial brush size
brushSize = 30
brushSizeSteps = 3
# Drawing Area Size
canvasSize = [800, 800]
Button Class
We use the button class from this tutorial (feel free to go and copy/paste or get the complete code here). So we insert its class here; we have already made the objects list, we only have to loop over it in the main loop, so our buttons appear:
# Button Class
class Button():
    ...
Handler Functions
Now we will set up three functions to handle the color and brush size changes and the save request.
Change Color
The changeColor() function will simply take the desired color and set the global variable drawColor to this value.
# Handler Functions
# Changing the Color
def changeColor(color):
    global drawColor
    drawColor = color
Change Brush Size
The changebrushSize() function will take the dir argument to check if the brush should get larger or smaller. If it is greater, it will add brushSizeSteps to our brushSize. The opposite happens in all other cases because we assume that the user wants it to be smaller.
# Changing the Brush Size
def changebrushSize(dir):
    global brushSize
    if dir == 'greater':
        brushSize += brushSizeSteps
    else:
        brushSize -= brushSizeSteps
Save to Disk
Thanks to the pygame.image module, saving our canvas is as easy as calling the pygame.image.save() function with the surface to save and the file path:
# Save the surface to the Disk
def save():
    pygame.image.save(canvas, "canvas.png")
Button Setup
We continue by setting up our buttons. We first define two variables that represent the button width and height:
# Button Variables.
buttonWidth = 120
buttonHeight = 35
After that, we make a list that consists of more lists where each first element is the displayed text and each second element is the function to be called:
# Buttons and their respective functions.
buttons = [
    ['Black', lambda: changeColor([0, 0, 0])],
    ['White', lambda: changeColor([255, 255, 255])],
    ['Blue', lambda: changeColor([0, 0, 255])],
    ['Green', lambda: changeColor([0, 255, 0])],
    ['Brush Larger', lambda: changebrushSize('greater')],
    ['Brush Smaller', lambda: changebrushSize('smaller')],
    ['Save', save],
]
We will now loop over this list and generate buttons. They will all be in a row and have 10-pixel gaps. This won't look pretty, but it will do the work for our little application:
# Making the buttons
for index, buttonName in enumerate(buttons):
    Button(index * (buttonWidth + 10) + 10, 10, buttonWidth,
           buttonHeight, buttonName[0], buttonName[1])
Canvas
Now we use the canvasSize to make a new surface that will serve as the canvas we draw onto. We fill() that surface with white:
# Canvas
canvas = pygame.Surface(canvasSize)
canvas.fill((255, 255, 255))
Related: How to Make a Planet Simulator with PyGame in Python.
Main Loop
Now for the exciting part. As usual, we fill() the whole screen with a dark grey, and then we check if the user pressed the red x at the top of the screen so we can stop the program.
We are also looping over our objects list and calling the process() function on each object to draw them.
# Game loop.
while True:
    screen.fill((30, 30, 30))
    for event in pygame.event.get():
        if event.type == pygame.QUIT:
            pygame.quit()
            sys.exit()
    # Drawing the Buttons
    for object in objects:
        object.process()
Drawing
Before we make the draw function, we blit() the canvas in the center of the screen:
    # Draw the Canvas at the center of the screen
    x, y = screen.get_size()
    screen.blit(canvas, [x/2 - canvasSize[0]/2, y/2 - canvasSize[1]/2])
Next, we check if the left mouse button was pressed with pygame.mouse.get_pressed()[0]. Then we get the mouse position and calculate the mouse position on the canvas. After that, we have all the info we need to draw a circle where the mouse was pressed. We also supply this function with our drawColor and our brushSize.
    # Drawing with the mouse
    if pygame.mouse.get_pressed()[0]:
        mx, my = pygame.mouse.get_pos()
        # Calculate Position on the Canvas
        dx = mx - x/2 + canvasSize[0]/2
        dy = my - y/2 + canvasSize[1]/2
        pygame.draw.circle(
            canvas,
            drawColor,
            [dx, dy],
            brushSize,
        )
In the end, we also draw a circle which shows the users how large the brush is and what color it is:
    # Reference Dot
    pygame.draw.circle(
        screen,
        drawColor,
        [100, 100],
        brushSize,
    )
    pygame.display.flip()
    fpsClock.tick(fps)
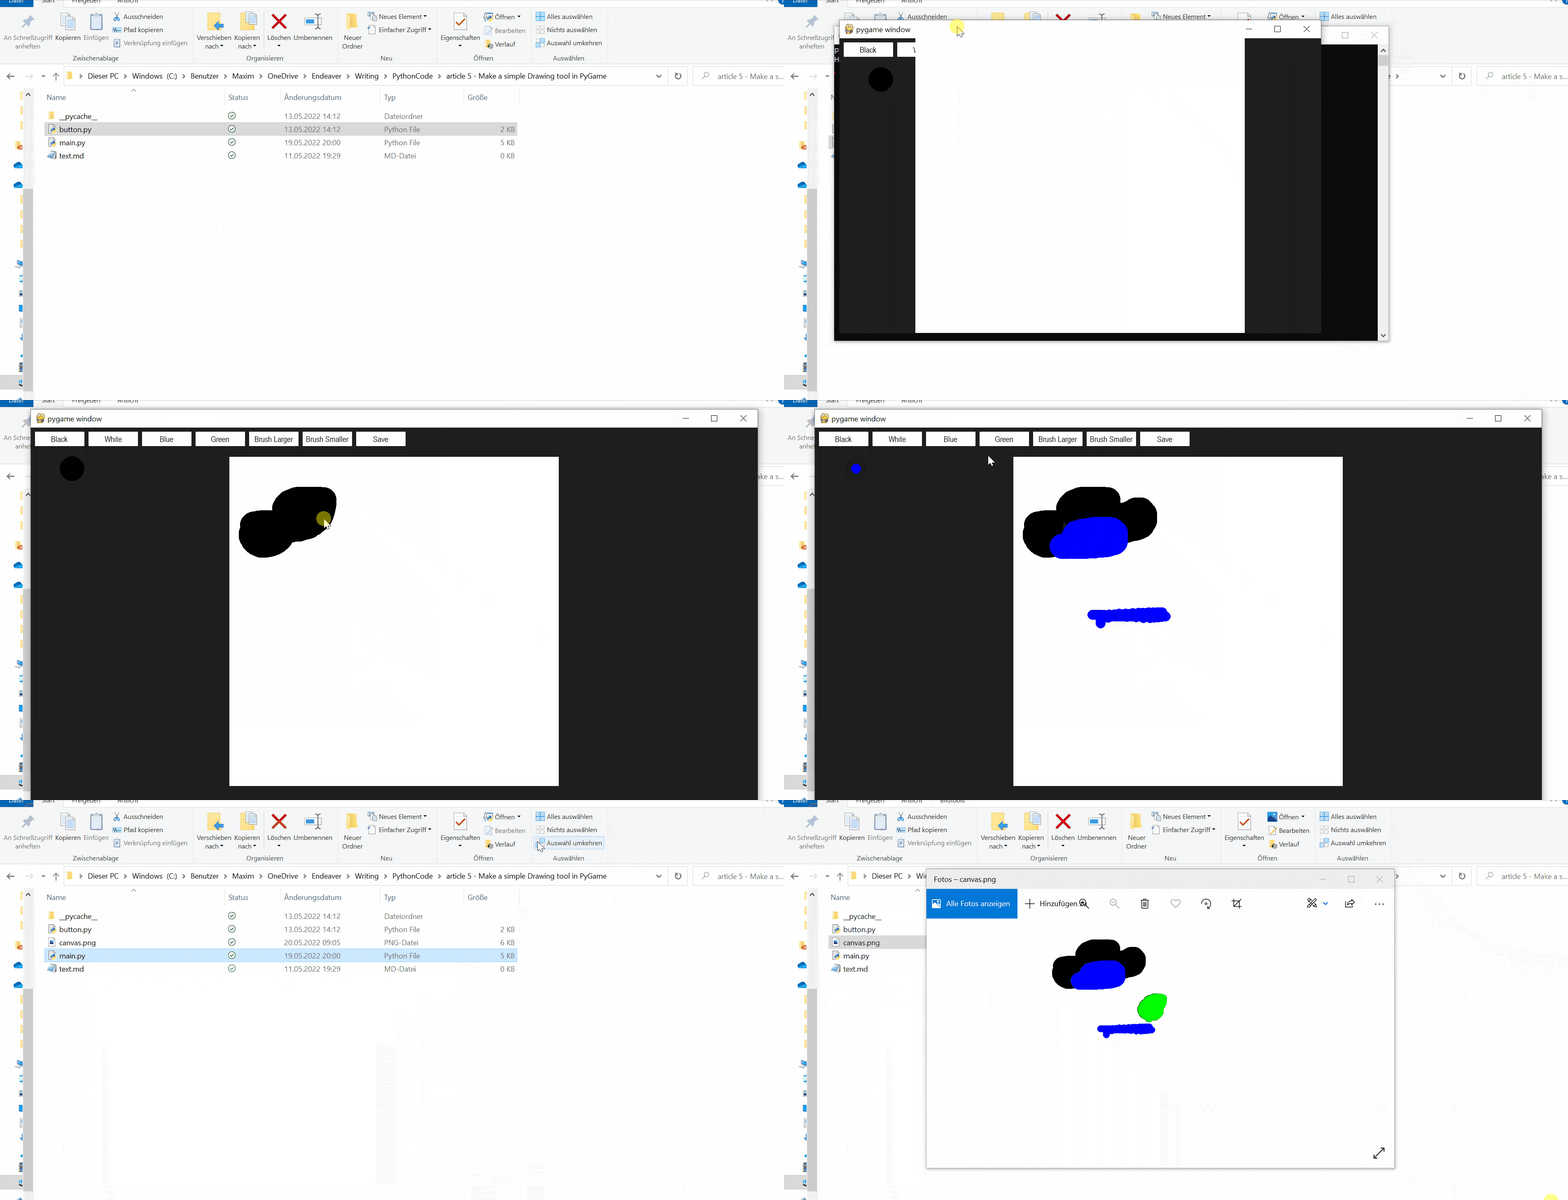
Showcase

Amazing, see how you can customize the tool however you want!
Get the full code here.
Here are some related tutorials:
- How to Make a Tetris Game using PyGame in Python
- How to Make Buttons in PyGame
- How to Make a Chess Game with Pygame in Python
- How to Create a Hangman Game using PyGame in Python
- How to Make a Planet Simulator with PyGame in Python
If you want to learn more about using Tkinter, check this tutorial where you create a calculator app along with many features!
Alternatively, If you want to build more GUIs with Python, check our GUI programming tutorials page!
Happy coding ♥
Finished reading? Keep the learning going with our AI-powered Code Explainer. Try it now!
View Full Code Switch My Framework


Got a coding query or need some guidance before you comment? Check out this Python Code Assistant for expert advice and handy tips. It's like having a coding tutor right in your fingertips!