Get a head start on your coding projects with our Python Code Generator. Perfect for those times when you need a quick solution. Don't wait, try it today!
In this article, we will make a simple file explorer with Python and its GUI Library Tkinter. We are adopting some features from the standard file explorer like the line-edit add the top, opening files with their usual program, and adding new files or folders.
Let's get started!
Imports
As always, we import the needed libraries. We get the os module; this holds a special role since we do all the file interactions using it, such as getting all files in a directory or adding files. The ctypes import is optional; we simply enable high dpi (dots per inch). Calling the function in the last line will do just that. This will result in smoother graphics:
from tkinter import *
import os
import ctypes
import pathlib

# Increas Dots Per inch so it looks sharper
ctypes.windll.shcore.SetProcessDpiAwareness(True)
Related: How to Make a PDF Viewer in Python
Tkinter Setup
Now we set up Tkinter. We start by making a new Tk() object. After that, we set the window title.
Next, we configure one column and one row. These two functions (grid_columnconfigure(), and grid_rowconfigure()) ensure that the second column and the second row expand. We will place our most essential widgets there, so they get a lot of space. Keep in mind that you can call these functions on any container widget.
root = Tk()
# set a title for our file explorer main window
root.title('Simple Explorer')

root.grid_columnconfigure(1, weight=1)
root.grid_rowconfigure(1, weight=1)
Handler Functions
After the Tkinter setup, we will continue making some functions that handle most things happening when the user does something.
Some of these functions have the parameter event=None and you notice that these event parameters aren't used in the function. This is because the functions are being called from two inputs. For one, there are called from buttons or menus, and these kinds of calls don't send any arguments to the supplied command functions.
On the other hand, keyboard bindings will send the keyboard event to the function, but we don't need that info. This parameter will ensure that the functions will be called correctly in either case.
Stringvar Change Event
Let's start with the pathChange() function. This will be called every time our path changes. We will bind a StringVar to it. It will update the list of files and folders and is responsible for displaying them.
We start by getting a list of all files and folders in a given path with the os.listdir() function. After that, we clear our list with its delete(start, end) method. Last but not least, we loop over every item in the directory list and insert it into the list with the insert(index, name) method.
def pathChange(*event):
    # Get all Files and Folders from the given Directory
    directory = os.listdir(currentPath.get())
    # Clearing the list
    list.delete(0, END)
    # Inserting the files and directories into the list
    for file in directory:
        list.insert(0, file)
Changing Path by Click or Enter
The changePathByClick() function does what it says on the box: It handles when the user clicks on an item in the list and then changes the path or opens the file.
We start by getting the name of the picked item by combining two functions. We supply the list.get() with the first value that is returned by the list.curselection().
The latter returns an array of all the selected items; that's why we only need the first item. We continue by joining with os.path.join() this picked file or folder with our current path, which is stored in a StringVar.
We check if the given path is a file with the os.path.isfile(path) function. If this turns out to be True, we call the os.startfile(path) with our path to open the file with its standard program. If it's False, we will set the StringVar to the new path, which triggers the pathChange() function we defined earlier and update the displayed files.
def changePathByClick(event=None):
    # Get clicked item.
    picked = list.get(list.curselection()[0])
    # get the complete path by joining the current path with the picked item
    path = os.path.join(currentPath.get(), picked)
    # Check if item is file, then open it
    if os.path.isfile(path):
        print('Opening: '+path)
        os.startfile(path)
    # Set new path, will trigger pathChange function.
    else:
        currentPath.set(path)
Going One Folder Up
In the changePathByClick(), we made it so we can enter folders; now we want the opposite: we want to be able to go back.
Here we will use the parent attribute of pathlib.Path() object to get the parent folder of our current one. After that, we just need to call the set(string) function on our StringVar and set it to this new path. This will once again trigger the pathChange() function.
def goBack(event=None):
    # get the new path
    newPath = pathlib.Path(currentPath.get()).parent
    # set it to currentPath
    currentPath.set(newPath)
    # simple message
    print('Going Back')
Generating and Opening New File or Folder Popup
In this function, we will make a popup that appears when clicking a menu button.
We start by getting a global variable called top that is defined outside the function, and we need to do this, so the other function has access to this variable.
It holds the window object, which is made in the following line with Toplevel(). Because it is a new window, it also has the title() and geometry() functions that set the name and dimensions of the window.
We also set both axes to not resizeable with the resizeable(False, False) method. After this, we configure some columns and make a label that tells the user what to do.
We define an Entry() that receives another StringVar which holds our new folder or file. This is also done to give the other function access to this function. In the end, we make a button that calls this function:
def open_popup():
    global top
    top = Toplevel(root)
    top.geometry("250x150")
    top.resizable(False, False)
    top.title("Child Window")
    top.columnconfigure(0, weight=1)
    Label(top, text='Enter File or Folder name').grid()
    Entry(top, textvariable=newFileName).grid(column=0, pady=10, sticky='NSEW')
    Button(top, text="Create", command=newFileOrFolder).grid(pady=10, sticky='NSEW')
New File or Folder
The below handles making new files or folders.
We first start by checking if the path name provided by the user is a file or a path. We cannot do this with the os.path.isfile(path) because it checks if the file exists.
That's why we split the string by '.' and check if the resulting array has another length than one. A string will like file.txt will result to True, and something like folder/path is False. If it is a file name, we create it by simply opening the path with the built-in function open(path, mode) because if the file doesn't exist, it will make it. If it is a folder name, we need the os module and its mkdir() function to make the new directory.
After that, we close the popup window with its destroy() method. and we call the pathChange() function so the directory is updated:
def newFileOrFolder():
    # check if it is a file name or a folder
    if len(newFileName.get().split('.')) != 1:
        open(os.path.join(currentPath.get(), newFileName.get()), 'w').close()
    else:
        os.mkdir(os.path.join(currentPath.get(), newFileName.get()))
    # destroy the top
    top.destroy()
    pathChange()

top = ''
String Variables
Now we have made all the needed functions, let's continue with the string variables:
newFileName: is the new file used when requesting to create a new file or folder.currentPath: is the current path variable. We connect any changes made to it with itstrace()method.
# String variables
newFileName = StringVar(root, "File.dot", 'new_name')
currentPath = StringVar(
    root,
    name='currentPath',
    value=pathlib.Path.cwd()
)
# Bind changes in this variable to the pathChange function
currentPath.trace('w', pathChange)
Related: How to Make a Drawing Program in Python
Widgets
Let's set up some widgets! We start by making the button that goes a folder up. It calls the goBack() method because we supplied a reference to its command parameter.
We then place it on the grid with the grid() method. The sticky parameter means where the widget should expand to. We supply it with NSEW which means it will expand in all directions.
After that, we connect the Alt-Up keyboard shortcut with the same function called by the button.
In the end, we make an Entry() that holds the path we are currently in. For it to work correctly with the StringVar we have to set the textvariable parameter to our string variable. We also place this on the grid and set some padding with ipadx and ipady.
Button(root, text='Folder Up', command=goBack).grid(
    sticky='NSEW', column=0, row=0
)
# Keyboard shortcut for going up
root.bind("<Alt-Up>", goBack)
Entry(root, textvariable=currentPath).grid(
    sticky='NSEW', column=1, row=0, ipady=10, ipadx=10
)
The following widget is the list that displays the files and folders of the current path, and we also bind some keyboard events that happen on it to our changePathByClick() function:
# List of files and folder
list = Listbox(root)
list.grid(sticky='NSEW', column=1, row=1, ipady=10, ipadx=10)
# List Accelerators
list.bind('<Double-1>', changePathByClick)
list.bind('<Return>', changePathByClick)
The last widget is just a simple menubar with two buttons, one that opens the new file or folder window and one that quits the program. We can quit the program with root.quit():
# Menu
menubar = Menu(root)
# Adding a new File button
menubar.add_command(label="Add File or Folder", command=open_popup)
# Adding a quit button to the Menubar
menubar.add_command(label="Quit", command=root.quit)
# Make the menubar the Main Menu
root.config(menu=menubar)
The Main Loop
Now before we start the main loop, we call the pathChange() function so the list is generated for the first time:
# Call the function so the list displays
pathChange('')
# run the main program
root.mainloop()
Showcase
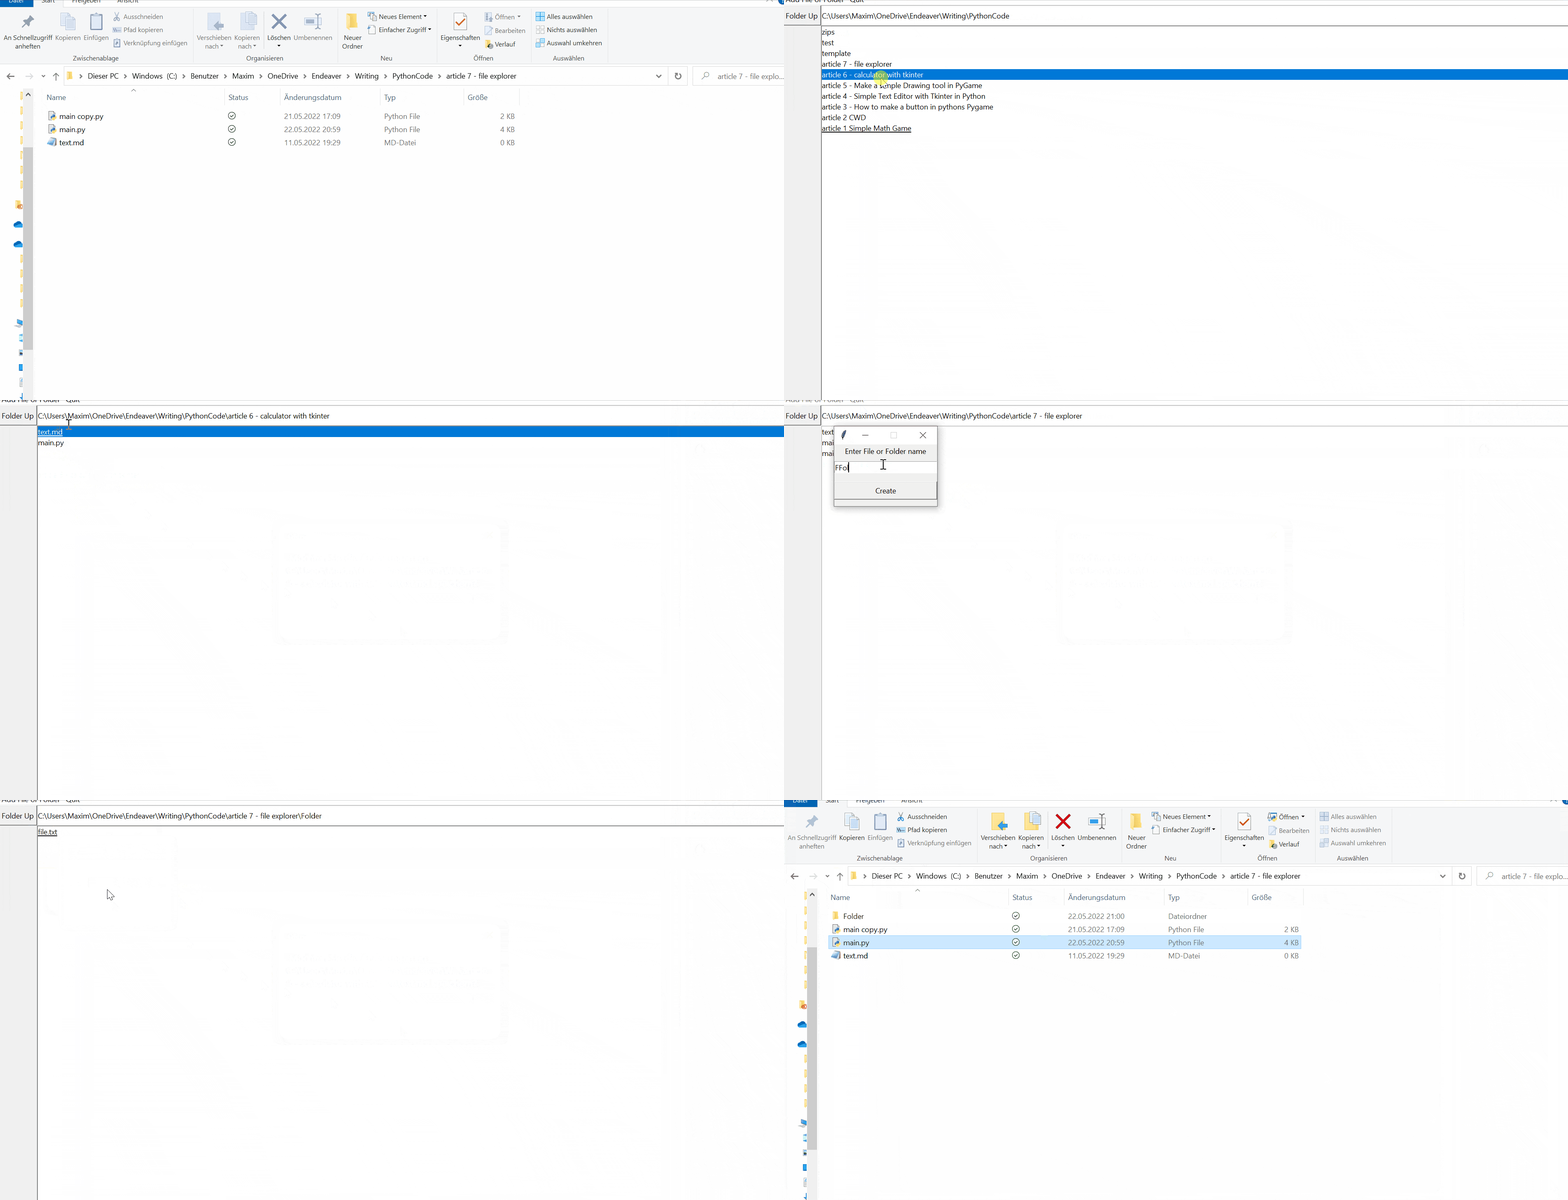
Let's run it. You can take a look at the file explorer in action:

Conclusion
Excellent! You have successfully created a simple file explorer using Python code! See how you can add more features to this program, such as renaming files or sorting the files and folders.
Here are some related tutorials:
- How to Make a Text Editor using Tkinter in Python
- How to Make a Typing Speed Tester with Tkinter in Python
- How to Build a GUI Currency Converter using Tkinter in Python
- How to Build a GUI Dictionary App with Tkinter in Python
- How to Make a Rich Text Editor with Tkinter in Python
Happy coding ♥
Save time and energy with our Python Code Generator. Why start from scratch when you can generate? Give it a try!
View Full Code Switch My Framework


Got a coding query or need some guidance before you comment? Check out this Python Code Assistant for expert advice and handy tips. It's like having a coding tutor right in your fingertips!