Unlock the secrets of your code with our AI-powered Code Explainer. Take a look!
Idea
In this article, we will make a simple rich text editor where we can set several predefined styles for parts of the text via a Graphical User Interface (GUI).
We will save this information and make it so the user can load them. This will be a little like the text editor we created earlier. We will make use of Tkinter’s Text Widget and its Tag functionality to make the editor. The Text widget is like a normal text area, but it allows us to style certain text parts differently by using tags. We will implement our own file format, which is basically just JSON.
Imports
For this program, we will obviously need Tkinter for the UI; We need to also get askopenfilename and asksaveasfilename from tkinter.filedialog separately so we can ask the user for a file path. We get some functions from functools and json, which will be helpful later. We also enable high DPI with ctypes:
from tkinter import *
from tkinter.filedialog import askopenfilename, asksaveasfilename
import ctypes
from functools import partial
from json import loads, dumps

ctypes.windll.shcore.SetProcessDpiAwareness(True)
Setup
Let’s first set up! We start by making a new Tk() object representing the top-level window of our application. Then we set the starting dimension of this window that is saved in the root variable with the geometry() method. We then define a variable that holds the name of the application.
We save this information to have a consistent title for the window later. We will change this often.
# Setup
root = Tk()
root.geometry('600x600')

# Used to make title of the application
applicationName = 'Rich Text Editor'
root.title(applicationName)
Then we initiate a variable containing the file path of the current file. We also set an initial directory for the file dialogs.
Last but not least, we define a tuple holding more tuples that will be the file types that can be chosen in the file dialog. The first item in the nested tuple is the name, and the second is the file name pattern. If you want to make it so the user can choose any file ending with .rte you write *.rte:
# Current File Path
filePath = None
# initial directory to be the current directory
initialdir = '.'
# Define File Types that can be choosen
validFileTypes = (
    ("Rich Text File","*.rte"),
    ("all files","*.*")
)
Then we define Bahnschrift to be the font for the text area that we later insert, and we define padding for the same text area.
After that, we initiate a variable called document that will hold information about the current document. Last but not least, we define a default content for this document. This is what we save inside the files. The content key is the text, and the tags key will hold the positions of every tag used in the document:
# Setting the font and Padding for the Text Area
fontName = 'Bahnschrift'
padding = 60
# Infos about the Document are stored here
document = None
# Default content of the File
defaultContent = {
    "content": "",
    "tags": {
        'bold': [(), ()]
    },
}
Below are some tags that can be used in the document. The dictionary can be simply inserted into the tag_configure() function with the appropriate keys. To make the font bold, we add bold to the end of the font description.
As you see, we also do this for italics. Then we add a code tag that has the font set to consolas and the background color to a light grey.
For the color, we use a function that transforms RGB to hex. It is the one grabbed from this tutorial. Then we also define tags where the font size is larger and tags where the background and text colors are changed. We change the text color with the foreground key.
# Add Different Types of Tags that can be added to the document.
tagTypes = {
    # Font Settings
    'Bold': {'font': f'{fontName} 15 bold'},
    'Italic': {'font': f'{fontName} 15 italic'},
    'Code': {'font': 'Consolas 15', 'background': rgbToHex((200, 200, 200))},
    # Sizes
    'Normal Size': {'font': f'{fontName} 15'},
    'Larger Size': {'font': f'{fontName} 25'},
    'Largest Size': {'font': f'{fontName} 35'},
    # Background Colors
    'Highlight': {'background': rgbToHex((255, 255, 0))},
    'Highlight Red': {'background': rgbToHex((255, 0, 0))},
    'Highlight Green': {'background': rgbToHex((0, 255, 0))},
    'Highlight Black': {'background': rgbToHex((0, 0, 0))},
    # Foreground /  Text Colors
    'Text White': {'foreground': rgbToHex((255, 255, 255))},
    'Text Grey': {'foreground': rgbToHex((200, 200, 200))},
    'Text Blue': {'foreground': rgbToHex((0, 0, 255))},
    'Text green': {'foreground': rgbToHex((0, 255, 0))},
    'Text Red': {'foreground': rgbToHex((255, 0, 0))},
}
Widgets
Next, we setup up the widgets of our program. We start with the textArea, where the user writes their stuff. The widget is called Text; we set its master to be the root and define a font.
We also set the relief to FLAT so there is no outline. We can use this constant this way because we imported everything from Tkinter.
We then place the widget with the pack() method, we set fill to BOTH and expand to TRUE. This will be the only widget, so it should span the whole window. We also add some padding on both axes with padx and pady.
We bind any key press on this widget to call the keyDown callback. This is done so we can register changes in the text content. We also call the resetTags() function that will make the tags usable in the editor:
textArea = Text(root, font=f'{fontName} 15', relief=FLAT)
textArea.pack(fill=BOTH, expand=TRUE, padx=padding, pady=padding)
textArea.bind("<Key>", keyDown)

resetTags()
Continuing, we a make a menu that will appear at the top of the window, where we can choose tags, save and open files. We do this by creating and setting the menu on the top-level window to be this:
menu = Menu(root)
root.config(menu=menu)
Then we add a cascade to this menu by making another Menu and adding it to the main menu with add_cascade(). For this nested menu, we set tearoff to 0 because we don’t want to be able to break the menu of the window.
We add three commands to it; Open, Save, and Exit. For Open and Save, we set a partial() function to be its command. This will call the fileManager() function that will handle file interaction with either open or save as action. We use the partial() function because only this way we can supply arguments.
For Exit, we simply call root.quit(). But we also bind control o and control s as keyboard shortcuts for the menus with bind_all():
fileMenu = Menu(menu, tearoff=0)
menu.add_cascade(label="File", menu=fileMenu)

fileMenu.add_command(label="Open", command=partial(fileManager, action='open'), accelerator='Ctrl+O')
root.bind_all('<Control-o>', partial(fileManager, action='open'))

fileMenu.add_command(label="Save", command=partial(fileManager, action='save'), accelerator='Ctrl+S')
root.bind_all('<Control-s>', partial(fileManager, action='save'))

fileMenu.add_command(label="Exit", command=root.quit)
We then add another cascade that holds the commands for the formatting. We loop over the tags we defined earlier and create a command for each one. We supply the tagToggle() function with the lowered name of the tag as an argument. This function will handle the styling:
formatMenu = Menu(menu, tearoff=0)
menu.add_cascade(label="Format", menu=formatMenu)

for tagType in tagTypes:
    formatMenu.add_command(label=tagType, command=partial(tagToggle, tagName=tagType.lower()))
At the end of the program, we need to simply call the main loop function on the root, so the program starts running:
root.mainloop()Functions
Now let us go over all the functions that are used in this program.
Resetting the Tags
This function will reset all tags of the textArea. First, we loop over all used tags, and we remove them with tag_remove(). Then we loop over all tags defined at the start of the program and add their lowered name and all the properties with the tag_configure() function:
def resetTags():
    for tag in textArea.tag_names():
        textArea.tag_remove(tag, "1.0", "end")

    for tagType in tagTypes:
        textArea.tag_configure(tagType.lower(), tagTypes[tagType])
Handling Key Events
This function will be called every time any key is pressed down. If that’s the case, we can assume that changes were made to the text area, so we add an asterisk to the file path title of the window. We could do more in this function, but that’s it for now:
def keyDown(event=None):
    root.title(f'{applicationName} - *{filePath}')
Toggle Tags Function
This function will fire when the user presses one of the formatting buttons. It will apply the tags at the current selection in the textArea.
The logic does not have to be that big because it is pretty smart in placing and deleting tags. Inside, we first save two strings to a variable: 'sel.first' and 'sel.last' simply tell tag_remove() and tag_add() that we want to take the current selection. Now, if the tag has a range that encloses the start of the user selection, we delete the tag where the selection is. If not, it will simply add this tag at the specified position.
def tagToggle(tagName):
    start, end = "sel.first", "sel.last"

    if tagName in textArea.tag_names('sel.first'):
        textArea.tag_remove(tagName, start, end)
    else:
        textArea.tag_add(tagName, start, end)
File Manager Function
Now let’s get to the file manager function. This is by far the largest function since it will open and save our .rte files. So it will decode and encode the tags and their position.
It will take an event parameter that is never used and an action that determines whether we want to save or open a file:
# Handle File Events
def fileManager(event=None, action=None):
    global document, filePath
So if the action is open, we first want to ask the user which files they want. We can do this with askopenfilename(). We can also specify valid file types and an initial directory. We save the path:
# Open
    if action == 'open':
        # ask the user for a filename with the native file explorer.
        filePath = askopenfilename(filetypes=validFileTypes, initialdir=initialdir)
Then we open the file and read its content to the document variable. Keep in mind to parse it because it will be JSON. Then we clear the textArea and we insert the content:
        with open(filePath, 'r') as f:
            document = loads(f.read())
        # Delete Content
        textArea.delete('1.0', END)
        # Set Content
        textArea.insert('1.0', document['content'])
        # Set Title
        root.title(f'{applicationName} - {filePath}')
Continuing, we reset the tags and add them via for loop. They should be stored inside document in a nested fashion:
        # Reset all tags
        resetTags()
        # Add To the Document
        for tagName in document['tags']:
            for tagStart, tagEnd in document['tags'][tagName]:
                textArea.tag_add(tagName, tagStart, tagEnd)
If the user wants to save, we set the document as the default content and insert the text content into it:
    elif action == 'save':
        document = defaultContent
        document['content'] = textArea.get('1.0', END)
Then we loop over all tags and add each tag name as a key to the document. We then loop over all ranges of this tag and add them. They get returned weirdly, so we have to do some convoluted things to get each pair:
        for tagName in textArea.tag_names():
            if tagName == 'sel': continue

            document['tags'][tagName] = []
            ranges = textArea.tag_ranges(tagName)
            for i, tagRange in enumerate(ranges[::2]):
                document['tags'][tagName].append([str(tagRange), str(ranges[i+1])])
Now, if the file path is not set, we have to ask the user once again:
        if not filePath:
            # ask the user for a filename with the native file explorer.
            newfilePath = asksaveasfilename(filetypes=validFileTypes, initialdir=initialdir)
            # Return in case the User Leaves the Window without
            # choosing a file to save
            if newfilePath is None: return
            filePath = newfilePath
Then we append .rte to the path in case it is not there. Lastly, we save the encoded content and change the title again:
        if not filePath.endswith('.rte'):
            filePath += '.rte'
        with open(filePath, 'w') as f:
            print('Saving at: ', filePath)
            f.write(dumps(document))
        root.title(f'{applicationName} - {filePath}')
Showcase
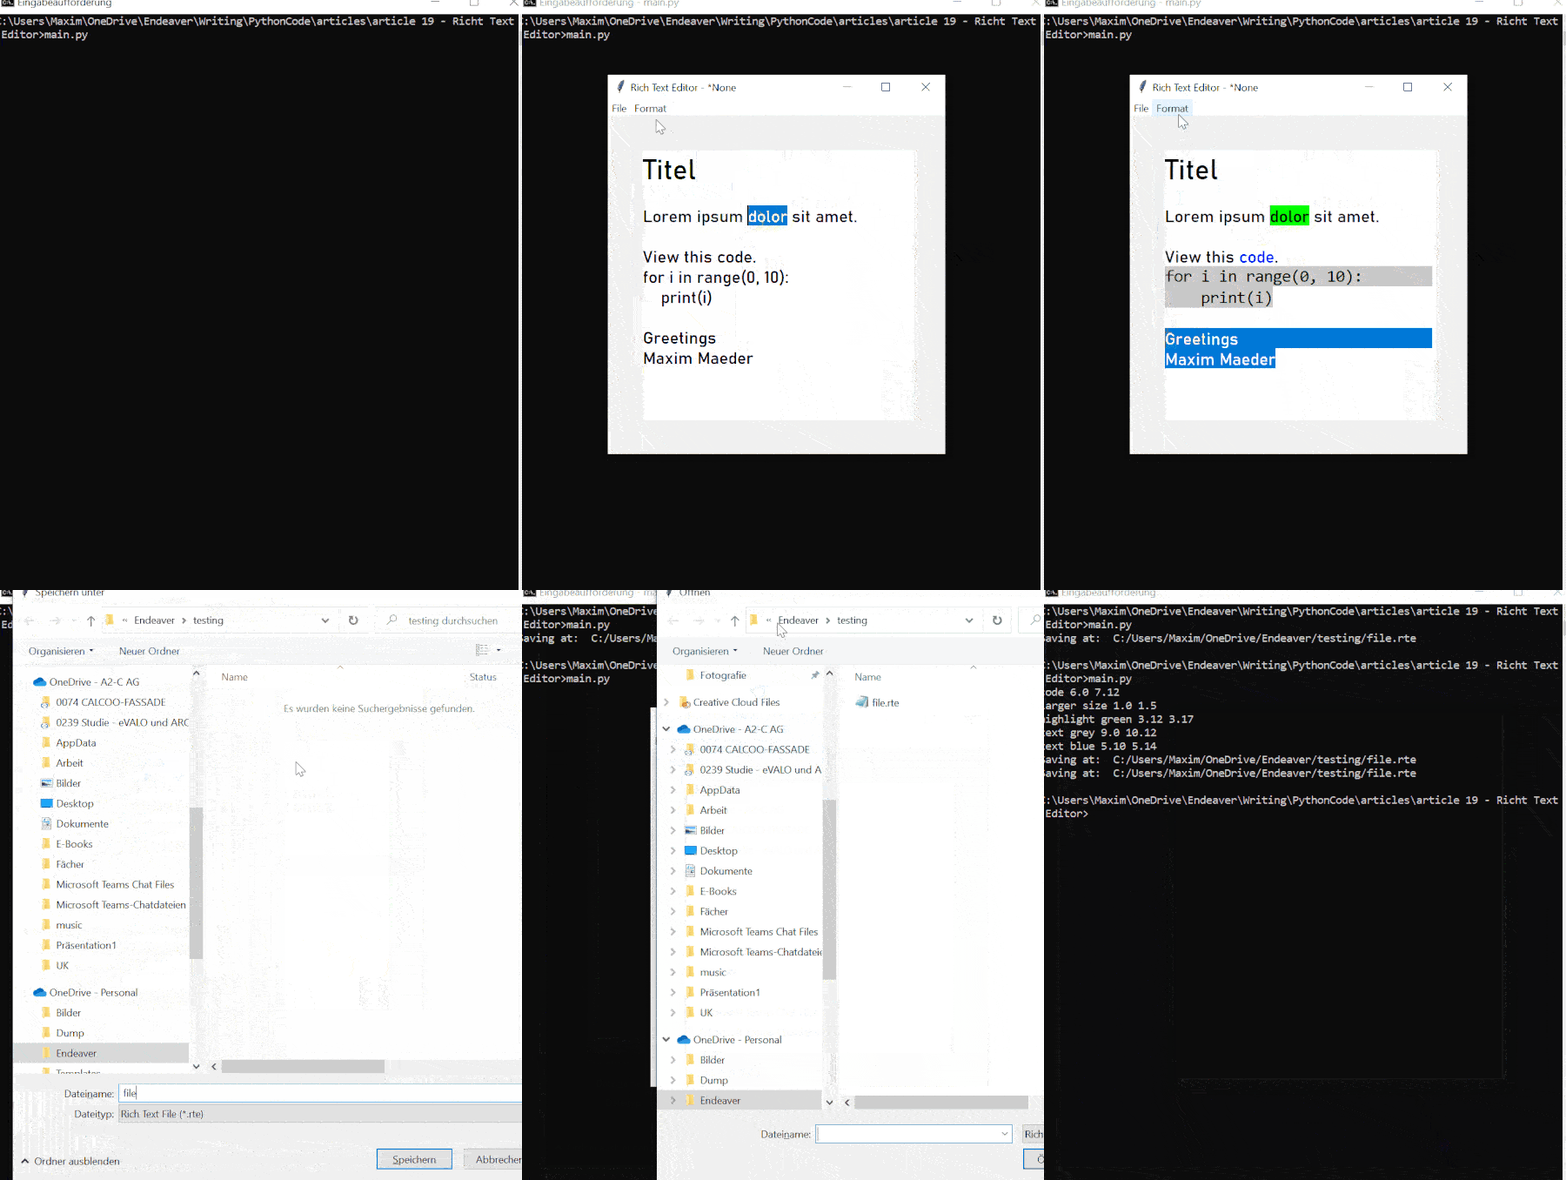
In the Gif below, you see the program in action.

Conclusion
Excellent! You have successfully created a Simple Rich Text Editor using Python code! See how you can add more features to this program, such as Exporting to HTML or PDF.
You can get the complete code here.
Learn also: How to Make a Markdown Editor using Tkinter in Python
Happy coding ♥
Liked what you read? You'll love what you can learn from our AI-powered Code Explainer. Check it out!
View Full Code Build My Python Code


Got a coding query or need some guidance before you comment? Check out this Python Code Assistant for expert advice and handy tips. It's like having a coding tutor right in your fingertips!