Unlock the secrets of your code with our AI-powered Code Explainer. Take a look!
Idea
In this article, we are going to make a button class in pygame in Python which can be utilized in different ways. We make it, so the button calls a custom function when pressed. We also enable it to support "pressed calling" and "one-shot" pressing. Last but not least, we will build a system for multiple buttons, so they dynamically get drawn without having to add them to a list manually. Let us start!
Imports and Setup
Before we make the Button class we need to set up a viable pygame window, therefore we import sys and pygame. sys will be needed later to shut down the window. After that, we initiate pygame with the pygame.init() function. After defining the fps we make a new pygame clock.
We continue by making the screen. After that, we load a font which we will later use in the buttons, you can use whatever font you want, but I'll choose Arial for this tutorial. At last, we make a list called objects. We later need this for the buttons and the dynamic drawing.
# Imports
import sys
import pygame

# Configuration
pygame.init()
fps = 60
fpsClock = pygame.time.Clock()
width, height = 640, 480
screen = pygame.display.set_mode((width, height))

font = pygame.font.SysFont('Arial', 40)

objects = []
Button Class Initiation
Now we can finally start with the Button class. We code the __init__() to take several arguments: the x and y coordinates, the width and the height, the text in the button, the function which will be called, and whether the button will be pressed once.
We map all these information to variables in the object. We also define some colors for the three states the button will have; 'normal', 'hover', and 'pressed'.
class Button():
    def __init__(self, x, y, width, height, buttonText='Button', onclickFunction=None, onePress=False):
        self.x = x
        self.y = y
        self.width = width
        self.height = height
        self.onclickFunction = onclickFunction
        self.onePress = onePress
        self.alreadyPressed = False

        self.fillColors = {
            'normal': '#ffffff',
            'hover': '#666666',
            'pressed': '#333333',
        }
After we set up the variables, we make the buttonSurface, and the buttonRect. Here we use the values we defined above.
We also make a surface that contains the buttonText. Here we use the font variable we defined earlier to call the render() method on it:
        self.buttonSurface = pygame.Surface((self.width, self.height))
        self.buttonRect = pygame.Rect(self.x, self.y, self.width, self.height)

        self.buttonSurf = font.render(buttonText, True, (20, 20, 20))
Last but not least, we append the object itself to the objects list. Later we will loop over this list to call all the process() functions from the buttons.
objects.append(self)Button Class Process
Now we turn to the process() method. This will be called every frame. That's why we are here checking for the mouse hover and click.
We start by getting the mouse position. After that, we fill the buttonSurface with our 'normal' color, this may be an unnecessary step because it may be recolored depending on the hover or click.
Then we check whether the mouse position is inside the rect or not. If this evaluates to True, we set the color to the 'hover' color.
Next, we check if the left mouse button has been pressed with the pygame.mouse.get_pressed() method. This method will return a tuple representing the pressed states of the three mouse buttons. The first one is the left button, which is what we need. If this is also evaluated to be True we once again fill the buttonSurface with the 'pressed' color.
Now, if we set the onePress variable to False (which is the default) then the onclickFunction(), which we later defined, will be called. This means it will be called once when the mouse clicks on the button. For this to work, we also need an alreadyPressed attribute in the object, which is set to True when we press and is set to False when we release it.
But maybe you want to call as long as you press it down. That is what the first if statement is for. When we set onePress to True this happens.
    def process(self):
        mousePos = pygame.mouse.get_pos()
        self.buttonSurface.fill(self.fillColors['normal'])
        if self.buttonRect.collidepoint(mousePos):
            self.buttonSurface.fill(self.fillColors['hover'])
            if pygame.mouse.get_pressed(num_buttons=3)[0]:
                self.buttonSurface.fill(self.fillColors['pressed'])
                if self.onePress:
                    self.onclickFunction()
                elif not self.alreadyPressed:
                    self.onclickFunction()
                    self.alreadyPressed = True
            else:
                self.alreadyPressed = False
The last thing we do in the process() method is blitting the text onto the buttonSurface and then this surface onto the screen.
        self.buttonSurface.blit(self.buttonSurf, [
            self.buttonRect.width/2 - self.buttonSurf.get_rect().width/2,
            self.buttonRect.height/2 - self.buttonSurf.get_rect().height/2
        ])
        screen.blit(self.buttonSurface, self.buttonRect)
Learn also: How to Change Text Color in Python.
Defining Button Objects
Now that we have made the Button class, we can make a little function that will be passed to the class constructor. In our example, it just prints out "Button Pressed".
Let's make two button objects. We don't have to save them into a variable or something like that because the constructor already does that:
def myFunction():
    print('Button Pressed')

Button(30, 30, 400, 100, 'Button One (onePress)', myFunction)
Button(30, 140, 400, 100, 'Button Two (multiPress)', myFunction, True)
The Main Game Loop
We first fill the screen with a dark grey in the main loop. After that, we enable the user to stop the game with the little x at the top right of the window.
In the objects loop, we go over every object and call its process() function. In our example, this list will have two button objects. After that, we simply flip() the display and call the tick() method on the clock object from pygame.
while True:
    screen.fill((20, 20, 20))
    for event in pygame.event.get():
        if event.type == pygame.QUIT:
            pygame.quit()
            sys.exit()
    for object in objects:
        object.process()
    pygame.display.flip()
    fpsClock.tick(fps)
Result
The following GIF shows how the button works:
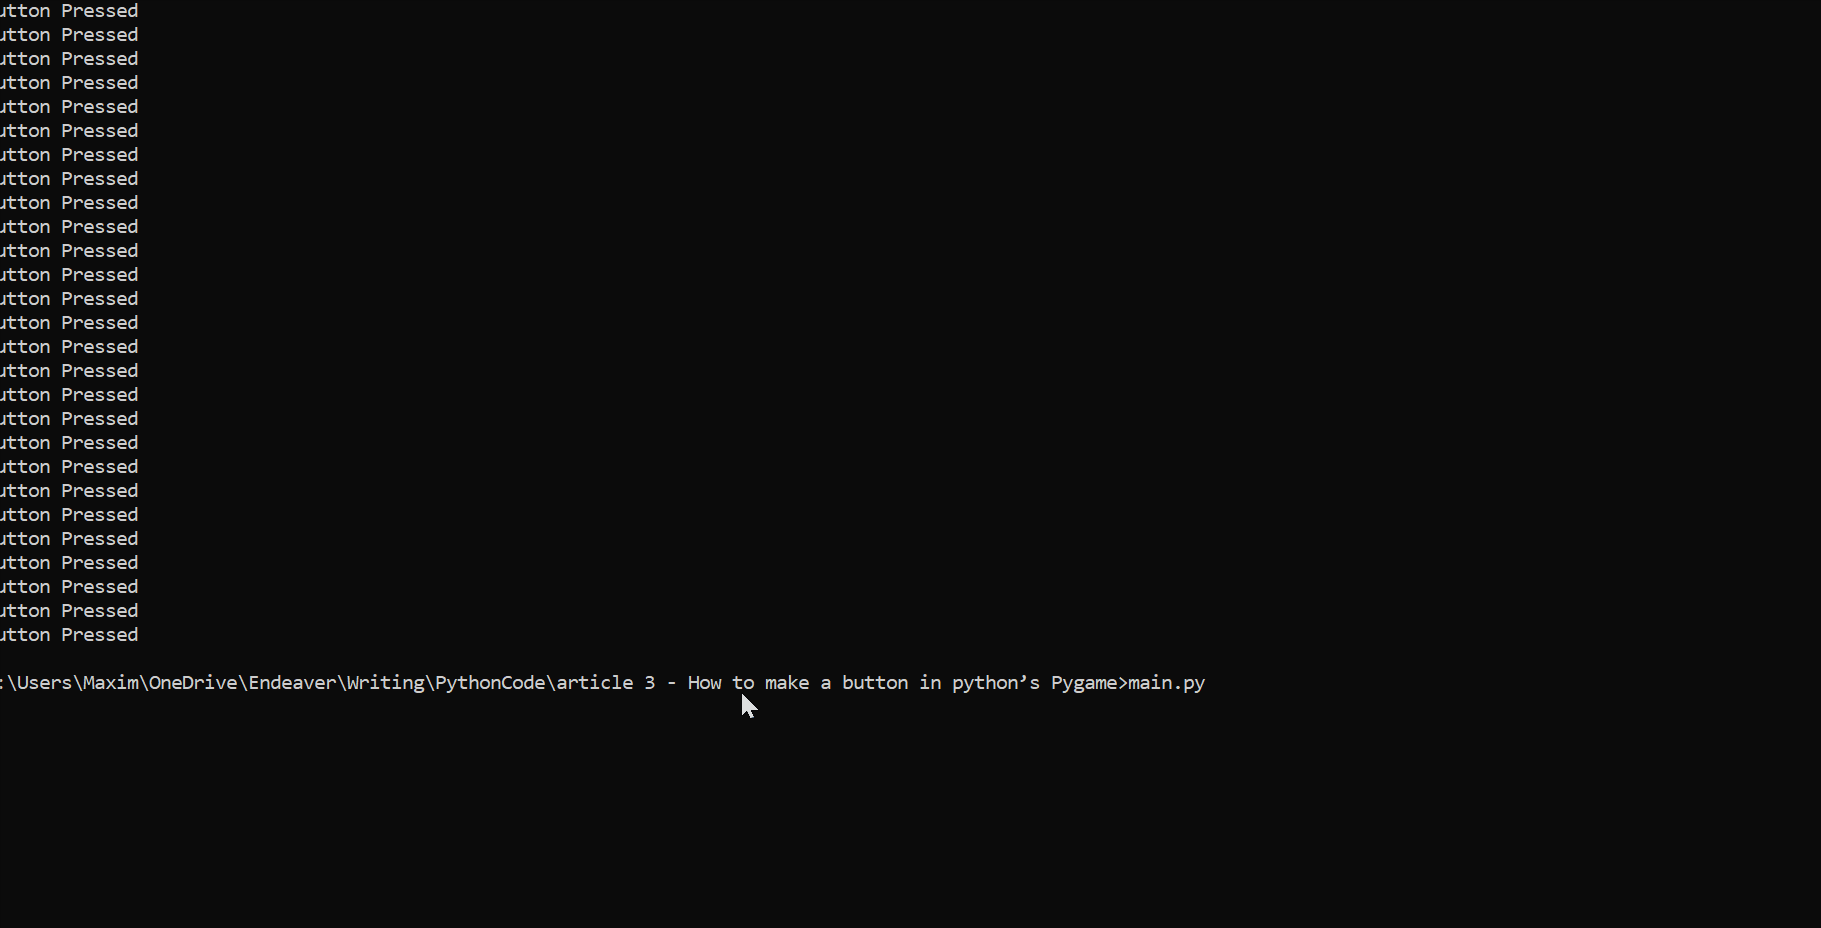 Awesome! Now you know how to make a button in
 pygame, see how you can customize the buttons by editing the variables we've set in this tutorial.
You can get the complete code here.
Here are some related tutorials:
- How to Make a Planet Simulator with PyGame in Python
- How to Make a Drawing Program in Python
- How to Create a Hangman Game using PyGame in Python
- How to Make a Chess Game with Pygame in Python
Happy coding ♥
Loved the article? You'll love our Code Converter even more! It's your secret weapon for effortless coding. Give it a whirl!
View Full Code Generate Python Code


Got a coding query or need some guidance before you comment? Check out this Python Code Assistant for expert advice and handy tips. It's like having a coding tutor right in your fingertips!