Welcome! Meet our Python Code Assistant, your new coding buddy. Why wait? Start exploring now!
In this tutorial, I will show you how to generate fake user data in Python. The program we are about to make using the Faker tool can help us keep things private and anonymous online. You can use it to make up fake details that act as a shield against potential hackers, keeping your real information safe. For those familiar with the dark web, this program can help us register for various services without entering your correct details.
It's also handy for software developers who require user data for testing. Instead of using real user data, which might not be safe or allowed, they can use the fake data to test if their programs work correctly. It's like using pretend data to make sure everything runs smoothly without risking any real information.
As mentioned earlier, we are going to be implementing this very cool concept using the Faker library in Python. The Faker library in Python is a tool for generating fake data. With Faker, you can generate a wide range of fake data, including names, addresses, phone numbers, email addresses, dates of birth, credit card numbers, and more. This can be especially useful in scenarios where using real data is impractical or poses privacy concerns. Feel free to check out the documentation here.
Before we can use Faker, we need to install it:
$ pip install FakerNow, let’s get coding. We’ll be implementing this program using Python 3. So open up a new Python file, name it meaningfully like fake_data.py and follow along!
As usual, we’ll start by importing the necessary libraries and modules:
# Import necessary libraries and modules.
from faker import Faker
from faker.providers import internet
import csv
The csv module in Python allows for easy reading and writing of CSV (Comma-Separated Values) files. We are importing this because after having generated our data, we’ll prompt the user to choose if they want to save the data or not. If they do, they also have the option of saving the data to either a CSV, TXT file, or both.
Next up, we create a function to generate the fake data for us:
# Function to generate user data with the specified number of users.
def generate_user_data(num_of_users):
   # Create a Faker instance.
   fake = Faker()
   # Add the Internet provider to generate email addresses and IP addresses.
   fake.add_provider(internet)
   # Initialize an empty list to store user data.
   user_data = []
   # Loop to generate data for the specified number of users.
   for _ in range(num_of_users):
       # Create a dictionary representing a user with various attributes.
       user = {
           'Name': fake.name(),
           'Email': fake.free_email(),
           'Phone Number': fake.phone_number(),
           'Birthdate': fake.date_of_birth(),
           'Address': fake.address(),
           'City': fake.city(),
           'Country': fake.country(),
           'ZIP Code': fake.zipcode(),
           'Job Title': fake.job(),
           'Company': fake.company(),
           'IP Address': fake.ipv4_private(),
           'Credit Card Number': fake.credit_card_number(),
           'Username': fake.user_name(),
           'Website': fake.url(),
           'SSN': fake.ssn()
       }
       # Append the user data dictionary to the user_data list.
       user_data.append(user)
   # Return the list of generated user data.
   return user_data
In this function, using Faker, we implemented functionality to generate fake data for us. The data to be generated includes Name, email, Phone Number, etc. The generated data will be written to a CSV or TXT file. Depending on the user’s choice. Now, let’s implement functionality to save the data in a csv file:
# Function to save user data to a CSV file.
def save_to_csv(data, filename):
   # Get the keys (column names) from the first dictionary in the data list.
   keys = data[0].keys()
   # Open the CSV file for writing.
   with open(filename, 'w', newline='') as output_file:
       # Create a CSV writer with the specified column names.
       writer = csv.DictWriter(output_file, fieldnames=keys)
       # Write the header row to the CSV file.
       writer.writeheader()
       # Iterate through each user dictionary and write a row to the CSV file.
       for user in data:
           writer.writerow(user)
   # Print a success message indicating that the data has been saved to the file.
   print(f'[+] Data saved to {filename} successfully.')
Similarly, we’ll create a function to save the data in a text file (if that’s what the user prefers):
# Function to save user data to a text file.
def save_to_text(data, filename):
   # Open the text file for writing.
   with open(filename, 'w') as output_file:
       # Iterate through each user dictionary.
       for user in data:
           # Iterate through key-value pairs in the user dictionary and write to the text file.
           for key, value in user.items():
               output_file.write(f"{key}: {value}\n")
           # Add a newline between users in the text file.
           output_file.write('\n')
   # Print a success message indicating that the data has been saved to the file.
   print(f'[+] Data saved to {filename} successfully.')
For readability, we’ll implement a function to print the generated data vertically. This is because, by default, when we run the code, if the user just wants to see the data and not save it, the generated data gets printed in a key-value pair form horizontally. Reading the data in that form can get a bit overwhelming. So, it’s a better practice to print it vertically. We also did that in the save_to_text() function. We did not need to do that for the save_to_csv() function because CSV files are comma-separated:
# Function to print user data vertically.
def print_data_vertically(data):
   # Iterate through each user dictionary in the data list.
   for user in data:
       # Iterate through key-value pairs in the user dictionary and print vertically.
       for key, value in user.items():
           print(f"{key}: {value}")
       # Add a newline between users.
       print()
Finally, we implement functionality to accept user input:
# Get the number of users from user input.
number_of_users = int(input("[!] Enter the number of users to generate: "))
# Generate user data using the specified number of users.
user_data = generate_user_data(number_of_users)
# Ask the user if they want to save the data to a file.
save_option = input("[?] Do you want to save the data to a file? (yes/no): ").lower()
# If the user chooses to save the data.
if save_option == 'yes':
   # Ask the user for the file type (CSV, TXT, or both).
   file_type = input("[!] Enter file type (csv/txt/both): ").lower()
   # Save to CSV if the user chose CSV or both.
   if file_type == 'csv' or file_type == 'both':
       # Ask the user for the CSV filename.
       custom_filename_csv = input("[!] Enter the CSV filename (without extension): ")
       # Concatenate the filename with the .csv extension.
       filename_csv = f"{custom_filename_csv}.csv"
       # Call the save_to_csv function to save the data to the CSV file.
       save_to_csv(user_data, filename_csv)
   # Save to TXT if the user chose TXT or both.
   if file_type == 'txt' or file_type == 'both':
       # Ask the user for the TXT filename.
       custom_filename_txt = input("[!] Enter the TXT filename (without extension): ")
       # Concatenate the filename with the .txt extension.
       filename_txt = f"{custom_filename_txt}.txt"
       # Call the save_to_text function to save the data to the text file.
       save_to_text(user_data, filename_txt)
   # If the user entered an invalid file type.
   if file_type not in ['csv', 'txt', 'both']:
       # Print an error message indicating that the file type is invalid.
       print("[-] Invalid file type. Data not saved.")
# If the user chose not to save the data, print it vertically.
else:
   # Call the print_data_vertically function to print the data vertically.
   print_data_vertically(user_data)
This part of the code begins by prompting the user to input the desired number of users to generate and then proceeds to generate user data accordingly. Subsequently, it inquires whether the user wishes to save the generated data, providing options for both CSV and TXT formats allowing customization of filenames. The script appropriately calls functions to save the data based on user preferences or, if the user opts not to save it, prints the generated data vertically for display (as mentioned earlier).
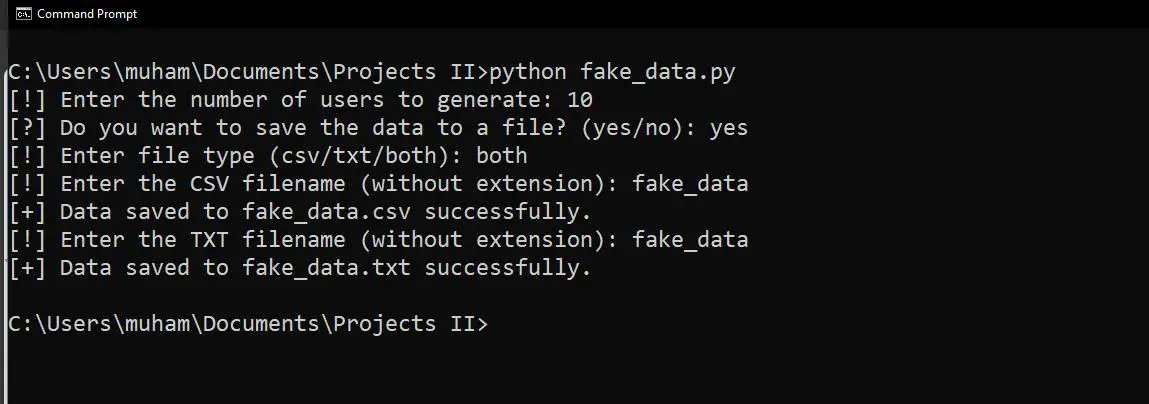
There you have it. We just wrote a program that can be used to generate fake user data. Let’s run our code to see how it works. Please bear in mind that I will select the ‘both’ option for testing purposes when asked for the file type I want. Feel free to test all available options. Also, the generated files will be saved in your current working directory.
Running the code:
$ python fake_data.pyResult:

When I open the CSV file (with MS Excel):

One thing to note is that Excel tends to shorten large numbers to their scientific forms (as seen in the ‘Credit Card Number' column). To see the actual (extended) value, simply double-click on the value you’re trying to see (as you can see for the first value in the said column).
Let’s see what our generated data looks like in the text format:

Finally, let’s see what data looks like when the user just views it and not saves it.

There you have it. Similar to the text format. This is thanks to the print_data_vertically() function.
With that, we’ve come to the end of this tutorial. As always, feel free to check out the Faker documentation to learn more about the Faker library. You can look for more variables to expand the data generation.
Also, if you want to learn a similar concept but with passwords, check out our password generator tutorial.
In conclusion, mastering the art of fake data generation not only empowers users to bolster their online privacy effectively but also proves invaluable in the realm of software testing. By understanding and harnessing the capabilities of tools like the Faker library, we can navigate the digital landscape with a heightened sense of security while contributing to the development and fortification of robust and privacy-conscious software. Embrace the versatility of fake data – a dual-purpose tool that safeguards personal information and propels innovation in the ever-evolving landscape of technology. Stay curious, stay secure, and happy coding!
Save time and energy with our Python Code Generator. Why start from scratch when you can generate? Give it a try!
View Full Code Switch My Framework


Got a coding query or need some guidance before you comment? Check out this Python Code Assistant for expert advice and handy tips. It's like having a coding tutor right in your fingertips!