Unlock the secrets of your code with our AI-powered Code Explainer. Take a look!
Text classification is one of the essential and common tasks in supervised machine learning. It is about assigning a category (a class) to documents, articles, books, reviews, tweets, or anything that involves text. It is a core task in natural language processing.
Many applications appeared to use text classification as the main task; examples include spam filtering, sentiment analysis, speech tagging, language detection, etc.
In this tutorial, we will build a text classifier model using RNNs using Tensorflow in Python; we will use the IMDB reviews dataset, which has 50K real-world movie reviews along with their sentiment (positive or negative). At the end of this tutorial, I will show you how you can integrate your own dataset so you can train the model on it.
Although we're using a sentiment analysis dataset, this tutorial is intended to perform text classification on any task. If you wish to perform sentiment analysis out of the box, check this tutorial.
If you wish to use state-of-the-art transformer models such as BERT, check this tutorial where we fine-tune BERT for our custom dataset.
To get started, you need to install the following libraries:
pip3 install tqdm numpy tensorflow==2.0.0 sklearnNow open up a new Python notebook or file and follow along. Let's import our necessary modules:
from tqdm import tqdm
from tensorflow.keras.preprocessing.sequence import pad_sequences
from tensorflow.keras.layers import Dense, Dropout, LSTM, Embedding, Bidirectional
from tensorflow.keras.models import Sequential
from tensorflow.keras.preprocessing.text import Tokenizer
from tensorflow.keras.preprocessing.sequence import pad_sequences
from tensorflow.keras.utils import to_categorical
from tensorflow.keras.callbacks import TensorBoard
from sklearn.model_selection import train_test_split
import numpy as np

from glob import glob
import random
import os
Data Preparation
Before we load our dataset into Python, you need to download the dataset here; you'll see two files there, reviews.txt, which contains a movie review in each line, and labels.txt which holds its corresponding label.
The below function loads and preprocesses the dataset:
def load_imdb_data(num_words, sequence_length, test_size=0.25, oov_token=None):
    # read reviews
    reviews = []
    with open("data/reviews.txt") as f:
        for review in f:
            review = review.strip()
            reviews.append(review)

    labels = []
    with open("data/labels.txt") as f:
        for label in f:
            label = label.strip()
            labels.append(label)
    # tokenize the dataset corpus, delete uncommon words such as names, etc.
    tokenizer = Tokenizer(num_words=num_words, oov_token=oov_token)
    tokenizer.fit_on_texts(reviews)
    X = tokenizer.texts_to_sequences(reviews)
    X, y = np.array(X), np.array(labels)
    # pad sequences with 0's
    X = pad_sequences(X, maxlen=sequence_length)
    # convert labels to one-hot encoded
    y = to_categorical(y)
    # split data to training and testing sets
    X_train, X_test, y_train, y_test = train_test_split(X, y, test_size=test_size, random_state=1)
    data = {}
    data["X_train"] = X_train
    data["X_test"]= X_test
    data["y_train"] = y_train
    data["y_test"] = y_test
    data["tokenizer"] = tokenizer
    data["int2label"] =  {0: "negative", 1: "positive"}
    data["label2int"] = {"negative": 0, "positive": 1}
    return data
A lot to cover here. This function does the following:
- It loads the dataset from the files mentioned earlier.
- After that, it uses Keras' utility Tokenizer class, which helps us remove all punctuations automatically, tokenize the corpus, remove rare words such as names, and convert text sentences into a sequence of numbers (each word corresponds to a number).
- We already know that neural networks expect a fixed-length input, and since the reviews don't have the same length of words, we need a way to make the length of sequences a fixed size. pad_sequences() function comes to the rescue; we tell it we want only say 300 words in each review (
maxlenparameter), it will remove the words that exceed that number, and it'll pad with 0's to the reviews below 300. - We use Keras'
to_categorical()function to one-hot encode the labels, this is a binary classification, so it'll convert the label 0 to [1, 0] vector and 1 to [0, 1]. But in general, it converts categorical labels to a fixed-length vector. - After that, we split our dataset into a training set and a testing set using sklearn's
train_test_split()function and use the data dictionary to add all the things we need in the training process: the dataset, the tokenizer, and the label encoding dictionary.
Building the Model
Now that we know how to load the dataset, let's build our model.
We will use an embedding layer as the first layer of the model. Embedding proved to be useful in mapping categorical variables (words, in this case) to a vector of continuous numbers; it is widely used in natural language processing tasks.
More precisely, we will use pre-trained GloVe word vectors, which are pre-trained vectors that map each word to a vector of a specific size. This size parameter is often called embedding size, although GloVe uses 50, 100, 200, or 300 embedding size vectors. We will try all of them in this tutorial and see which performs best. Also, two words with the same meaning tend to have very close vectors.
The second layer will be recurrent, you'll have the choice to choose any recurrent cell you want, including LSTM, GRU, or even just SimpleRNN, and again, we'll see which one outperforms the others.
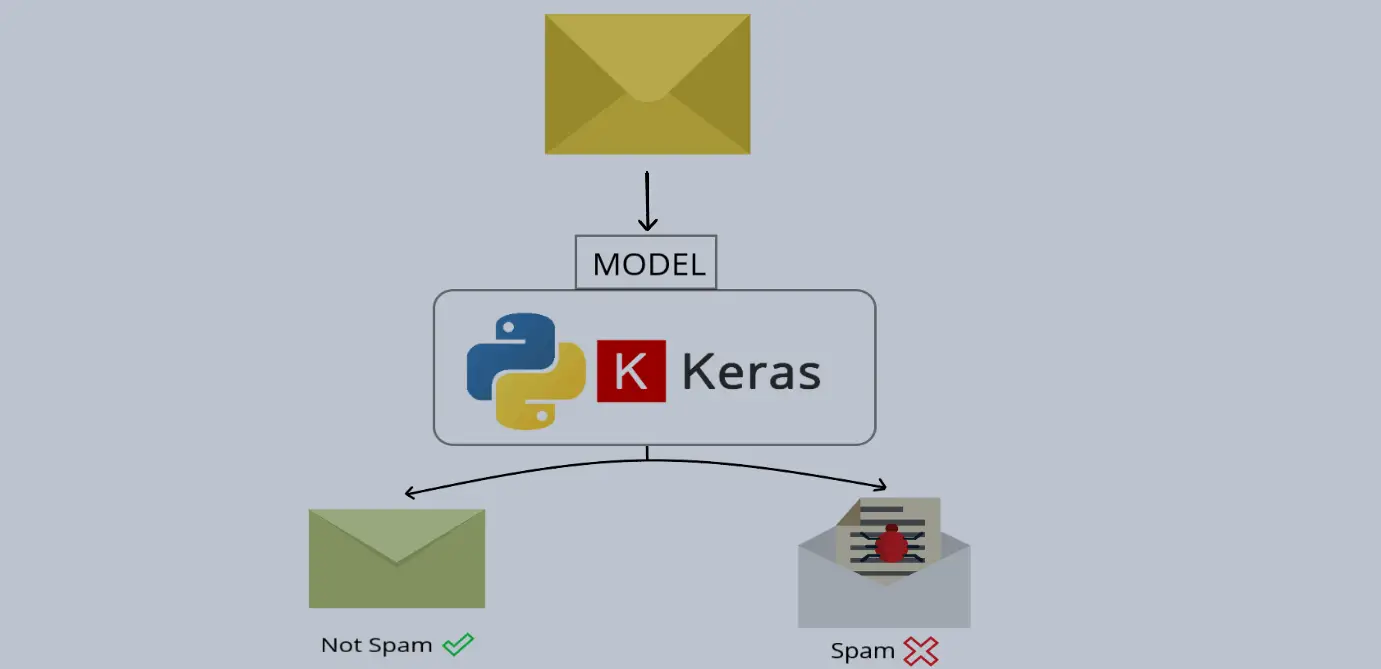
The last layer should be a dense layer with N neurons. N should be the same number of categories in your dataset. In the case of positive/negative sentiment analysis, it should be 2.
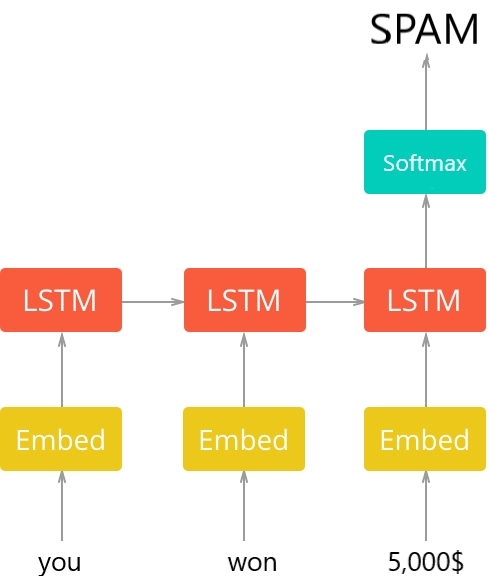
The general architecture of the model is shown in the following figure (grabbed from the spam classifier tutorial):
Now you need to download the pre-trained GloVe (download here). After you have done that, extract all of them in the data folder (you'll find different vectors for different embedding sizes), the below function loads these vectors:
def get_embedding_vectors(word_index, embedding_size=100):
    embedding_matrix = np.zeros((len(word_index) + 1, embedding_size))
    with open(f"data/glove.6B.{embedding_size}d.txt", encoding="utf8") as f:
        for line in tqdm(f, "Reading GloVe"):
            values = line.split()
            # get the word as the first word in the line
            word = values[0]
            if word in word_index:
                idx = word_index[word]
                # get the vectors as the remaining values in the line
                embedding_matrix[idx] = np.array(values[1:], dtype="float32")
    return embedding_matrix
Now we are going to need a function that creates the model from scratch, given the hyperparameters:
def create_model(word_index, units=128, n_layers=1, cell=LSTM, bidirectional=False,
                embedding_size=100, sequence_length=100, dropout=0.3,
                loss="categorical_crossentropy", optimizer="adam",
                output_length=2):
    """Constructs a RNN model given its parameters"""
    embedding_matrix = get_embedding_vectors(word_index, embedding_size)
    model = Sequential()
    # add the embedding layer
    model.add(Embedding(len(word_index) + 1,
              embedding_size,
              weights=[embedding_matrix],
              trainable=False,
              input_length=sequence_length))
    for i in range(n_layers):
        if i == n_layers - 1:
            # last layer
            if bidirectional:
                model.add(Bidirectional(cell(units, return_sequences=False)))
            else:
                model.add(cell(units, return_sequences=False))
        else:
            # first layer or hidden layers
            if bidirectional:
                model.add(Bidirectional(cell(units, return_sequences=True)))
            else:
                model.add(cell(units, return_sequences=True))
        model.add(Dropout(dropout))
    model.add(Dense(output_length, activation="softmax"))
    # compile the model
    model.compile(optimizer=optimizer, loss=loss, metrics=["accuracy"])
    return model
I know there are a lot of parameters in this function. Well, to test various parameters, this function will be flexible to all parameters provided. Let's explain them:
word_index: This is a dictionary that maps each word to its corresponding index number; this is produced by the previously mentioned Tokenizer object.units: This is the number of neurons in each recurrent layer; it defaults to 128, but use any number you want, be aware that the more units, the more weights to adjust, and therefore, the slower it'll be in the training process.n_layers: This is the number of recurrent layers we want to use; 1 is a good one to start with.cell: The recurrent cell you wish to use, LSTM is a good choice.bidirectional: This is a boolean variable that indicates whether we use bidirectional recurrent layers.embedding_size: The size of our embedding vector we mentioned earlier, we will experiment with various sizes.sequence_length: The number of tokenized words on each text sample to feed into the neural networks, we will experiment with this parameter too.dropout: it is the probability of training a given node on the layer. It helps reduce overfitting. 40% is pretty good for this, but try to tweak it and see if it performs better. Check this tutorial for more information about dropouts.loss: It's the loss function to use for the training. By default, we're using the categorical cross-entropy function.optimizer: The optimizer function to use, we're using ADAM here.output_length: This is the number of neurons to use in the last layer. Since we're using only positive and negative sentiment classification, it must be 2.
When you look closely, you'll notice that I'm using the Embedding class with weights parameter. It specifies the pre-trained weights we just downloaded, we're also setting trainable to False, so these vectors won't change during the training process.
If your dataset is in a different language than English, make sure you find embedding vectors for the language you're using, if not, you shouldn't set weights parameter at all, and you need to set trainable to True, so you'll train the parameters of the vector from scratch, check this page for word vectors of your language.
Training the Model
Now to start training, we need to define all of the previously mentioned hyperparameters and more:
# max number of words in each sentence
SEQUENCE_LENGTH = 300
# N-Dimensional GloVe embedding vectors
EMBEDDING_SIZE = 300
# number of words to use, discarding the rest
N_WORDS = 10000
# out of vocabulary token
OOV_TOKEN = None
# 30% testing set, 70% training set
TEST_SIZE = 0.3
# number of CELL layers
N_LAYERS = 1
# the RNN cell to use, LSTM in this case
RNN_CELL = LSTM
# whether it's a bidirectional RNN
IS_BIDIRECTIONAL = False
# number of units (RNN_CELL ,nodes) in each layer
UNITS = 128
# dropout rate
DROPOUT = 0.4
### Training parameters
LOSS = "categorical_crossentropy"
OPTIMIZER = "adam"
BATCH_SIZE = 64
EPOCHS = 6

def get_model_name(dataset_name):
    # construct the unique model name
    model_name = f"{dataset_name}-{RNN_CELL.__name__}-seq-{SEQUENCE_LENGTH}-em-{EMBEDDING_SIZE}-w-{N_WORDS}-layers-{N_LAYERS}-units-{UNITS}-opt-{OPTIMIZER}-BS-{BATCH_SIZE}-d-{DROPOUT}"
    if IS_BIDIRECTIONAL:
        # add 'bid' str if bidirectional
        model_name = "bid-" + model_name
    if OOV_TOKEN:
        # add 'oov' str if OOV token is specified
        model_name += "-oov"
    return model_name
I've set the optimal parameters so far that I've found, the get_model_name() function produces a unique model name based on parameters; this is useful when it comes to comparing various parameters on TensorBoard.
Let's bring everything together and start training our model:
# create these folders if they does not exist
if not os.path.isdir("results"):
    os.mkdir("results")
if not os.path.isdir("logs"):
    os.mkdir("logs")
if not os.path.isdir("data"):
    os.mkdir("data")
# dataset name, IMDB movie reviews dataset
dataset_name = "imdb"
# get the unique model name based on hyper parameters on parameters.py
model_name = get_model_name(dataset_name)
# load the data
data = load_imdb_data(N_WORDS, SEQUENCE_LENGTH, TEST_SIZE, oov_token=OOV_TOKEN)
# construct the model
model = create_model(data["tokenizer"].word_index, units=UNITS, n_layers=N_LAYERS,
                    cell=RNN_CELL, bidirectional=IS_BIDIRECTIONAL, embedding_size=EMBEDDING_SIZE,
                    sequence_length=SEQUENCE_LENGTH, dropout=DROPOUT,
                    loss=LOSS, optimizer=OPTIMIZER, output_length=data["y_train"][0].shape[0])
model.summary()
# using tensorboard on 'logs' folder
tensorboard = TensorBoard(log_dir=os.path.join("logs", model_name))
# start training
history = model.fit(data["X_train"], data["y_train"],
                    batch_size=BATCH_SIZE,
                    epochs=EPOCHS,
                    validation_data=(data["X_test"], data["y_test"]),
                    callbacks=[tensorboard],
                    verbose=1)
# save the resulting model into 'results' folder
model.save(os.path.join("results", model_name) + ".h5")
This will take several minutes to train. Here is my execution output after the training is finished:
Reading GloVe: 400000it [00:17, 23047.55it/s]
Model: "sequential"
_________________________________________________________________
Layer (type)                 Output Shape              Param #
=================================================================
embedding (Embedding)        (None, 300, 300)          37267200
_________________________________________________________________
lstm (LSTM)                  (None, 128)               219648
_________________________________________________________________
dropout (Dropout)            (None, 128)               0
_________________________________________________________________
dense (Dense)                (None, 2)                 258
=================================================================
Total params: 37,487,106
Trainable params: 219,906
Non-trainable params: 37,267,200
_________________________________________________________________
Train on 35000 samples, validate on 15000 samples
Epoch 1/6
35000/35000 [==============================] - 186s 5ms/sample - loss: 0.4359 - accuracy: 0.7919 - val_loss: 0.2912 - val_accuracy: 0.8788
Epoch 2/6
35000/35000 [==============================] - 179s 5ms/sample - loss: 0.2857 - accuracy: 0.8820 - val_loss: 0.2608 - val_accuracy: 0.8919
Epoch 3/6
35000/35000 [==============================] - 175s 5ms/sample - loss: 0.2501 - accuracy: 0.8985 - val_loss: 0.2472 - val_accuracy: 0.8977
Epoch 4/6
35000/35000 [==============================] - 174s 5ms/sample - loss: 0.2184 - accuracy: 0.9129 - val_loss: 0.2525 - val_accuracy: 0.8997
Epoch 5/6
35000/35000 [==============================] - 185s 5ms/sample - loss: 0.1918 - accuracy: 0.9246 - val_loss: 0.2576 - val_accuracy: 0.9035
Epoch 6/6
35000/35000 [==============================] - 188s 5ms/sample - loss: 0.1598 - accuracy: 0.9391 - val_loss: 0.2494 - val_accuracy: 0.9004
Excellent, it reached about 90% accuracy after 6 epochs of training.
Testing the Model
Using the model is pretty straightforward. The below function uses the model.predict() method to produce the output:
def get_predictions(text):
    sequence = data["tokenizer"].texts_to_sequences([text])
    # pad the sequences
    sequence = pad_sequences(sequence, maxlen=SEQUENCE_LENGTH)
    # get the prediction
    prediction = model.predict(sequence)[0]
    return prediction, data["int2label"][np.argmax(prediction)]
So as you can see, in order to properly produce predictions, we need to use our previously used tokenizer to convert the text into sequences, after that, we pad sequences so it's a fixed-length sequence, and then we produce the output using model.predict() method, let's play around with this model:
text = "The movie is awesome!"
output_vector, prediction = get_predictions(text)
print("Output vector:", output_vector)
print("Prediction:", prediction)
Output:
Output vector: [0.3001343  0.69986564]
Prediction: positive
Let's use another text:
text = "The movie is bad."
output_vector, prediction = get_predictions(text)
print("Output vector:", output_vector)
print("Prediction:", prediction)
Output:
Output vector: [0.92491007 0.07508987]
Prediction: negative
It is pretty sure that it's a negative sentiment with about 92% confidence. Let's be more challenging:
text = "Not very good, but pretty good try."
output_vector, prediction = get_predictions(text)
print("Output vector:", output_vector)
print("Prediction:", prediction)
Output:
Output vector: [0.38528103 0.61471903]
Prediction: positive
It is pretty 61% sure that's a good sentiment, as you can see, it's giving interesting results, spend some time tricking the model!
Hyperparameter Tuning
Before I came up with 90% accuracy, I have experimented with various hyper parameters, here are some of the interesting ones:
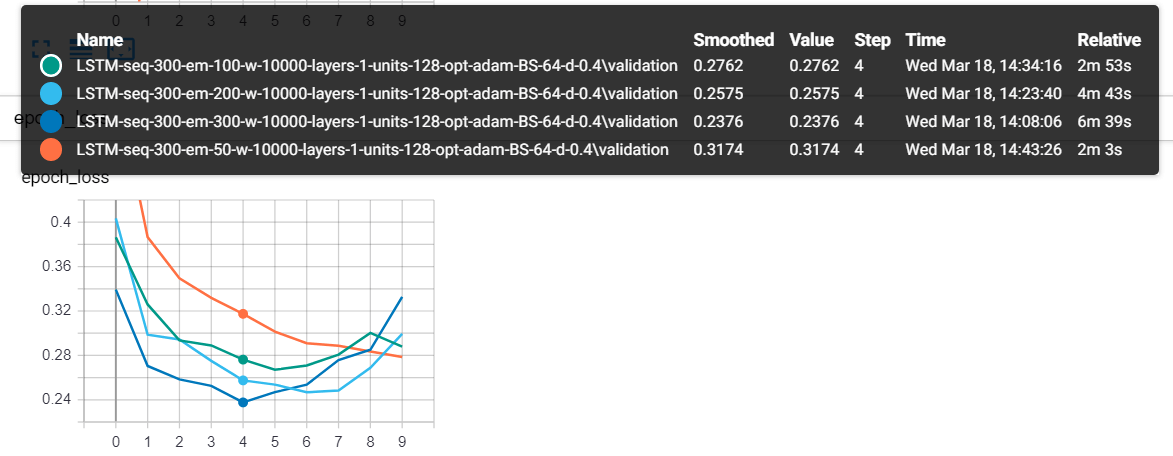
These are 4 models, and each has a different embedding size, as you can see, the one that has a 300 length vector (each word got a 300 length vector) reached the lowest validation loss value.
Here is another one when I used the sequence length as the varying parameter:
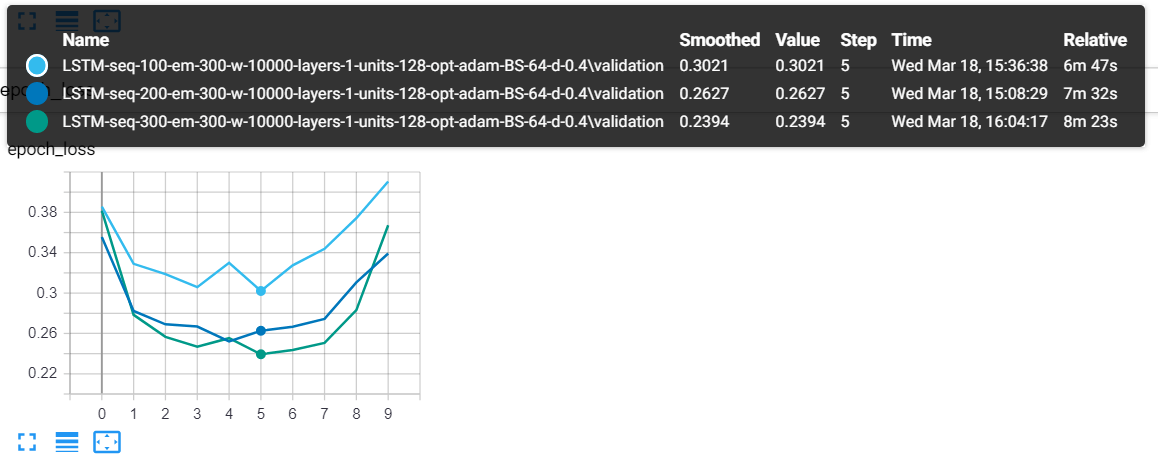
The model which has a 300 sequence length (the green one) tends to perform better.
Using tensorboard, you can see that after reaching epochs 4-5-6, the validation loss will try to increase again, that's clearly overfitting. That's why I set epochs to 6. try to tweak other parameters such as dropout rate and see if you can decrease it furthermore.
Integrating Custom Datasets
Since this is a text classification tutorial, it would be useful if you can use your own datasets without changing much of this tutorial's code. In fact, all you have to change is the loading data function, previously we used the load_imdb_data() function, which returns a data dictionary that has:
X_train: A NumPy array that is of the shape (number of training samples, sequence length) which contains all the sequences of each data sample.X_test: Same as above, but for testing samples.y_train: These are the labels of the training set, it's a NumPy array of the shape (number of testing samples, number of total categories), in the case of sentiment analysis, this should be something like (15000, 2)y_test: Same as above, but for testing samples.tokenizer: This is a Tokenizer instance from tensorflow.keras.preprocessing.text module, the object that is used to tokenize the corpus.label2int: A Python dictionary that converts a label to its corresponding encoded integer, in the sentiment analysis example, we used 1 for positive and 0 for negative.int2label: Vice-versa of the above.
Here is an example function that loads the 20 newsgroup dataset (which contains around 18000 newsgroups posts on 20 topics), it uses sklearn's built-in function fetch_20newsgroups():
from sklearn.datasets import fetch_20newsgroups

def load_20_newsgroup_data(num_words, sequence_length, test_size=0.25, oov_token=None):
    # load the 20 news groups dataset
    # shuffling the data & removing each document's header, signature blocks and quotation blocks
    dataset = fetch_20newsgroups(subset="all", shuffle=True, remove=("headers", "footers", "quotes"))
    documents = dataset.data
    labels = dataset.target
    tokenizer = Tokenizer(num_words=num_words, oov_token=oov_token)
    tokenizer.fit_on_texts(documents)
    X = tokenizer.texts_to_sequences(documents)
    X, y = np.array(X), np.array(labels)
    # pad sequences with 0's
    X = pad_sequences(X, maxlen=sequence_length)
    # convert labels to one-hot encoded
    y = to_categorical(y)
    # split data to training and testing sets
    X_train, X_test, y_train, y_test = train_test_split(X, y, test_size=test_size, random_state=1)
    data = {}
    data["X_train"] = X_train
    data["X_test"]= X_test
    data["y_train"] = y_train
    data["y_test"] = y_test
    data["tokenizer"] = tokenizer
    data["int2label"] = { i: label for i, label in enumerate(dataset.target_names) }
    data["label2int"] = { label: i for i, label in enumerate(dataset.target_names) }
    return data
Alright, good luck implementing your own text classifier, if you have any problems integrating one, post your comment below and I'll try to reach you as soon as possible.
As I mentioned earlier, try to experiment with all the hyperparameters provided. I tried to write the code as flexiblely as possible so you can change only the parameters without doing anything else. If you outperformed my parameters, share them with us in the comments below!
Related: Fake News Detection in Python.
Happy Learning ♥
Just finished the article? Now, boost your next project with our Python Code Generator. Discover a faster, smarter way to code.
View Full Code Fix My Code


Got a coding query or need some guidance before you comment? Check out this Python Code Assistant for expert advice and handy tips. It's like having a coding tutor right in your fingertips!