Turn your code into any language with our Code Converter. It's the ultimate tool for multi-language programming. Start converting now!
PyQt5 is a Python framework for building GUI applications. Most beginners are more familiar with Tkinter, which is by far the easiest way to build GUI for whatever side project you're building quickly.
But Tkinter is less customizable, and the UI looks terrible if you don't use ttkboostrap. Users might want something functional, but they also love a good UI.
This is where PyQT5 comes in; It is a framework built on QT, which is a C++ framework for building UI. Apart from being customizable with CSS2, Another added beauty of PyQT is that it can build UI to adapt to the native implementation, i.e., your app blends in and looks just the way other apps in whatever operating system your user use looks like.
Great. In this article, we will build a book repo; it is a very basic but nerdy idea, i.e., an app we can use to record books we've read.
Let's install PyQt5:
$ pip install pyqt5Table of Contents:
- Database
- User Interface with PyQt5
- Create Forms With PyQT5
- Create Cards with PyQt5 QFrame
- Create a Scrollable Area PyQt5
- Updating Books
- Conclusion
Database
Like any other full-stack project you will be building in the future or have built before, you always need a database of some sort, and that is not less for our app either.
We will be using SQLite3 for the database, a very lightweight implementation of SQL; you've probably heard of it or used it. I will give a detailed explanation of what we're doing as we implement them.
Project Structure
Our project will have a very basic structure, which looks like something below:
BookDumodb.pymain.py
db.pythis is where all our database functions will reside.main.pythis is where the UI stuff with pyqt5 will be.
We will first tackle our db functions and then fully concentrate on the UI.
Here are a list of what needs to be done:
- Create table
- Select from table
- Delete from table
- and, Update
Note: SQLite comes with Python by default; pip install is unnecessary.
import sqlite3Create a Table with SQLite
# db.py

def create_table():
    db = sqlite3.connect('database.db')
    query = """
    CREATE TABLE if not exists BOOKS
    (
     ID INTEGER PRIMARY KEY AUTOINCREMENT,
     NAME TEXT NOT NULL,
     PRICE INTERGER NOT NULL,
     CREATED_AT DATETIME default current_timestamp,
     COMPLETED_AT DATATIME NOT NULL
    )
    """
    cur = db.cursor()
    cur.execute(query)
    db.close()
db = sqlite3.connect('database.db')- This is very straightforward, For us to perform any action in our database, we have to connect with it. The file will be automatically created, if it does not exist.- Now, to the query part, this is where things get interesting if you've never read or coded any SQL before.
CREATE TABLE BOOKS- very readable, this creates a table,if not exists- we added this statement, because every time our app runs, we will be calling the create table function, and we will get an error otherwise, saying stuff like the table already exists.- Inside the bracket, we have the columns, which are:
ID- which has the typeINTEGER, and we made it aPRIMARY KEYi.e. a unique identifier for whatever created row in the table. LastlyAUTOINCREMENT- this tells sqlite3 to auto-populate that value with a unique key.NAME- This is where the name of our book will go, It has a typeTEXT, andNOT NULL, that this column is not nullable, i.e. you cannot create a row with an empty name value.PRICE- This will be an integer value and will hold the price of our book.CREATED_AT- This is for when the record was created, the type isDATETIME, and defaultcurrent_timestamptellssqlite3to use the current time to populate this column whenever a row is created.COMPLETED_AT- This is where the date we completed our book goes, it also has aDATETIMEtype and can't be null.
db.cursor()is a method that allows you to create a cursor object associated with a SQLite database connection. You can use this cursor to execute SQL statements and interact with the database.cur.execute(query)- We're using our created cursor to execute that query.db.close()- closes db connection, freeing up resources.
Insert in SQLite3 Database
# db.py
def insert_book(name,  completed_at, price):
    db = sqlite3.connect('database.db')
    query = """
    INSERT INTO BOOKS(NAME, COMPLETED_AT, PRICE)
    VALUES (?,?)
    """
    cur = db.cursor()
    cur.execute(query, (name, completed_at, price))
    db.commit()
db.close()- The above function takes in two arguments,
nameandcompleted_at, these are of course the columns we will be altering, theidandcreated_atwill be auto-populated. - In the query:
INSERT INTO BOOKS- very straightforward and readable, and then in the bracket we have the columns we want to insert to.VALUES (?,?,?) - ?Is a placeholder and will be replaced with the proper values when we call the execute function.
db.cursor()is a method that allows you to create a cursor object associated with a SQLite database connection. You can use this cursor to execute SQL statements and interact with the database.cur.execute(query, (name, completed_at, price))- You can see that the next argument we passed right after the query is a tuple that contains the values that will replace the?placeholder. If you have only a single value to pass to the query, It should be in a tuple format as well. Something like this (value,)- After executing the query,
db.commit()is called to commit the changes made to the database. This ensures that the insert operation is permanent. - Finally,
db.close()is used to close the database connection when the operation is completed, freeing up resources.
Select Row/Rows from SQLite3 Table
# db.py
def get_all_books():
    db = sqlite3.connect('database.db')
    query = 'SELECT name, completed_at, price FROM BOOKS'
    cur = db.cursor()
    items_io = cur.execute(statement)
    item_lst = [i for i in items_io]
return item_lst- You are already familiar with the syntax and concept of connecting to the database file, cursor, and closing database.
- The
SELECTquery will trigger a fetch, unlike INSERT, which will trigger a put. - After that are the columns we want to select i.e. (
name,completed_at). FROM BOOKS, is just from which table. In our case,BOOKS- If you're selecting everything from the table, you should use that asterisk (
*) shorthand instead of typing all the columns out. - Lastly, when we execute our query, we get an I/O object as a response, which we then convert to a list.
Update Row in SQLite Database
def update_book(book_id, updated_name, updated_completed_date, updated_price):
    db = sqlite3.connect('database.db')
    query = "UPDATE BOOKS SET NAME=?, COMPLETED_AT=? PRICE=? WHERE ID=?"
    cur = db.cursor()
    cur.execute(query, (updated_name, updated_completed_date,
                updated_price, book_id))
    db.commit()
    db.close()
query = "UPDATE BOOKS SET NAME=?, COMPLETED_AT=? PRICE=? WHERE ID=?"- This line defines an SQL query string to update a record in theBOOKStable. It uses placeholders (question marks) to represent values that will be provided later when executing the query. The query is intended to update theNAME,COMPLETED_AT, andPRICEcolumns based on theIDcolumn's value.- After executing the query,
db.commit()is called to commit the changes made to the database. This ensures that the update operation is permanent. - Finally,
db.close()is used to close the database connection when the operation is completed, freeing up resources.
Delete Row from SQLite Database
def delete_book(book_id):
    # Connect to the SQLite database
    db = sqlite3.connect('database.db')
    # Define the SQL query to delete a book with a specific ID
    query = "DELETE FROM books WHERE id = ?"
    # Execute the query with the provided book ID as a parameter
    db.execute(query, (book_id,))
    # Commit the changes to the database
    db.commit()
    # Close the database connection
db.close()- The
delete_book()function is defined with one parameter,book_id. This function is intended to delete a book from the database based on its ID. - The SQL query to delete a book with a specific ID is defined and stored in the
queryvariable. The?placeholder is used as a parameter placeholder to prevent SQL injection and allow safe substitution of thebook_idvalue. - The
db.execute(query, (book_id,))line executes the SQL query, passing thebook_idas a parameter to replace the?placeholder. This deletes the book with the specified ID from thebookstable in the database. - After executing the query,
db.commit()is called to commit the changes made to the database. This ensures that the deletion operation is permanent. - Finally,
db.close()is used to close the database connection when the operation is completed, freeing up resources.
User Interface with PyQt5
We've tackled pretty much everything on the backend of our app, what is left for us is to delve into the frontend and make a super cool UI with pyqt5.
As usual, we will have a boilerplate code, which will include every import and probably the structure of the code:
from PyQt5.QtWidgets import (QApplication, QMainWindow, QVBoxLayout, QScrollArea,
                             QLineEdit, QHBoxLayout, QFrame,
                             QPushButton, QLabel)
from PyQt5.QtCore import Qt
from datetime import datetime
from db import (get_all_books, create_table, insert_book, update_book)

class Main(QMainWindow):
    def __init__(self):
        super().__init__()
        create_table()

def main():
    app = QApplication([])
    app.setStyle('fusion')
    win = Main()
    win.show()
    app.exec_()

if __name__ == '__main__':
    main()
We'll dissect the code step by step and explain each component.
1. Importing Required Modules
The first part of the code imports the necessary modules. These modules provide the tools we need to create our GUI application.
from PyQt5.QtWidgets import (QApplication, QMainWindow, QVBoxLayout,
                             QScrollArea, QLineEdit, QHBoxLayout,
                             QFrame, QPushButton, QLabel)

from datetime import datetime
from db import (get_all_books, create_table, insert_book, delete_book)QApplication: This class represents the application itself and is essential for starting the PyQt5 application event loop.QMainWindow: It's a fundamental class for creating the application's main window.- Several other classes such as
QVBoxLayout,QScrollArea,QLineEdit,QHBoxLayout,QFrame,QPushButton, andQLabelare imported to create various GUI elements.
We also import Python's built-in datetime class for working with date and time values and functions from our custom db.py.
2. Defining the Main Class
The core of our application is represented by a class named Main, which inherits from QMainWindow. However, in this code, the class is empty, meaning it doesn't contain any specific functionality or GUI elements, that will be our starting point.
class Main(QMainWindow):
    def __init__(self):
        super().__init__()
        create_table()
We're also calling the create_table() function, so the database or table can be created if it does not exist. Remember we added a condition in our query that will prevent the function from throwing an error if that table already exists.
3. The Main Function
The main function serves as the entry point of our application. It sets up the application, creates the main window, and starts the event loop:
def main():
    app = QApplication([])
    app.setStyle('fusion')  # Setting the application style
    win = Main()            # Creating an instance of the Main class
    win.show()              # Displaying the main window
app.exec_() # Starting the application event loopQApplication([])initializes the PyQt5 application. The[]argument can be used to pass command-line arguments to the application.app.setStyle('fusion')sets the application style to'fusion,'which is one of the available styles in PyQt5.Main()creates an instance of theMainclass, representing the main window.win.show()displays the main window on the screen.app.exec_()starts the PyQt5 event loop, allowing the application to respond to user interactions and events.
4. Conditional Execution
The final section checks if the script is being run directly (instead of imported as a module) using the if __name__ == '__main__': construct. If the script is the main program, it calls the main() function to start the application.
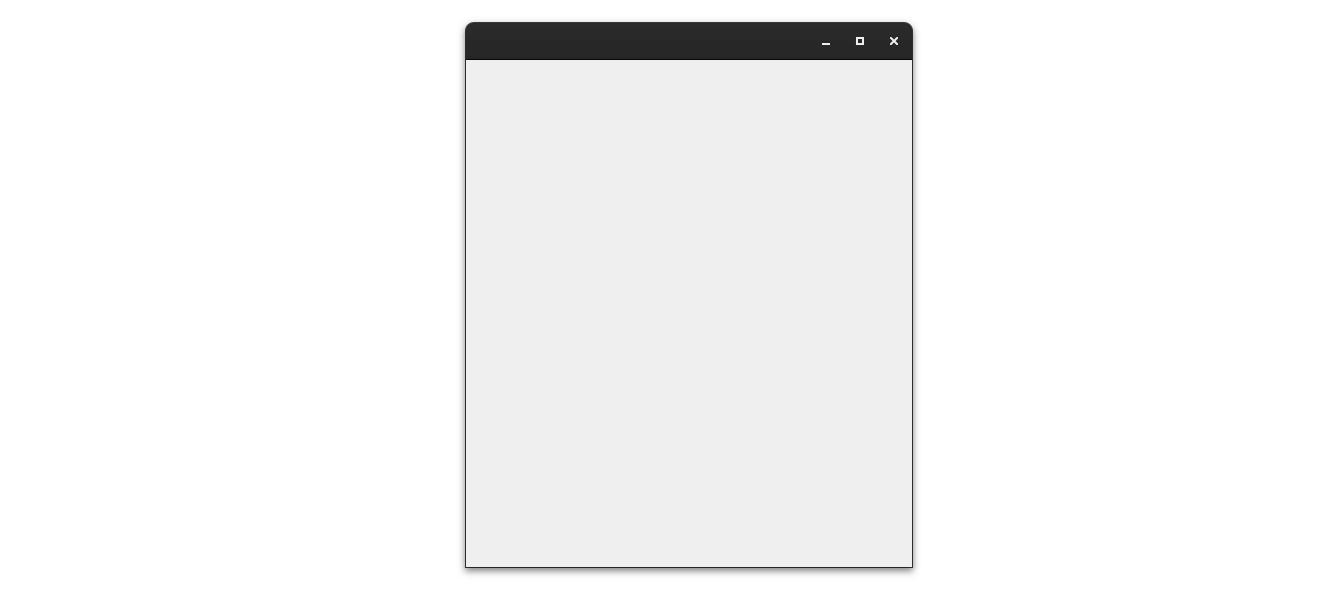
If we run or execute this script at this point, we should be able to see an empty window show up on our screen:
Create Forms With PyQT5
We will then add the section to add records to our database, which trust me, will be very smooth and fairly easy.
Creating the Widget
class CreateRecord(QFrame):
    def __init__(self, main_window):
        super().__init__()
We start by defining a new class called CreateRecord. This class is a subclass of QFrame, which is a fundamental building block for creating GUI components in PyQt5. We're using QFrame as the base for our widget.
The __init__() method is a special method called when we create an instance of the class. In this method, we receive a reference to the main window (the main_window parameter) because we'll need it to reload our book collection later.
Adding Input Fields
        self.date_entry = QDateEdit()
        self.book_name = QLineEdit()
        self.book_name.setPlaceholderText('Book name')
        self.price = QLineEdit()
        self.price.setPlaceholderText('$')
Next, we create two input fields using PyQt5 widgets:
self.date_entryis aQDateEditwidget, which allows users to select a date.self.book_nameis aQLineEditwidget, which provides a text input field for users to enter the book's name.self.pricealso a text input field.
We also set a placeholder text, "Book name, $" to hint to the user about what should be entered in the input field.
Adding a Button
self.add_button = QPushButton(text="Add Book")We create a button labeled Add Book using the QPushButton widget. This button will trigger adding a new book to our database when clicked.
Connecting Button Click to Function
        # Connect the button to add_book function
        self.add_button.clicked.connect(self.add_book)
This line of code connects the button's clicked signal to a function called add_book(). In other words, when the Add Book button is clicked, it will trigger the add_book() function.
Layout Management
        layout = QVBoxLayout(self)
        layout.addWidget(QLabel('Book Name:'))
        layout.addWidget(self.book_name)
        layout.addWidget(QLabel('Completed Date:'))
        layout.addWidget(self.date_entry)
        layout.addWidget(self.add_button)
To arrange our widgets nicely within the CreateRecord widget, we create a vertical layout (QVBoxLayout) called layout. We pass self as the parent widget for this layout.
We then add several items to this layout:
- Labels: We add labels for "Book Name:" and "Completed Date:" to provide context for the input fields.
- Input Fields: We add the book name input field (
self.book_name) and the date selection field (self.date_entry). - Button: We added the Add Book button.
This layout ensures the components are stacked vertically, making the user interface clean and intuitive.
Adding a Function to Add Books
    def add_book(self):
        book_name = self.book_name.text()
        completed_date = self.date_entry.date().toString("yyyy-MM-dd")
        price = self.price.text()
        if book_name and price:
            insert_book(book_name, completed_date, price)
            # Reload the book collection after adding a book
            self.main_window.load_collection()
            self.book_name.clear()  # Clear the input field
            self.price.clear()
Finally, we define the add_book() function. This function is called when the Add Book button is clicked.
Inside the function:
- We retrieve the text entered in the book name input field (
self.book_name.text(),self.price.text()) and the selected date from the date entry field (self.date_entry.date().toString("yyyy-MM-dd")). - We check if a book name and price were provided (the
if book_name and price:condition). If a book name and price exist, we proceed. - We use the
insert_book()function to add the new book to our database, providing the book name, completion date, and price as parameters. - After adding the book, we reload the book collection in the main window using
self.main_window.load_collection(). This ensures that the newly added book is displayed in the list of completed books. - Finally, we clear the book name input field and price to prepare it for the next entry (
self.book_name.clear(),self.price.clear()).
NOTE: The load_collection() function isn't defined yet so we can add a placeholder to our main function.
This completes the explanation of the CreateRecord class. It allows users to input the name of a book and its completion date, and by clicking the Add Book button, the book is added to the database and displayed in the collection.
We can then add this to our main layout like this:
## ... main class
def initUI(self):
    self.main_frame = QFrame()
    self.main_layout = QVBoxLayout(self.main_frame)
    # Create an instance of CreateRecord
    # Pass a reference to the main window
    self.register_widget = CreateRecord(self)
    self.main_layout.addWidget(self.register_widget)

def load_collection(self):
    # content will be updated later!
This should be this super cool form for our window that looks like this:
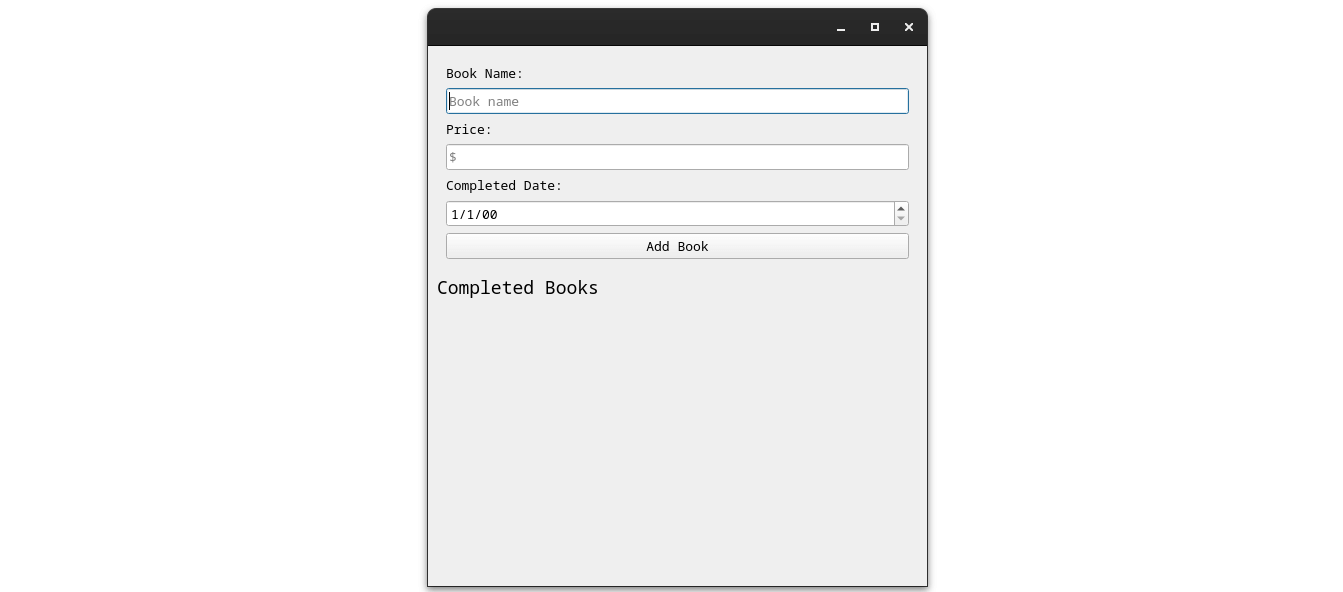
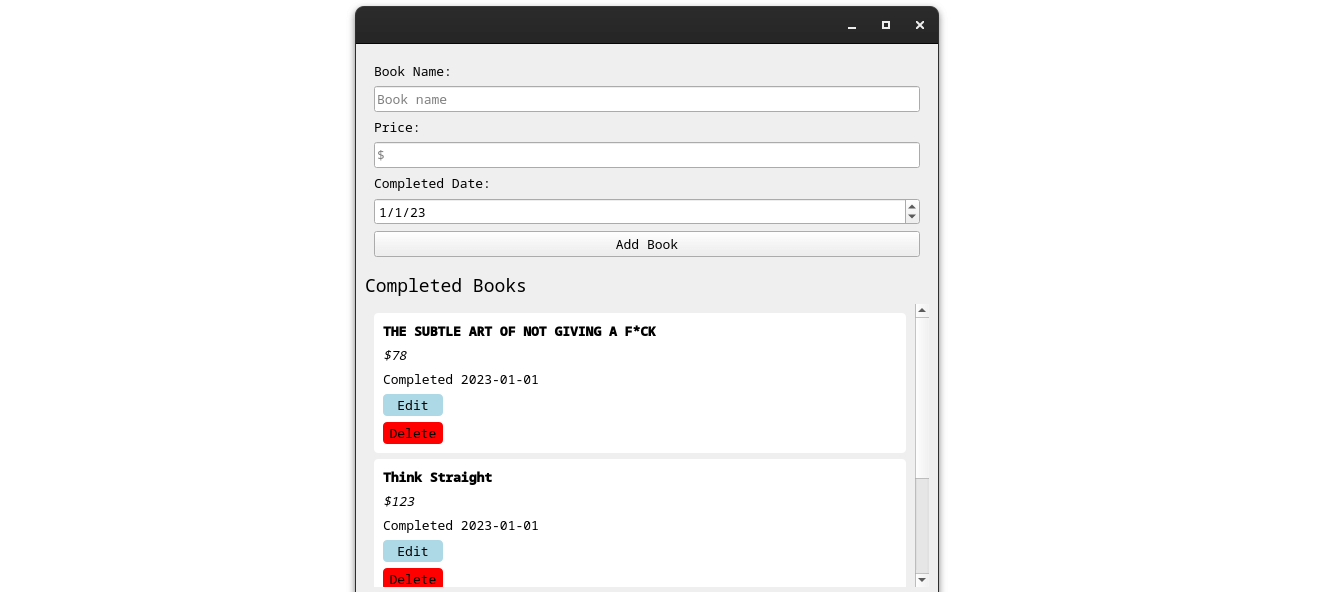
Create Cards with PyQt5 QFrame
The next component on our list will be the card that displays the books, this card will contain the name of the book, the date completed, and a delete button.
We're going to define a custom class with the name of BookCard:
# ..... ()

class BookCard(QFrame):
    def __init__(self, book_id, bookname, completed_date, price):
        super().__init__()
        self.setStyleSheet(
            'background:white; border-radius:4px; color:black;'
        )
        self.setFixedHeight(110)
        self.book_id = book_id
        layout = QVBoxLayout()
        label = QLabel(f'<strong>{bookname}</strong>')
        price_label = QLabel(f'<em>${price}</em>')
        # Update the format string here
        parsed_datetime = datetime.strptime(completed_date, "%Y-%m-%d")
        formatted_datetime = parsed_datetime.strftime("%Y-%m-%d")
        date_completed = QLabel(f"Completed {formatted_datetime}")
        delete_button = QPushButton(
            text='Delete', clicked=self.delete_book_click)
        delete_button.setFixedWidth(60)
        delete_button.setStyleSheet('background:orange; padding:3px;')
        layout.addWidget(label)
        layout.addWidget(price_label)
        layout.addWidget(date_completed)
        layout.addWidget(delete_button)
        layout.addStretch()
        self.setLayout(layout)

    def delete_book_click(self):
        delete_book(self.book_id)
        self.close()
To explain what's going on:
- Our
BookCardinherits fromQFrame, which is just like an empty container, that we can use to create custom elements. - In our
__init__()we will be taking in three (3) parameters,book_id,bookname,completed_date. I.e when we initialize the class we will be passing these as argument.
Example:
newbook = BookCard(book_id, name, completed_at)super().__init__()make sure to call the__init__()function of the parent. Which isQFrame.
Styling
As I said earlier, or as you already know, we can use CSS2 to customize our pyqt5 elements, and we can use a bit of HTML as well.
This is why here we are styling the card with the following CSS rule:
self.setStyleSheet(
            'background:white; border-radius:4px; color:black;'
)
The layouts and widgets should be straightforward by now, one thing I think I will need to elaborate more on is this date stuff:
parsed_datetime = datetime.strptime(completed_date, "%Y-%m-%d")
formatted_datetime = parsed_datetime.strftime("%Y-%m-%d")
Because we're storing the date in our database as a string, we need to convert it to a datetime object, that is why the parsed_datetime exist. We can then use this to format the date properly.
Finally, Our delete_book() function is bound to the click of the delete button:
    def delete_book_click(self):
        delete_book(self.book_id)
        self.close()
Fair enough, this function calls the delete_book() function imported from our database and parsed the book_id.
self.close() erases this frame from the layout.
Create a Scrollable Area PyQt5
To be able to make use of our book card, we need to make sure the area we are adding it to is scrollable. Otherwise, it will when it overflows; the rest of the card will just be hidden.
class Main(QMainWindow):
    def __init__(self):
        super().__init__()

    # .... Existing Code

    def book_collection_area(self):
        scroll_frame = QFrame()
        self.book_collection_layout = QVBoxLayout(scroll_frame)
        scroll = QScrollArea()
        scroll.setWidgetResizable(True)
        scroll.setWidget(scroll_frame)
        scroll.setStyleSheet('QScrollArea{border:0px}')
        self.book_collection_layout.addStretch()
        self.main_layout.addWidget(scroll)
We can just do this directly from our initUI function, but I decided to do it in a function instead for a cleaner code. We can just call that function in the init, and should set up the scrollable layout.
So basically, in this code:
QFrame, as said earlier, can be used for anything; in this case, we are going to make the contents of this frame scrollable.QSCrollAreathis API from pyqt5 lets us create a widget that is scrollable when its content overflows.- Our frame has a layout, which is a vertical layout (
self.book_collection_layout), this is where we are going to add the book cards.
- Our frame has a layout, which is a vertical layout (
scroll.setWidget(scroll_frame)This is where we're setting the content of the frame to be scrollable if it overflows.- Next, we added styling to the scroll area to remove the default border.
self.book_collection_layout.addStretch()here we are doing a trick, so if the content of a layout is smaller than the actual size of the layout, it kind of justifies a gap between those content.
Here is an image to visualize that:

- This doesn't look good, but the stretch will push everything to the top and make it look nice.
- Finally, we added that frame to our main layout.
So, in our initUI we can call this function like this:
class Main(QMainWindow):
    def __init__(self):
        super().__init__()

    # ... Existing code

    def initUI(self):
        self.main_frame = QFrame()
        self.main_layout = QVBoxLayout(self.main_frame)
        # add register widget
        # Pass a reference to the main window
        self.register_widget = CreateRecord(self)
        self.main_layout.addWidget(self.register_widget)
        books_label = QLabel('Completed Books')
        books_label.setStyleSheet('font-size:18px;')
        self.main_layout.addWidget(books_label)
        self.book_collection_area() # our scrollable frame
Our function to load our books from the database, creates the card, and add them to the self.book_collection_layout:
class Main(QMainWindow):
    def __init__(self):
        super().__init__()

     # --- Existing code

    def load_collection(self):
        # Clear existing book cards before reloading
        for i in reversed(range(self.book_collection_layout.count())):
            widget = self.book_collection_layout.itemAt(i).widget()
            if widget is not None:
                widget.deleteLater()

        collections = get_all_books()
        for collection in collections:
            frame = BookCard(*collection)
            self.book_collection_layout.insertWidget(0, frame)
The first part of the for-loop, as the comment says, is clearing whatever is in the self.book_collection_layout.
Finally, we get all the books, iterate over them, create a BookCard from with the data we got, then add that to the self.book_collection_layout.
The reason we're inserting at index 0. is so that all recent books, will be at the top of the previous.
We can then call this load_function() once our UI is loaded:
class Main(QMainWindow):
    def __init__(self):
        super().__init__()
        self.initUI()
        self.load_collection()

    # .. Existing Code
Updating Books
First, modify the BookCard class to include an Edit button next to each book record. This button will allow users to initiate the book update process. You'll also need to include a reference to the main window to handle the update process:
class BookCard(QFrame):
    def __init__(self, book_id, bookname, completed_date, price, main_window):
        super().__init__()
        self.main_window = main_window  # Pass a reference to the main window
        self.book_id, self.bookname, self.completed_date, self.price = book_id, bookname, completed_date, price

        # ... Existing code ...

        edit_button = QPushButton(
            text='Edit', clicked=lambda: self.edit_book_click(main_window))
        edit_button.setFixedWidth(60)
        edit_button.setStyleSheet('background:lightblue; padding:3px;')
        layout.addWidget(edit_button)
We've added an Edit button, which calls the edit_book_click() method when clicked. In this method, it will call the update_book() method in the Main class to open the update dialog for the selected book.
We've modified our BookCard parameters so that we can get a reference to the main class, this will allow us to call the update_book() function that will be defined in the main class.
class BookCard(QFrame):
def __init__(self, book_id, bookname, completed_date, price, main_window):
super().__init__()
# ... Rest of the code
def edit_book_click(self, main_window):
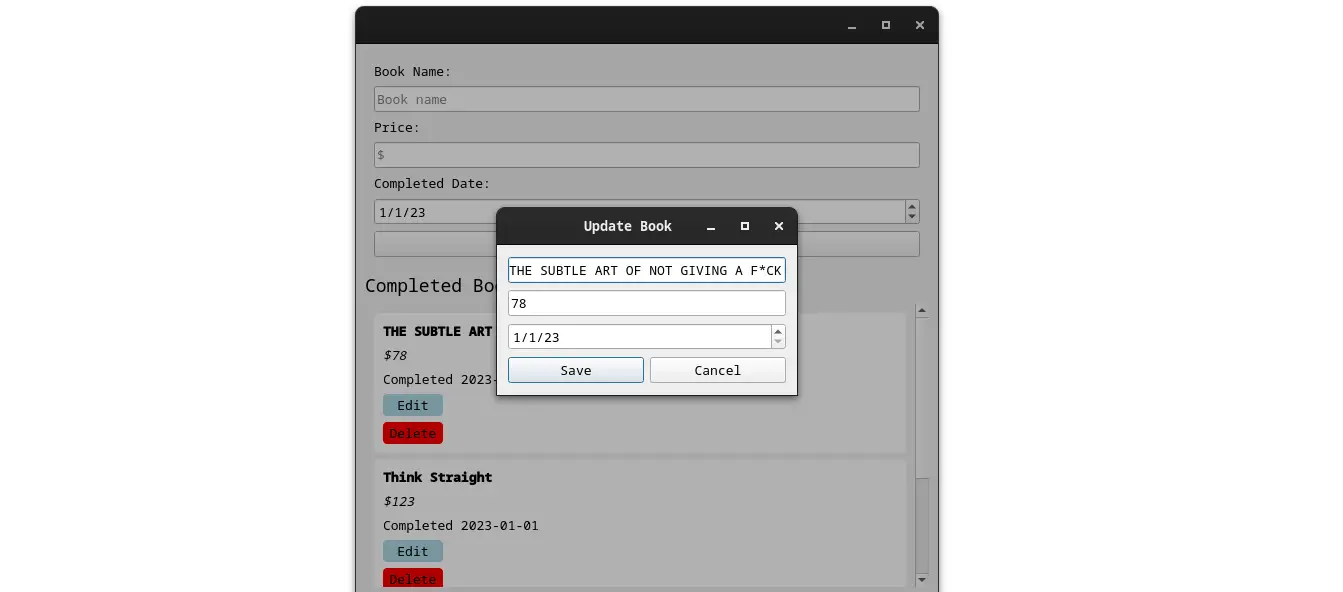
main_window.update_book(self.book_id, self.bookname, self.completed_date, self.price)Finally, we're going to have a dialog to update the book; in this dialog, users will be able to edit the book name, completed date, and also the price.
class UpdateBookDialog(QDialog):
    def __init__(self, main_window, book_id, name, completed_date, price):
        super().__init__(main_window)
        self.main_window = main_window
        self.book_id = book_id
        self.setWindowTitle('Update Book')
        self.setFixedSize(300, 150)
        self.main_layout = QVBoxLayout()
        self.book_name_edit = QLineEdit()
        self.book_name_edit.setText(name)
        self.price_edit = QLineEdit()
        self.price_edit.setText(price)
        self.date_edit = QDateEdit()
        # set the date edit
        self.set_date(completed_date)
        self.action_button_layout = QHBoxLayout()
        self.save_button = QPushButton(text="Save", clicked=self.save_update)
        self.cancel_button = QPushButton(text="Cancel", clicked=self.accept)
        self.main_layout.addWidget(self.book_name_edit)
        self.main_layout.addWidget(self.price_edit)
        self.main_layout.addWidget(self.date_edit)
        self.action_button_layout.addWidget(self.save_button)
        self.action_button_layout.addWidget(self.cancel_button)
        self.main_layout.addLayout(self.action_button_layout)
        self.setLayout(self.main_layout)

    def set_date(self, date_string):
        # Convert the date string to a QDate object
        date = QDate.fromString(date_string, "yyyy-MM-dd")
        # Set the date in the QDateEdit widget
        self.date_edit.setDate(date)

    def save_update(self):
        updated_name, updated_price = self.book_name_edit.text(), self.price_edit.text()
        updated_completed_date = self.date_edit.date().toString("yyyy-MM-dd")
        update_book(self.book_id, updated_name,
                    updated_completed_date, updated_price)
        self.accept()  # Close the dialog after updating
        self.main_window.load_collection()
This class inherits from QDialog, a PyQt5 class that allows us to create custom dialog boxes. Here's an overview of what this class does:
- In the constructor, we receive four arguments:
main_window,book_id,name,completed_date, andprice. These parameters help us initialize the dialog with the necessary book information. - Next, we create the user interface elements within the dialog,
- We set up a vertical layout (
main_layout) to organize our UI elements. - A
QLineEditwidget (book_name_edit) is provided for editing the book's name. The initial text is set to the providedname. - Another input for the price as well.
- We also include a
QDateEditwidget (date_edit) for editing the book's completion date, which is initialized using theset_datemethod. - For action buttons, we create a horizontal layout (
action_button_layout). - Two buttons are added: Save and Cancel. The Save button is linked to the
save_updatemethod, while the Cancel button simply closes the dialog. - Then, we arrange the widgets and buttons within our dialog using the layouts we defined earlier.
- Finally, we set the main layout for our dialog, effectively defining its structure.
Supporting Methods
set_date() - This method takes a date string in the "yyyy-MM-dd" format, converts it into a QDate object, and sets the date in the QDateEdit widget (date_edit).
The save_update() method is called when the Save button is clicked. It gathers the updated book name and completion date from the respective widgets, invokes the update_book function (which presumably updates the book information elsewhere in the code), and then closes the dialog using self.accept(). Additionally, it triggers the load_collection() method of the main_window.
Our Update dialog will look like this:
 Finally in our
 Main class, we're going to write the last piece of code for this project, and this will be the update_book() function, which will open the dialog whenever the edit button is clicked:
class Main(QMainWindow):
     def __init__(self):
         super().__init__()

     # .. Existing Code
  def update_book(self, book_id, name, date, price):
        dialog = UpdateBookDialog(self, book_id, name, date, str(price))
        dialog.exec_()
In this code, we're converting the price to a string object because QLineEdit would throw an error if you're not setting a string value.
Conclusion
Certainly, PyQt5 is indeed a powerful library for creating desktop applications with Python. It provides a wide range of features and capabilities that allow you to build robust and feature-rich applications. Here are some aspects to consider:
- Rich GUI Elements: PyQt5 offers various GUI elements, including buttons, labels, text inputs, and more. You can easily create complex user interfaces with its extensive set of widgets.
- Custom Widgets: You can create custom widgets in PyQt5, which means you're not limited to the built-in components. This enables you to design unique and specialized elements for your application.
- Event Handling: PyQt5 provides a robust event handling system, allowing you to respond to user interactions and implement dynamic behavior in your application.
- Layout Management: PyQt5 includes layout managers like
QVBoxLayoutandQHBoxLayout, making it easier to design responsive and well-organized user interfaces. - Signals and Slots: One of the most powerful features of PyQt5 is its signals and slots mechanism. It enables you to connect user interface elements to functions or methods, allowing for seamless interaction between different parts of your application.
- Dialogs: PyQt5 supports various dialogs, including message boxes, file, and custom dialogs. These are essential for user interaction and data input.
- Threading: You can use PyQt5 with Python's threading module to create multi-threaded applications, improving performance and responsiveness, especially in tasks involving I/O operations.
- Integration with Qt Designer: PyQt5 integrates seamlessly with Qt Designer, a visual tool for designing user interfaces. You can design your UI visually and then load it into your PyQt5 application.
- Cross-Platform: PyQt5 is cross-platform, meaning you can develop Windows, macOS, and Linux applications without major code changes.
- Active Community: PyQt5 has a strong and active community. This means you can find plenty of resources, tutorials, and support when you encounter challenges during development.
In summary, PyQt5 is a versatile library for building desktop applications with Python. Its rich set of features and the active community around it make it a great choice for a wide range of projects. Whether developing a small utility or a complex desktop application, PyQt5 provides the tools and support needed to bring your ideas to life.
You can get the complete code of this tutorial here.
Learn also: How to Build a Complete CRUD App using Flask and Jinja2 in Python
Happy coding ♥
Found the article interesting? You'll love our Python Code Generator! Give AI a chance to do the heavy lifting for you. Check it out!
View Full Code Improve My Code


Got a coding query or need some guidance before you comment? Check out this Python Code Assistant for expert advice and handy tips. It's like having a coding tutor right in your fingertips!