Turn your code into any language with our Code Converter. It's the ultimate tool for multi-language programming. Start converting now!
A CRUD app is a web app that allows you to create, read, update and delete things. It is a prevalent task in web development and very useful for learning how to build web apps.
In this tutorial, you will learn how to build a CRUD application in Flask, and the result will be a working backend for a bookshop web application. We will define services to handle the CRUD operations; GET, POST, PUT, and DELETE requests for the RESTful bookshop API. There is part two of the tutorial where we complete building the app by adding the frontend code using Jinja2 and Bootstrap; check it here.
Building a bookshop app is helpful for learning because it's a real example, not a toy project. The code will be based on Flask and Flask-SQLAlchemy extension.
Flask is a microframework for building web apps using Python. It is a very lightweight framework that is easy to learn and use. Being lightweight does not mean that Flask is not powerful. You can use Flask's extensions whenever you want to use something like the ORM (Object Relational Mapping) in your application. In this tutorial, I've used the Flask-SQLAlchemy extension to create a database and a table for storing books.
SQLAlchemy is a Python ORM (Object Relational Mapping) library that makes it easy to work with databases.
Table of content:
- Designing the Database
- Structuring the API
- Installing the Dependencies
- Creating the Database Model
- Configuring your Flask App
- Setting up the GET Requests
- Adding Data to SQLAlchemy
- Running the Flask App
- Deleting a Book
- Adding a New Book
- Updating a Book
- Conclusion
Designing the Database
Before creating the database, we need to define the database schema and the tables. The schema is the metadata structure of the database, while the tables are the actual data that we want to store.
The design of this project is simple: We have a single table called books that stores the books fields: ISBN (of the book), title, author, and price.
These fields will be stored in the database via the SQLAlchemy ORM. The Flask API will use these fields as the data model for the CRUD operations.
Here is a UML diagram to show the functions used in the API that will depend on the database schema:
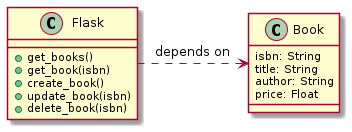 Flask app invoked functions depending on the Book table. (Designed by Plantuml)
As we can see, Flask API has five functions that rely on the Book table. You will see how these functions will invoke appropriate methods from SQLAlchemy. Let's first see how we structure the API functions. Those functions will be invoked by the Flask API and decorated with the @app.route decorator. The mappings for each are shown below:
get_books()to list all the books which map to/book/listURL using the GET request.get_book(isbn)to get the specified book defined by the URL parameterisbnthat we pass to the function. This function maps to/book/<isbn>URL using the GET request.create_book()to add a new book to the database. This function maps to/bookURL using the POST request.update_book(isbn)to update the specified book, which maps to/book/<isbn>URL using the PUT request.delete_book(isbn)to delete the selected book which maps to/book/<isbn>URL using the DELETE request.
Structuring the API
To follow along with this project, you can create one file and dump the code in it. You can also create multiple files and import the code from those files to separate the concerns, or ultimately, you can check this page to get the code for each file.
I prefer structuring the API code in multiple files. The reason is that it helps you to keep the code organized and also helps you to keep the code clean.
Let's create a folder called bookshop. Inside that folder, the structure of this project is shown as follows:
├── app
│   ├── __init__.py
│   ├── models.py
│   └── routes.py
├── bookshop.py
├── config.py
I tried to make the structure as minimal as possible without blueprints, which I think would be overkill for this small app. Here is a breakdown of each file:
bookshop.pyis the main file that contains the Flask API.config.pyhas the configuration for the API.app/__init__.pyis the file that contains database and application instances.app/models.pycontains the database schema and the ORM.app/routes.pycontains the API functions that the API will invoke.
Let's start with the app/models.py file to create the database.
Installing the Dependencies
Before creating the DB model, let's install Flask and Flask-SQLAlchemy extension.
Let's also install the database engine. In this tutorial, you'll use MySQL but feel free to use any other database engine. SQLAlchemy supports MySQL, SQLite, Postgres, and more. For MySQL, we install the PyMySQL library:
$ pip install flask flask-sqlalchemy PyMySQLCreating the Database Model
Let's define the database model in the app/models.py file as follows:
from . import db

class Book(db.Model):
    __tablename__ = 'books'
    isbn = db.Column(db.Integer, primary_key=True)
    author = db.Column(db.String(100), nullable=False)
    title = db.Column(db.String(100), nullable=False)
    price = db.Column(db.Float)

    def to_json(self):
        return {
            'isbn': self.isbn,
            'author': self.author,
            'title': self.title,
            'price': self.price
        }
In that file, we have defined the table name as books and the fields as:
isbn: the primary key of the table.author: the book's author, a required string field and cannot be NULL. It is restricted to 100 characters long.title: the title of the book, a required field, and is 100 chars long.price: the price of the book, which is a float field and can be NULL.
The to_json() function is used here to convert the Book object to a JSON object that can be returned to the client on the browser. We will see a better way to do that in the following sections.
Note that the Book class is a subclass of the db.Model class. This DB instance is defined in the app/__init__.py file as follows:
from flask_sqlalchemy import SQLAlchemy

db = SQLAlchemy()
Configuring your Flask App
Now that we have the database model, let's configure the Flask application for the SQLAlchemy extension.
The best practice for configuring your app is to define a parent Config class that will hold standard configurations for all environments. Then create an instance of the child config class for your environments. In our case, we will create three environments: development, testing, and production.
Let's see this in action:
#config.py
import os

class Config:
    SQLALCHEMY_TRACK_MODIFICATIONS = False

    @staticmethod
    def init_app(app):
        pass

class DevelopmentConfig(Config):
    DEBUG = True
    SQLALCHEMY_DATABASE_URI = os.getenv("DEV_DATABASE_URL")

class TestingConfig(Config):
    TESTING = True
    SQLALCHEMY_DATABASE_URI = os.getenv("TEST_DATABASE_URL")

class ProductionConfig(Config):
    SQLALCHEMY_DATABASE_URI = os.getenv("DATABASE_URL")

config = {
    "development": DevelopmentConfig,
    "testing": TestingConfig,
    "production": ProductionConfig,
    "default": DevelopmentConfig
}
So the Config class holds the global configs for the app, which are:
SQLALCHEMY_TRACK_MODIFICATIONSset toFalseto disable the modification tracking system. This is a good practice to avoid the overhead of tracking the changes from Flask-SQLAlchemy to the SQLAlchemy library.init_app()is a static method that is used to initialize the app configurations.
We have three child classes for each environment following this Config parent class. Each environment defines the configurations suitable for that environment.
And finally, we have the config dictionary that maps the environment name to the configuration class. The default environment is the development environment we will use in this tutorial.
The DevelopmentConfig class has the DEBUG attribute set to True because we want to see the debug messages in the browser if there is an error in the API.
Further, it has the SQLALCHEMY_DATABASE_URI attribute set to the database URL, which we define for the connection to the database.
In our case, we set the database URL to the environment variable DEV_DATABASE_URL , which is the URL for the MySQL database. Run the following command on your terminal to define that env var:
$ export DEV_DATABASE_URL=mysql+pymysql://<username>:<password>@localhost:3306/flaskappwhere <username> and <password> are the credentials for the MySQL database and flaskapp is the name of the database. Feel free to replace any of the values with your own.
If you're on Windows, you can use the SET command instead of export:
$ SET DEV_DATABASE_URL=mysql+pymysql://<username>:<password>@localhost:3306/flaskappIf you're working with another database engine, you can change the DEV_DATABASE_URL to the appropriate URL for that database. For example, if you're using SQLite, you can set it to sqlite:///<path_to_db>.
Now let's import the config dictionary and start creating the Flask application. Now, the app/__init__.py file looks like the following:
from flask import Flask
from flask_sqlalchemy import SQLAlchemy
from config import config

db = SQLAlchemy()

def create_app(config_name):
    app = Flask(__name__)
    app.config.from_object(config[config_name])
    config[config_name].init_app(app)

    db.init_app(app)
    return app
The create_app() function is used to create the app instance based on the environment, which is passed as an argument to the function through the config_name parameter.
The app.config.from_object() method is used to load the configuration from the config dictionary. Then that config is used to initialize the app. Finally, the SQLAlchemy instance db is initialized with the app instance.
Let's set up the first endpoints for the API, the GET requests.
Setting up the GET Requests
Let's add the GET request functions to the app/routes.py file:
import os
from . import create_app
from .models import Book
from flask import jsonify

app = create_app(os.getenv('FLASK_CONFIG') or 'default')

@app.route("/book/list", methods=["GET"])
def get_books():
    books = Book.query.all()
    return jsonify([book.to_json() for book in books])

@app.route("/book/<int:isbn>", methods=["GET"])
def get_book(isbn):
    book = Book.query.get(isbn)
    if book is None:
        abort(404)
    return jsonify(book.to_json())
The create_app() function instantiates the app instance and then uses the app.route() decorator to register the endpoints. Inside the get_books() method we query the database for all the books using Book.query.all() and then we return the JSON representation of all the books using the jsonify() function; it is a helper function that serializes Python objects to JSON.
Now, let's add some data through SQLAlchemy before running the app.
Adding Data to SQLAlchemy
One way to add data to the database is to open a Flask interactive shell and then create a new instance of the Book model.
Before we do that, let's configure our flask app environment variable using this command:
$ export FLASK_APP=bookshop.pyIf you're on Windows, you use SET instead:
$ SET FLASK_APP=bookshop.pyand then we can run:
$ flask shellThis command opens an interactive session for you to execute Python commands. It helps debug and test your code.
We're now inside the shell. Let's import the db instance and Book model:
>>> from app import db
>>> db
<SQLAlchemy engine=mysql+pymysql://root:***@localhost:3306/flaskapp?charset=utf8>
>>> from app.models import Book
>>> Book
<class 'app.models.Book'>
With the assumption that flaskapp database is already created on your machine. Let's create the Book table in the database and then define a new book:
>>> db.create_all()
>>> book = Book(author="Ezz", title="Cleaner Python", price=0.0)
>>> book
<app.models.Book object at 0x7f404a052e50>
>>> db.session.add(book)
>>> db.session.commit()
So now the Book table has been created with the db.create_all() which makes all the tables that are subclasses of db.Model.
The book variable is added to the database using db.session.add(). Note that adding the book object to the database does not mean you can query it. It's not yet committed to the database. That's why we need to run db.session.commit() to save the changes we made to the database.
Let's create one more book:
>>> book2 = Book(author="Ahmed", title="Python", price=10.99)
>>> db.session.add(book2)
>>> db.session.commit()
So now we have two books in our bookshop. That will suffice to demonstrate listing and playing with the API.
Let's close the shell with CTRL+C (or CMD+C) and return to our terminal to run the app.
Running the Flask App
You can run the application by running the following command on your terminal:
$ export FLASK_APP=bookshop.py
$ flask run
On Windows:
$ SET FLASK_APP=bookshop.py
$ flask run
The first command defines the FLASK_APP environment variable to point to the bookshop.py file. If you already defined FLASK_APP, you shouldn't repeat though. You'll find an expected error when you do flask run. That bookshop.py file is empty. Let's fix that and import the app variable from the app/routes.py file:
from app.routes import appYou can now run the application and expose the API endpoints at http://localhost:5000/book/list.
In this case, you'll find the following JSON response:
[
  {
    "author": "Ezz",
    "isbn": 1,
    "price": 0.0,
    "title": "Cleaner Python"
  },
  {
    "author": "Ahmed",
    "isbn": 2,
    "price": 10.99,
    "title": "Python"
  }
]
And when you invoke this endpoint http://localhost:5000/book/1, you'll get the first book:
{
  "author": "Ezz",
  "isbn": 1,
  "price": 0.0,
  "title": "Cleaner Python"
}
Replacing 1 with the ISBN of the book, you'll get the response associated with the book you queried.
Deleting a Book
The DELETE request is similar to what we did for the GET request. Let's open the app/routes.py again file and add the following snippet:
from . import db
# ...

@app.route("/book/<int:isbn>", methods=["DELETE"])
def delete_book(isbn):
    book = Book.query.get(isbn)
    if book is None:
        abort(404)
    db.session.delete(book)
    db.session.commit()
    return jsonify({'result': True})
Here, we use db.session.delete(book) to delete the book from the database, and then we commit that change using db.session.commit().
You might wonder how to test that endpoint while the DELETE route is the same as the GET route. To delete a book, you can use curl or any API client program such as Postman, and choose the DELETE method because, by default, it will consider the request as a GET request.
For example, if you want to delete the second book, you can use the following command:
$ curl http://localhost:5000/book/2 -X DELETE
{
  "result": true
}
Which successfully returns a JSON response with the result key set to True as expected.
You can invoke the GET endpoint again to check if the second book is gone through by looking at the URL: http://localhost:5000/book/list or by using the curl command:
$ curl http://localhost:5000/book/list
[
  {
    "author": "Ezz",
    "isbn": 1,
    "price": 0.0,
    "title": "Cleaner Python"
  }
]
Which gives a list of just one book; the first one.
Adding a New Book
We can also add a new book to the database by invoking a POST method function.
from flask import request
...

@app.route('/book', methods=['POST'])
def create_book():
    if not request.json:
        abort(400)
    book = Book(
        title=request.json.get('title'),
        author=request.json.get('author'),
        price=request.json.get('price')
    )
    db.session.add(book)
    db.session.commit()
    return jsonify(book.to_json()), 201
To test adding a new book, let's use the curl program again:
$ curl -H "Content-Type: application/json" -X POST -d '{"title": "Learning", "author": "Ibrahim", "price": "3.44"}' http://localhost:5000/book
{
  "author": "Ibrahim",
  "isbn": 3,
  "price": 3.44,
  "title": "Learning"
}
Of course, we can also add new books using the flask shell. The problem with this approach is that you have to import the db and Book instances. To avoid that, now the bookshop.py file would look like the following (after adding a snippet to it):
from app import db
from app.routes import app
from app.models import Book

@app.shell_context_processor
def make_shell_context():
    return dict(db=db, Book=Book)
The @app.shell_context_processor decorator is used to registering a function that will be called to inject variables into the shell session.
The make_shell_context() function returns a dictionary that contains the db and Book instances that we need to add to the shell session to use them in the shell without having to import them.
Updating a Book
Updating a book is similar to adding a new one, except we use the PUT method instead of POST.
Let's add the following to the app/routes.py file:
@app.route('/book/<int:isbn>', methods=['PUT'])
def update_book(isbn):
    if not request.json:
        abort(400)
    book = Book.query.get(isbn)
    if book is None:
        abort(404)
    book.title = request.json.get('title', book.title)
    book.author = request.json.get('author', book.author)
    book.price = request.json.get('price', book.price)
    db.session.commit()
    return jsonify(book.to_json())
To test updating a book, let's use curl:
$ curl http://localhost:5000/book/3 -X PUT -H "Content-Type: application/json" -d '{"author": "Ahmed", "title": "Python for Beginners", "price": 12.99}'
{
  "author": "Ahmed",
  "isbn": 3,
  "price": 12.99,
  "title": "Python for Beginners"
}
Conclusion
This tutorial covered creating a RESTful API that interacts with a CRUD application using Flask and SQLAlchemy through a real-world application.
We've seen how to use SQLAlchemy to connect to a database, how to create a model, how to map the model to a table, how to create a route, how to use the curl program to invoke and test the API, and how to use the flask shell to debug your application.
We also covered how to read, create, update, and delete a book from the CRUD bookshop application.
You can get the complete code for this tutorial on this page.
If you want to make a graphical user interface around the app, then check part two of the tutorial, where we build a nice frontend using Jinja2 and Bootstrap.
Learn also: Asynchronous Tasks with Celery in Python.
Happy coding ♥
Liked what you read? You'll love what you can learn from our AI-powered Code Explainer. Check it out!
View Full Code Explain My Code


Got a coding query or need some guidance before you comment? Check out this Python Code Assistant for expert advice and handy tips. It's like having a coding tutor right in your fingertips!