Step up your coding game with AI-powered Code Explainer. Get insights like never before!
Legacy web applications are synchronous in nature. The user interacts with a web interface presented in the browser, the browser makes requests back to the server based on that user interaction, and the server responds to those requests with a new presentation for the user.
Nowadays, things have changed; modern-day websites need to handle requests from hundreds of thousands of visitors. When these requests involve interaction with a database or a web service, response time increases, and when thousands of visitors access the same resources, website performance can drastically decrease. Here Asynchronous web comes to the rescue.
Here are some of the benefits we may grasp when opting for asynchronicity:
- Ability to handle more requests
- Parallel execution of I/O bound methods.
- Improved responsiveness.
Scope
In this tutorial, we will explain how to overcome one of the common pitfalls encountered when building a web application which is handling long-running tasks that limit the ability of the webserver to respond to new requests.
A straightforward solution would be to run these long-running tasks asynchronously in the background, within a separate thread or process, freeing up the webserver.
We will leverage several components like Redis, Flask, Celery, and SocketIO to offload the execution of a long-running task and, once completed, send a push notification to the client indicating its status.
It is worth noting that this tutorial will not cover asyncio Python's built-in library, which allows us to run code concurrently using coroutines.
Pre-requisites
As our requirements stand, the following components come into play:
-
Redis: is an open-source, advanced key-value store and an apt solution for building high-performance, scalable web applications. It has three main peculiarities that set it apart:
-
Redis holds its database entirely in the memory, using the disk only for persistence.
-
Redis has a relatively rich set of data types when compared to many key-value data stores.
- Redis can replicate data from any number of slaves.
-
Installing Redis is outside the scope of this tutorial. However, I would suggest you follow this quick guide in order to install it on your Windows machine.
If you're on Linux or macOS, running one of the below commands sets up Redis for you.
Ubuntu/Debian:
$ sudo apt-get install redis-servermacOS:
$ brew install redis
$ brew services start redis
NB: For the purpose of this tutorial, I'm using Redis version 3.0.504
-
Celery: is one of the most popular background job managers in the Python world. It is focused on real-time operations but supports scheduling as well. It is compatible with several message brokers like Redis or RabbitMQ and can act as both producer and consumer.
We'll be installing Celery on our requirements.txt file.
NB: For the purpose of this tutorial, I'm using Celery version 4.4.7
- Socket.IO: is a JavaScript library for real-time web applications. It enables real-time, bidirectional communication between web clients and servers. It has two parts: a client-side library that runs in the browser, and a server-side library.
- Flask: a web application microframework that is written in Python.
Whetting your Appetite
In this tutorial, I will adopt the scaffolding technique and walk you through a series of different scenarios to understand the differences between synchronous and asynchronous communications and variations with asynchronous communications.
All scenarios will be presented within the Flask framework; however, most of them could easily be ported to other Python frameworks (Django, Pyramid).
If this tutorial intrigues you and makes you want to dive into code immediately, then go to this Github repository for the code used in this article.
Creating the Application Skeleton
Our application will consist of:
- A program
app_sync.pyshowcasing a synchronous communication. - A program
app_async1.pyshowing an asynchronous service call where the client may ask for feedback on the server-side process using a polling mechanism. - A program
app_async2.pyshowing an asynchronous service call with automatic feedback to the client. - A program
app_async3.pyshowing a post-scheduled asynchronous service call with automatic feedback to the client.
Let’s jump right into the setup. Of course, you need Python 3 installed on your system. I will be using a virtual environment where I will install the needed libraries (and you should definitely do as well):
$ python -m venv async-venv
$ source async-venv/bin/activate
Create a file named requirements.txt and add the following lines to it:
Flask==1.1.2
Flask-SocketIO==5.0.1
Celery==4.4.7
redis==3.5.3
gevent==21.1.2
gevent-websocket==0.10.1
flower==0.9.7
Now install them:
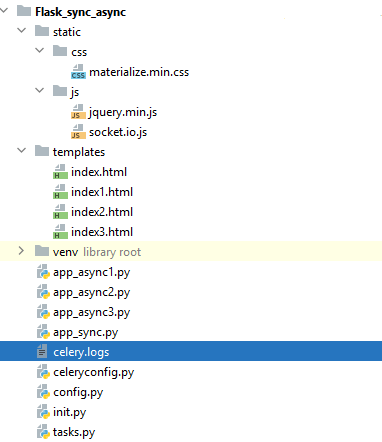
$ pip install -r requirements.txtAt the end of this tutorial, our folder structure will look like the following:
With that cleared out, let's now start writing the actual code.
First, let’s define the configuration parameters for our application within config.py:
#config.py
#Application configuration File
################################

#Secret key that will be used by Flask for securely signing the session cookie
# and can be used for other security related needs
SECRET_KEY = 'SECRET_KEY'

#Map to REDIS Server Port
BROKER_URL = 'redis://localhost:6379'

#Minimum interval of wait time for our task
MIN_WAIT_TIME = 1
#Maximum interval of wait time for our task
MAX_WAIT_TIME = 20
NB: For the sake of brevity, I hardcoded these configuration parameters in config.py, but it’s recommended to store these parameters in a separate file (for example .env).
Second, create an initialization file for our project in init.py:
#init.py
from flask import Flask

#Create a flask instance
app = Flask(__name__)
#Loads flask configurations from config.py
app.secret_key = app.config['SECRET_KEY']
app.config.from_object("config")

#Setup the Flask SocketIO integration (Required only for asynchronous scenarios)
from flask_socketio import SocketIO
socketio = SocketIO(app,logger=True,engineio_logger=True,message_queue=app.config['BROKER_URL'])
Scenario 1: Showcasing a Synchronous Communication
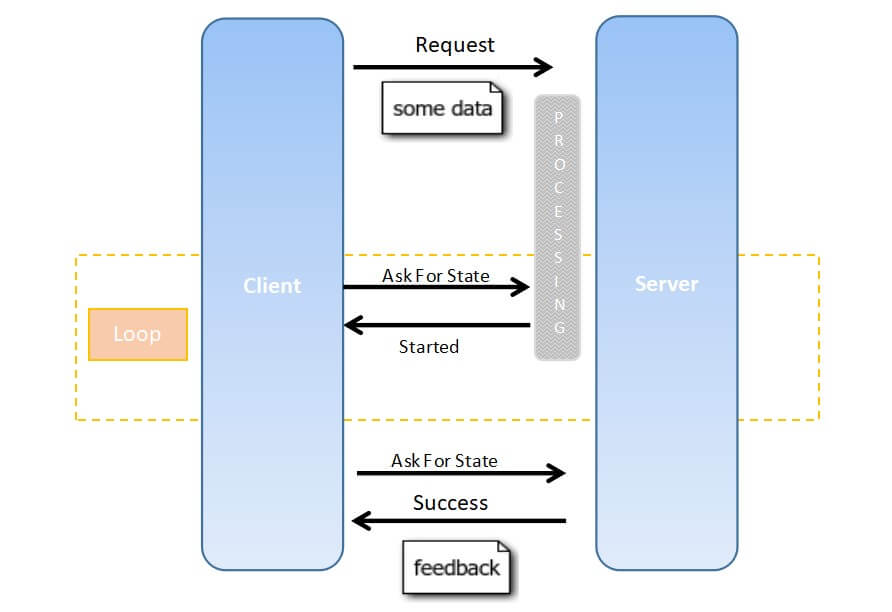
Before we dive into coding, I will give you a brief highlight describing a synchronous communication.
In synchronous communication, the calling party requests a service and waits for the service to complete. Only when it receives the result of that service it continue with its work. A timeout may be defined so that if the service does not finish within the defined period the call is assumed to have failed and the caller continues.
To understand how synchronous communication works, Imagine a dedicated waiter was allocated for you. He will now take your order, deliver it to the kitchen, and wait there for the chef to prepare your food. During this time, the waiter is not doing anything.
The following figure illustrates a synchronous service call:
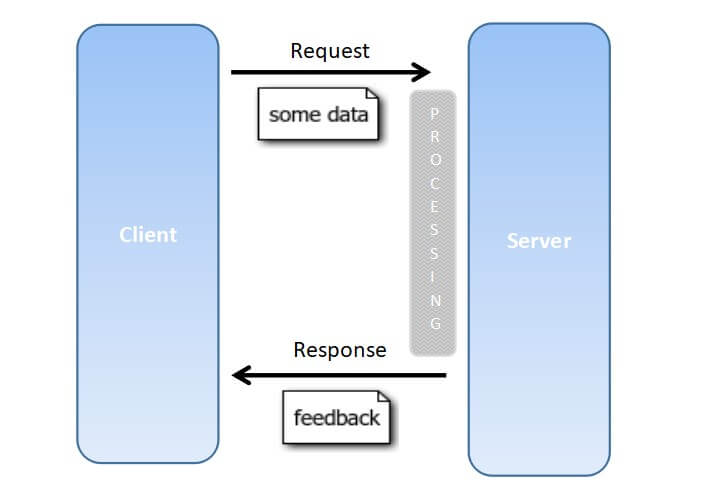
Synchronous communication is a better fit for sequential tasks, however, If there is a large number of concurrent tasks, the program may run out of threads, putting new tasks to wait until a thread is available.
Now let’s jump into coding; we will create a template that Flask can render (index.html) with the following HTML code in it:
templates/index.html
<!DOCTYPE html>
<html>
  <head>
    <title>Synchronicity versus Asynchronicity</title>
    <link rel="stylesheet" href="{{url_for('static',filename='css/materialize.min.css')}}">
    <script src="{{ url_for('static',filename='js/jquery.min.js') }}"></script>
    <script src="{{ url_for('static',filename='js/socket.io.js') }}"></script>
    <meta name="viewport" content="width=device-width, initial-scale=1.0"/>
  </head>
  <body class="container">
    <div class="row">
        <h5>Click to start a post scheduled ansycnhronous task with automatic feedback.</h5>
    </div>
    <div class="card-panel">
      <form method='post' id="runTaskForm" action="/runPSATask">
          <div>
             <input id="duration" name="duration" placeholder="Enter duration in seconds. for example: 30" type="text">
             <label for="duration">Duration</label>
          </div>
          <button style="height:50px;width:600px" type="submit" id="runTask">Run A Post Scheduled Asynchronous Task With Automatic Feedback</button>
      </form>
    </div>
    <div class="row">
        <div id="Messages" class="red-text" style="width:800px; height:400px; overflow-y:scroll;"></div>
    </div>
    <script>
      $(document).ready(function(){
        var namespace='/runPSATask';
        var url = 'http://' + document.domain + ':' + location.port + namespace;
        var socket = io.connect(url);
        socket.on('connect', function() {
                             socket.emit('join_room');
                            });

        socket.on('msg' , function(data) {
                            $("#Messages").prepend('<li>'+data.msg+'</li>');
                          });

        socket.on('status', function(data) {
                            ////alert('socket on status ='+ data.msg);
                            if (data.msg == 'End') {
                                $("#runTask").attr("disabled",false);
                            };
                          });
      });
    </script>
    <script>
      $("#runTask").click(function(e) {
         $("#runTask").attr("disabled",true);
         $("#Messages").empty();
         $.ajax({ type: "Post"
                , url: '/runPSATask'
                , data: $("#runTaskForm").serialize()
                , success: function(data) {
                    $("#Messages").empty();
                    $("#Messages").prepend('<li>The Task ' + data.taskid + ' has been submitted and will execute in ' + data.duration + ' seconds. </li>');
                  }
                });
         e.preventDefault();
         console.log('runPSATask complete');
      });
    </script>
  </body>
</html>
This template includes:
- The button
runTaskwhich will submit a task to the server using the route/runSyncTask. - The results will be placed in the
divwith the idMessages.
Next, we'll create a program called app_sync.py which will contain our Flask application; we'll define two routes within this program:
"/"renders the web page (index.html)"/runSyncTask"simulate long running task which will generate a random number between 1 and 20 seconds then run through a loop that sleeps for 1 second in every iteration.
#app_sync.py
from flask import render_template, jsonify
from random import randint
from init import app
import tasks

#Render the predefined template index.html
@app.route("/",methods=['GET'])
def index():
    return render_template('index.html')

#Defining the route for running A Synchronous Task
@app.route("/runSyncTask",methods=['POST'])
def long_sync_task():
    print("Running","/runSyncTask")
    #Generate a random number between MIN_WAIT_TIME and MAX_WAIT_TIME
    n = randint(app.config['MIN_WAIT_TIME'],app.config['MAX_WAIT_TIME'])
    #Call the function long_sync_task included within tasks.py
    task = tasks.long_sync_task(n=n)
    #Return the random wait time generated
    return jsonify({ 'waittime': n })

if __name__ == "__main__":
    app.run(debug=True)
The core logic of all the tasks defined in this tutorial is located within the program tasks.py:
#tasks.py
import time
from celery import Celery
from celery.utils.log import get_task_logger
from flask_socketio import SocketIO
import config
# Setup the logger (compatible with celery version 4)
logger = get_task_logger(__name__)
# Setup the celery client
celery = Celery(__name__)
# Load celery configurations from celeryconfig.py
celery.config_from_object("celeryconfig")
# Setup and connect the socket instance to Redis Server
socketio = SocketIO(message_queue=config.BROKER_URL)
###############################################################################
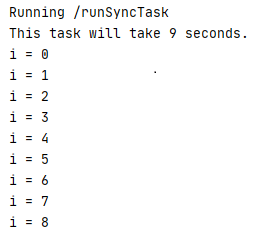
def long_sync_task(n):
print(f"This task will take {n} seconds.")
for i in range(n):
print(f"i = {i}")
time.sleep(1)
###############################################################################
@celery.task(name = 'tasks.long_async_task')
def long_async_task(n,session):
print(f"The task of session {session} will take {n} seconds.")
for i in range(n):
print(f"i = {i}")
time.sleep(1)
###############################################################################
def send_message(event, namespace, room, message):
print("Message = ", message)
socketio.emit(event, {'msg': message}, namespace=namespace, room=room)
@celery.task(name = 'tasks.long_async_taskf')
def long_async_taskf(data):
room = data['sessionid']
namespace = data['namespase']
n = data['waittime']
#Send messages signaling the lifecycle of the task
send_message('status', namespace, room, 'Begin')
send_message('msg', namespace, room, 'Begin Task {}'.format(long_async_taskf.request.id))
send_message('msg', namespace, room, 'This task will take {} seconds'.format(n))
print(f"This task will take {n} seconds.")
for i in range(n):
msg = f"{i}"
send_message('msg', namespace, room, msg )
time.sleep(1)
send_message('msg', namespace, room, 'End Task {}'.format(long_async_taskf.request.id))
send_message('status', namespace, room, 'End')
###############################################################################
@celery.task(name = 'tasks.long_async_sch_task')
def long_async_sch_task(data):
room = data['sessionid']
namespace = data['namespase']
n = data['waittime']
send_message('status', namespace, room, 'Begin')
send_message('msg' , namespace, room, 'Begin Task {}'.format(long_async_sch_task.request.id))
send_message('msg' , namespace, room, 'This task will take {} seconds'.format(n))
print(f"This task will take {n} seconds.")
for i in range(n):
msg = f"{i}"
send_message('msg', namespace, room, msg )
time.sleep(1)
send_message('msg' , namespace, room, 'End Task {}'.format(long_async_sch_task.request.id))
send_message('status', namespace, room, 'End')
###############################################################################
In this section, we'll only be using the long_sync_task() function as a synchronous task.
Let's test our synchronous scenario by running the app_sync.py program:
$ python app_sync.pyAccess the link http://localhost:5000 where Flask instance is running, and you will see the following output:
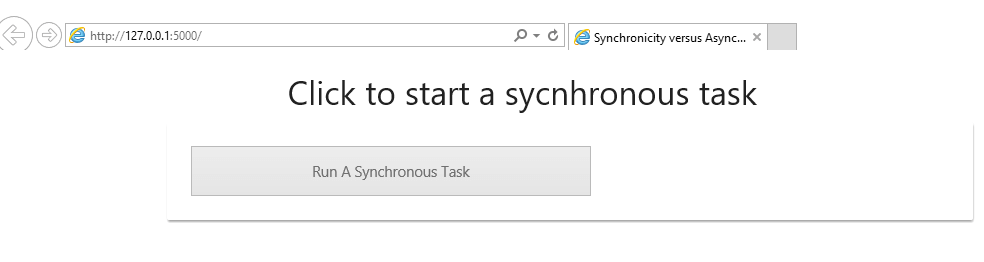
Press on the button "Run A Synchronous Task" and wait until the process is accomplished:
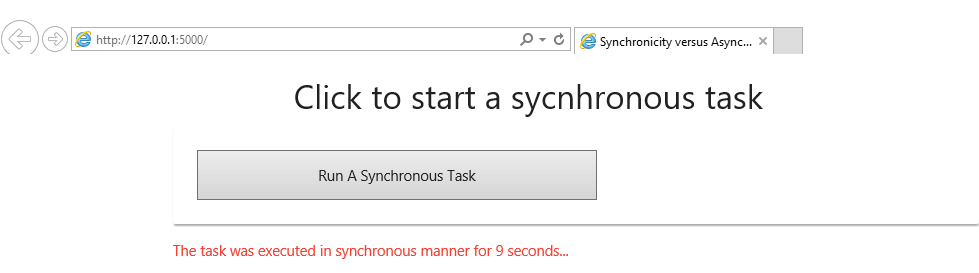
Once accomplished, a message is displayed signaling the random time allotted for the triggered task.
Simultaneously, as the server executes the task, you will see each second an incremented number displayed in your console:
Scenario 2: Showing an Asynchronous Service Call with Polling Mechanism
In this section, we'll be showing an asynchronous service call where the client may ask for feedback on the server-side process using a polling mechanism.
In brief, asynchronous means that the program doesn’t wait for a particular process to complete, but carries on regardless.
The calling party initiates a service call but does not wait for the result. The caller immediately continues with their work without caring about the result. If the caller is interested in the result, then there are mechanisms that we'll discuss later.
The simplest asynchronous message exchange pattern is called fire-and-forget and means that a message is sent but no feedback is required, but in case of feedback is required, the client may repeatedly ask for the result through a polling mechanism.
Polling causes potentially high network loads and is therefore not recommended. Nevertheless, it has the advantage that the service provider (server) does not need to know about its clients.
The following figure illustrates our scenario:
 Asynchronous communication is a better fit for code that must respond to events – for example, any time-consuming I/O bound operations that involve waiting.
Opting for asynchronicity makes the system capable of handling more requests at the same time, increasing the throughput.
Now let’s move into coding. We'll define celery initialization parameters using a configuration file celeryconfig.py:
#celeryconfig.py
#Celery Configuration parameters
#Map to Redis server
broker_url = 'redis://localhost:6379/0'

#Backend used to store the tasks results
result_backend = 'redis://localhost:6379/0'

#A string identifying the default serialization to use Default json
task_serializer = 'json'
result_serializer = 'json'
accept_content = ['json']

#When set to false the local system timezone is used.
enable_utc = False

#To track the started state of a task, we should explicitly enable it
task_track_started = True

#Configure Celery to use a specific time zone.
#The timezone value can be any time zone supported by the pytz library
#timezone = 'Asia/Beirut'
#enable_utc = True
We will create a template that Flask can render (index1.html):
<!DOCTYPE html>
<html>
  <head>
    <title>Synchronicity versus Asynchronicity</title>
    <link rel="stylesheet" href="{{url_for('static',filename='css/materialize.min.css')}}">
    <script src="{{ url_for('static',filename='js/jquery.min.js') }}"></script>
    <meta name="viewport" content="width=device-width, initial-scale=1.0"/>
  </head>
  <body class="container">
    <div class="row">
        <h4>Click to start an ansycnhronous task</h4>
    </div>
    <div class="card-panel">
      <form method='post' id="runTaskForm" action="/runAsyncTask">
          <button style="height:50px;width:400px" type="submit" id="runTask">Run An Asynchronous Task</button>
      </form>
      <form method='post' id="getTaskResultForm" action="/getAsyncTaskResult">
          <button style="height:50px;width:400px" type="submit" id="getTaskResult">Get Asynchronous Task Result</button>
      </form>
    </div>
    <div class="row">
        <div id="Messages" class="red-text" style="width:800px; height:400px; overflow-y:scroll;"></div>
    </div>
    <script>
      $("#runTask").click(function(e) {
         $("#runTask").attr("disabled",true);
         $("*").css("cursor","wait");
         $("#Messages").empty();
         $.ajax({ type: "Post"
                , url: '/runAsyncTask'
                , data: $("#runTaskForm").serialize()
                , success: function(data) {
                    $("#runTask").attr("disabled",false);
                    $("*").css("cursor","");
                    $("#Messages").append('The task ' + data.taskid + ' will be executed in asynchronous manner for ' + data.waittime + ' seconds...');
                  }
                });
         e.preventDefault();
         console.log('runAsyncTask complete');
      });
      $("#getTaskResult").click(function(e) {
         var msg = $("#Messages").text();
         var taskid = msg.match("task(.*)will");
         //Get The Task ID from The Messages div and create a Target URL
         var vurl = '/getAsyncTaskResult?taskid=' + jQuery.trim(taskid[1]);
         $.ajax({ type: "Post"
                , url: vurl
                , data: $("#getTaskResultForm").serialize()
                , success: function(data) {
                    $("*").css("cursor","");
                    $("#Messages").append('<p> The Status of the task = ' + data.taskid + ' is ' + data.taskstatus + '</p>');
                  }
                });
         e.preventDefault();
         console.log('getAsyncTaskResult complete');
      });
    </script>
  </body>
</html>
Then, we create our app_async1.py program which contains our Flask app:
#app_async1.py
from flask import render_template, jsonify, session,request
from random import randint
import uuid
import tasks
from init import app
from celery.result import AsyncResult

@app.route("/",methods=['GET'])
def index():
    # create a unique ID to assign for the asynchronous task
    if 'uid' not in session:
        sid = str(uuid.uuid4())
        session['uid'] = sid
        print("Session ID stored =", sid)
    return render_template('index1.html')

#Run an Asynchronous Task
@app.route("/runAsyncTask",methods=['POST'])
def long_async_task():
    print("Running", "/runAsyncTask")
    #Generate a random number between MIN_WAIT_TIME and MAX_WAIT_TIME
    n = randint(app.config['MIN_WAIT_TIME'],app.config['MAX_WAIT_TIME'])
    sid = str(session['uid'])
    task = tasks.long_async_task.delay(n=n,session=sid)
    #print('taskid',task.id,'sessionid',sid,'waittime',n )
    return jsonify({'taskid':task.id,'sessionid':sid,'waittime':n })

#Get The Result of The Asynchronous Task
@app.route('/getAsyncTaskResult', methods=['GET', 'POST'])
def result():
    task_id = request.args.get('taskid')
    # grab the AsyncResult
    result = AsyncResult(task_id)
    # print the task id
    print("Task ID = ", result.task_id)
    # print the Asynchronous result status
    print("Task Status = ", result.status)
    return jsonify({'taskid': result.task_id, 'taskstatus': result.status})

if __name__ == "__main__":
   app.run(debug=True)
There are three main routes within this program:
"/": renders the web page (index1.html)."/runAsyncTask": call an asynchronous task which will generate a random number between 1 and 20 seconds then run through a loop that sleeps for 1 second in every iteration."/getAsyncTaskResult": Based on the received task ID, it collects the task state.
NB: This scenario does not involve the SocketIO component.
Let’s test this scenario, proceeding pas per the following steps:
- Start Redis server: On Windows, locate the folder where Redis is installed and double click on
redis-server.exe. For a default installation or on Linux/macOS, make sure that the Redis instance is running on TCP port 6379. - Start Celery worker: On Windows, open the command prompt, go to the project folder, and run the following command:
$ async-venv\Scripts\celery.exe worker -A tasks --loglevel=DEBUG --concurrency=1 -P solo -f celery.logsOn Linux/macOS, quite similar:
$ async-venv/bin/celery worker -A tasks --loglevel=DEBUG --concurrency=1 -P solo -f celery.logsNote that
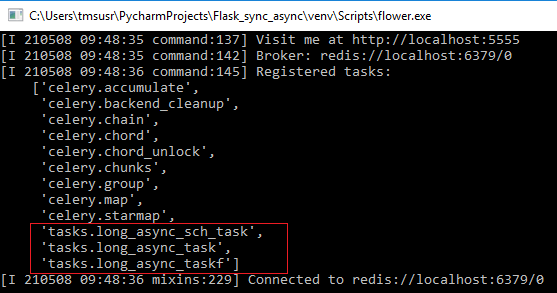
async-venvis your virtual environment name, if you named it differently, make sure you replace it with your name. Once celery starts, the following output should be displayed: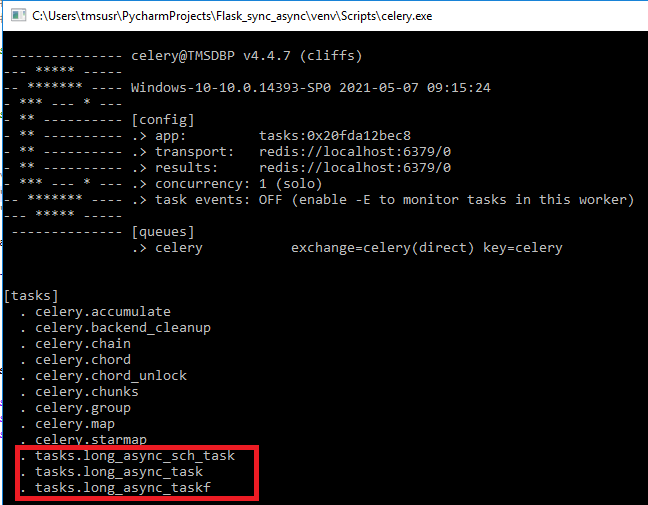
Make sure that the tasks defined in the program
tasks.pyare reflected within Celery. - Open up a terminal window, and start the main program:
$ python app_async1.py
Then open your browser and access the following link:
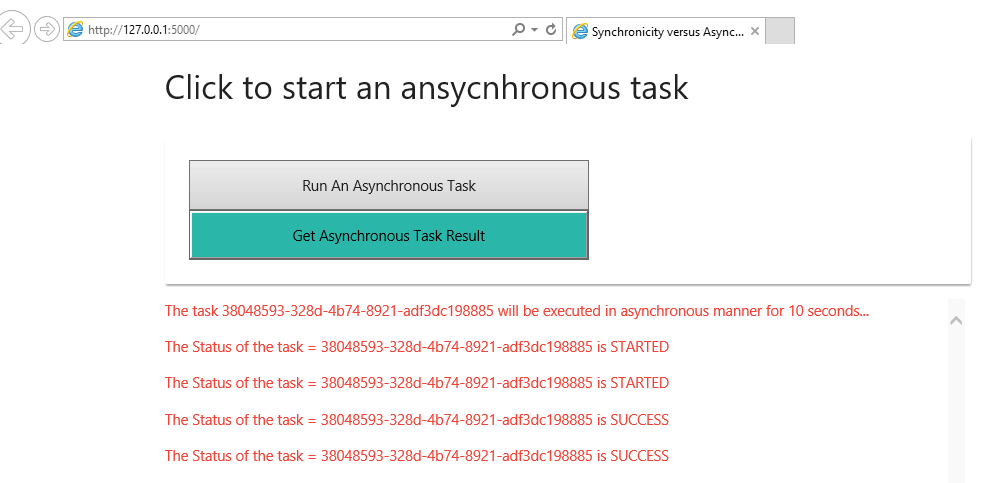
By pressing on the button Run An Asynchronous Task a new task will be queued and then directly executed; A message will be displayed in the "Messages" section showing the ID of the task and its execution time.
By pressing the button Get Asynchronous Task Result (continuously) you will collect the state of the Task at that specific time.
The built-in states of a celery task are the following:
PENDING: Waiting for execution.STARTED: Task has been started.SUCCESS: Task executed successfully.FAILURE: Task execution resulted in an exception.RETRY: Task is being retried.REVOKED: Task has been revoked.
While reviewing the logs of the celery worker included within the log file celery.logs, you will notice the task lifecycle:
 Scenario 3: Showing an Asynchronous Service Call with Automatic Feedback
Based on our previous scenario and in order to alleviate the cumbersome resulting from initiating multiple requests to collect the state of the task, we will try to incorporate the socket technology enabling the server to update the client regarding the state of the task continuously.
Indeed a socket IO engine allows real-time bidirectional event-based communication.
The main advantage this gives us is that it reduces the amount of load on a network and can be more efficient for propagating information to many clients.
The following figure illustrates our scenario:
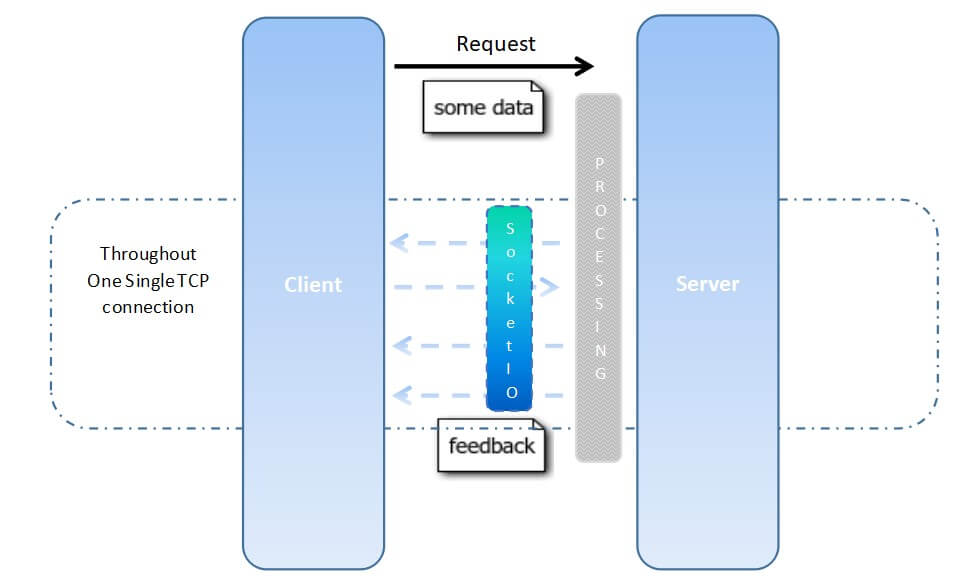
Before digging further, I will try to briefly explain the steps to be done:
To be able to send messages from celery back to the web browser, we are going to leverage the following:
- The message queue capabilities of Flask-SocketIO will allow the Celery worker to communicate with the client.
- The capabilities of the Socket.io which is an easy-to-use JavaScript library for enabling WebSocket connections.
To manage our data connection effectively, we will adopt the following compartmentalization strategy:
- We will assign the namespace
"/runAsyncTaskF"for this scenario. (Namespaces are used to separate server logic over a single shared connection). - We will assign a room for each user session. (Rooms are subdivisions or sub-channels of namespaces).
Now let’s step forward into coding:
- We will create a template that Flask can render (
index2.html):<!DOCTYPE html> <html> <head> <title>Synchronicity versus Asynchronicity</title> <link rel="stylesheet" href="{{url_for('static',filename='css/materialize.min.css')}}"> <script src="{{ url_for('static',filename='js/jquery.min.js') }}"></script> <script src="{{ url_for('static',filename='js/socket.io.js') }}"></script> <meta name="viewport" content="width=device-width, initial-scale=1.0" /> </head> <body class="container"> <div class="row"> <h5>Click to start an ansycnhronous task with automatic feedback.</h5> </div> <div class="card-panel"> <form method='post' id="runTaskForm" action="/runAsyncTask"> <button style="height:50px;width:400px" type="submit" id="runTask">Run An Asynchronous Task With Automatic Feedback</button> </form> </div> <div class="row"> <div id="Messages" class="red-text" style="width:800px; height:400px; overflow-y:scroll;"></div> </div> <script> $(document).ready(function() { var namespace = '/runAsyncTaskF'; var url = 'http://' + document.domain + ':' + location.port + namespace; var socket = io.connect(url); socket.on('connect', function() { ////alert('socket on connect'); socket.emit('join_room'); }); socket.on('msg', function(data) { ////alert('socket on msg ='+ data.msg); $("#Messages").prepend('<li>' + data.msg + '</li>'); }); socket.on('status', function(data) { ////alert('socket on status ='+ data.msg); if (data.msg == 'End') { $("#runTask").attr("disabled", false); }; }); }); </script> <script> $("#runTask").click(function(e) { $("#runTask").attr("disabled", true); $("*").css("cursor", "wait"); $("#Messages").empty(); $.ajax({ type: "Post", url: '/runAsyncTaskF', data: $("#runTaskForm").serialize(), success: function(data) { $("*").css("cursor", ""); $("#Messages").empty(); $("#Messages").prepend('<li>The Task ' + data.taskid + ' has been submitted. </li>'); } }); e.preventDefault(); console.log('runAsyncTaskF complete'); }); </script> </body> </html> -
We will create a program called
app_async2.pywhich will contain our Flask application:#Gevent is a coroutine based concurrency library for Python from gevent import monkey #For dynamic modifications of a class or module monkey.patch_all() from flask import render_template, jsonify, session, request from random import randint import uuid import tasks from init import app, socketio from flask_socketio import join_room @app.route("/",methods=['GET']) def index(): # create a unique session ID and store it within the Flask session if 'uid' not in session: sid = str(uuid.uuid4()) session['uid'] = sid print("Session ID stored =", sid) return render_template('index2.html') #Run an Asynchronous Task With Automatic Feedback @app.route("/runAsyncTaskF",methods=['POST']) def long_async_taskf(): print("Running", "/runAsyncTaskF") # Generate a random number between MIN_WAIT_TIME and MAX_WAIT_TIME n = randint(app.config['MIN_WAIT_TIME'], app.config['MAX_WAIT_TIME']) data = {} data['sessionid'] = str(session['uid']) data['waittime'] = n data['namespase'] = '/runAsyncTaskF' task = tasks.long_async_taskf.delay(data) return jsonify({ 'taskid':task.id ,'sessionid':data['sessionid'] ,'waittime':data['waittime'] ,'namespace':data['namespase'] }) @socketio.on('connect', namespace='/runAsyncTaskF') def socket_connect(): #Display message upon connecting to the namespace print('Client Connected To NameSpace /runAsyncTaskF - ',request.sid) @socketio.on('disconnect', namespace='/runAsyncTaskF') def socket_connect(): # Display message upon disconnecting from the namespace print('Client disconnected From NameSpace /runAsyncTaskF - ',request.sid) @socketio.on('join_room', namespace='/runAsyncTaskF') def on_room(): room = str(session['uid']) # Display message upon joining a room specific to the session previously stored. print(f"Socket joining room {room}") join_room(room) @socketio.on_error_default def error_handler(e): # Display message on error. print(f"socket error: {e}, {str(request.event)}") if __name__ == "__main__": # Run the application with socketio integration. socketio.run(app,debug=True)
There are two main routes within this program:
"/": renders the web page (index2.html)."/runAsyncTaskF": Call an asynchronous task that will perform the following:- Generate a random number between 1 and 20 seconds.
- Call the respective
long_async_taskf()task within the programtasks.py.
To run this scenario:
- Start the Redis server.
- Start the Celery worker.
- Run
app_async2.py
Open your browser and access the following link and press the button. You will gradually receive an output similar to the following:
 Simultaneously, you will get the following output on the console:
 You can also always check the
 celery.logs file for the task lifecycle.
Scenario 4: Showing a Port Scheduled Asynchronous Service Call with Automatic Feedback
This scenario is similar to scenario 3; The only difference is that instead of running the asynchronous task directly, this task will be scheduled to run after a certain duration to be specified by the client.
Let’s move forward into coding. We'll create the template index3.html with a new field "Duration" representing the time in seconds to wait for before executing the asynchronous task:
<!DOCTYPE html>
<html>
<head>
    <title>Synchronicity versus Asynchronicity</title>
    <link rel="stylesheet" href="{{url_for('static',filename='css/materialize.min.css')}}">
    <script src="{{ url_for('static',filename='js/jquery.min.js') }}"></script>
    <script src="{{ url_for('static',filename='js/socket.io.js') }}"></script>
    <meta name="viewport" content="width=device-width, initial-scale=1.0" />
</head>
<body class="container">
    <div class="row">
        <h5>Click to start a post scheduled ansycnhronous task with automatic feedback.</h5>
    </div>
    <div class="card-panel">
        <form method='post' id="runTaskForm" action="/runPSATask">
            <div>
                <input id="duration" name="duration" placeholder="Enter duration in seconds. for example: 30" type="text">
                <label for="duration">Duration</label>
            </div>
            <button style="height:50px;width:600px" type="submit" id="runTask">Run A Post Scheduled Asynchronous Task With Automatic Feedback</button>
        </form>
    </div>
    <div class="row">
        <div id="Messages" class="red-text" style="width:800px; height:400px; overflow-y:scroll;"></div>
    </div>
    <script>
        $(document).ready(function() {
            var namespace = '/runPSATask';
            var url = 'http://' + document.domain + ':' + location.port + namespace;
            var socket = io.connect(url);
            socket.on('connect', function() {
                socket.emit('join_room');
            });
            socket.on('msg', function(data) {
                $("#Messages").prepend('<li>' + data.msg + '</li>');
            });
            socket.on('status', function(data) {
                ////alert('socket on status ='+ data.msg);
                if (data.msg == 'End') {
                    $("#runTask").attr("disabled", false);
                };
            });
        });
    </script>
    <script>
        $("#runTask").click(function(e) {
            $("#runTask").attr("disabled", true);
            $("#Messages").empty();
            $.ajax({
                type: "Post",
                url: '/runPSATask',
                data: $("#runTaskForm").serialize(),
                success: function(data) {
                    $("#Messages").empty();
                    $("#Messages").prepend('<li>The Task ' + data.taskid + ' has been submitted and will execute in ' + data.duration + ' seconds. </li>');
                }
            });
            e.preventDefault();
            console.log('runPSATask complete');
        });
    </script>
</body>
</html>
Next is the app_async3.py Flask app for this scenario:
#app_async3.py
from gevent import monkey
monkey.patch_all()

from flask import render_template, jsonify, session, request
from random import randint
import uuid
import tasks
from init import app, socketio
from flask_socketio import join_room

@app.route("/",methods=['GET'])
def index():
    # create a unique session ID
    if 'uid' not in session:
        sid = str(uuid.uuid4())
        session['uid'] = sid
        print("Session ID stored =", sid)
    return render_template('index3.html')

#Run a Post Scheduled Asynchronous Task With Automatic Feedback
@app.route("/runPSATask",methods=['POST'])
def long_async_sch_task():
        print("Running", "/runPSATask")
        # Generate a random number between MIN_WAIT_TIME and MAX_WAIT_TIME
        n = randint(app.config['MIN_WAIT_TIME'], app.config['MAX_WAIT_TIME'])
        data = {}
        data['sessionid'] = str(session['uid'])
        data['waittime']  = n
        data['namespase'] = '/runPSATask'
        data['duration']  = int(request.form['duration'])
        #Countdown represents the duration to wait in seconds before running the task
        task = tasks.long_async_sch_task.apply_async(args=[data],countdown=data['duration'])
        return jsonify({ 'taskid':task.id
                        ,'sessionid':data['sessionid']
                        ,'waittime': data['waittime']
                        ,'namespace':data['namespase']
                        ,'duration':data['duration']
                        })


@socketio.on('connect', namespace='/runPSATask')
def socket_connect():
    print('Client Connected To NameSpace /runPSATask - ',request.sid)

@socketio.on('disconnect', namespace='/runPSATask')
def socket_connect():
    print('Client disconnected From NameSpace /runPSATask - ',request.sid)

@socketio.on('join_room', namespace='/runPSATask')
def on_room():
    room = str(session['uid'])
    print(f"Socket joining room {room}")
    join_room(room)

@socketio.on_error_default
def error_handler(e):
    print(f"socket error: {e}, {str(request.event)}")

if __name__ == "__main__":
    socketio.run(app,debug=True)
Notice we're using long_async_sch_task() task method from tasks.py this time.
Run app_async3.py as previously, and open your browser:
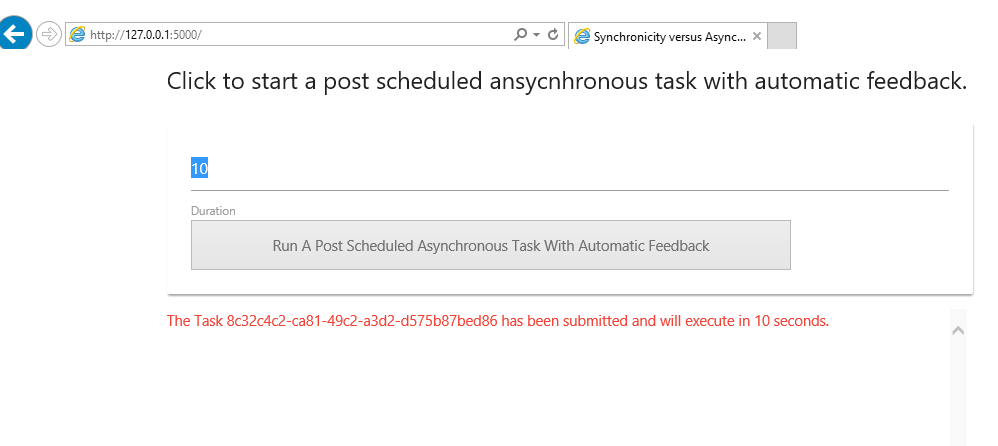 Enter a duration (i.e. 10) and press the button to create the post-scheduled asynchronous task. Once created, a message showing the details of the task will be displayed in the Messages box.
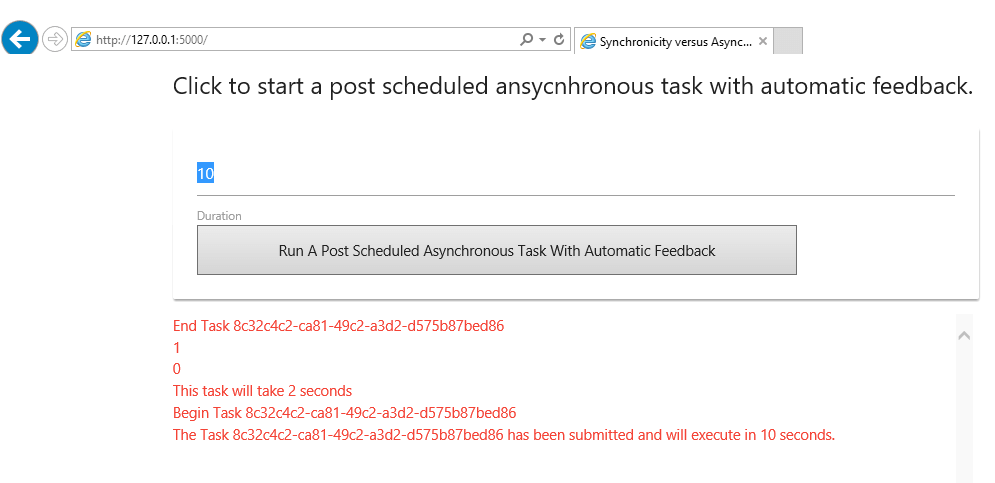
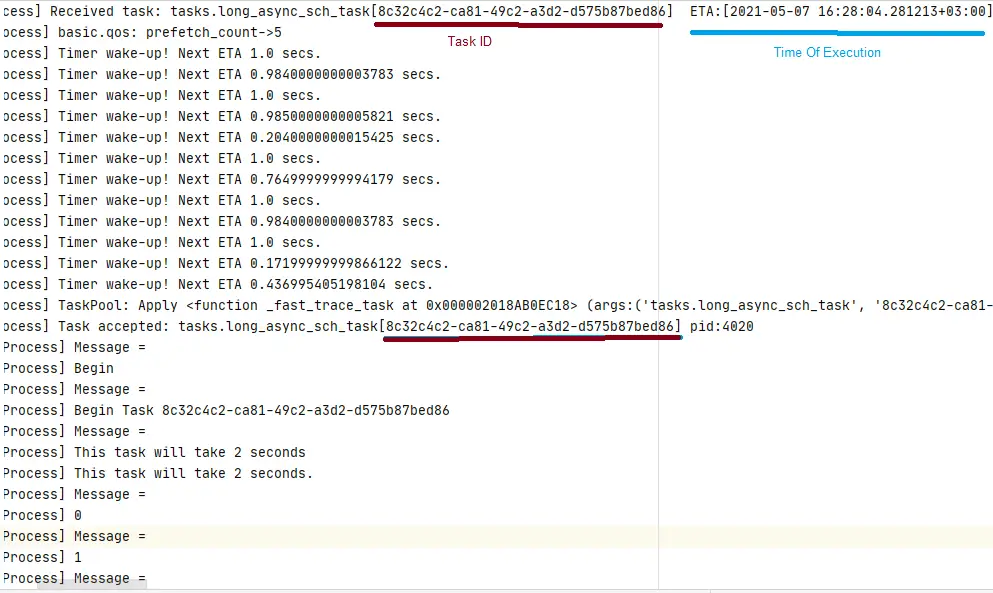
You should wait for the time you specified in the duration field, and you'll see the task being executed:
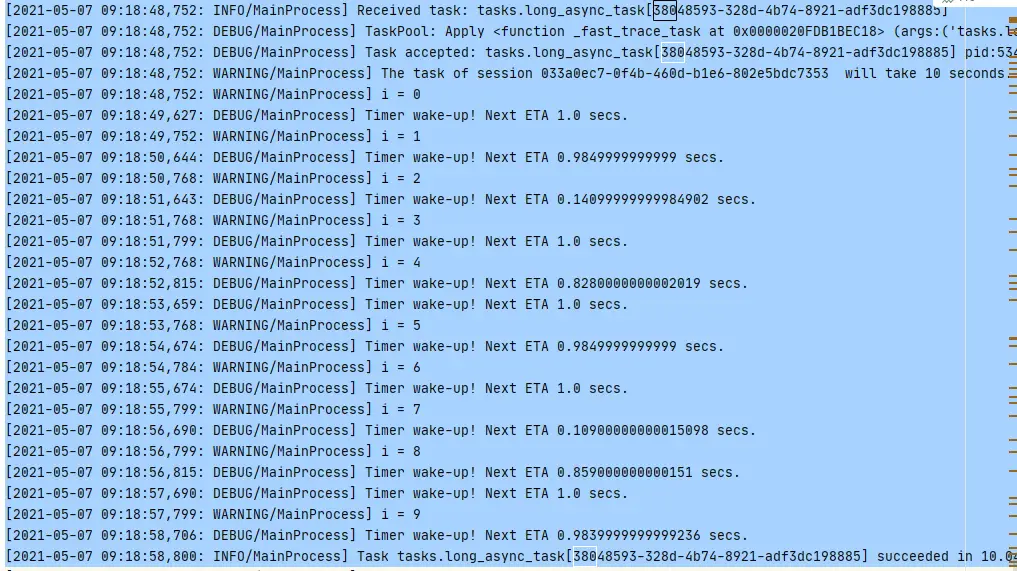
 Also, when reviewing the logs of the celery worker included within the
 celery.logs log file, you'll notice the task lifecycle:
 Appendix: Using Flower for Monitoring Celery
For better monitoring celery tasks, you may install Flower, which is a web-based tool for monitoring and administrating Celery clusters.
NB: flower library was part of the requirements.txt.
To view your Celery tasks using flower, kindly proceed as follows:
- Start the Redis server as previously.
- Start the Celery worker as previously.
- Start flower with the command on Windows:
$ async-venv\Scripts\flower.exe worker -A tasks --port=5555On Linux/MacOS:
$ async-venv/bin/flower worker -A tasks --port=5555
You'll get the following in your console:
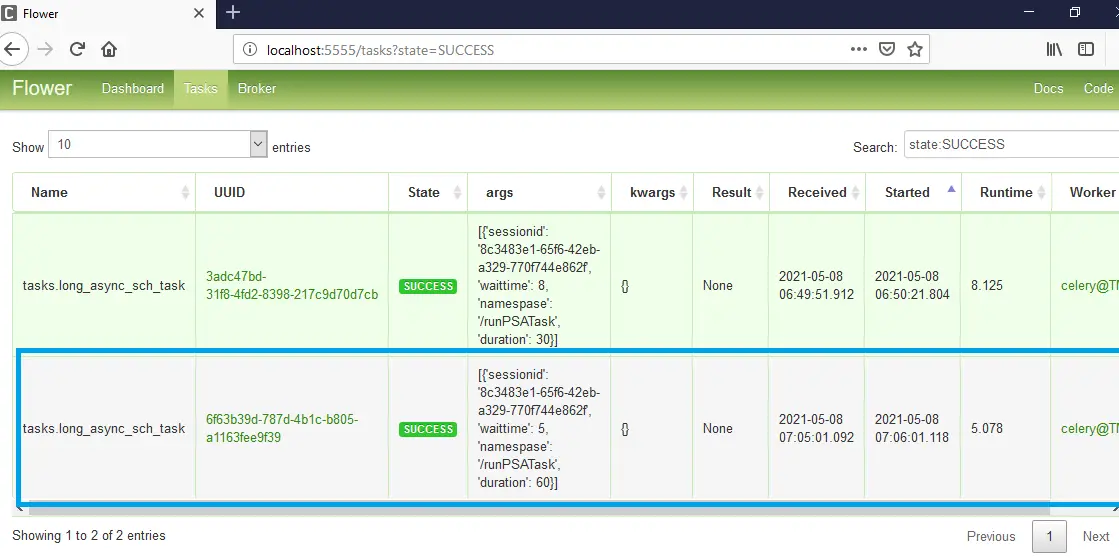
 Go back to your app and run a task, then open up your browser on
 http://localhost:5555 and head to tasks tab:

When your task is accomplished, you'll notice that in flower dashboard as follows:
 Conclusion
I hope this article has helped you get a conceptual grounding in synchronous and asynchronous requests with the help of Celery. While synchronous requests can be slow and asynchronous requests strike with speed, recognizing the appropriate method for any scenario is the key. Sometimes, they even work together.
Learn also: How to Build a CRUD App with Flask and SQLAlchemy in Python.
Happy coding ♥
Just finished the article? Now, boost your next project with our Python Code Generator. Discover a faster, smarter way to code.
View Full Code Fix My Code


Got a coding query or need some guidance before you comment? Check out this Python Code Assistant for expert advice and handy tips. It's like having a coding tutor right in your fingertips!