Step up your coding game with AI-powered Code Explainer. Get insights like never before!
MySQL is one of the most popular open-source relational database management systems (RDBMS) out there, it is developed, distributed and supported by Oracle Corporation now.
In this tutorial, you will use MySQL connector Python library to:
- Connect to MySQL Database
- Create a Database
- Create a Table
- Insert Data into a Table
- Fetch Data from a Table
Related: How to Use MongoDB Database in Python.
To get started, first, you need to have a MySQL server instance running in your machine, if you're on Windows, I suggest you get XAMPP installed.
Second, let's install MySQL connector Python library as well as tabulate module:
pip3 install mysql-connector-python tabulateWe'll be using tabulate module optionally to output fetched data in a similar way to regular MySQL clients.
Connect to MySQL Database
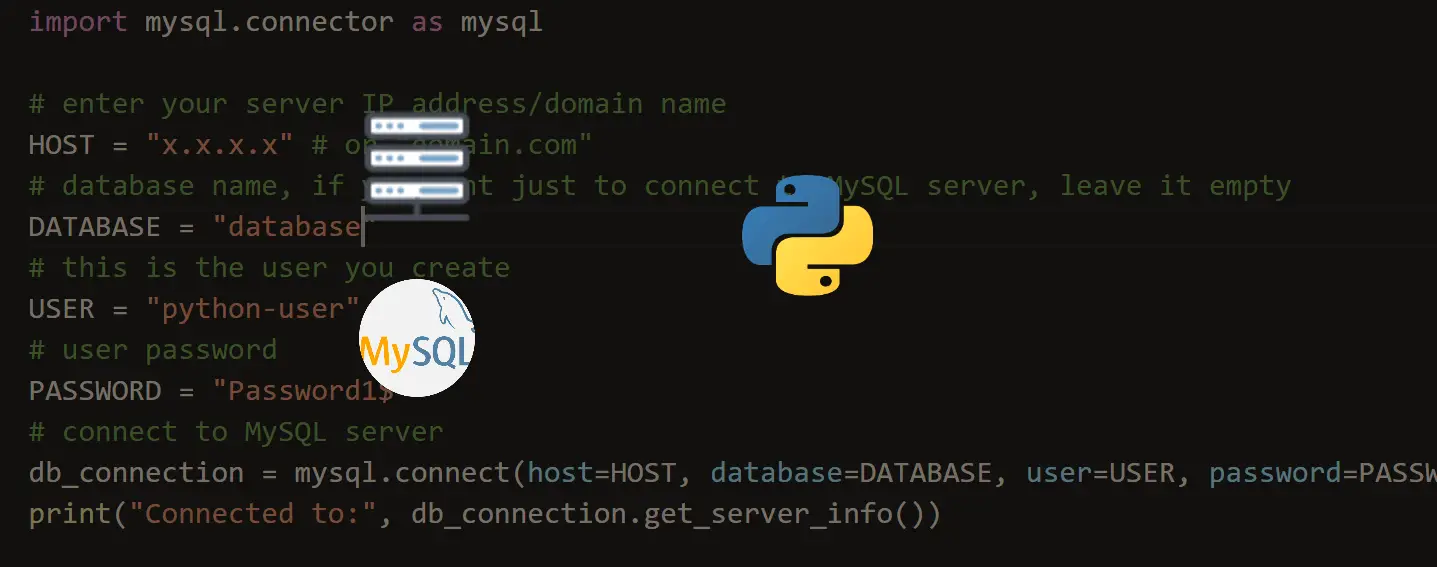
Let's import MySQL connector and connect it to our database:
import mysql.connector as mysql
from tabulate import tabulate

# insert MySQL Database information here
HOST = "localhost"
DATABASE = ""
USER = "root"
PASSWORD = ""

# connect to the database
db_connection = mysql.connect(host=HOST, database=DATABASE, user=USER, password=PASSWORD)
# get server information
print(db_connection.get_server_info())
We've used mysql.connector.connect() method to connect to a database, it accepts 4 arguments:
host: I specified"localhost"as host, which means we're connecting to our local MySQL server (installed on our machine). However, If you want to connect to a remote MySQL server, you need to do some configurations, check this tutorial in which I show you how to set up your MySQL server to accept remote connections.database: This is the name of the database you want to connect, setting the database to an empty string will only connect to MySQL, not to an actual database, so we'll handle creating our database manually.user: root is the default user in MySQL, you can of course use another one.password: This is the password of the user, by default it's an empty string for the root user (of course, that's just for development).
After that, we called the get_server_info() method to print server information, here is the output so far:
5.5.5-10.1.32-MariaDBIf you got your server information, then everything went fine.
Let's see which database we're in:
# get the db cursor
cursor = db_connection.cursor()
# get database information
cursor.execute("select database();")
database_name = cursor.fetchone()
print("[+] You are connected to the database:", database_name)
Notice before we execute any MySQL command, we need to create a cursor. A cursor is a temporary work area created in MySQL server instance when a SQL statement is executed.
Here is my output:
[+] You are connected to the database: (None,)Of course, we're not connected to any database, before we do that, let's create one first.
Create a Database
Since we're not in any database, we need to create one:
# create a new database called library
cursor.execute("create database if not exists library")
It is as simple as executing a regular MySQL command, we're using "if not exists" so if you run the code one more time, you won't get any "Database exists" error. Let's work on this database now:
# use that database
cursor.execute("use library")
print("[+] Changed to `library` database")
Create a Table
To create a table, all we need to do is pass the proper SQL command to the cursor.execute() method:
# create a table
cursor.execute("""create table if not exists book (
    `id` integer primary key auto_increment not null,
    `name` varchar(255) not null,
    `author` varchar(255) not null,
    `price` float not null,
    `url` varchar(255)
    )""")
print("[+] Table `book` created")
We have just created a book table with 5 columns. For demonstration, I noticed that I used triple-double quotes to allow us to jump to new lines easily.
Insert Data into a Table
To insert data into a table, we need a data source. You may want to insert scraped data into the database, or some data in a local file, whatever the source might be; for this tutorial, we'll insert from a regular Python dictionary, just for convenience:
# insert some books
books = [
    {
        "name": "Automate the Boring Stuff with Python: Practical Programming for Total Beginners",
        "author": "Al Sweigart",
        "price": 17.76,
        "url": "https://amzn.to/2YAncdY"
    },
    {
        "name": "Python Crash Course: A Hands-On, Project-Based Introduction to Programming",
        "author": "Eric Matthes",
        "price": 22.97,
        "url": "https://amzn.to/2yQfQZl"
    },
    {
        "name": "MySQL for Python",
        "author": "Albert Lukaszewski",
        "price": 49.99,
    }
]
# iterate over books list
for book in books:
    id = book.get("id")
    name = book.get("name")
    author = book.get("author")
    price = book.get("price")
    url = book.get("url")
    # insert each book as a row in MySQL
    cursor.execute("""insert into book (id, name, author, price, url) values (
        %s, %s, %s, %s, %s
    )
    """, params=(id, name, author, price, url))
    print(f"[+] Inserted the book: {name}")
So we have inserted a couple of books here, notice we used "%s" to replace the actual data fields passed in params parameter, this is due to many reasons including SQL injection prevention and performance.
Here is my output:
[+] Inserted the book: Automate the Boring Stuff with Python: Practical Programming for Total Beginners
[+] Inserted the book: Python Crash Course: A Hands-On, Project-Based Introduction to Programming
[+] Inserted the book: MySQL for Python
If you go now to your MySQL client, whether it's PhpMyAdmin or in the command line, you won't find these newly inserted books; that's because we need to commit:
# commit insertion
db_connection.commit()
The main reason for using commit is to end the current transaction (in this case, inserting 3 books) and make all changes permanent in the transaction.
The opposite of commit is a rollback, it basically means canceling all modifications made by the current transaction (in this case, not inserting 3 books), you can use db_connection.rollback() for that if you want.
For more information about transactions, check MySQL's documentation about that.
Fetch Data from a Table
Now let's get the data we just inserted from the actual database:
# fetch the database
cursor.execute("select * from book")
# get all selected rows
rows = cursor.fetchall()
# print all rows in a tabular format
print(tabulate(rows, headers=cursor.column_names))
We executed the select command and grabbed all the rows using the cursor.fetchall() method, if you want to fetch only the first, you can use fetchone() method as well.
Then we print all returned rows in a tabular format with the help of the tabulate module, check my output:
  id  name                                                                              author                price  url
----  --------------------------------------------------------------------------------  ------------------  -------  -----------------------
   1  Automate the Boring Stuff with Python: Practical Programming for Total Beginners  Al Sweigart           17.76  https://amzn.to/2YAncdY
   2  Python Crash Course: A Hands-On, Project-Based Introduction to Programming        Eric Matthes          22.97  https://amzn.to/2yQfQZl
   3  MySQL for Python                                                                  Albert Lukaszewski    49.99
Finally, let's close the connection:
# close the cursor
cursor.close()
# close the DB connection
db_connection.close()
Conclusion
There you have it, MySQL connector library makes it convenient for Python developers to execute SQL commands, you can follow the same procedure on other commands such as UPDATE and DELETE.
Check the full code for this tutorial.
Learn also: How to Convert HTML Tables into CSV Files in Python.
Happy Coding ♥
Loved the article? You'll love our Code Converter even more! It's your secret weapon for effortless coding. Give it a whirl!
View Full Code Explain My Code


Got a coding query or need some guidance before you comment? Check out this Python Code Assistant for expert advice and handy tips. It's like having a coding tutor right in your fingertips!