Want to code faster? Our Python Code Generator lets you create Python scripts with just a few clicks. Try it now!
Have you ever wanted to build a tool to display nearby wireless networks along with their MAC address and some other useful information? Well, in this tutorial, we are going to build a Wi-Fi scanner using the Scapy library in Python.
If you're in this field for a while, you might have seen the airodump-ng utility that sniffs, captures, and decodes 802.11 frames to display nearby wireless networks in a nice format, in this tutorial, we will do a similar one.
Related: How to Extract Saved WiFi Passwords in Python.
Getting Started
To get started, you need to install Scapy, I have cloned the development version, you can also install it using pip:
pip3 install scapyOr you can clone the current development version in Github:
git clone https://github.com/secdev/scapy.git
cd scapy
sudo python setup.py install
Note: This tutorial assumes you are using any Unix-based environment, it is also suggested you use Kali Linux.
After that, we gonna use pandas just for printing in a nice format (you can change that obviously):
pip3 install pandasNow the code of this tutorial won't work if you do not enable monitor mode in your network interface, please install aircrack-ng (comes pre-installed on Kali) and run the following command:
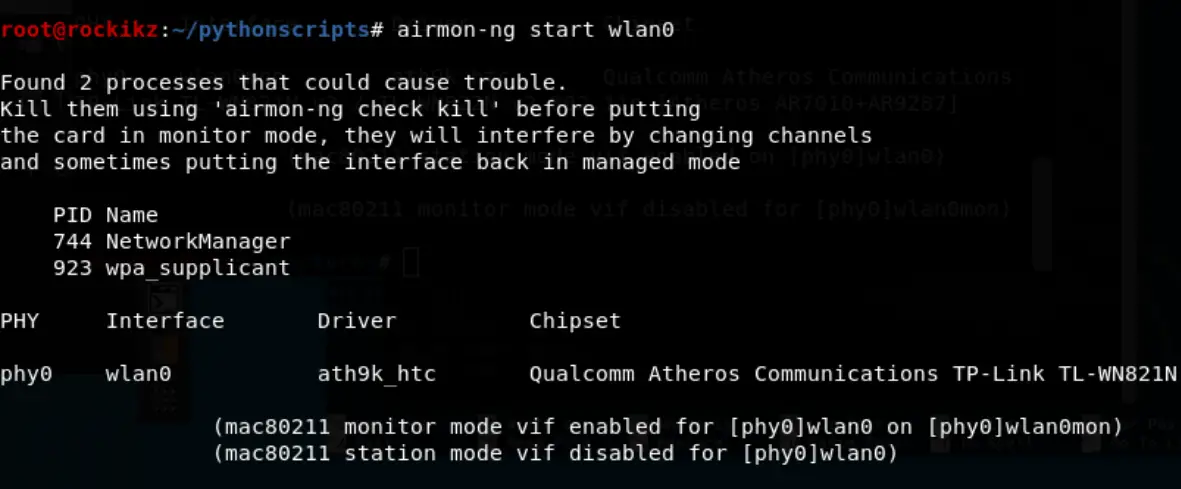
Now you can check your interface name using iwconfig:
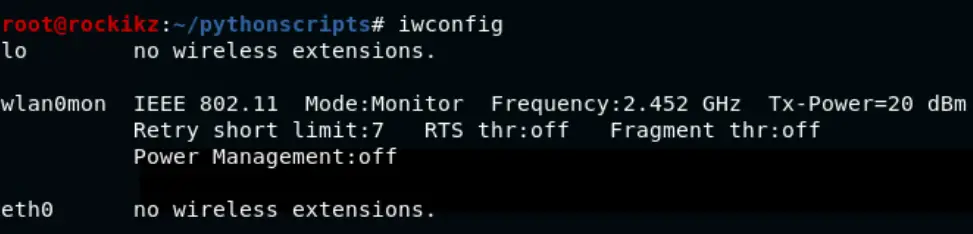
As you can see, our interface is now in monitor mode and has the name "wlan0mon".
You can also use iwconfig itself to change your network card into monitor mode:
sudo ifconfig wlan0 down
sudo iwconfig wlan0 mode monitor
GET -10% OFF: Build 24 Ethical Hacking Scripts & Tools with Python EBook
Writing the Code
Let's get started, open up a new Python file and import the necessary modules:
from scapy.all import *
from threading import Thread
import pandas
import time
import os
Next, we need to initialize an empty data frame that stores our networks:
# initialize the networks dataframe that will contain all access points nearby
networks = pandas.DataFrame(columns=["BSSID", "SSID", "dBm_Signal", "Channel", "Crypto"])
# set the index BSSID (MAC address of the AP)
networks.set_index("BSSID", inplace=True)
So I've set the BSSID (MAC address of the access point) as the index of each row, as it is unique for every device.
If you're familiar with Scapy, then you know for sure that we are going to use the sniff() function, which takes the callback function that is executed whenever a packet is sniffed, let's implement this function:
def callback(packet):
    if packet.haslayer(Dot11Beacon):
        # extract the MAC address of the network
        bssid = packet[Dot11].addr2
        # get the name of it
        ssid = packet[Dot11Elt].info.decode()
        try:
            dbm_signal = packet.dBm_AntSignal
        except:
            dbm_signal = "N/A"
        # extract network stats
        stats = packet[Dot11Beacon].network_stats()
        # get the channel of the AP
        channel = stats.get("channel")
        # get the crypto
        crypto = stats.get("crypto")
        networks.loc[bssid] = (ssid, dbm_signal, channel, crypto)
Related: How to Make a MAC Address Changer in Python
This callback makes sure that the sniffed packet has a beacon layer on it, if it is the case, then it will extract the BSSID, SSID (name of access point), signal, and some stats. Scapy's Dot11Beacon class has the awesome network_stats() function that extracts some useful information from the network, such as the channel, rates, and encryption type. Finally, we add these information to the dataframe with the BSSID as the index.
You will encounter some networks that don't have the SSID (ssid equals to ""), this is an indicator that it's a hidden network. In hidden networks, the access point leaves the info field blank to hide the discovery of the network name, you will still find them using this tutorial's script, but without a network name.
Now we need a way to visualize this dataframe. Since we're going to use sniff() function (which blocks and start sniffing in the main thread), we need to use a separate thread to print the content of networks dataframe, the below code does that:
def print_all():
    while True:
        os.system("clear")
        print(networks)
        time.sleep(0.5)
To the main code now:
if __name__ == "__main__":
    # interface name, check using iwconfig
    interface = "wlan0mon"
    # start the thread that prints all the networks
    printer = Thread(target=print_all)
    printer.daemon = True
    printer.start()
    # start sniffing
    sniff(prn=callback, iface=interface)
Learn also: How to Make a SYN Flooding Attack in Python.
Changing Channels
Now, if you execute this, you will notice not all nearby networks are available. That's because we're listening on one WLAN channel only. We can use the iwconfig command to change the channel. Here is the Python function for it:
def change_channel():
    ch = 1
    while True:
        os.system(f"iwconfig {interface} channel {ch}")
        # switch channel from 1 to 14 each 0.5s
        ch = ch % 14 + 1
        time.sleep(0.5)
For instance, if you want to change to channel 2, the command would be:
iwconfig wlan0mon channel 2Great, so this will change channels incrementally from 1 to 14 every 0.5 seconds, spawning the daemon thread that runs this function:
    # start the channel changer
    channel_changer = Thread(target=change_channel)
    channel_changer.daemon = True
    channel_changer.start()
Note: Channels 12 and 13 are allowed in low-power mode, while channel 14 is banned and only allowed in Japan.
Note that we set the daemon attribute of the thread to True, so this thread will end whenever the program exits. Check this tutorial for more information about daemon threads.
Check the full code here.
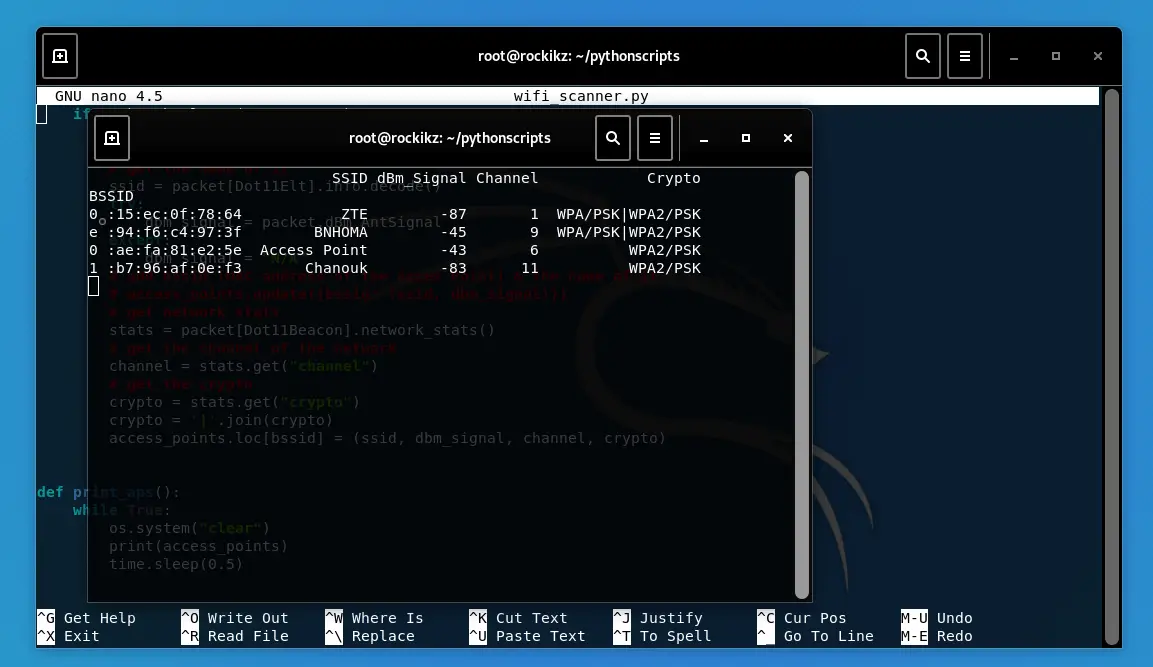
Here is a screenshot of my execution:
Related: Build 24 Ethical Hacking Scripts & Tools with Python EBook
Conclusion
Alright, in this tutorial, we wrote a simple Wi-Fi scanner using the Scapy library that sniffs and decodes beacon frames which are transmitted every time by access points. They serve to announce the presence of a wireless network.
Finally, we have an Ethical Hacking with Python EBook where we build over 20 hacking tools scripts from scratch using Python. Make sure to check it out if you're interested!
Learn also: How to Create Fake Access Points using Scapy in Python.
Happy Sniffing ♥
Liked what you read? You'll love what you can learn from our AI-powered Code Explainer. Check it out!
View Full Code Auto-Generate My Code


Got a coding query or need some guidance before you comment? Check out this Python Code Assistant for expert advice and handy tips. It's like having a coding tutor right in your fingertips!