Turn your code into any language with our Code Converter. It's the ultimate tool for multi-language programming. Start converting now!
In this tutorial, I will show you how to create your custom facial recognition system with Python. We'll be building two excellent facial recognition systems. The first one recognizes a person from the live stream of a camera, while the other would identify a person based on an uploaded image of that person. Pretty cool, right? I highly suggest you stick around!
As the name implies, a facial recognition system is a system or technology that identifies and verifies individuals based on their unique facial features. It is a biometric technology that uses various facial characteristics, such as the distance between the eyes, the shape of the nose, the contour of the chin, and other distinguishing features to establish the identity of a person.
I know you might be wondering how a computer can recognize a person. That seems like an extensive biological process. However, I'm here to tell you for free that the way computers recognize people is more of a mathematical process than a biological one. Encodings of a face are taken, which are various distances (such as the distance between the eyes), and calculation of facial features are taken from a known image. Therefore, when attempting to recognize a person, they compare the encodings of the known image to that of the image they're trying to recognize. If there's a match, Voila! That's basically how a facial recognition system works.
As an additional feature, our facial recognition system (from the live stream) would document a person after recognition: When a person is recognized, our program will document the person's name, date of recognition, and time of recognition. As you may have guessed, it can be used as an attendance system! Pretty cool, right? Yeah, I think so too. Apart from attendance, it can also be used for general record-keeping and in-house monitoring as a security measure.
Please note that the first program we're going to build is going to be performing facial recognition from a live webcam stream. So you need to have a computer that has a webcam (built-in) or an external webcam. If you do not have access to either type of webcam, you can skip to the second part of the tutorial. But make sure you go through the installation of this program, as they're practically the same.
Tables of Contents
- Installation
- Building A Live Stream Facial Recognition System
- Facial Recognition System on Uploaded Images
Installation
Enough talk. Let's get into it. To run this program, the first thing you should do is download and install Visual Studio. You may be wondering what Visual Studio has to do with any of this. Trust me, I did too. But due to the functionality it provides through dlib, to be able to follow along with this tutorial, you need to install Visual Studio. And please! I don't mean VS Code, but the full Visual Studio IDE. You can get it here. The community version is fine.
After installing it, when you get to this page:

Select Desktop Development with C++ and install.
Another requirement is Python 3.7. For this program, I used Python 3.7.7. I suggest you do, too, because I found out that there are a lot of conflicts with some of the libraries we will use in this program in the newer Python versions. So please download 3.7.7 here and configure it as your interpreter for this program, or use it in a virtual environment. However, if you want to try other Python versions, be my guest! I'm only telling you what I used and why.
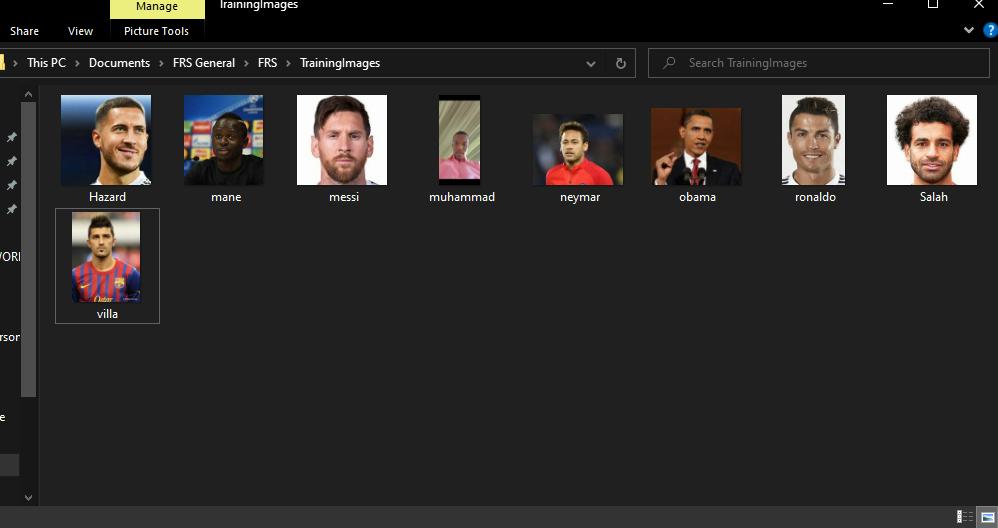
Next up, you create a folder and save images of known people. People you would want to be able to recognize from the live stream. The images in this folder are what our program is going to train on. After that, it'll be able to recognize anyone from that folder in a live stream. Please save the images with the names of the people. Your folder should be similar to:
Now, let's install the required packages using pip:
$ pip install cmake dlib==19.18.0 face-recognition opencv-python-
cmake: CMake is a build system and project configuration tool. -
dlib==19.18.0: Dlib is a C++ library for machine learning and computer vision. Please make sure to install the specified version. -
face-recognition: is a Python module for facial recognition. This is the module that does the magic for us. Feel free to check out the documentation here. -
OpenCV-Python: OpenCV is a computer vision library, and OpenCV-Python refers to its Python bindings used for image and video processing.
Building A Live Stream Facial Recognition System
And now, to the exciting part. The coding! We'll start by importing the necessary libraries:
import tkinter as tk, numpy as np, cv2, os, face_recognition
from datetime import datetime
We already talked about some of the imported libraries. Others include:
-
numpy- is a Python library for efficient numerical computations and array operations. -
os- is a Python module that provides tools for interacting with the operating system, including file and directory management. -
datetimeis a Python module used for working with dates and times, including capturing the current date and time. -
tkinter- is basically for GUI ( Graphical User Interface).
Next up:
# Initialize empty lists to store images and people's names.
known_faces = []
face_labels = []
# Get a list of all images in the TrainingImages directory.
image_files = os.listdir("TrainingImages")
# Loop through the images in the directory.
for image_name in image_files:
   # Read each image and add it to the known_faces list.
   current_image = cv2.imread(f'TrainingImages/{image_name}')
   known_faces.append(current_image)
   # Extract the person's name by removing the file extension and add it to the face_labels list.
   face_labels.append(os.path.splitext(image_name)[0])
What we're doing here is iterating through all the images in our folder (the known images) and appending them to a list for further processing (encoding and comparing). We're also extracting the names of the known people by removing the extension. So from Muhammad.jpg, we take out Muhammad and display this as the person's name if recognized.
Then, we create a function to get encodings from the images:
# Function to get face encodings from a list of images.
def get_face_encodings(images):
   encoding_list = []
   for image in images:
       # Convert the image to RGB format. RGB is Red Green Blue.
       image = cv2.cvtColor(image, cv2.COLOR_BGR2RGB)
       # Get the face encoding for the first face found in the image.
       face_encoding = face_recognition.face_encodings(image)[0]
       encoding_list.append(face_encoding)
   return encoding_list
Afterward, we create a function that does the documentation:
# Define a function to document the recognized face.
def document_recognised_face(name, filename='records.csv'):
   # Get the current date in the YYYY-MM-DD format.
   capture_date = datetime.now().strftime("%Y-%m-%d")
   # Check if the specified CSV file exists.
   if not os.path.isfile(filename):
       # If the file doesn't exist, create it and write the header.
       with open(filename, 'w') as f:
           f.write('Name,Date,Time')  # Create the file and write the header.
   # Open the CSV file for reading and writing ('r+')
   with open(filename, 'r+') as file:
       # Read all lines from the file into a list.
       lines = file.readlines()
       # Extract the names from existing lines in the CSV.
       existing_names = [line.split(",")[0] for line in lines]
       # Check if the provided name is not already in the existing names.
       if name not in existing_names:
           # Get the current time in the HH:MM:SS format.
           now = datetime.now()
           current_time = now.strftime("%H:%M:%S")
           # Write the new entry to the CSV file including name, capture date, and time.
           file.write(f'\n{name},{capture_date},{current_time}')
The above function documents the name of the person and the date/time they were recognized and saves the info in a records.csv file.
Next, we get encodings for known images and create a function for starting the program. This is necessary because this is a GUI-based program, and we must pass this function as an action to a button:
# Get face encodings for known images.
known_face_encodings = get_face_encodings(known_faces)
# Function to start the Facial recognition program.
def start_recognition_program():
# Open a webcam for capturing video. If you are using your computer's webcam, change 1 to 0.
# If using an external webcam, leave it as 1.
video_capture = cv2.VideoCapture(1)
while True:
# Read a frame from the webcam.
frame = video_capture.read()
# Check if the frame is not None (indicating a successful frame capture).
if frame is not None:
frame = frame[1] # The frame is usually the second element of the tuple returned by video_capture.read().
# Resize the image to a smaller size.
resized_frame = cv2.resize(frame, (0, 0), None, 0.25, 0.25)
resized_frame = cv2.cvtColor(resized_frame, cv2.COLOR_BGR2RGB)
# Detect faces in the current frame.
face_locations = face_recognition.face_locations(resized_frame)
# Get face encodings for the faces detected in the current frame.
current_face_encodings = face_recognition.face_encodings(resized_frame, face_locations)
# Loop through the detected faces in the current frame.
for face_encoding, location in zip(current_face_encodings, face_locations):
# Compare the current face encoding with the known encodings.
matches = face_recognition.compare_faces(known_face_encodings, face_encoding)
face_distances = face_recognition.face_distance(known_face_encodings, face_encoding)
# Find the index of the best match. That is, the best resemblance.
best_match_index = np.argmin(face_distances)
if matches[best_match_index]:
# If a match is found, get the name of the recognized person.
recognized_name = face_labels[best_match_index].upper()
# Extract face location coordinates.
top, right, bottom, left = location
top, right, bottom, left = top * 4, right * 4, bottom * 4, left * 4
# Draw a rectangle around the recognized face.
cv2.rectangle(frame, (left, top), (right, bottom), (0, 255, 0), 2)
# Draw a filled rectangle and display the name above the face.
cv2.rectangle(frame, (left, bottom - 35), (right, bottom), (0, 255, 0), cv2.FILLED)
cv2.putText(frame, recognized_name, (left + 6, bottom - 6), cv2.FONT_HERSHEY_COMPLEX, 1,
(255, 255, 255), 2)
document_recognised_face(recognized_name)
# Display the image with recognized faces.
cv2.imshow("Webcam", frame)
# Check for key press
key = cv2.waitKey(1) & 0xFF
# Check if the 'q' key is pressed to exit the program.
if key == ord('q'):
break
# Release the video capture and close all OpenCV windows.
video_capture.release()
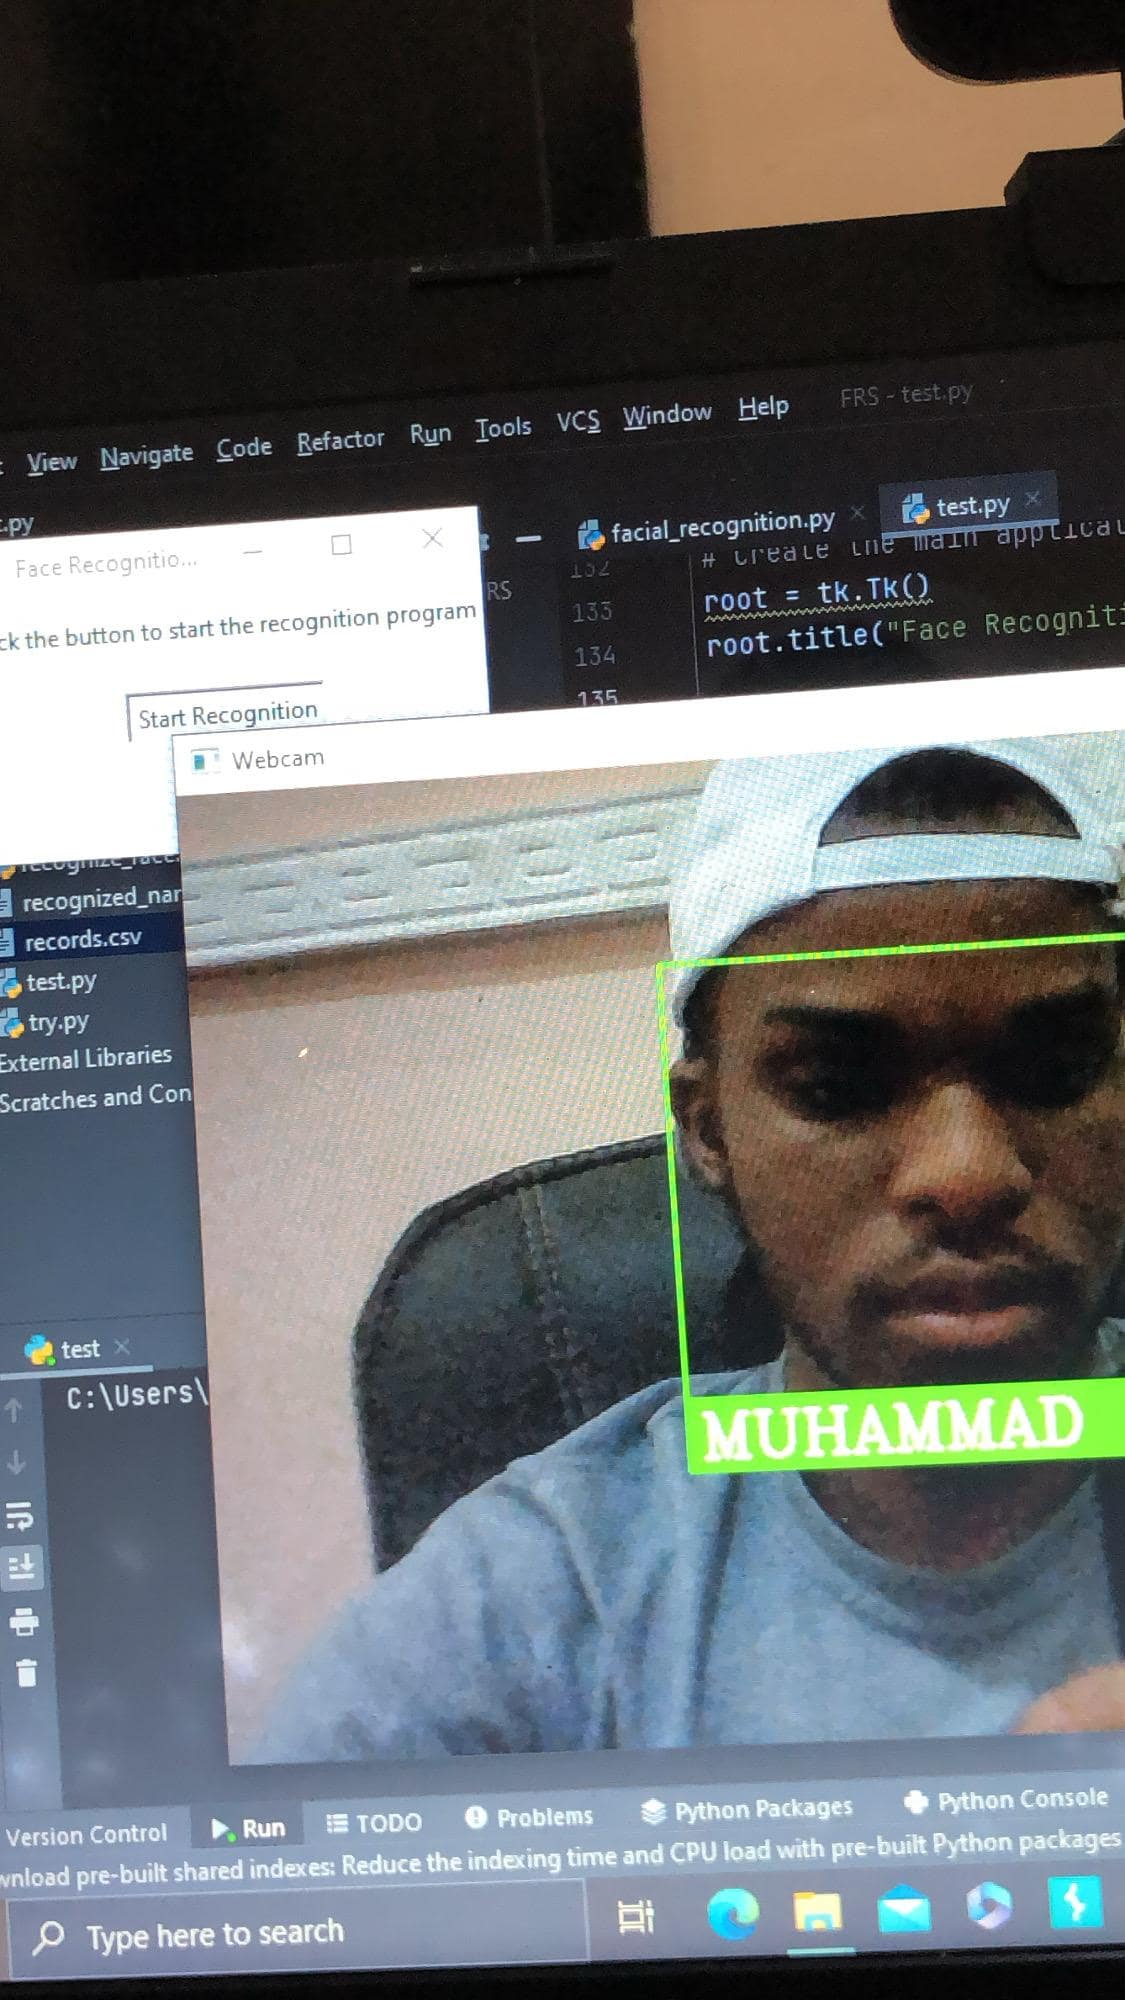
cv2.destroyAllWindows()In this function, we access our webcam, resize the frame to a suitable size, detect faces from our live stream (frame), get encodings of the detected face, and compare them to the encodings of our known faces. If there is a match, we return the name of the known face. This information is passed by drawing a rectangle on the face of the recognized person with a label carrying their name.
And finally, we create the simple GUI for this program:
# Create the main application window.
root = tk.Tk()
root.title("Face Recognition Program")
# Create a label
label = tk.Label(root, text="Click the button to start the facial recognition program")
label.pack(pady=10)
# Create a button to start the program
start_button = tk.Button(root, text="Start Recognition", command=start_recognition_program)
start_button.pack(pady=10)

# Function to quit the application. This is for quitting the entire program. To quit the webcam stream, hit q.
def quit_app():
   root.quit()
   cv2.destroyAllWindows()

# Create a quit button to exit the application.
exit_button = tk.Button(root, text="Close", command=quit_app)
exit_button.pack(pady=10)
# Start the Tkinter event loop.
root.mainloop()
And there you have it! You just built yourself a facial recognition system that documents activity!
Please bear in mind that just as seen in the comments, to close the webcam, you hit the letter q (make sure the caps lock is off) on your keyboard. Do not hit the close button to close the webcam. So you hit q to close the webcam, then close to exit the program entirely.
Also, please make sure the lighting conditions are good when testing this program, as even we humans find it a bit difficult to recognize people under bad lighting conditions. Here's a demo:
Our record.csv file should be automatically created (if it didn't exist) and look something like:
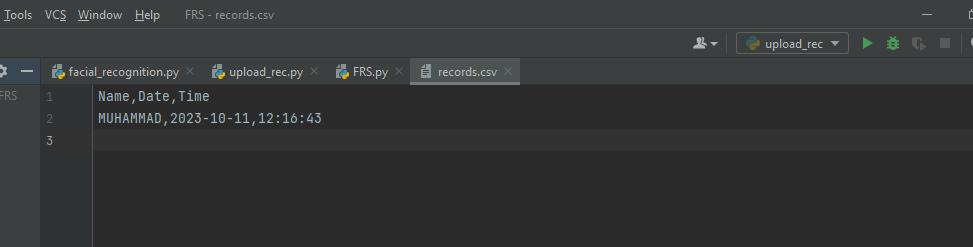
To get a more detailed view, open this with Microsoft Excel or any other software that handles CSV files very well. But we see clearly that our program is recording the time and date of attendance.
And there you have it, project 1 done! Next, we'll see how to build a facial recognition system to recognize the person in an image.
Related: How to Fine Tune ViT for Image Classification using Transformers in Python.
Facial Recognition System on Uploaded Images
Unlike the first program we built, where we recognized faces from a live stream, in this section, we will recognize people based on uploaded images. This program is handy in a wide range of scenarios, from identifying a criminal from video footage to checking the details of a person to confirm their identity. The usefulness of this program cannot be overemphasized.
So, open up a new Python file for this program, and let's get into it.
Also, please note that we will be using some of the functionalities of the first program. But for the sake of the people who skipped to this program because of the lack of a webcam, I'll go over the code again. For the installation, like I said earlier, it's exactly the same thing. We're also using the same training folder as the first program. I'm only going through the code again for the sake of clarity.
We'll start by importing the necessary libraries:
import cv2, numpy as np, face_recognition, os, tkinter as tk
from tkinter import filedialog
The filedialog from tkinter allows us to select and upload an image of our choice:
# Initialize empty lists to store images and people's names.
known_faces = []
face_labels = []
# Get a list of all images in the TrainingImages directory.
image_files = os.listdir("TrainingImages")
# Loop through the images in the directory.
for image_name in image_files:
   # Read each image and add it to the known_faces list.
   current_image = cv2.imread(f'TrainingImages/{image_name}')
   known_faces.append(current_image)
   # Extract the person's name by removing the file extension and add it to the face_labels list.
   face_labels.append(os.path.splitext(image_name)[0])
We're iterating through all the images in our folder (the known images) and appending them to a list for further processing (encoding and comparing). We're also extracting the names of the known people by removing the extension. From Muhammad.jpg, we take out Muhammad and display this as the person's name if recognized.
Then, we create a function to get encodings from the images:
# Function to get face encodings from a list of images.
def get_face_encodings(images):
   encoding_list = []
   for image in images:
       # Convert the image to RGB format. RGB is Red Green Blue.
       image = cv2.cvtColor(image, cv2.COLOR_BGR2RGB)
       # Get the face encoding for the first face found in the image.
       face_encoding = face_recognition.face_encodings(image)[0]
       encoding_list.append(face_encoding)
   return encoding_list

# Get face encodings for known images.
known_face_encodings = get_face_encodings(known_faces)
Afterward, we create a function to select an image for recognition:
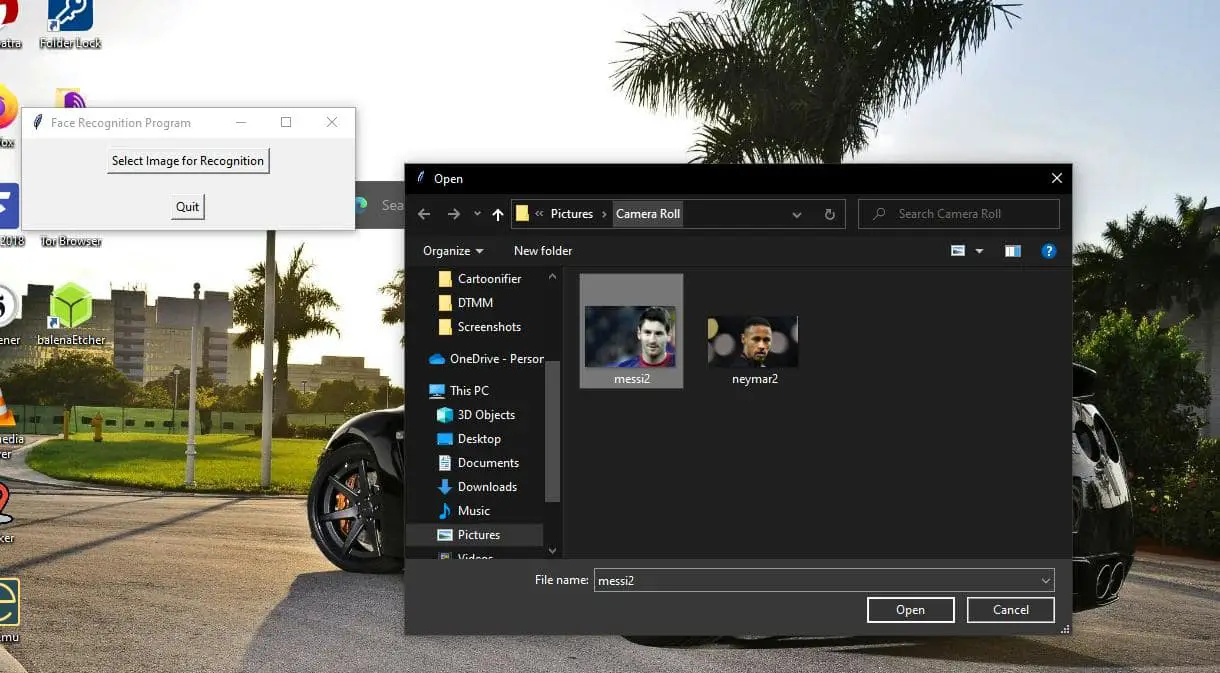
# Function to handle image selection and recognition
def select_and_recognize_image():
   # Use a file dialog to let the user select an image.
   selected_file = filedialog.askopenfilename()
   if selected_file:
       # Read the selected image.
       selected_image = cv2.imread(selected_file)
       # Convert the image to RGB format.
       selected_image_rgb = cv2.cvtColor(selected_image, cv2.COLOR_BGR2RGB)
       # Get face encodings for the selected image.
       selected_face_encodings = face_recognition.face_encodings(selected_image_rgb)
       match_found = False  # Flag to track if a match is found.
       if not selected_face_encodings:
           print("No faces found in the selected image.")
       else:
           # Loop through the detected faces in the selected image.
           for face_encoding in selected_face_encodings:
               # Compare the current face encoding with the known encodings.
               matches = face_recognition.compare_faces(known_face_encodings, face_encoding)
               face_distances = face_recognition.face_distance(known_face_encodings, face_encoding)
               # Find the index of the best match. That is, the best resemblance.
               best_match_index = np.argmin(face_distances)
               if matches[best_match_index]:
                   # If a match is found, get the name of the recognized person.
                   recognized_name = face_labels[best_match_index].upper()
                   # Draw a green rectangle around the recognized face.
                   top, right, bottom, left = face_recognition.face_locations(selected_image_rgb)[0]
                   cv2.rectangle(selected_image, (left, top), (right, bottom), (0, 255, 0), 2)
                   # Display the name below the face.
                   cv2.putText(selected_image, recognized_name, (left + 6, bottom - 6), cv2.FONT_HERSHEY_COMPLEX, 0.5,
                               (0, 255, 0), 2)
                   match_found = True  # Match found flag.
                   break  # Exit loop as soon as a match is found.

           if not match_found:
               # If no match is found, draw a red rectangle and display No Match.
               top, right, bottom, left = face_recognition.face_locations(selected_image_rgb)[0]
               cv2.rectangle(selected_image, (left, top), (right, bottom), (0, 0, 255), 2)
               cv2.putText(selected_image, "No match", (left + 6, bottom - 6), cv2.FONT_HERSHEY_COMPLEX, 1,
                           (0, 0, 255), 2)

           # Show the image with the rectangle and name.
           cv2.imshow("Recognized Image", selected_image)
           known_faces.clear()# To prevent the program from slowing down due to excess unnecessary encodings.

           cv2.waitKey(0)
           cv2.destroyAllWindows()
Basically, in this function:
- We let the user select an image file using a file dialog.
- The selected image is read and converted to RGB format for face recognition.
- It checks if faces are in the selected image; if not, it prints a message indicating so on the terminal.
- For detected faces, it compares them with known faces to find a match based on facial features.
- If a match is found, it draws a green rectangle around the recognized face and displays the person's name.
- If no match is found, it draws a red rectangle and displays "No match."
- The recognized image is shown to the user.
And finally, we write simple GUI code:
# Create the main application window.
root = tk.Tk()
root.title("Face Recognition Program")

# Create a button to select an image for recognition.
select_button = tk.Button(root, text="Select Image for Recognition", command=select_and_recognize_image)
select_button.pack(pady=10)

# Function to quit the application.
def quit_app():
   root.quit()

# Create a quit button to exit the application.
quit_button = tk.Button(root, text="Quit", command=quit_app)
quit_button.pack(pady=10)

# Start the Tkinter event loop.
root.mainloop()
And that's it. Go ahead and run the program (after fulfilling all requirements). You should get output similar to:

If you're not a fan of the GOAT, close your eyes :) Notice that the image of Messi in the training folder differs from what I uploaded. The image in the training folder is one where Messi has a beard. And now, I uploaded a picture of him without a beard, and we're still able to recognize him.
So, that's basically it. One thing to note is that you want to use an image of reasonable size. The image shouldn't be too large or too small. Because if it is, you won't be able to see the name even if the program recognizes the person. Also, if you upload an image without a face, you'll get a message on the terminal telling you that no face was detected.
Also, this was just a demonstration of how facial recognition works. In a real-world scenario, say a country, state, or school wanted to implement this, all they need to do is put images of all citizens or students in a database or preferred storage option similar to what we did from the folder, they can access it and process it accordingly.
There you have it. We built two cool facial recognition projects, and you can get the complete code for both here. I hope you found this helpful and fun.
Learn also: Real-Time Vehicle Detection, Tracking and Counting in Python.
Happy coding ♥
Finished reading? Keep the learning going with our AI-powered Code Explainer. Try it now!
View Full Code Understand My Code


Got a coding query or need some guidance before you comment? Check out this Python Code Assistant for expert advice and handy tips. It's like having a coding tutor right in your fingertips!