Want to code faster? Our Python Code Generator lets you create Python scripts with just a few clicks. Try it now!
Introduction
![]()
Are you a seasoned Photoshop user who frequently edits images, inserts new objects, or changes the background and theme? If yes, then you must be aware of how tiring and difficult it is to manually do all this. Or are you like me who doesn't have a clue about editing images because those applications are so overwhelming? In any case, we now have AI to the rescue which lets us edit images using mere words. In this article, we are going to learn about InstructPix2Pix, a new AI model designed specifically to follow user instructions to edit and modify both virtual and real images.
This article assumes you're familiar with how latent diffusion models work. If not or if you want a quick brush, check out our stable diffusion article before getting into this one.
Table of contents:
- Introduction
- Generating the Multi-modal Training Dataset
- New Objective and Training
- Code
- Limitations
- Conclusion
- References
InstructPix2Pix Overview
InstructPix2Pix is a new model designed by researchers from the University of California, Berkeley to follow human commands. It follows a similar training procedure as the other text-to-image models with a special emphasis on leveraging existing LLMs and image generation models trained on different modalities to generate the paired training dataset.
Before we dive into its working, let's see some examples!
Example 1
Prompt: “Turn the bird to red”
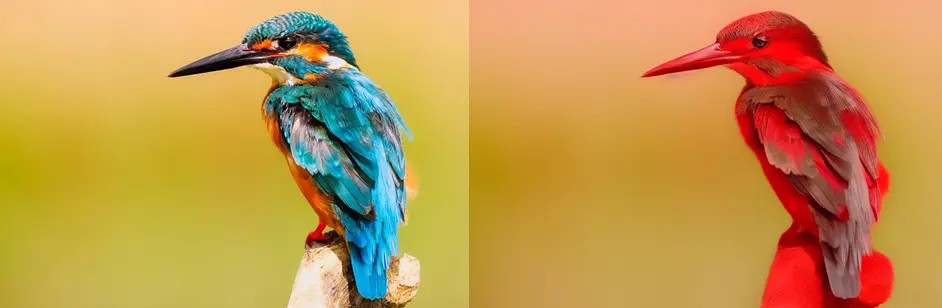 Left: Original image, Right: Output
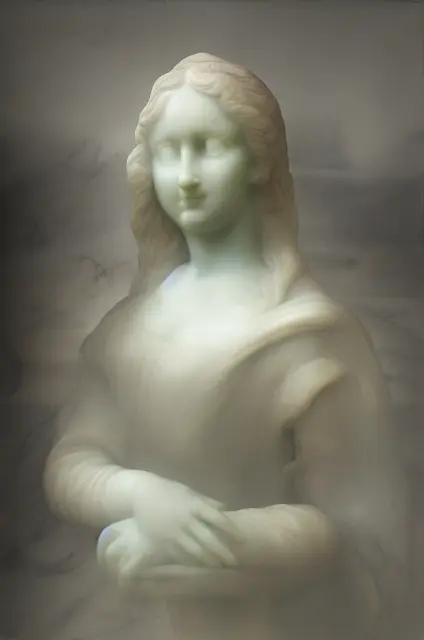
Example 2
Prompt: “Convert the lady into a highly detailed marble statue”
 Left: Original image, Right: Output
The main idea behind InstructPix2Pix is to generate the dataset for supervised training. It is achieved by taking an existing captioned image dataset (LAION-Aesthetics V2 6.5+ in our case) and using an LLM (GPT-3 in our case) to generate human instruction and corresponding captions of the target image. Then using a pairwise image generation technique or model (like Prompt-to-Prompt), we can transform the original caption and the generated caption into a pair of images.
Once we have the dataset it can be utilized to train a diffusion model to take the input image, and the input instruction to generate the target image. Once trained, InstructPix2Pix does not require any fine-tuning or inversion, unlike other diffusion models. Hence it is computationally much more convenient.
Generating the Multi-modal Training Dataset
Generating Instructions and Paired Captions
The human instructions and the target captions need to be consistent. To use an LLM for the same, a GPT-3 model is first finetuned on a small, 700 sample, manually labeled dataset. This fine-tuned model is then used on the captions from LAION-Aesthetics to generate a variety of instructions and target captions.
For this task, LAION-Aesthetics is chosen due to its large size, and a diverse number of images which include popular culture, and references to proper nouns. It also features different mediums of images such as photographs, paintings, digital artwork, and more. A drawback of using this dataset is that some images contain nonsensical or undescriptive captions but all such image-text pairs are filtered when generating the images.
Generating Paired Images from Paired Captions
Text-to-image models do not guarantee any image consistency. That is, for two very similar prompts, the same model may give us two vastly different images due to its stochastic and unpredictable nature. To tackle this, Prompt-to-Prompt, a method to generate multiple but similar images from a text-to-image diffusion model is used. Prompt-to-Prompt features a parameter, p, letting the user control the amount of similarity between these multiple generations. Since some image edits require minor changes (like adding freckles to a portrait of a woman) and some require drastic changes (like converting the portrait of the woman to a man), the parameter p is very useful. Since p needs to be uniquely and manually chosen for each image, we can generate 100 samples of images per caption with p coming from a uniform distribution i.e., U(0.1, 0.9). All these generated samples are then filtered by using a CLIP-based metric.
Contrastive Language-Image Pretraining (or just CLIP) is a model that can measure the similarity between a (text, image) pair. It operates in the CLIP space which is a joint embedding space for image and text. To find out which image-caption pair is the best out of the 100 generated samples, we can measure how consistent the change between the two images and the change between the two captions are. This is exactly what CLIP directional similarity (the CLIP-based metric we talked about before) does. This filtering mechanism helps maximize the diversity and quality of image pairs and makes InstructPix2Pix more robust to failures of Prompt-to-Prompt and Stable Diffusion.
New Objective and Training
To train the InstructPix2Pix model, the authors optimize the following learning objective:

It minimizes the difference between the actual noise from the predicted noise conditioned on the text instruction (c_T) and the given image (c_I). z_t represents the image latent at timestep t.
Instead of training from scratch, InstructPix2Pix leverages the pre-trained Stable Diffusion checkpoint. Also, to support image conditioning, additional input channels are added to the first convolutional layer. These new input channels are initialized to zero.
Classifier-free Guidance
Since we have two conditional inputs, we can modify our classifier-free guidance equation as follows:
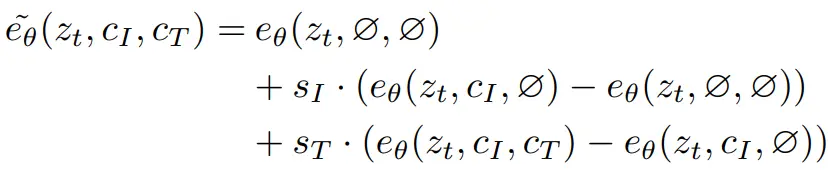
The term on the left is the final noise prediction. On the right side, the first term represents the unconditional noise prediction. The second term represents the scaled difference between noise predictions when conditioned on just an image and without any conditioning. This difference directs our noise prediction to go towards the noise prediction when conditioned on the image, which is what we want.
However, this doesn't include the conditioning by text so we have the third term which represents the scaled difference between the noise predictions when conditioned on both the image as well as the text and the noise prediction when conditioned on just the image. This moves the noise prediction from just being conditioned on the image towards the predictions that are also conditioned on the text.
Code
Okay enough with all the theory and the talking. It’s time to get our hands dirty with some code. Let’s begin with installing the required libraries:
$ pip install diffusers accelerate safetensors transformersHuggingface Implementation
Let’s kick off our code by using the implementation offered by Huggingface. We’ll first import the required libraries:
import PIL
import requests
import torch
from diffusers import StableDiffusionInstructPix2PixPipeline, EulerAncestralDiscreteScheduler
Let’s now define a function to download images from a URL:
def download_image(url):
    image = PIL.Image.open(requests.get(url, stream=True).raw)
    image = PIL.ImageOps.exif_transpose(image)
    image = image.convert("RGB")
    return image
Now let’s download and load our pipeline:
model_id = "timbrooks/instruct-pix2pix"
pipe = StableDiffusionInstructPix2PixPipeline.from_pretrained(model_id, torch_dtype=torch.float16, safety_checker=None)
pipe.to("cuda")
pipe.scheduler = EulerAncestralDiscreteScheduler.from_config(pipe.scheduler.config)
We will also use the EulerAncestralDiscreteScheduler. It is a fast scheduler that helps generate good outputs with just 20-30 steps. It is an ancestral sampling scheduler with Euler method steps. An ancestral sampler adds noise to the image at each sampling step, and this scheduler is similar to Euler’s sampler but subtracts more noise than it should and adds some random noise.
Let’s load our first image using our previously defined function.
url = "https://cdn.pixabay.com/photo/2013/01/05/21/02/art-74050_640.jpg"
image = download_image(url)
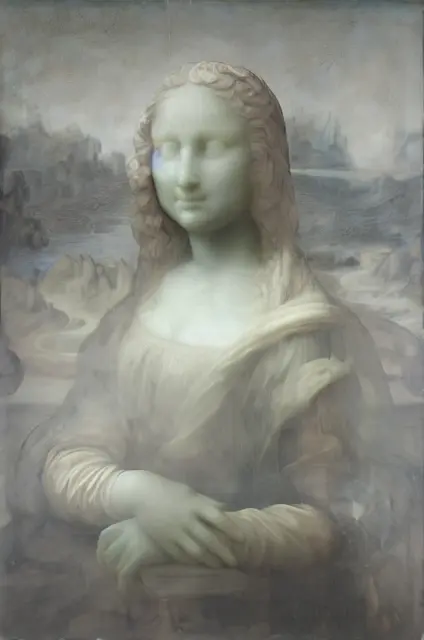
image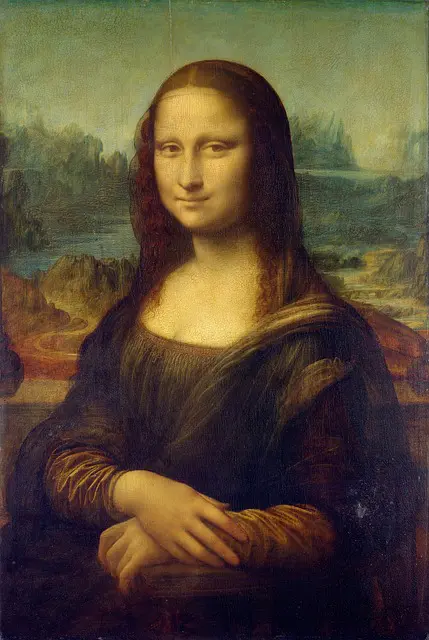 Let’s use the instance of our pipeline to convert the painting of the Mona Lisa we just loaded into a marble statue:
prompt = "convert the lady into a highly detailed marble statue"
images = pipe(prompt, image=image, num_inference_steps=10, image_guidance_scale=1).images
images[0]
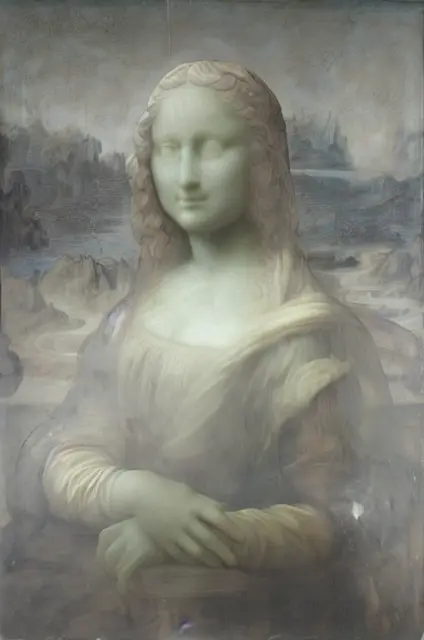
 It looks good but it smoothened so many of the details. We want to make it more detailed just like the image. So let’s increase the image guidance scale a bit and try again:
prompt = "convert the lady into a highly detailed marble statue"
images = pipe(prompt, image=image, num_inference_steps=10, image_guidance_scale=1.5).images
images[0]
 Now this looks great, doesn’t it? Let’s try another image:
url = "https://cdn.pixabay.com/photo/2018/05/08/06/52/vacation-3382400_640.jpg"
image = download_image(url)
image
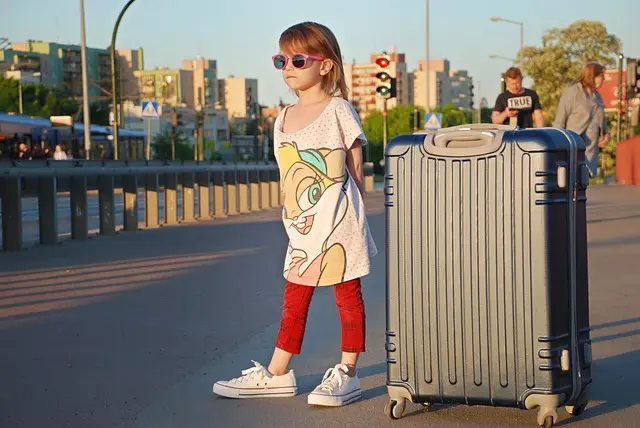 Now we’ll turn the suitcase yellow with the following prompt:
prompt = "turn the suitcase yellow"
images = pipe(prompt, image=image, num_inference_steps=20, image_guidance_scale=1.7).images
images[0]
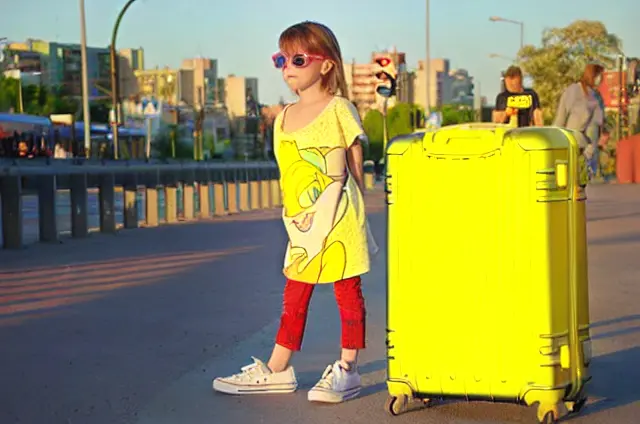 It looks great! Though we lost some of the details, it’s fine as we can use AI upscaling models.
Custom Implementation
Let’s now implement the InstructPix2Pix pipeline ourselves.
We’ll use the tqdm library to have the loading bar and autocast from the torch library to do AMP inference (work with lower precision float tensors) for faster outputs:
from tqdm import tqdm
from torch import autocast
Next, let’s define a class for the pipeline and store all the different components we will need:
class InstructPix2PixPipelineCustom:
    """custom implementation of the InstructPix2Pix Pipeline"""
    def __init__(self, vae, tokenizer, text_encoder,
                 unet, scheduler, image_processor):
        self.vae = vae
        self.tokenizer = tokenizer
        self.text_encoder = text_encoder
        self.unet = unet
        self.scheduler = scheduler
        self.image_processor = image_processor
        self.device = 'cuda' if torch.cuda.is_available() else 'cpu'
Now we will define a method for getting text embeddings from a text and also a method for getting prompt embeddings from the user’s prompt:
    def get_text_embeds(self, text):
        """returns embeddings for the given `text`"""
        # tokenize the text
        text_input = self.tokenizer(text,
                                    padding='max_length',
                                    max_length=tokenizer.model_max_length,
                                    truncation=True,
                                    return_tensors='pt')
        # embed the text
        with torch.no_grad():
            text_embeds = self.text_encoder(text_input.input_ids.to(self.device))[0]
        return text_embeds

    def get_prompt_embeds(self, prompt, prompt_negative=None):
        """returns prompt embeddings based on classifier free guidance"""
        if isinstance(prompt, str):
            prompt = [prompt]
        if prompt_negative is None:
            prompt_negative = ['']
        elif isinstance(prompt_negative, str):
            prompt_negative = [prompt_negative]
        # get conditional prompt embeddings
        cond_embeds = self.get_text_embeds(prompt)
        # get unconditional prompt embeddings
        uncond_embeds = self.get_text_embeds(prompt_negative)
        # instructpix2pix takes conditional embeds first, followed by unconditional embeds twice
        # this is different from other diffusion pipelines
        prompt_embeds = torch.cat([cond_embeds, uncond_embeds, uncond_embeds])
        return prompt_embeds
In the method above, we generate the conditional embeddings from the prompt and get the unconditional embeddings from the negative prompt given to us. If the negative prompt is not given, it is declared as an empty string.
A key thing to note here is that the prompt embeddings consist of 3 embeddings (one conditional and two unconditional). This is because we are doing classifier-free guidance. The first embedding will be used to predict noise conditioned on both the text and the image. The second embedding will be used to predict noise conditioned on just the image (hence we add unconditional text embeddings here) and the last embedding will be unconditional.
We’ll now define the method to get image latents from our input image:
    def get_image_latents(self, image):
        """get image latents to be used with classifier free guidance"""
        # get conditional image embeds
        image = image.to(self.device)
        image_latents_cond = self.vae.encode(image).latent_dist.mode()
        # get unconditional image embeds
        image_latents_uncond = torch.zeros_like(image_latents_cond)
        image_latents = torch.cat([image_latents_cond, image_latents_cond, image_latents_uncond])
        return image_latents
We first encoded the image using InstructPix2Pix's self.vae. We then initialize the unconditional image embeddings with zero tensors. Note how we first have two conditional embeddings and then an unconditional embedding.
Combining this permutation of image embeddings and the permutation of prompt embeddings we defined just before this, we get the following three noise predictions: conditioned on both image and prompt, conditioned just on the image, and unconditional. This is a crucial thing to understand as this is exactly what lets us do classifier-free guidance with two types of conditioning.
Let’s now define a method to get initial latents for the target image as follows:
    def get_initial_latents(self, height, width, num_channels_latents, batch_size):
        """returns noise latent tensor of relevant shape scaled by the scheduler"""
        image_latents = torch.randn((batch_size, num_channels_latents, height, width))
        image_latents = image_latents.to(self.device)
        # scale the initial noise by the standard deviation required by the scheduler
        image_latents = image_latents * self.scheduler.init_noise_sigma
        return image_latents
We can also define a method to transform our image from torch tensors to the PIL format. This method utilizes the image processor of the InstructPix2Pix pipeline:
    def transform_image(self, image):
        """transform image from pytorch tensor to PIL format"""
        image = self.image_processor.postprocess(image, output_type='pil')
        return image
Now we come to the meat of our code where we will denoise the latents:
    def denoise_latents(self, prompt_embeds, image_latents, timesteps,
                        latents, guidance_scale, image_guidance_scale):
        """denoises latents from noisy latent to a meaningful latent as conditioned by image_latents"""
        # use autocast for automatic mixed precision (AMP) inference
        with autocast('cuda'):
            for i, t in tqdm(enumerate(timesteps)):
                # duplicate image latents *thrice* to do classifier free guidance
                latent_model_input = torch.cat([latents] * 3)
                latent_model_input = self.scheduler.scale_model_input(latent_model_input, t)
                latent_model_input = torch.cat([latent_model_input, image_latents], dim=1)
                # predict noise residuals
                with torch.no_grad():
                    noise_pred = self.unet(latent_model_input, t,
                        encoder_hidden_states=prompt_embeds)['sample']
                # separate predictions into conditional (on text), conditional (on image) and unconditional outputs
                noise_pred_text, noise_pred_image, noise_pred_uncond = noise_pred.chunk(3)
                # perform guidance
                noise_pred = (
                    noise_pred_uncond
                    + guidance_scale * (noise_pred_text - noise_pred_image)
                    + image_guidance_scale * (noise_pred_image - noise_pred_uncond)
                    )
                # remove the noise from the current sample i.e. go from x_t to x_{t-1}
                latents = self.scheduler.step(noise_pred, t, latents)['prev_sample']
        return latents
This denoising loop is similar to the one with the basic text-to-image models except it has three major differences.
First, instead of duplicating the image latents twice, we duplicate it thrice. This is because each of these latents will be used to predict the noise based on different conditionings as we discussed earlier.
Second, we concatenate our source image latents to all these three latents. This is because the InstructPix2Pix model has extra channels to accommodate the user's query on the source image.
Third, to do classifier-free guidance, we follow the formula used for handling two conditionings as we have already discussed.
Let’s now combine all the methods we have defined so far to build an easy, ready-to-use function for editing images.
    def __call__(self, prompt, image, prompt_negative=None,
                 num_inference_steps=20, guidance_scale=7.5,
                 image_guidance_scale=1.5):
        """generates new image based on the `prompt` and the `image`"""
        # encode input prompt
        prompt_embeds = self.get_prompt_embeds(prompt, prompt_negative)
        # preprocess image
        image = self.image_processor.preprocess(image)
        # prepare image latents
        image = image.half()
        image_latents = self.get_image_latents(image)
        # prepare timesteps
        self.scheduler.set_timesteps(num_inference_steps)
        timesteps = self.scheduler.timesteps
        height_latents, width_latents = image_latents.shape[-2:]
        # prepare the initial image in the latent space (noise on which we will do reverse diffusion)
        num_channels_latents = self.vae.config.latent_channels
        batch_size = prompt_embeds.shape[0] // 2
        latents = self.get_initial_latents(height_latents, width_latents, num_channels_latents, batch_size)
        # denoise latents
        latents = self.denoise_latents(prompt_embeds, image_latents,
                                       timesteps, latents,
                                       guidance_scale, image_guidance_scale)
        # decode latents to get the image into pixel space
        latents = latents.to(torch.float16) # change dtype of latents since
        image = self.vae.decode(latents / self.vae.config.scaling_factor, return_dict=False)[0]
        # convert to PIL Image format
        image = image.detach() # detach to remove any computed gradients
        image = self.transform_image(image)
        return image
In this method, we first encode the prompt and the source image after preprocessing it. We set the timesteps in the scheduler and also get the random latents which will get denoised to form the target image. All these things are sent to the denoising method which returns the target image latents. These latents are decoded by the VAE into the pixel space which is then post-processed to get the final PIL image.
Let’s now test the class we just implemented. Let’s start by making an instance of the same:
# We can get all the components from the InstructPix2Pix Pipeline
vae = pipe.vae
tokenizer = pipe.tokenizer
text_encoder = pipe.text_encoder
unet = pipe.unet
scheduler = pipe.scheduler
image_processor = pipe.image_processor
custom_pipe = InstructPix2PixPipelineCustom(vae, tokenizer, text_encoder, unet, scheduler, image_processor)
Let’s also load the Mona Lisa image we saw before:
url = "https://cdn.pixabay.com/photo/2013/01/05/21/02/art-74050_640.jpg"
image = download_image(url)
image
Now let’s try the code below and cross our fingers:
# sample image 1
prompt = "convert the lady into a highly detailed marble statue"
images_custom = custom_pipe(prompt, image, num_inference_steps=20)
images_custom[0]
 Hurray, it works!
Let’s see another example where we turn a girl into an anime character.
url = "https://cdn.pixabay.com/photo/2023/03/22/01/41/little-girl-7868485_640.jpg"
image = download_image(url)
image
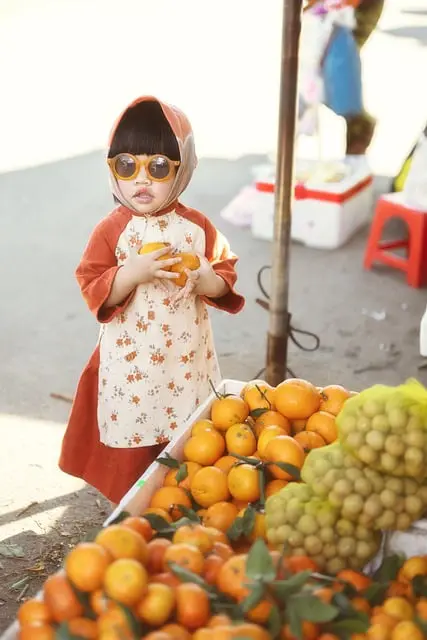
prompt = "turn into 8k anime"
images_custom = custom_pipe(prompt, image, num_inference_steps=20)
images_custom[0]
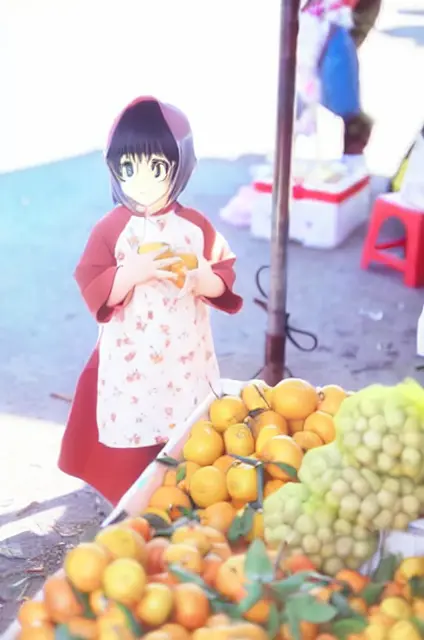 It looks great!
Limitations
Though InstructPix2Pix is able to correctly edit images as desired by the user, there are times when it gets confused and may not follow the instructions properly. For instance, consider the following examples:
Example 1
prompt = "turn entire pic into anime frame"
images_custom = custom_pipe(prompt, image, num_inference_steps=20)
images_custom[0]
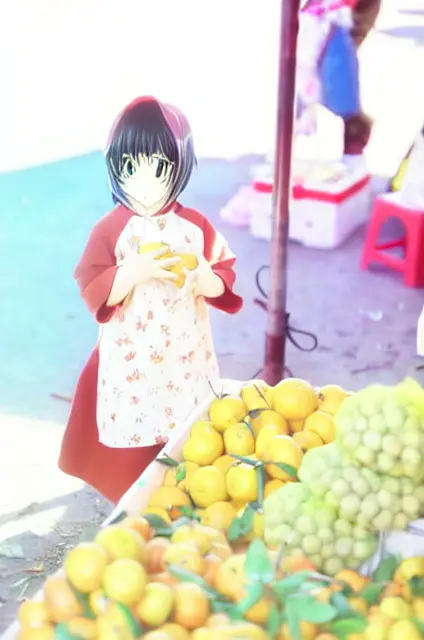 Here we tried to turn the entire picture of the little girl near oranges into anime-style art. However, the model only converted the face and the hands and made the overall picture lighter.
Conclusion
In this article, we learned in-depth about InstructPix2Pix. We didn’t just cover how its dataset was prepared and it was trained but also gained first-hand experience using Huggingface libraries and implementing it ourselves.
Here are some related tutorials:
- How to Control Generated Images by Diffusion Models via ControlNet in Python
- Image-to-Image Generation with Stable Diffusion in Python
- How to Generate Images from Text using Stable Diffusion in Python
Get the complete code here.
![]()
References
- InstructPix2Pix: Learning to Follow Image Editing Instructions
pipeline_stable_diffusion_instruct_pix2pix.py
Want to code smarter? Our Python Code Assistant is waiting to help you. Try it now!
View Full Code Assist My Coding


Got a coding query or need some guidance before you comment? Check out this Python Code Assistant for expert advice and handy tips. It's like having a coding tutor right in your fingertips!