Welcome! Meet our Python Code Assistant, your new coding buddy. Why wait? Start exploring now!
![]()
Have you used those popular Stable Diffusion models to make AI-generated images? If so, you must be aware of how significantly time-consuming it gets to make higher-resolution images. Making higher-resolution images also demands massive amounts of GPU RAM which isn’t available to everyone.
This is where the Stable Diffusion x4 Upscaler comes to our rescue! To overcome this problem, an easy trick is to generate a low-resolution image and then upscale it to a higher resolution. In this tutorial, we will learn about the Stable Diffusion x4 Upscaler, how it works, and also see how to use it ourselves. Finally, we’ll implement it from scratch as well.
This article assumes you are familiar with how the text-to-image diffusion models work. If not, check out this in-depth article.
Table of Contents
Introduction
The Stable Diffusion x4 Upscaler (SD x4 Upscaler) is a Latent Diffusion model used for upscaling images by a factor of 4. It works by denoising the latent image noise directly conditioned on the low-resolution image. As with many other AI-related tasks, its performance is superior to the traditional way of upscaling images which was done via interpolation (or more specifically bilinear interpolation).
Let’s see a comparison. Here is our low-resolution image which we would like to upscale:
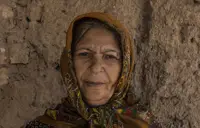
Here is the same image upscaled using the SD x4 Upscaler:
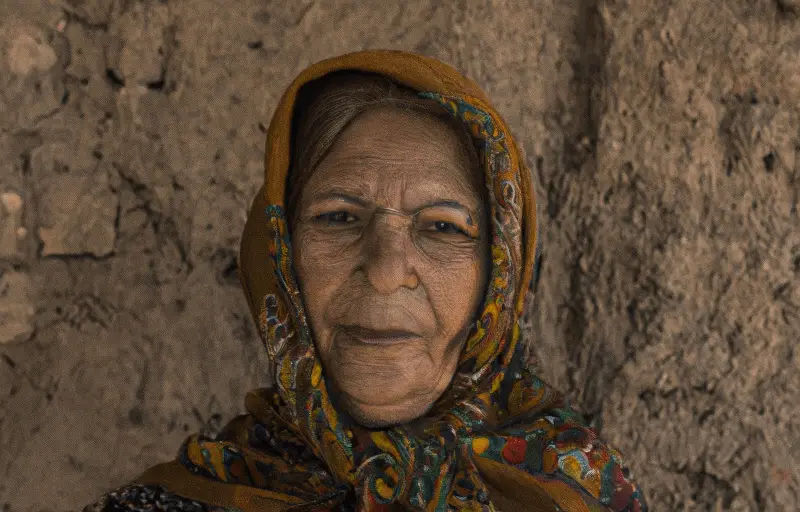
And here is the image upscaled via interpolation:

Do you see how big the difference is? You can find the code for this example in our notebook.
Applications of Upscaling Images
There are just so many applications of upscaling images to cover. Here are a few of them:
- Upscaling videos: We can easily separate each video frame and use SD Upscaler to upscale each frame individually and then stitch back all the frames to form the upscaled video.
- Facial Recognition: Upscaling can vastly improve the performance of facial recognition software, especially in cases where the face may be blurry
- Text recognition: Upscaling images of text can make the edges of the text clearer resulting in improved performance of OCR models
- Entertainment: Generating low-quality video game graphics and using an efficient upscaler can prove to be more consumer hardware friendly than playing the same game on high-end settings. Also, imagine loading a 720p YouTube video and upscaling it to 4k would require so much less network bandwidth!
- Higher-quality images: It might be possible to take multiple photographs of the same scene with a low-end camera and combine them to form one really high-quality image.
There are many more applications like avoiding pixelation when zooming in, or upscaling movies and tv shows, or even upscaling medical scans which can be life-saving!
Stable Diffusion x4 Upscaler
The SD x4 Upscaler has the same workflow as the basic text-to-image model except it does one additional thing. It directly conditions the prediction of noise on the given low-resolution image. As a matter of fact, if we just concatenate the preprocessed low-resolution image to the image latent before passing it to the U-Net, our job is done! We then only need to change some hyperparameters, take care of the shapes of different tensors, etc.
To train the upscaler, the ImageNet dataset is downsampled to 4 times smaller. These downsampled images are then given as input and the upscaler is forced to construct the original bigger images.
Why Does this Upscaler Outperform Interpolation?
Making images smaller removes the lower-level details from the image. For example, if we downsample an image of a woman with long hair, the hair would appear to be smooth like a continuous layer instead of appearing as different strands. Upscaling this image would require the computer to know hair in real life is not continuous. Interpolation also works by just viewing the neighboring pixels, meanwhile, the SD Upscaler encodes the entire image which can give a lot more context while predicting each pixel.
Code
Now that we know how the stable diffusion upscaler actually works, let’s see how to use it ourselves. We will first try the Huggingface implementation and then implement it ourselves.
Before we begin, we will install some required libraries:
$ pip install -qU diffusers transformers accelerate scipy safetensorsHuggingFace Implementation
Let’s first import all the libraries we will be needing:
import requests
from PIL import Image
from io import BytesIO
from diffusers import StableDiffusionUpscalePipeline
import torch
Now let’s load the entire upscaling pipeline as follows. This downloads all the required components such as the VAE, the U-Net model, the scheduler, etc:
# load model and scheduler
model_id = "stabilityai/stable-diffusion-x4-upscaler"
pipeline = StableDiffusionUpscalePipeline.from_pretrained(model_id, torch_dtype=torch.float16)
pipeline = pipeline.to("cuda")
After this, we can define a function that takes the URL of an image and resizes it to the specified shape. We will resize the images we download to a lower resolution and then use the SD upscaler to do its magic:
def get_low_res_img(url, shape):
    response = requests.get(url)
    low_res_img = Image.open(BytesIO(response.content)).convert("RGB")
    low_res_img = low_res_img.resize(shape)
    return low_res_img
Let’s now load an image of the Kingfisher bird using the function we just defined:
url = "https://cdn.pixabay.com/photo/2017/02/07/16/47/kingfisher-2046453_640.jpg"
shape = (200, 128)
low_res_img = get_low_res_img(url, shape)
low_res_img
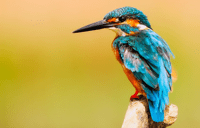
This image is pretty small. Let’s upscale it!
First, we will upscale using the SD Upscaler with a simple prompt:
prompt = "an aesthetic kingfisher"
upscaled_image = pipeline(prompt=prompt, image=low_res_img).images[0]
upscaled_image

This image of the Kingfisher bird looks quite detailed! However, it appears to be a little grainy, so we can rethink our prompt and add keywords like not grainy and smooth, We can also add other modifiers to make it look more realistic and to add details:
prompt = "an aesthetic kingfisher, UHD, 4k, hyper realistic, extremely detailed, professional, vibrant, not grainy, smooth"
upscaled_image = pipeline(prompt=prompt, image=low_res_img).images[0]
upscaled_image

Hurray, we now have our desired image!
Let’s now upscale the low-resolution image using interpolation. We use the PIL library’s resize() method which uses bilinear interpolation to resize images. Bilinear interpolation is the most used interpolation in the industry so we will stick with it:
upscaled_interpolation = low_res_img.resize((800, 512))
upscaled_interpolation

This interpolated image looks blurry! It is pretty obvious to see the SD Upscaler outperformed interpolation.
Let’s see another example involving 3 zebras standing together. This might be a confusing image for the AI and even for some people because of the black and white stripes merging in a pattern.
As before, we’ll first download the low-resolution image:
url = "https://cdn.pixabay.com/photo/2017/12/28/07/44/zebra-3044577_1280.jpg"
shape = (450, 128)
low_res_img = get_low_res_img(url, shape)
low_res_img

Let’s now use the SD Upscaler:
prompt = "zebras drinking water"
upscaled_image = pipeline(prompt=prompt, image=low_res_img).images[0]
upscaled_image
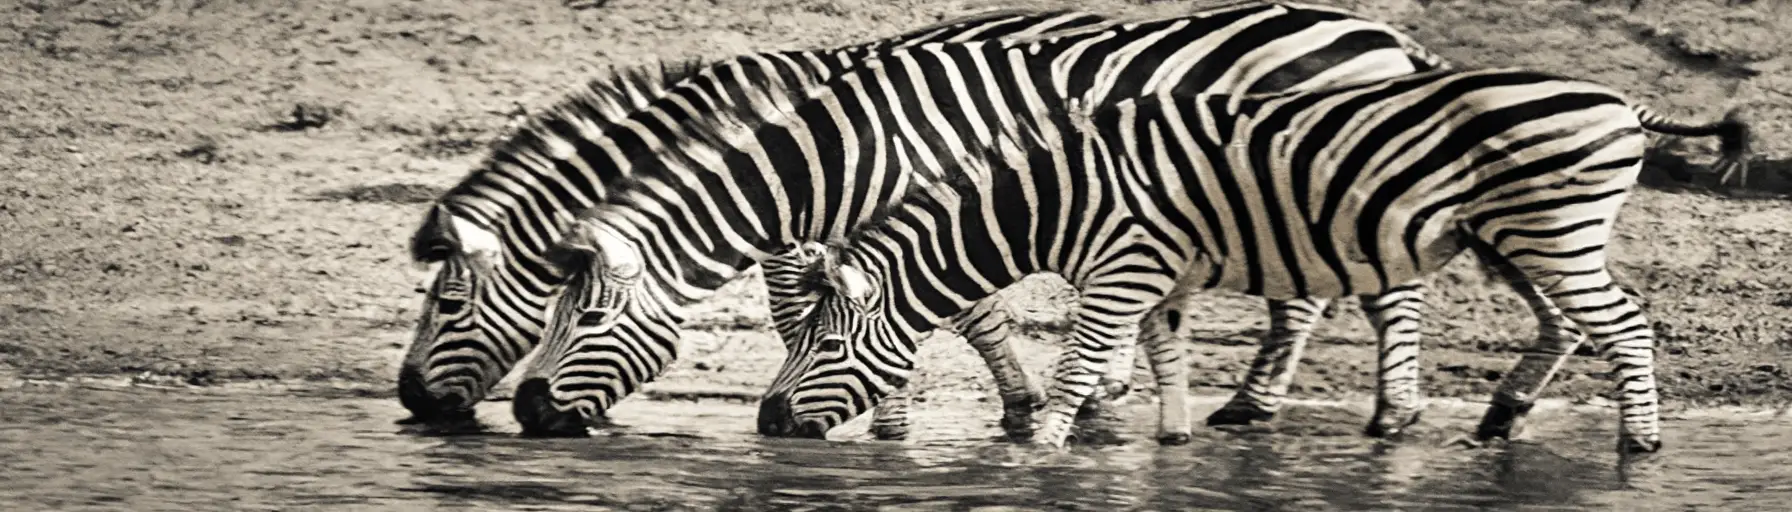
It still works! Isn’t this nice?
For comparison, here’s the interpolated image:
upscaled_interpolation = low_res_img.resize((1800, 512))
upscaled_interpolation
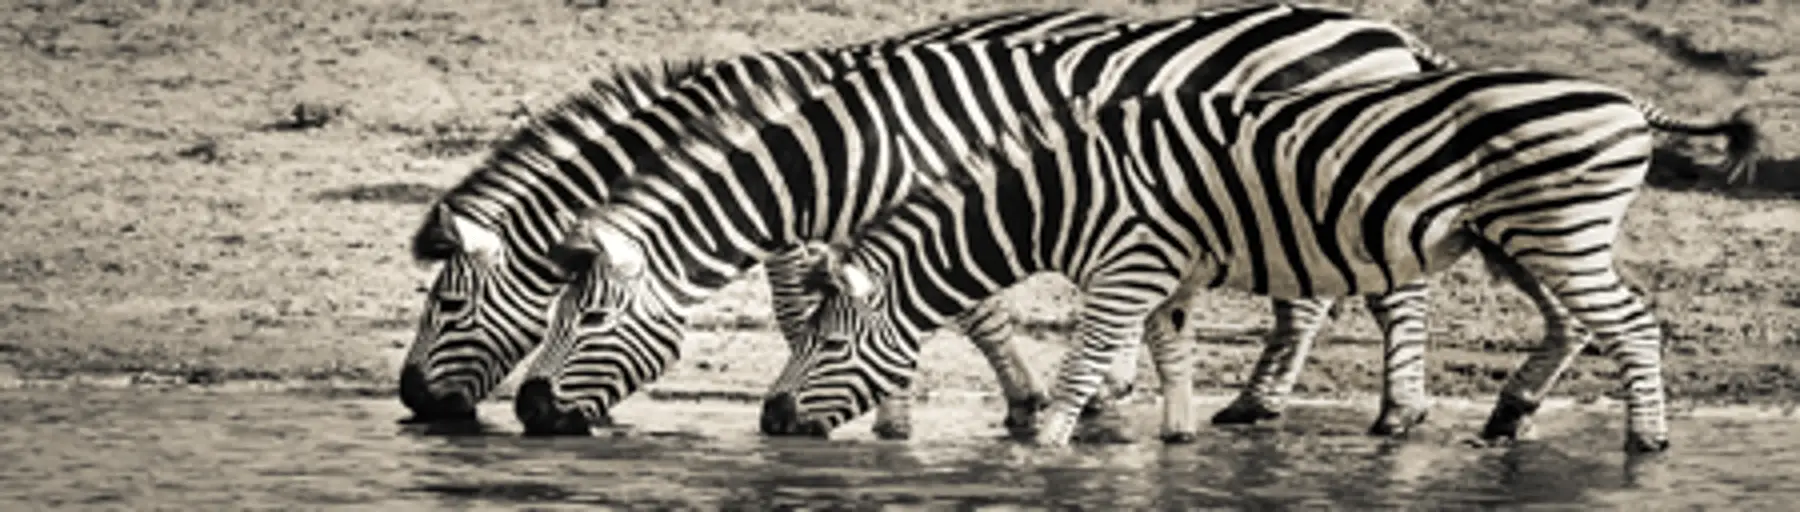
The SD Upscaler has produced a significantly better result with sharper edges and less blurriness.
Custom Implementation
Let’s now learn how to implement the upscaler model ourselves. We will first import tqdm for the progress bar and the autocast from torch for faster inference:
from tqdm import tqdm
from torch import autocast
Let’s now define a custom Python class for the upscaling pipeline. This class will store all the components we need along with the device we are using.
class CustomSDUpscalingPipeline:
    """custom implementation of the Stable Diffusion Upscaling Pipeline"""
    def __init__(self, vae, tokenizer, text_encoder,
                 unet, low_res_scheduler, scheduler,
                 image_processor):
        self.vae = vae
        self.tokenizer = tokenizer
        self.text_encoder = text_encoder
        self.unet = unet
        self.low_res_scheduler = low_res_scheduler
        self.scheduler = scheduler
        self.image_processor = image_processor
        self.device = 'cuda' if torch.cuda.is_available() else 'cpu'
We will now define methods for getting the prompt embeddings. We will not go into its details as it’s the same as we have defined in our previous article:
    def get_text_embeds(self, text):
        """returns embeddings for the given `text`"""
        # tokenize the text
        text_input = self.tokenizer(text, padding='max_length',
                                    max_length=tokenizer.model_max_length,
                                    truncation=True, return_tensors='pt')
        # embed the text
        with torch.no_grad():
            text_embeds = self.text_encoder(text_input.input_ids.to(self.device))[0]
        return text_embeds

    def get_prompt_embeds(self, prompt):
        """returns prompt embeddings based on classifier free guidance"""
        if isinstance(prompt, str):
            prompt = [prompt]
        # get conditional prompt embeddings
        cond_embeds = self.get_text_embeds(prompt)
        # get unconditional prompt embeddings
        uncond_embeds = self.get_text_embeds([''] * len(prompt))
        # concatenate the above 2 embeds for classfier free guidance
        prompt_embeds = torch.cat([uncond_embeds, cond_embeds])
        return prompt_embeds
Let’s define a method for handling all the postprocessing. Lucky for us, the image_processor does it for us in a single line:
    def transform_image(self, image):
        """convert image from pytorch tensor to PIL format"""
        return self.image_processor.postprocess(image, output_type='pil')
Now we need a method to get the initial image latents which will be denoised in the denoising step. We can define it as follows:
    def get_initial_latents(self, height, width, num_channels_latents, batch_size):
        """returns noise latent tensor of relevant shape scaled by the scheduler"""
        image_latents = torch.randn((batch_size, num_channels_latents, height, width)).to(self.device)
        # scale the initial noise by the standard deviation required by the scheduler
        image_latents = image_latents * self.scheduler.init_noise_sigma
        return image_latents
There are two things to note here. First is how the latents are scaled because the scheduler expects a normal distribution with a certain standard deviation. Second is how the height and width aren’t divided by 8 which is what we did in the base text-to-image diffusion model.
Let’s now define our denoising method as follows:
    def denoise_latents(self, prompt_embeds, image,
                        timesteps, latents, noise_level,
                        guidance_scale):
        """denoises latents from noisy latent to meaningful latents"""
        with autocast('cuda'):
            for i, t in tqdm(enumerate(timesteps)):
                # duplicate image latents to do classifier-free guidance
                latent_model_input = torch.cat([latents] * 2)
                latent_model_input = self.scheduler.scale_model_input(latent_model_input, t)
                latent_model_input = torch.cat([latent_model_input, image], dim=1)
                # predict noise residuals
                with torch.no_grad():
                    noise_pred = self.unet(
                        latent_model_input, t,
                        encoder_hidden_states=prompt_embeds,
                        class_labels=noise_level
                    )['sample']
                # separate predictions for unconditional and conditional outputs
                noise_pred_uncond, noise_pred_text = noise_pred.chunk(2)
                # perform guidance
                noise_pred = noise_pred_uncond + guidance_scale * (noise_pred_text - noise_pred_uncond)
                # remove the noise from the current sample i.e. go from x_t to x_{t-1}
                latents = self.scheduler.step(noise_pred, t, latents)['prev_sample']
        return latents
In each denoising step, the image latents are first duplicated and then scaled by the scheduler. The low-resolution image is then concatenated with the latents as required by the U-Net. We then predict the noise residuals and pass noise levels as the class_labels. The noise predictions are separated for the conditional and unconditional outputs and we perform classifier-free guidance to get the final noise prediction. This noise is then removed from the image latents by the scheduler and we get a denoised image latent. This process repeats and latents keep getting denoised.
Now that we have defined all the necessary methods, we will wrap all of them into a single ready-to-use method as follows.
    def __call__(self, prompt, image,
                 num_inference_steps=20, guidance_scale=9.0,
                 noise_level=20):
        """generates new image based on the `prompt` and the `image`"""
        # encode input prompt
        prompt_embeds = self.get_prompt_embeds(prompt)
        # preprocess image
        image = self.image_processor.preprocess(image).to(self.device)
        # prepare timesteps
        self.scheduler.set_timesteps(num_inference_steps, device=self.device)
        timesteps = self.scheduler.timesteps
        # add noise to image
        noise_level = torch.tensor([noise_level], device=self.device)
        noise = torch.randn(image.shape, device=self.device)
        image = self.low_res_scheduler.add_noise(image, noise, noise_level)
        # duplicate image for classifier free guidance
        image = torch.cat([image] * 2)
        noise_level = torch.cat([noise_level] * image.shape[0])
        # prepare the initial image in the latent space (noise on which we will do reverse diffusion)
        num_channels_latents = self.vae.config.latent_channels
        batch_size = prompt_embeds.shape[0] // 2
        height, width = image.shape[2:]
        latents = self.get_initial_latents(height, width, num_channels_latents, batch_size)
        # denoise latents
        latents = self.denoise_latents(prompt_embeds, image,
                                       timesteps, latents,
                                       noise_level, guidance_scale)
        # decode latents to get the image into pixel space
        latents = latents.to(torch.float16)
        image = self.vae.decode(latents / self.vae.config.scaling_factor, return_dict=False)[0]
        # convert to PIL Image format
        image = self.transform_image(image.detach()) # detach to remove any computed gradients
        return image
Here we first get the prompt embeddings and then preprocess the image using the image_processor. We then prepare the timesteps and add slight noise to the low-resolution image followed by duplicating images and the noise level for classifier-free guidance. We then prepare the initial image latents utilizing the method we defined earlier and finally denoise the image latents. This is then decoded by the VAE to send the latents to the pixel space which is then post-processed and converted to the PIL image format.
Let’s now make an instance of the pipeline we just diligently coded. We will get all the required components directly from Huggingface's implementation of the SD Upscaler:
# get all the components from the SD Upscaler pipeline
vae = pipeline.vae
tokenizer = pipeline.tokenizer
text_encoder = pipeline.text_encoder
unet = pipeline.unet
low_res_scheduler = pipeline.low_res_scheduler
scheduler = pipeline.scheduler
image_processor = pipeline.image_processor

custom_pipe = CustomSDUpscalingPipeline(vae, tokenizer, text_encoder, unet, low_res_scheduler, scheduler, image_processor)
Now let’s load the Kingfisher image again and upscale it:
url = "https://cdn.pixabay.com/photo/2017/02/07/16/47/kingfisher-2046453_640.jpg"
shape = (200, 128)
low_res_img = get_low_res_img(url, shape)

prompt = "an aesthetic kingfisher"
upscaled_image = custom_pipe(prompt=prompt, image=low_res_img)[0]
upscaled_image

Great, it works!
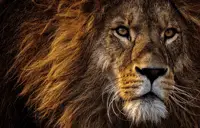
Let’s now take an example of a close-up photograph of a lion:
url = "https://cdn.pixabay.com/photo/2018/07/31/22/08/lion-3576045_1280.jpg"
shape = (200, 128)
low_res_img = get_low_res_img(url, shape)
low_res_img
We will now upscale it using both our custom implementation and the interpolation:
prompt = "a professional photograph of a lion's face"
upscaled_image = custom_pipe(prompt=prompt, image=low_res_img)[0]
upscaled_image

It looks very detailed, especially the fur. Now let’s try interpolation:
upscaled_interpolation = low_res_img.resize((800, 512))
upscaled_interpolation

This looks much worse and is so blurry. The fur of the lion isn’t even noticeable, especially around the nose.
More Upscaling Models
Another very popular upscaling model is ESRGAN which is based on Generative Adversarial Networks (GANs). You can look at more models related to upscaling here.
Conclusion
In this article, we learned about the Stable Diffusion x4 Upscaler and saw how it worked both theoretically and in practice. We also implemented the upscaler on our own and saw its different use cases. Now that you know how to make quality, high-resolution images, you can upscale your projects to a new level 😉
Learn also: Image to Image Generation with Stable Diffusion in Python
![]()
References
Happy upscaling ♥
Ready for more? Dive deeper into coding with our AI-powered Code Explainer. Don't miss it!
View Full Code Understand My Code


Got a coding query or need some guidance before you comment? Check out this Python Code Assistant for expert advice and handy tips. It's like having a coding tutor right in your fingertips!