Get a head start on your coding projects with our Python Code Generator. Perfect for those times when you need a quick solution. Don't wait, try it today!
Gender prediction is becoming a more popular topic within technology and throughout the world. A gender predictor application would come in handy if a blog website hosted a poll, survey, or product review. If the owners were to find out the gender that has the most votes, they would instead use a gender predictor application to find the gender of the voters and find the number of genders that have voted most rather than trying to figure out the gender of the names manually themselves.
In this article, we will build a gender predictor application with Tkinter, the Python GUI toolkit, and an API from genderize.io. We will use the Genderize API to determine the gender of the user's first name, this API is completely free, and it needs no API Key to be able to make API requests.
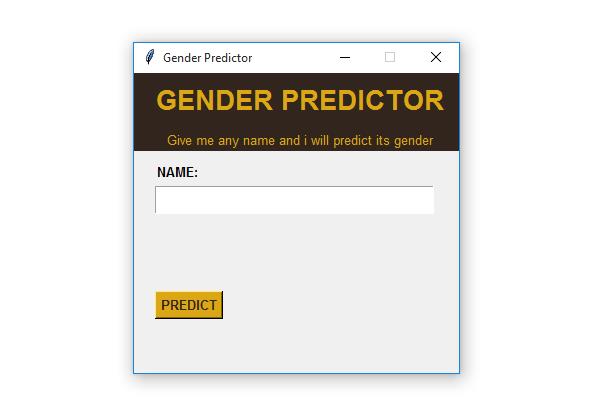
At the end of this article, we are going to build an application that looks like this:
We will make this application from the ground up.
Table of contents:
- Setting up the Project
- Designing the Graphical User Interface (GUI)
- Implementing the Gender Predictor Functionality
- Conclusion
Setting up the Project
The first task is to set up the project. Let's install the requests library:
$ pip install requestsThen create a folder and name it genderpredictor and cd into the folder:
$ mkdir genderpredictor
$ cd genderpredictor
Inside the genderpredictor folder, create a file and name it genderize_app.py, this is not a convention. Feel free to name it whatever you want:

Designing the Graphical User Interface (GUI)
We will, first of all, create the main window that will contain all the other widgets (frames, labels, entry, button), open the file, and paste the following code:
# importing everything from tkinter
from tkinter import *
# tkinter message box to display errors
from tkinter.messagebox import showerror
# colors for the application
gold = '#dca714'
brown = '#31251d'
# creating the main window
window = Tk()
# defining the demensions of the window, width(325), height(300), 500+200 center the window
window.geometry('325x300+500+200')
# this is the title of the application
window.title('Gender Predictor')
# this makes the window unresizable
window.resizable(height=FALSE, width=FALSE)
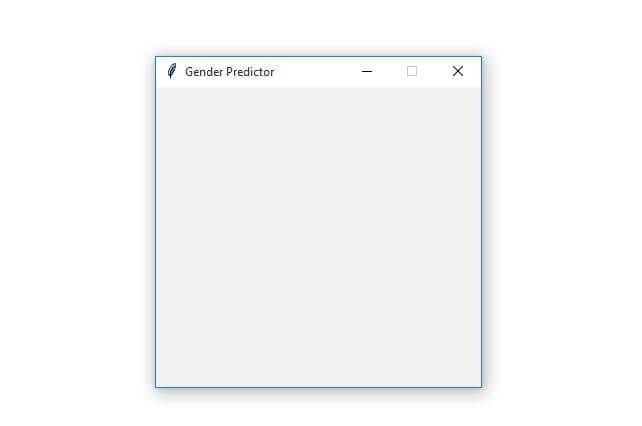
window.mainloop()Let us break this code a bit, we are creating the main window using Tk() function, and we are giving this window dimensions and a title using the geometry() and title() functions. The resizable() with attributes set to FALSE will make the main window non-resizable, and finally, we want to run the window as a loop until the user closes.
Run the program, and the output will be as below:
Now inside the created window, let us create two frames, the top frame and the bottom frame, below this line of code:
window.resizable(height=FALSE, width=FALSE)Paste this code:
"""The two frames"""
# this is the top frame inside the main window
top_frame = Frame(window, bg=brown, width=325, height=80)
top_frame.grid(row=0, column=0)
# this is the bottom frame inside the main window
bottom_frame = Frame(window, width=300, height=250)
bottom_frame.grid(row=1, column=0)
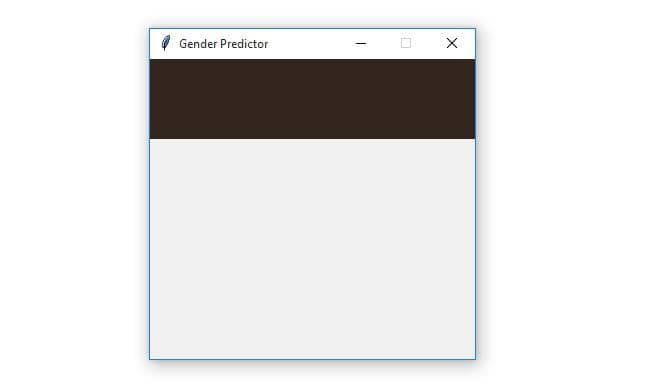
Here we are creating two frames, the top frame and the bottom frame, and all these frames are placed inside the main window. We are setting dimensions to both these frames using width and height attributes. The top frame takes bg as an additional attribute, this will set the top frame's background color to brown.
Running the program, the output will be:
Inside the top frame, let's create the two labels; just below the frames, paste this code:
# the label for the big title inside the top_frame
first_label = Label(top_frame, text='GENDER PREDICTOR', bg=brown, fg=gold, pady=10, padx=20, justify=CENTER, font=('Poppins 20 bold'))
first_label.grid(row=0, column=0)

# the label for the small text inside the top_frame
second_label = Label(top_frame, text='Give me any name and i will predict its gender', bg=brown, fg=gold, font=('Poppins 10'))
second_label.grid(row=1, column=0)
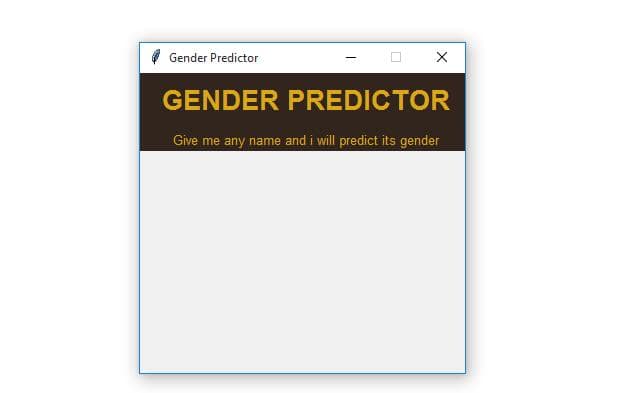
The above code snippet will create two labels that will be placed inside the top frame.
Now run the program, and you'll get something like this:
This time, we will create the remaining widgets in the bottom frame; just right after the two labels, paste this code:
"""below are widgets inside the top_frame"""
# the name label
label = Label(bottom_frame, text='NAME:', font=('Poppins 10 bold'), justify=LEFT)
label.place(x=4, y=10)
# the entry for entering the user's name
name_entry = Entry(bottom_frame, width=25, font=('Poppins 15 bold'))
name_entry.place(x=5, y=35)
# the empty name label, it will be used to display the name
name_label = Label(bottom_frame, text='', font=('Poppins 10 bold'))
name_label.place(x=5, y=70)
# the empty gender label, it will be used to display the gender
gender_label = Label(bottom_frame, text='', font=('Poppins 10 bold'))
gender_label.place(x=5, y=90)
# the empty probability label, it will be used to display the gender probalility
probability_label = Label(bottom_frame, text='', font=('Poppins 10 bold'))
probability_label.place(x=5, y=110)
# the predict button
predict_button = Button(bottom_frame, text="PREDICT", bg=gold, fg=brown, font=('Poppins 10 bold'))
predict_button.place(x=5, y=140)
The above code snippet creates the remaining widgets, the four labels, the entry, and the button inside the bottom frame.
Let us run the program, and this is the output:
Congratulations on successfully designing the application's user interface!
Implementing the Gender Predictor Functionality
Now that the user interface is complete, let us focus on implementing the predict gender functionality. We will create a function that will handle all this for us, just below the:
# importing everything from tkinter
from tkinter import *
# tkinter message box to display errors
from tkinter.messagebox import showerror
Paste these lines of code:
# the requests will be used for making requests to the API
import requests
The URL that we will be using will take this format:
https://api.genderize.io?name={YOUR_NAME}The genderize.io website provides a playground where you can test the API. You can access it here.
Let us now create the function for predicting the gender, let us name it predict_gender(), and make it look like this:
def predict_gender():
# executes when code has no errors
try:
# getting the input from entry
entered_name = name_entry.get()
# making a request to the API, the user's entered name is injected in the url
response = requests.get(f'https://api.genderize.io/?name={entered_name}').json()
# getting name from the response
name = response['name']
# getting gender from the response
gender = response['gender']
# getting probability from the response
probability = 100 * response['probability']
# adding name to the label that was empty, the name is being uppercased
name_label.config(text='The name is ' + name.upper())
# adding gender to the label that was empty, the gender is being uppercased
gender_label.config(text='The gender is ' + gender.upper())
# adding probability to the label that was empty
probability_label.config(text='Am ' + str(probability) + '%' + ' accurate')
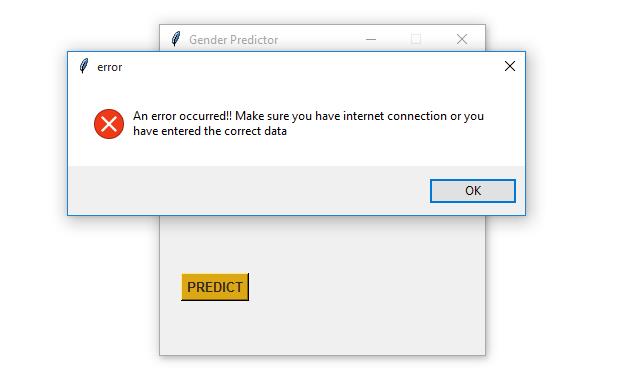
# executes when errors are caught
# KeyError, ConnectionTimeoutError
except:
showerror(title='error', message='An error occurred!! Make sure you have internet connection or you have entered the correct data')The above function gets name data from the entry using the get() function, and this name is passed to the API URL. The request is then sent to the API to get a response. After getting the response, the response is converted to JSON using the json() function, and from this JSON data, the name, the gender, and the probability are retrieved using keys, and they are plugged into their respective labels.
We're also wrapping the whole code in a try/except block and show a window error whenever an error occurs.
After creating the function, let us connect it with the Predict button; we want the function to be triggered when the user clicks it. The Button() widget in Tkinter takes an argument called command, so replace the predict_button variable with this:
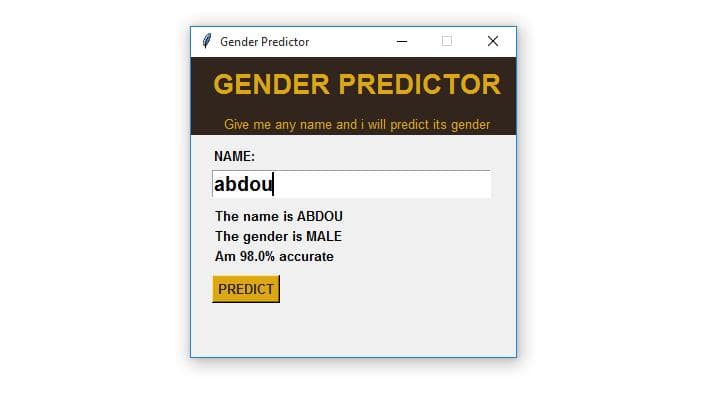
predict_button = Button(bottom_frame, text="PREDICT", bg=gold, fg=brown, font=('Poppins 10 bold'), command=predict_gender)Now let us test the application, run it and enter the name jane and click the button:
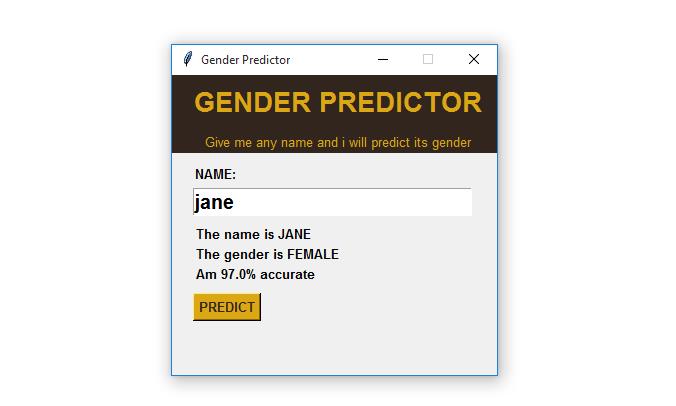
The application is working as we expected!
Now let us run the application again, but this time we will leave the entry empty and click on the Predict button:
Conclusion
That's it! We hope you enjoyed this article on how to build a gender predictor application with Tkinter and the Genderize API. We hope that you will incorporate the knowledge you have gained into your future applications.
You can get the complete code here.
Happy coding ♥
Take the stress out of learning Python. Meet our Python Code Assistant – your new coding buddy. Give it a whirl!
View Full Code Explain My Code


Got a coding query or need some guidance before you comment? Check out this Python Code Assistant for expert advice and handy tips. It's like having a coding tutor right in your fingertips!