Want to code faster? Our Python Code Generator lets you create Python scripts with just a few clicks. Try it now!
Humans can easily understand the text content of an image simply by looking at it. However, it is not the case for computers. They need some sort of structured method or algorithm to be able to understand it. This is where Optical Character Recognition (OCR) comes into play.
Optical Character Recognition is the process of detecting text content on images and converting it to machine-encoded text that we can access and manipulate in Python (or any programming language) as a string variable. In this tutorial, we gonna use the Tesseract library to do that.
Tesseract library contains an OCR engine and a command-line program, so it has nothing to do with Python, please follow their official guide for installation, as it is a required tool for this tutorial.
We gonna use pytesseract module for Python which is a wrapper for the Tesseract-OCR engine, so we can access it via Python.
The most recent stable version of Tesseract is 4 which uses a new recurrent neural network (LSTM) based OCR engine that is focused on line recognition.
RELATED: Mastering YOLO: Build an Automatic Number Plate Recognition System with OpenCV in Python.
Let's get started, you need to install:
- Tesseract-OCR Engine (follow their guide for your operating system).
- pytesseract wrapper module using:
pip3 install pytesseract - Other utility modules for this tutorial:
pip3 install numpy matplotlib opencv-python pillow
After you have everything installed on your machine, open up a new Python file and follow along:
import pytesseract
import cv2
import matplotlib.pyplot as plt
from PIL import Image
For demonstration purposes, I'm gonna use this image for recognition:
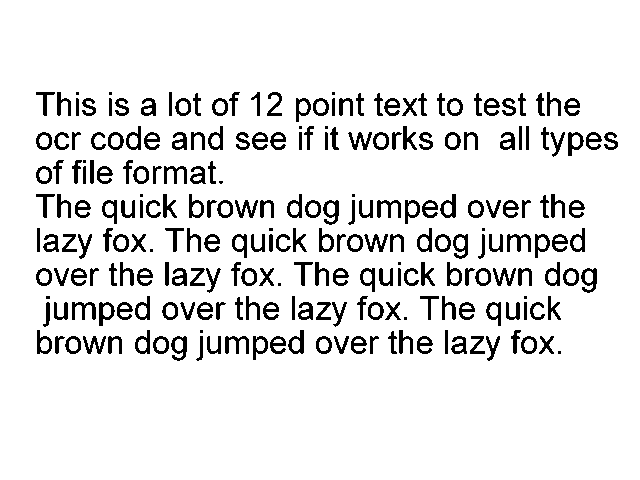 I've named it
 "test.png" and put it in the current directory, let's load this image:
# read the image using OpenCV
image = cv2.imread("test.png")
# or you can use Pillow
# image = Image.open("test.png")
As you may notice, you can load the image either with OpenCV or Pillow, I prefer using OpenCV as it enables us to use the live camera.
Let's recognize that text:
# get the string
string = pytesseract.image_to_string(image)
# print it
print(string)Note: If the above code raises an error, please consider adding Tesseract-OCR binaries to PATH variables. Read their official installation guide more carefully.
The image_to_string() function does exactly what you expect, it converts the containing image text to characters, let's see the result:
This is a lot of 12 point text to test the
ocr code and see if it works on all types
of file format.

The quick brown dog jumped over the
lazy fox. The quick brown dog jumped
over the lazy fox. The quick brown dog
jumped over the lazy fox. The quick
brown dog jumped over the lazy fox.
Excellent, there is another function image_to_data() which outputs more information than that, including words with their corresponding width, height, and x, y coordinates, this will enable us to make a lot of useful stuff. For instance, let's search for words in the document and draw a bounding box around a specific word of our choice, below code, handles that:
# make a copy of this image to draw in
image_copy = image.copy()
# the target word to search for
target_word = "dog"
# get all data from the image
data = pytesseract.image_to_data(image, output_type=pytesseract.Output.DICT)
So we're going to search for the word "dog" in the text document, we want the output data to be structured and not a raw string, that's why I passed output_type to be a dictionary, so we can easily get each word's data (you can print the data dictionary to see how the output is organized).
Let's get all the occurrences of that word:
# get all occurences of the that word
word_occurences = [ i for i, word in enumerate(data["text"]) if word.lower() == target_word ]
Now let's draw a surrounding box on each word:
for occ in word_occurences:
    # extract the width, height, top and left position for that detected word
    w = data["width"][occ]
    h = data["height"][occ]
    l = data["left"][occ]
    t = data["top"][occ]
    # define all the surrounding box points
    p1 = (l, t)
    p2 = (l + w, t)
    p3 = (l + w, t + h)
    p4 = (l, t + h)
    # draw the 4 lines (rectangular)
    image_copy = cv2.line(image_copy, p1, p2, color=(255, 0, 0), thickness=2)
    image_copy = cv2.line(image_copy, p2, p3, color=(255, 0, 0), thickness=2)
    image_copy = cv2.line(image_copy, p3, p4, color=(255, 0, 0), thickness=2)
    image_copy = cv2.line(image_copy, p4, p1, color=(255, 0, 0), thickness=2)
Learn also: Mastering YOLO: Build an Automatic Number Plate Recognition System with OpenCV in Python.
Saving and showing the resulting image:
plt.imsave("all_dog_words.png", image_copy)
plt.imshow(image_copy)
plt.show()
Take a look at the result:
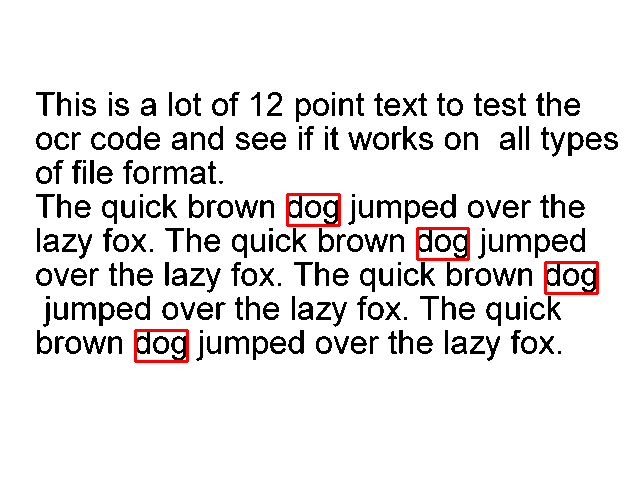
Amazing, isn't it? This is not all! you can pass lang parameter to image_to_string() or image_to_data() functions to make it easy to recognize text in different languages. You can also use the image_to_boxes() function which recognizes characters and their box boundaries. Please refer to their official documentation and available languages for more information.
A note though, this method is ideal for recognizing text in scanned documents and papers. Other uses of OCR include the automation of passport recognition and extraction of information from them, data entry processes, detection and recognition of car number plates, and much more!
Also, this won't work very well on hand-written text, complex real-world images, and unclear images or images that contain an exclusive amount of text.
Alright, that's it for this tutorial, let us see what you can build with this utility!
We have made a tutorial where you can use OCR to extract text from images inside PDF files, check it out!
Read Also: How to Perform YOLO Object Detection using OpenCV and PyTorch in Python.
Happy Coding ♥
Just finished the article? Now, boost your next project with our Python Code Generator. Discover a faster, smarter way to code.
View Full Code Explain My Code


Got a coding query or need some guidance before you comment? Check out this Python Code Assistant for expert advice and handy tips. It's like having a coding tutor right in your fingertips!