Confused by complex code? Let our AI-powered Code Explainer demystify it for you. Try it out!
Object detection is a computer technology related to computer vision and image processing that deals with detecting instances of semantic objects of a certain class (such as human faces, cars, fruits, etc.) in digital images and videos.
In this tutorial, we will be building a simple Python script that deals with detecting human faces in an image, we will be using two methods in OpenCV library. First, we are going to use haar cascade classifiers, which is an easy way (and not that accurate as well) and the most convenient way for beginners.
After that, we'll dive into using Single Shot Multibox Detectors (or SSDs in short), which is a method for detecting objects in images using a single deep neural network.
Note: It is worth mentioning that you need to distinguish between object detection and object classification, object detection is about detecting an object and where it is located in an image, while object classification is recognizing which class the object belongs to. If you are interested in image classification, head to this tutorial.
Face Detection using Haar Cascades
Haar feature-based cascade classifiers is a machine learning based approach where a cascade function is trained from a lot of positive and negative images. It is then used to detect objects in other images.
The nice thing about Haar feature-based cascade classifiers is that you can make a classifier of any object you want, OpenCV already provided some classifier parameters to you, so you don't have to collect any data to train on it.
To get started, install the requirements:
pip3 install opencv-python numpyAlright, create a new Python file and follow along, let's first import OpenCV:
import cv2You gonna need a sample image to test with, make sure it has clear front faces in it, I will use this stock image that contains two nice lovely kids:
# loading the test image
image = cv2.imread("kids.jpg")
The function imread() loads an image from the specified file and returns it as a numpy N-dimensional array.
Before we detect faces in the image, we will first need to convert the image to grayscale, that is because the function we gonna use to detect faces expects a grayscale image:
# converting to grayscale
image_gray = cv2.cvtColor(image, cv2.COLOR_BGR2GRAY)
The function cvtColor() converts an input image from one color space to another, we specified cv2.COLOR_BGR2GRAY code, which means converting from BGR (Blue Green Red) to grayscale.
Since this tutorial is about detecting human faces, go ahead and download the haar cascade for human face detection in this list. More precisely, "haarcascade_frontalface_default.xml". Let's put it in a folder called "cascades" and then load it:
# initialize the face recognizer (default face haar cascade)
face_cascade = cv2.CascadeClassifier("cascades/haarcascade_fontalface_default.xml")
Let's now detect all the faces in the image:
# detect all the faces in the image
faces = face_cascade.detectMultiScale(image_gray)
# print the number of faces detected
print(f"{len(faces)} faces detected in the image.")
detectMultiScale() function takes an image as a parameter and detects objects of different sizes as a list of rectangles, let's draw these rectangles in the image:
# for every face, draw a blue rectangle
for x, y, width, height in faces:
    cv2.rectangle(image, (x, y), (x + width, y + height), color=(255, 0, 0), thickness=2)
Finally, let's save the new image:
# save the image with rectangles
cv2.imwrite("kids_detected.jpg", image)
Here is my resulting image:
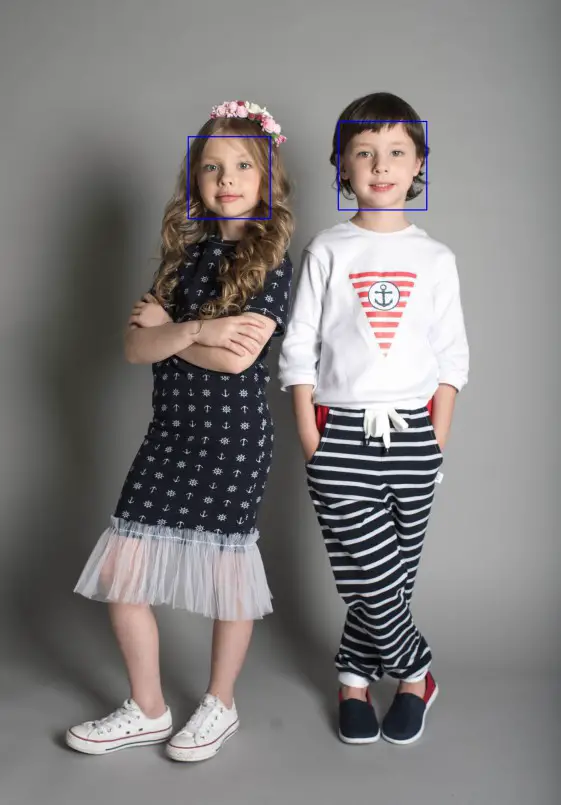
Pretty cool, right? Feel free to use other object classifiers, other images, and even more interesting, use your webcam! Here is the code for that:
import cv2

# create a new cam object
cap = cv2.VideoCapture(0)
# initialize the face recognizer (default face haar cascade)
face_cascade = cv2.CascadeClassifier("cascades/haarcascade_fontalface_default.xml")

while True:
    # read the image from the cam
    _, image = cap.read()
    # converting to grayscale
    image_gray = cv2.cvtColor(image, cv2.COLOR_BGR2GRAY)
    # detect all the faces in the image
    faces = face_cascade.detectMultiScale(image_gray, 1.3, 5)
    # for every face, draw a blue rectangle
    for x, y, width, height in faces:
        cv2.rectangle(image, (x, y), (x + width, y + height), color=(255, 0, 0), thickness=2)
    cv2.imshow("image", image)
    if cv2.waitKey(1) == ord("q"):
        break

cap.release()
cv2.destroyAllWindows()
Once you execute that (if you have a webcam of course), it will open up your webcam and start drawing blue rectangles around all front faces in the image. The code isn't that challenging, all I changed is, instead of reading the image from a file, I created a VideoCapture object that reads from it every time in a while loop, once you press the q button, the main loop will end.
Related: Mastering YOLO: Build an Automatic Number Plate Recognition System with OpenCV in Python.
Face Detection using SSDs
As you can see, the previous method isn't that challenging. Unfortunately, it is obsolete and it is rarely used today in the real world. However, neural networks always come into the rescue, and luckily for us, OpenCV provides us with the amazing dnn module within cv2 package, which enables to make inference on pre-trained deep learning models.
To get started predicting faces using SSDs in OpenCV, you need to download the ResNet face detection model architecture along with its pre-trained weights, and then save them into weights folder in the current working directory:
import cv2
import numpy as np

# https://raw.githubusercontent.com/opencv/opencv/master/samples/dnn/face_detector/deploy.prototxt
prototxt_path = "weights/deploy.prototxt.txt"
# https://raw.githubusercontent.com/opencv/opencv_3rdparty/dnn_samples_face_detector_20180205_fp16/res10_300x300_ssd_iter_140000_fp16.caffemodel
model_path = "weights/res10_300x300_ssd_iter_140000_fp16.caffemodel"
Now to load the actual model, we need to use readNetFromCaffe() method that takes the model architecture and weights as arguments:
# load Caffe model
model = cv2.dnn.readNetFromCaffe(prototxt_path, model_path)
We gonna use the same image that's used above:
# read the desired image
image = cv2.imread("kids.jpg")
# get width and height of the image
h, w = image.shape[:2]
Now to pass this image into the neural network, we need to prepare it. More specifically, we need to resize the image to the shape of (300, 300) and performs mean subtraction as it's trained that way:
# preprocess the image: resize and performs mean subtraction
blob = cv2.dnn.blobFromImage(image, 1.0, (300, 300), (104.0, 177.0, 123.0))
Let's use this blob object as the input of the network and perform feed forward to get detected faces:
# set the image into the input of the neural network
model.setInput(blob)
# perform inference and get the result
output = np.squeeze(model.forward())
Now output object has all detected objects (faces in this case), let's iterate over this array and draw all faces in the image that has confidence of more than 50%:
font_scale = 1.0
for i in range(0, output.shape[0]):
    # get the confidence
    confidence = output[i, 2]
    # if confidence is above 50%, then draw the surrounding box
    if confidence > 0.5:
        # get the surrounding box cordinates and upscale them to original image
        box = output[i, 3:7] * np.array([w, h, w, h])
        # convert to integers
        start_x, start_y, end_x, end_y = box.astype(np.int)
        # draw the rectangle surrounding the face
        cv2.rectangle(image, (start_x, start_y), (end_x, end_y), color=(255, 0, 0), thickness=2)
        # draw text as well
        cv2.putText(image, f"{confidence*100:.2f}%", (start_x, start_y-5), cv2.FONT_HERSHEY_SIMPLEX, font_scale, (255, 0, 0), 2)
After we extracted the confidence of the model of the detected object, we get the surrounding box and multiply it by the width and height of original image to get the right box coordinates, because as you remember, we've resized the image previously to (300, 300), so the output should be between 0 and 300 as well.
In this case, we didn't only draw the surrounding boxes, but we write some text indicating the confidence as a percentage, let's show and save the new image:
# show the image
cv2.imshow("image", image)
cv2.waitKey(0)
# save the image with rectangles
cv2.imwrite("kids_detected_dnn.jpg", image)
Here is the resulting image:
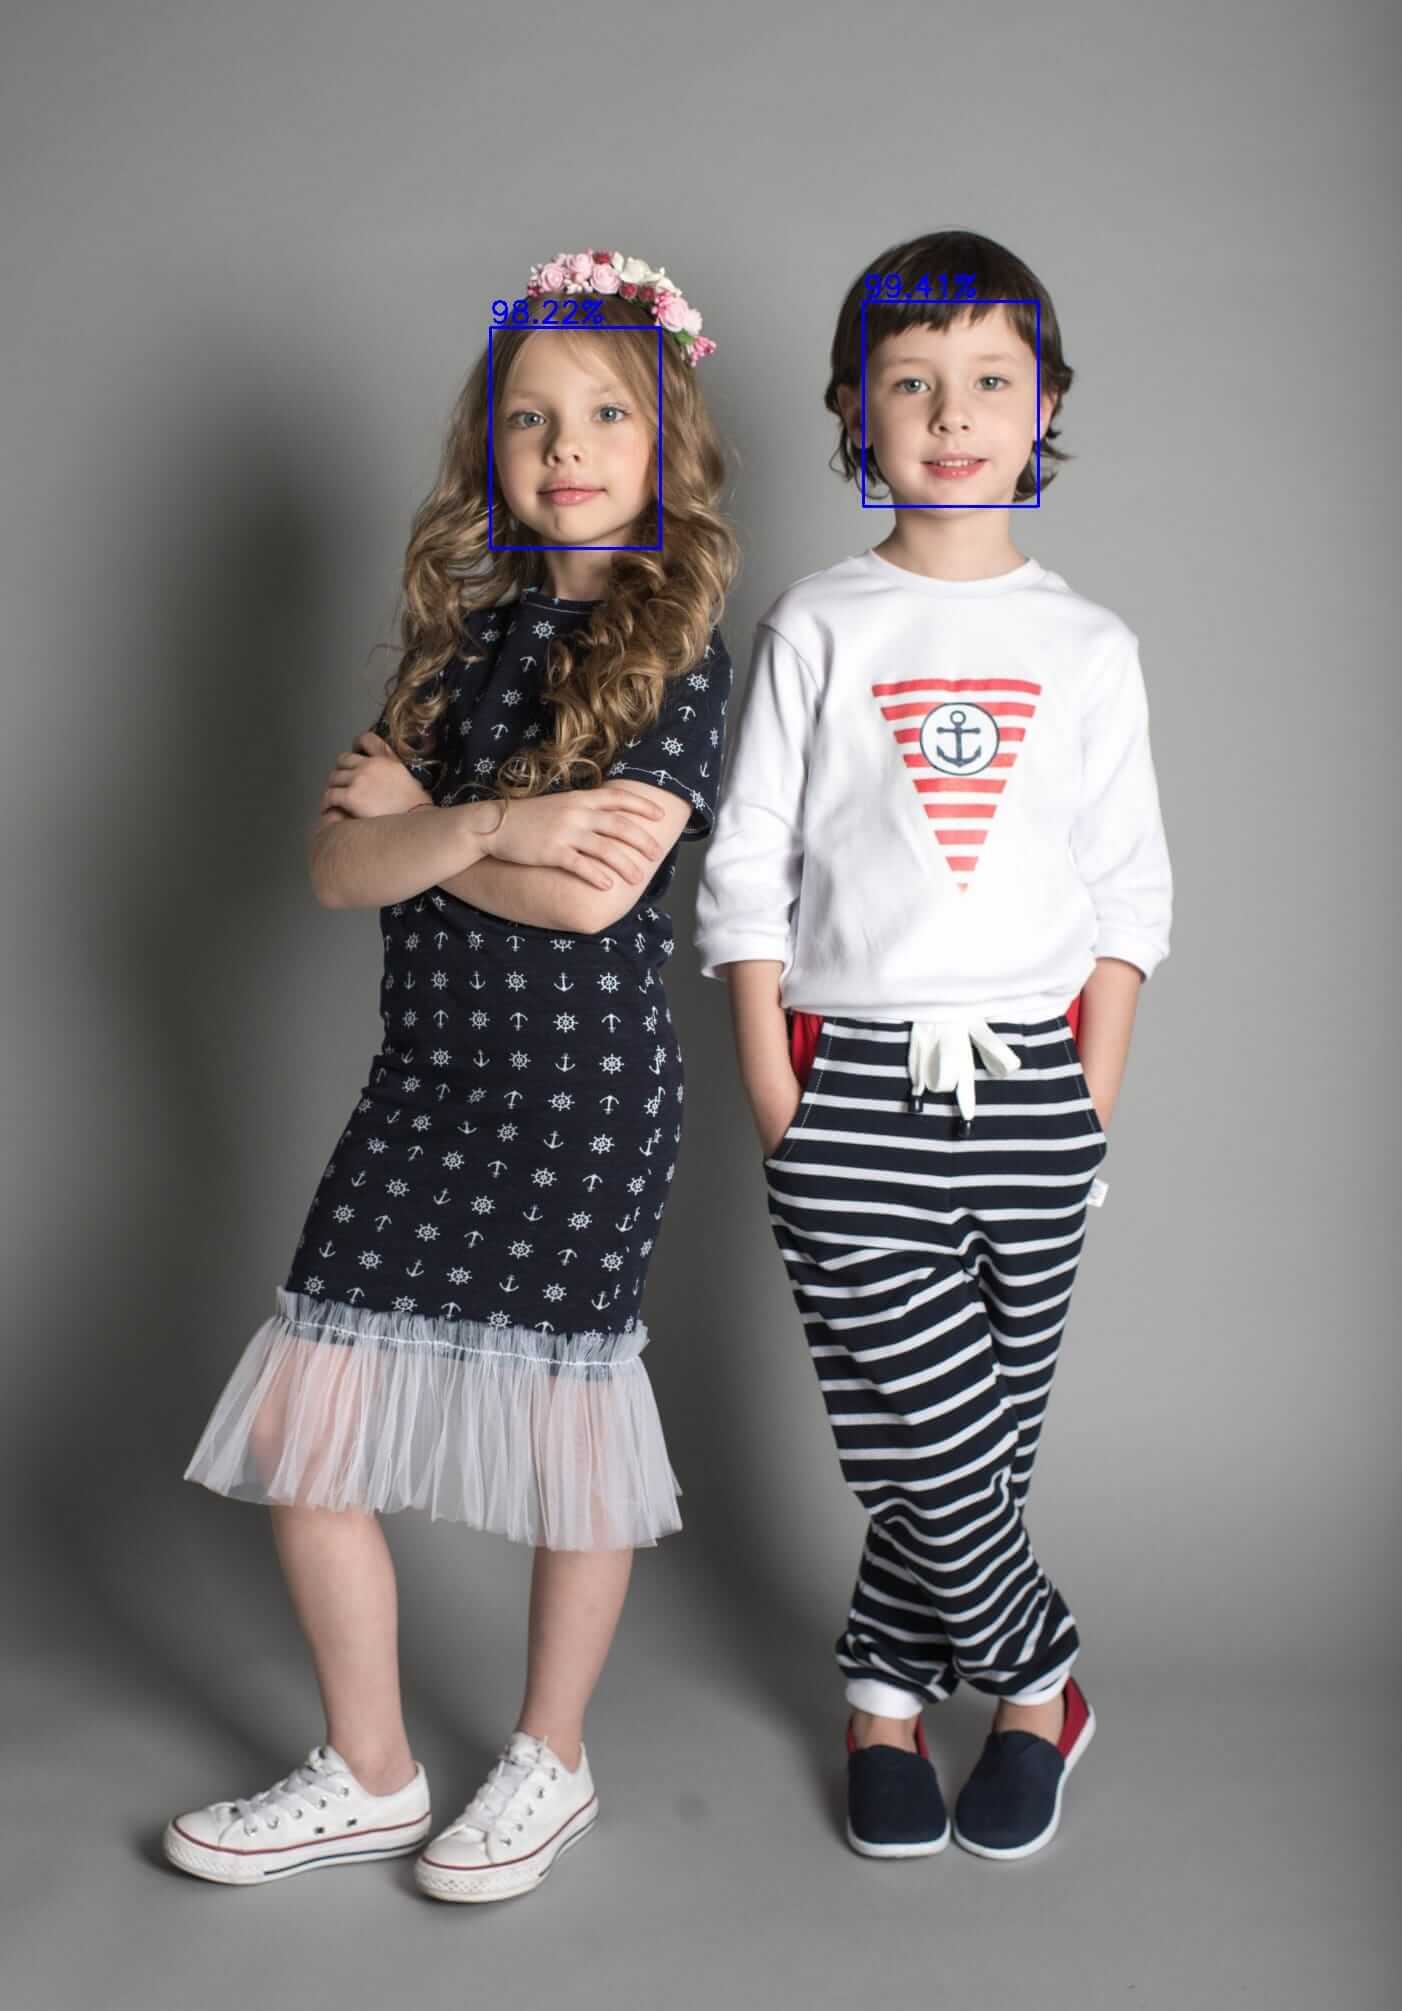
Awesome, this method is way better and accurate, but it may be lower in terms of FPS if you're predicting faces in real-time, as is it's not as fast as the haar cascade method.
By the way, if you want to detect faces using this method in real-time using your camera, you can check the full code page.
There are many real-world applications for face detection, for instance, we've used face detection to blur faces in images and videos in real-time using OpenCV as well!
Alright, this is it for this tutorial, you can get all tutorial materials (including the testing image, the haar cascade parameters, SSDs model weights, and the full code) here.
Mastering YOLO: Build an Automatic Number Plate Recognition System
Building a real-time automatic number plate recognition system using YOLO and OpenCV library in Python
Download EBookWant to Learn More?
Here are the references for this tutorial:
- Face detection with OpenCV and deep learning - Pyimagesearch.
- OpenCV documentation for Face Detection using Haar Cascades.
Learn also: How to Perform YOLO Object Detection using OpenCV and PyTorch in Python.
Happy Coding ♥
Ready for more? Dive deeper into coding with our AI-powered Code Explainer. Don't miss it!
View Full Code Convert My Code


Got a coding query or need some guidance before you comment? Check out this Python Code Assistant for expert advice and handy tips. It's like having a coding tutor right in your fingertips!