Struggling with multiple programming languages? No worries. Our Code Converter has got you covered. Give it a go!
A digital signature added to a PDF document is equivalent to an ink signature on a paper document, however the former is much more secure.
A digital signature guarantees the integrity of a PDF document and certifies that this document has not been modified by an unknown person. It can replace your handwritten signature to speed up virtually any paper-driven, manual signature process and to accelerate workflows.
Download: Practical Python PDF Processing EBook.
In this tutorial, you will learn:
- How to generate a self-signed certificate in Python.
- How to add a digital signature to a PDF document in Python.
The following components are required:
- PDFNetPython3: is a wrapper for PDFTron SDK. With PDFTron components you can build reliable & speedy applications that can view, create, print, edit, and annotate PDFs across various operating systems. Developers use PDFTron SDK to read, write, and edit PDF documents compatible with all published versions of PDF specifications (including the latest ISO32000). PDFTron is not freeware, it offers 2 types of licenses depending on whether you’re developing an external/commercial product or an in-house solution. For the purpose of this tutorial, we will use the free trial version of this SDK.
- pyOpenSSL: A Python wrapper around the OpenSSL library. OpenSSL is a popular security library used by a lot of products, applications, and vendors.
The purpose of this tutorial is to develop a lightweight command-line-based utility, through Python-based modules in order to digitally sign one or a collection of PDF files located under a specific path.
Related: How to Watermark PDF Files in Python.
To get started, let's install the libraries:
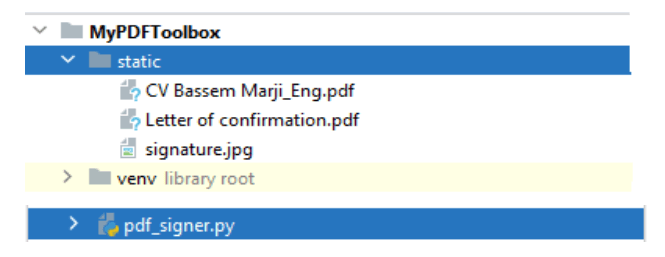
$ pip install PDFNetPython3==8.1.0 pyOpenSSL==20.0.1In the end, our folder structure will look like the following:
 The
The signature.jpg file represents a specimen signature:
 The
The "Letter of confirmation.pdf" file represents a sample PDF file to be signed.
Let's get started, open up a new Python file and name it sign_pdf.py or whatever:
# Import Libraries
import OpenSSL
import os
import time
import argparse
from PDFNetPython3.PDFNetPython import *
from typing import Tuple


def createKeyPair(type, bits):
    """
    Create a public/private key pair
    Arguments: Type - Key Type, must be one of TYPE_RSA and TYPE_DSA
               bits - Number of bits to use in the key (1024 or 2048 or 4096)
    Returns: The public/private key pair in a PKey object
    """
    pkey = OpenSSL.crypto.PKey()
    pkey.generate_key(type, bits)
    return pkey
The above function creates a public/private key pair to use when generating the self-signed certificate in order to perform asymmetric encryption.
Next, making a function to create a self-signed certificate:
def create_self_signed_cert(pKey):
    """Create a self signed certificate. This certificate will not require to be signed by a Certificate Authority."""
    # Create a self signed certificate
    cert = OpenSSL.crypto.X509()
    # Common Name (e.g. server FQDN or Your Name)
    cert.get_subject().CN = "BASSEM MARJI"
    # Serial Number
    cert.set_serial_number(int(time.time() * 10))
    # Not Before
    cert.gmtime_adj_notBefore(0)  # Not before
    # Not After (Expire after 10 years)
    cert.gmtime_adj_notAfter(10 * 365 * 24 * 60 * 60)
    # Identify issue
    cert.set_issuer((cert.get_subject()))
    cert.set_pubkey(pKey)
    cert.sign(pKey, 'md5')  # or cert.sign(pKey, 'sha256')
    return cert
Get Our Practical Python PDF Processing EBook
Master PDF Manipulation with Python by building PDF tools from scratch. Get your copy now!
Download EBookThis function creates a self-signed certificate that does not require to be signed by a certificate authority.
This function will assign the following attributes to the certificate:
- Common Name: BASSEM MARJI.
- Serial Number: a random number depending on the time function.
- Not After: Expiry after 10 years.
Now let's make a function that uses both functions to generate a certificate:
def load():
    """Generate the certificate"""
    summary = {}
    summary['OpenSSL Version'] = OpenSSL.__version__
    # Generating a Private Key...
    key = createKeyPair(OpenSSL.crypto.TYPE_RSA, 1024)
    # PEM encoded
    with open('.\static\private_key.pem', 'wb') as pk:
        pk_str = OpenSSL.crypto.dump_privatekey(OpenSSL.crypto.FILETYPE_PEM, key)
        pk.write(pk_str)
        summary['Private Key'] = pk_str
    # Done - Generating a private key...
    # Generating a self-signed client certification...
    cert = create_self_signed_cert(pKey=key)
    with open('.\static\certificate.cer', 'wb') as cer:
        cer_str = OpenSSL.crypto.dump_certificate(
            OpenSSL.crypto.FILETYPE_PEM, cert)
        cer.write(cer_str)
        summary['Self Signed Certificate'] = cer_str
    # Done - Generating a self-signed client certification...
    # Generating the public key...
    with open('.\static\public_key.pem', 'wb') as pub_key:
        pub_key_str = OpenSSL.crypto.dump_publickey(
            OpenSSL.crypto.FILETYPE_PEM, cert.get_pubkey())
        #print("Public key = ",pub_key_str)
        pub_key.write(pub_key_str)
        summary['Public Key'] = pub_key_str
    # Done - Generating the public key...
    # Take a private key and a certificate and combine them into a PKCS12 file.
    # Generating a container file of the private key and the certificate...
    p12 = OpenSSL.crypto.PKCS12()
    p12.set_privatekey(key)
    p12.set_certificate(cert)
    open('.\static\container.pfx', 'wb').write(p12.export())
    # You may convert a PKSC12 file (.pfx) to a PEM format
    # Done - Generating a container file of the private key and the certificate...
    # To Display A Summary
    print("## Initialization Summary ##################################################")
    print("\n".join("{}:{}".format(i, j) for i, j in summary.items()))
    print("############################################################################")
    return True
This function performs the following:
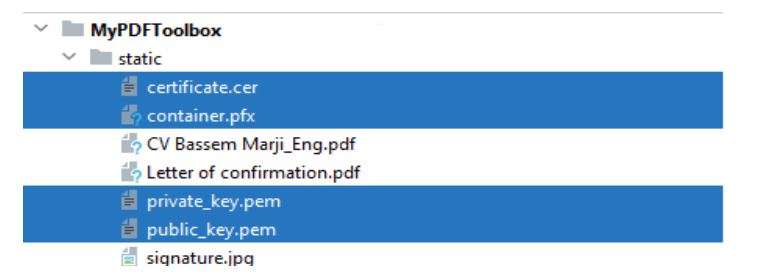
- Creates a public/private key pair.
- Stores the private key within the file
"private_key.pem"under thestaticfolder. - Generates a self-signed certificate and saves it to the file
"certificate.cer"under thestaticfolder. - Saves the public key in the file
"public_key.pem"under thestaticfolder. - Produces a container file
"container.pfx"combining the private key and the certificate and places it under thestaticfolder.
Note that the private key should not be printed in the console. However, it is included in the summary dictionary (that will be printed) for demonstration purposes, make sure you remove the private key from the console output if you're serious about this.
Now that we have the core function to generate a certificate, let's make a function to sign a PDF file:
def sign_file(input_file: str, signatureID: str, x_coordinate: int,
            y_coordinate: int, pages: Tuple = None, output_file: str = None
              ):
    """Sign a PDF file"""
    # An output file is automatically generated with the word signed added at its end
    if not output_file:
        output_file = (os.path.splitext(input_file)[0]) + "_signed.pdf"
    # Initialize the library
    PDFNet.Initialize()
    doc = PDFDoc(input_file)
    # Create a signature field
    sigField = SignatureWidget.Create(doc, Rect(
        x_coordinate, y_coordinate, x_coordinate+100, y_coordinate+50), signatureID)
    # Iterate throughout document pages
    for page in range(1, (doc.GetPageCount() + 1)):
        # If required for specific pages
        if pages:
            if str(page) not in pages:
                continue
        pg = doc.GetPage(page)
        # Create a signature text field and push it on the page
        pg.AnnotPushBack(sigField)
    # Signature image
    sign_filename = os.path.dirname(
        os.path.abspath(__file__)) + "\static\signature.jpg"
    # Self signed certificate
    pk_filename = os.path.dirname(
        os.path.abspath(__file__)) + "\static\container.pfx"
    # Retrieve the signature field.
    approval_field = doc.GetField(signatureID)
    approval_signature_digsig_field = DigitalSignatureField(approval_field)
    # Add appearance to the signature field.
    img = Image.Create(doc.GetSDFDoc(), sign_filename)
    found_approval_signature_widget = SignatureWidget(
        approval_field.GetSDFObj())
    found_approval_signature_widget.CreateSignatureAppearance(img)
    # Prepare the signature and signature handler for signing.
    approval_signature_digsig_field.SignOnNextSave(pk_filename, '')
    # The signing will be done during the following incremental save operation.
    doc.Save(output_file, SDFDoc.e_incremental)
    # Develop a Process Summary
    summary = {
        "Input File": input_file, "Signature ID": signatureID,
        "Output File": output_file, "Signature File": sign_filename,
        "Certificate File": pk_filename
    }
    # Printing Summary
    print("## Summary ########################################################")
    print("\n".join("{}:{}".format(i, j) for i, j in summary.items()))
    print("###################################################################")
    return True
The sign_file() function performs the following:
- Iterates across the pages of the input PDF file.
- Inserts a signature widget to the chosen pages of this file on a specific location.
- Adds the signature image and signs the file using the self-signed certificate.
Make sure you have the certificates under the static folder (we'll see how to generate this later).
Optionally, the following function is useful for signing all PDF files within a specific folder:
def sign_folder(**kwargs):
    """Sign all PDF Files within a specified path"""
    input_folder = kwargs.get('input_folder')
    signatureID = kwargs.get('signatureID')
    pages = kwargs.get('pages')
    x_coordinate = int(kwargs.get('x_coordinate'))
    y_coordinate = int(kwargs.get('y_coordinate'))
    # Run in recursive mode
    recursive = kwargs.get('recursive')
    # Loop though the files within the input folder.
    for foldername, dirs, filenames in os.walk(input_folder):
        for filename in filenames:
            # Check if pdf file
            if not filename.endswith('.pdf'):
                continue
            # PDF File found
            inp_pdf_file = os.path.join(foldername, filename)
            print("Processing file =", inp_pdf_file)
            # Compress Existing file
            sign_file(input_file=inp_pdf_file, signatureID=signatureID, x_coordinate=x_coordinate,
                      y_coordinate=y_coordinate, pages=pages, output_file=None)
        if not recursive:
            break
This function is targeted to sign the PDF files of a specific folder.
It loops throughout the files of the specified folder either recursively or not depending on the value of the recursive parameter and processes these files one by one. It accepts the following parameters:
input_folder: The path of the folder containing the PDF files to process.signatureID: The identifier of the signature widget to create.x_coordinateandy_coordinate: The coordinates indicating the location of the signature.pages: The range of the pages to sign.recursive: whether to run this process recursively by looping across the subfolders or not.
Alright, now we have everything, let's make the necessary code for parsing command-line arguments:
def is_valid_path(path):
    """Validates the path inputted and checks whether it is a file path or a folder path"""
    if not path:
        raise ValueError(f"Invalid Path")
    if os.path.isfile(path):
        return path
    elif os.path.isdir(path):
        return path
    else:
        raise ValueError(f"Invalid Path {path}")


def parse_args():
    """Get user command line parameters"""
    parser = argparse.ArgumentParser(description="Available Options")
    parser.add_argument('-l', '--load', dest='load', action="store_true",
                        help="Load the required configurations and create the certificate")
    parser.add_argument('-i', '--input_path', dest='input_path', type=is_valid_path,
                        help="Enter the path of the file or the folder to process")
    parser.add_argument('-s', '--signatureID', dest='signatureID',
                        type=str, help="Enter the ID of the signature")
    parser.add_argument('-p', '--pages', dest='pages', type=tuple,
                        help="Enter the pages to consider e.g.: [1,3]")
    parser.add_argument('-x', '--x_coordinate', dest='x_coordinate',
                        type=int, help="Enter the x coordinate.")
    parser.add_argument('-y', '--y_coordinate', dest='y_coordinate',
                        type=int, help="Enter the y coordinate.")
    path = parser.parse_known_args()[0].input_path
    if path and os.path.isfile(path):
        parser.add_argument('-o', '--output_file', dest='output_file',
                            type=str, help="Enter a valid output file")
    if path and os.path.isdir(path):
        parser.add_argument('-r', '--recursive', dest='recursive', default=False, type=lambda x: (
            str(x).lower() in ['true', '1', 'yes']), help="Process Recursively or Non-Recursively")
    args = vars(parser.parse_args())
    # To Display The Command Line Arguments
    print("## Command Arguments #################################################")
    print("\n".join("{}:{}".format(i, j) for i, j in args.items()))
    print("######################################################################")
    return args
The is_valid_path() function validates a path inputted as a parameter and checks whether it is a file or a directory.
The parse_args() function defines and sets the appropriate constraints for the command line arguments to be specified by the user when running this utility.
I will describe hereafter the defined arguments:
--loador-l: Initialize the configuration settings by generating a self-signed certificate. This step should be executed once or on a need basis.--input_pathor-i: Used to input the path of the file or the folder to process, this parameter is associated with theis_valid_path()function that is previously defined.--signatureIDor-s: The identifier to assign to the signature widget. (in case multiple signees need to sign off the same PDF document).--pagesor-p: The pages to sign off.--x_coordinateor-xand--y_coordinateor-y: Specifies the location of the signature on the page.--output_fileor-o: The path of the output file. Filling in this argument is constrained by the selection of a file as input, not a directory.--recursiveor-r: Whether to process a folder recursively or not. Filling in this argument is constrained by the selection of a directory.
Get Our Practical Python PDF Processing EBook
Master PDF Manipulation with Python by building PDF tools from scratch. Get your copy now!
Download EBookWriting the main code now:
if __name__ == '__main__':
    # Parsing command line arguments entered by user
    args = parse_args()
    if args['load'] == True:
        load()
    else:
        # If File Path
        if os.path.isfile(args['input_path']):
            sign_file(
                input_file=args['input_path'], signatureID=args['signatureID'],
                x_coordinate=int(args['x_coordinate']), y_coordinate=int(args['y_coordinate']),
                pages=args['pages'], output_file=args['output_file']
            )
        # If Folder Path
        elif os.path.isdir(args['input_path']):
            # Process a folder
            sign_folder(
                input_folder=args['input_path'], signatureID=args['signatureID'],
                x_coordinate=int(args['x_coordinate']), y_coordinate=int(args['y_coordinate']),
                pages=args['pages'], recursive=args['recursive']
            )
The above represents the main function of our program which calls the respective functions depending on the load parameter or the path selected.
Let’s test our program:
First, let's pass --help to see the available command-line arguments to pass:
$ python sign_pdf.py --helpOutput:
usage: sign_pdf.py [-h] [-l] [-i INPUT_PATH] [-s SIGNATUREID] [-p PAGES] [-x X_COORDINATE] [-y Y_COORDINATE]

Available Options

optional arguments:
  -h, --help            show this help message and exit
  -l, --load            Load the required configurations and create the certificate
  -i INPUT_PATH, --input_path INPUT_PATH
                        Enter the path of the file or the folder to process
  -s SIGNATUREID, --signatureID SIGNATUREID
                        Enter the ID of the signature
  -p PAGES, --pages PAGES
                        Enter the pages to consider e.g.: [1,3]
  -x X_COORDINATE, --x_coordinate X_COORDINATE
                        Enter the x coordinate.
  -y Y_COORDINATE, --y_coordinate Y_COORDINATE
                        Enter the y coordinate.
Alright, let's first generate a self-signed certificate:
$ python sign_pdf.py --loadOnce executed, you will notice that the related files were created beneath the static folder:
 Moreover, you will outline the following summary on your console:
## Command Arguments #################################################
load:True
input_path:None
signatureID:None
pages:None
x_coordinate:None
y_coordinate:None
######################################################################
## Initialization Summary ##################################################
OpenSSL Version:20.0.1
Private Key:b'-----BEGIN PRIVATE KEY-----\nMIICdwIBADANBgkqhkiG9w0BAQEFAASCAmEwggJdAgEAAoGBAM5HRS/5iLztVPxp\nnKUpjrECxVgqH+/BFh5A8v7KJcUsHY6ht6yL3D+vXxgiv170pOml2tGmW3zmvL/j\nEkWI/duMSyvPjc03SUp6rQqCnjw/dG2tSsOhzC51WwI8+bwDrdhNZ7x0UEdleeQw\n5NtwQ6MqwiLNLhJLT8V/dtVsK/LxAgMBAAECgYEAglt31cGUMBCrzHfRjm6cxjBC\nFl1IoXMcTzIsXefRxrECXMjGEjywi26AYfhTh+aC8UTm6+Z9mokWbw1I1rij85/y\nvx4CTSGFAkMGAzmRTkmliPZoQDUxjr2XmSZaRhipo0atLY5dQYhQcINXq80lLAxZ\nsS3Tl7mxnssRo0hcHCECQQDyTVQEE5YLKpAsLWYRqMP3L2EDKNmySycIvVKh9lKB\nSlaHWzUfdHgzONcTA5Egd2CQchifPLx9KrykkusXs4knAkEA2fCYpKaaDDY+CjUI\nrY5RsYYoh5v2tZZ3PB3ElbN5afZY+dHa+mXsI6eBZgaUmsHeT0/OyymfsxZk//mI\n85pCJwJBAI54h4kqFxSTv1gqjZSenjOO6UUZVP/wDpCl+ZuAIb0h/8TxDUhkjHTZ\n3CSy+TeU2fO1EuM2rEIQygEe3hr+lwsCQFMCgwFju5UfK+4zWQTSCme1k8ZjL0rm\n7q9lHzVt0Lb9b9JnjiKFo7XI3U6A/yUa5pQK79cOGZfa1clxwCoY/U0CQBu4vATn\nyWVfp6lgLgY9T9FsCp7wPIRJJA1sUfhDvNeNt7WK6ynhVDaD0bZ+lX0sYG2RxI3m\nVSgAaAyqkMcYl5Q=\n-----END PRIVATE KEY-----\n'
Self Signed Certificate:b'-----BEGIN CERTIFICATE-----\nMIIBoTCCAQoCBQPMisZRMA0GCSqGSIb3DQEBBAUAMBcxFTATBgNVBAMMDEJBU1NF\nTSBNQVJKSTAeFw0yMTA5MTQyMTI3NDhaFw0zMTA5MTIyMTI3NDhaMBcxFTATBgNV\nBAMMDEJBU1NFTSBNQVJKSTCBnzANBgkqhkiG9w0BAQEFAAOBjQAwgYkCgYEAzkdF\nL/mIvO1U/GmcpSmOsQLFWCof78EWHkDy/solxSwdjqG3rIvcP69fGCK/XvSk6aXa\n0aZbfOa8v+MSRYj924xLK8+NzTdJSnqtCoKePD90ba1Kw6HMLnVbAjz5vAOt2E1n\nvHRQR2V55DDk23BDoyrCIs0uEktPxX921Wwr8vECAwEAATANBgkqhkiG9w0BAQQF\nAAOBgQBLqfxOdXkXO2nubqSTdLEZYKyN4L+BxlYm2ZuG8ki0tAOrAAVIcmCM6QYf\n0oWURShZko+a6YP5f4UmZh1DVO7WnnBOytDf+f+n3SErw5YEkfbCDQp5MSjz+79N\nvJtQOPr3RjtyuDFWvNlcit2q6JW2lsmfD2+CdG7iSbiKLC8Bag==\n-----END CERTIFICATE-----\n'
Public Key:b'-----BEGIN PUBLIC KEY-----\nMIGfMA0GCSqGSIb3DQEBAQUAA4GNADCBiQKBgQDOR0Uv+Yi87VT8aZylKY6xAsVY\nKh/vwRYeQPL+yiXFLB2Oobesi9w/r18YIr9e9KTppdrRplt85ry/4xJFiP3bjEsr\nz43NN0lKeq0Kgp48P3RtrUrDocwudVsCPPm8A63YTWe8dFBHZXnkMOTbcEOjKsIi\nzS4SS0/Ff3bVbCvy8QIDAQAB\n-----END PUBLIC KEY-----\n'
############################################################################
As you can see, private and public keys were successfully generated, as well as the certificate. Again, as noted earlier. If you're using this code, you should exclude the private key from the summary dictionary so it won't be printed to the console.
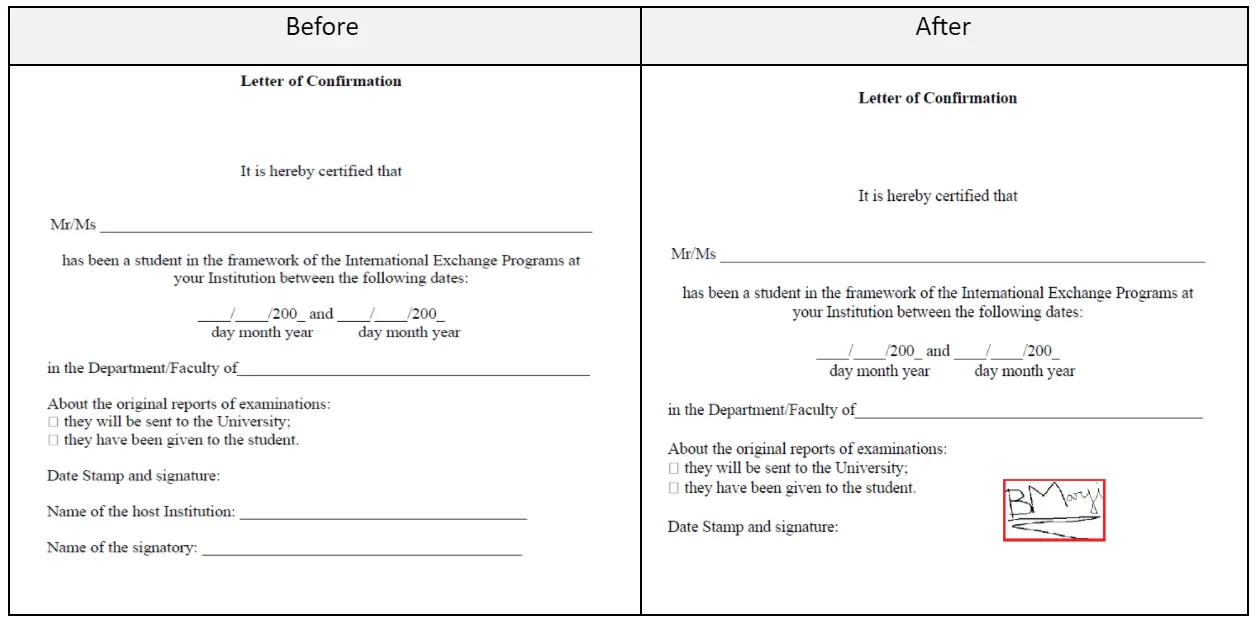
Now let’s sign the document entitled "Letter of confirmation.pdf" placed under the static folder:
$ python sign_pdf.py -i ".\static\Letter of confirmation.pdf" -s "BM" -x 330 -y 280The following summary will be displayed on the console:
## Command Arguments #################################################
load:False
input_path:static\Letter of confirmation.pdf
signatureID:BM
pages:None
x_coordinate:330
y_coordinate:280
output_file:None
######################################################################
PDFNet is running in demo mode.
Permission: read
Permission: write
## Summary ########################################################
Input File:static\Letter of confirmation.pdf
Signature ID:BM
Output File:static\Letter of confirmation_signed.pdf
Signature File:C:\pythoncode-tutorials\handling-pdf-files\pdf-signer\static\signature.jpg
Certificate File:C:\pythoncode-tutorials\handling-pdf-files\pdf-signer\static\container.pfx
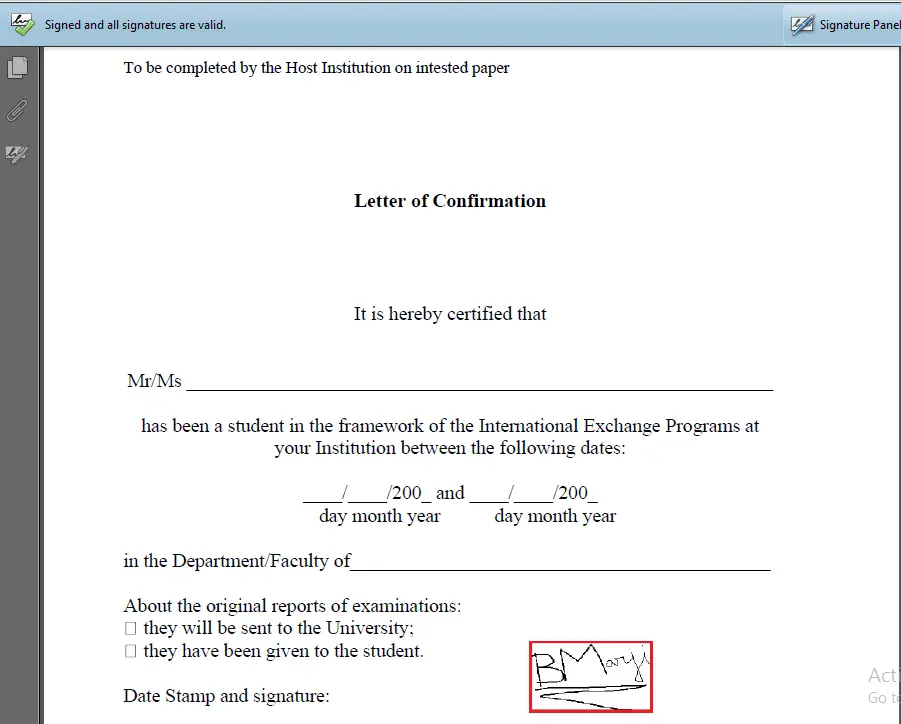
###################################################################The document will be updated in "Letter of confirmation_signed.pdf" as follows:
 When you click on the signature field highlighted, you will notice the warning message displayed hereafter:
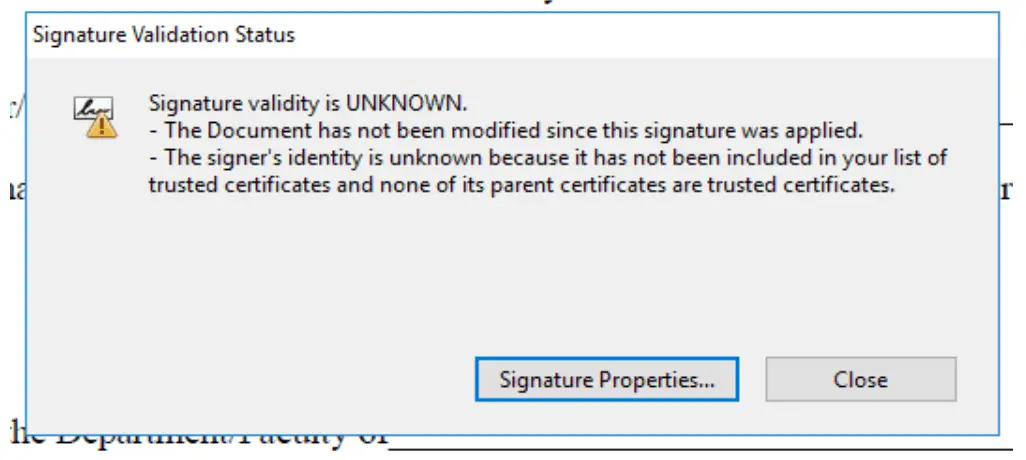 The reason for this warning is that the new self-signed certificate is not yet trusted by Acrobat Reader. Press on the Signature Properties button and you will see the details of the self-signed certificate.
Note: Please refer to the enclosed appendix detailing the operating instructions for trusting the self-signed certificate by Adobe Reader.
Conclusion
You can also specify the -p option to sign multiple pages within a PDF file, something like:
$ python sign_pdf.py -i pdf_file.pdf -s "BM" -x 330 -y 300 -p [1, 3]Or signing multiple PDF files included within a folder:
$ python sign_pdf.py -i pdf-files-folder -s "BM" -p [1] -x 330 -y 300 -r 0Digitally signing documents saves time, reduces the need for paper-driven processes, and offers you the flexibility to approve a document from almost anywhere.
I hope you enjoyed this article and helped you build your tools!
Check the complete code here.
For more PDF handling guides on Python, you can check our Practical Python PDF Processing EBook, where we dive deeper into PDF document manipulation with Python, make sure to check it out here if you're interested!
Related tutorials:
Appendix
After signing a PDF file (i.e. "Letter of confirmation_signed.pdf") and then opening it in Adobe Reader, the following message ("At least one signature has problems") may be shown below the toolbar:

Indeed, this message does not indicate that the digital signature is invalid or corrupt but it means that the digital signature added using the self-signed certificate cannot be automatically validated by Adobe Reader because the certificate is not in the list of Trusted identities that Adobe uses to validate the signature.
Please follow the steps exhibited in the following screen-shots in order to add the self-signed certificate into Adobe’s list of Trusted identities:
- Go to Edit > Preferences
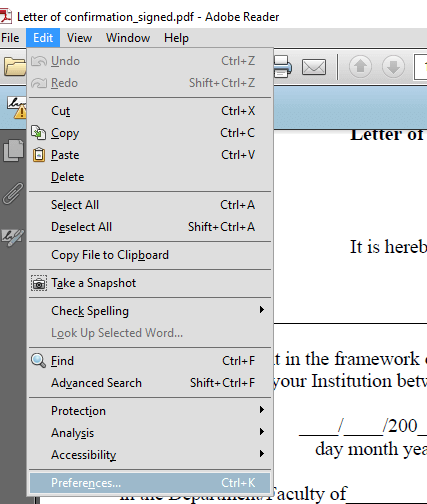
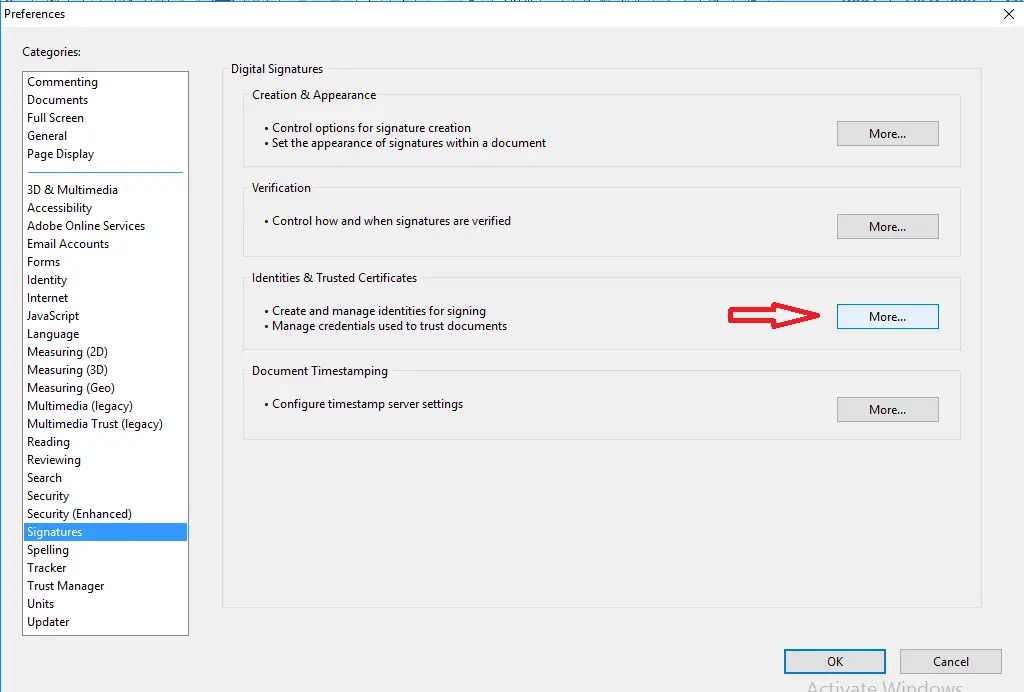
- Select the Signatures option and press on the More button highlighted below:
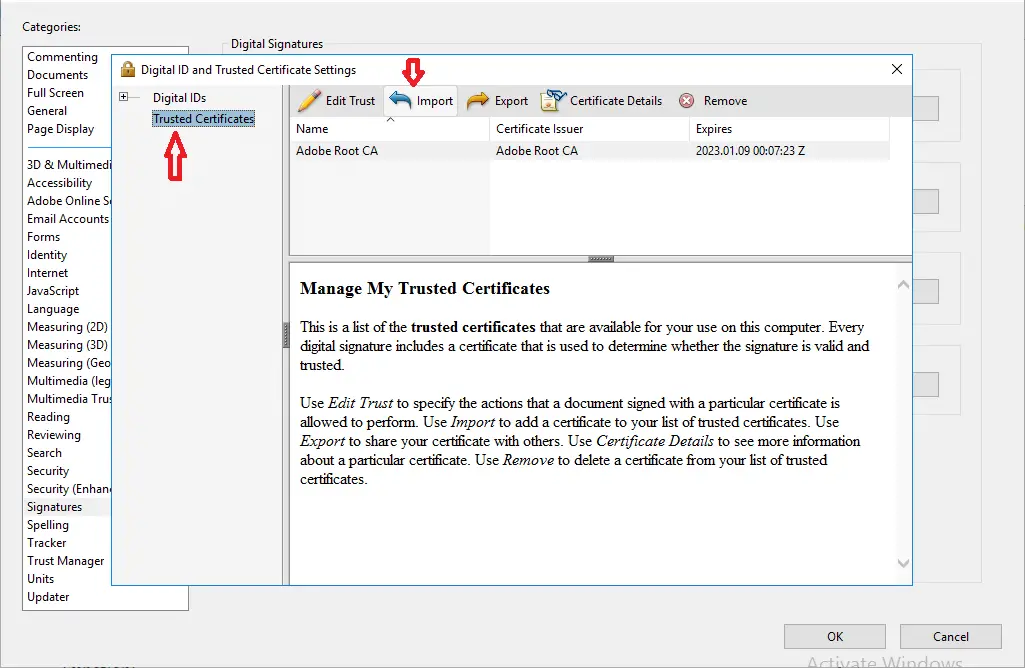
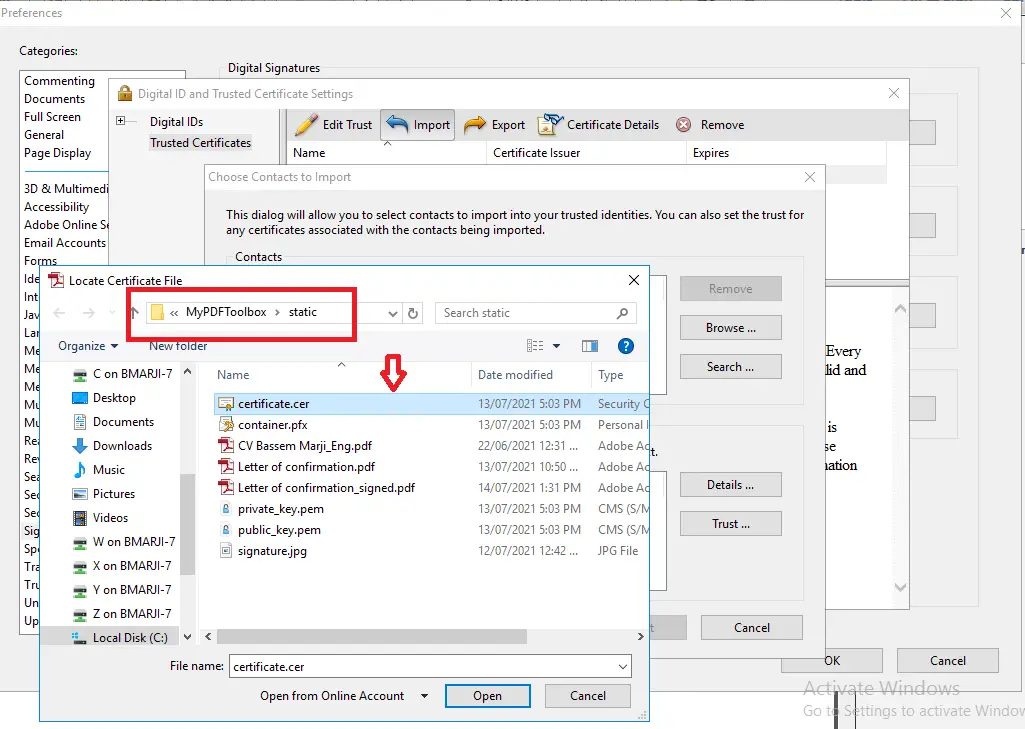
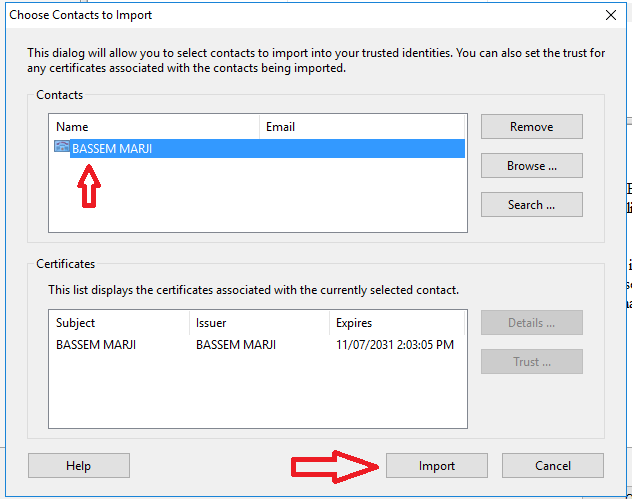
- Select the Trusted Certificates option and click Import:
- Click on Browse and Import the self-signed certificate from the
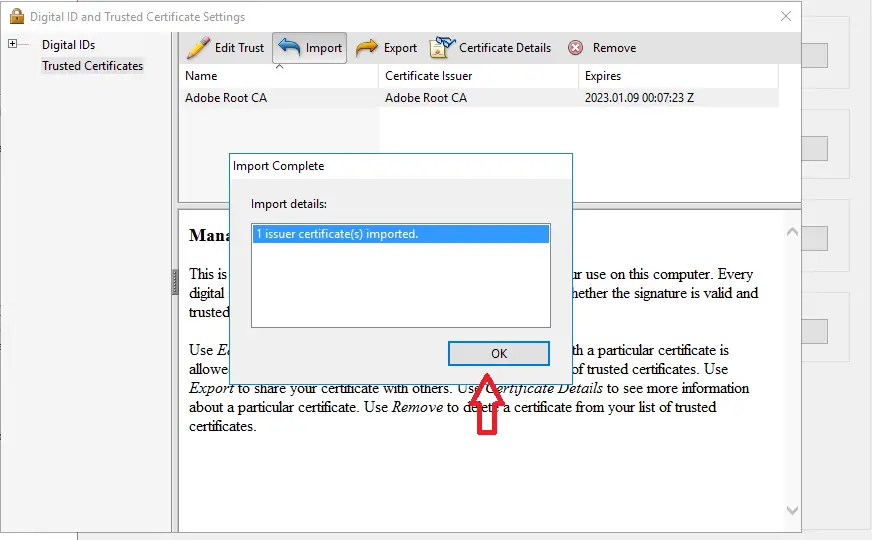
staticfolder: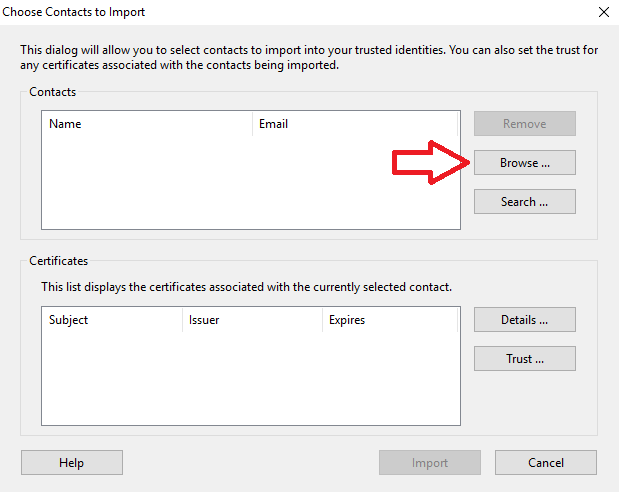
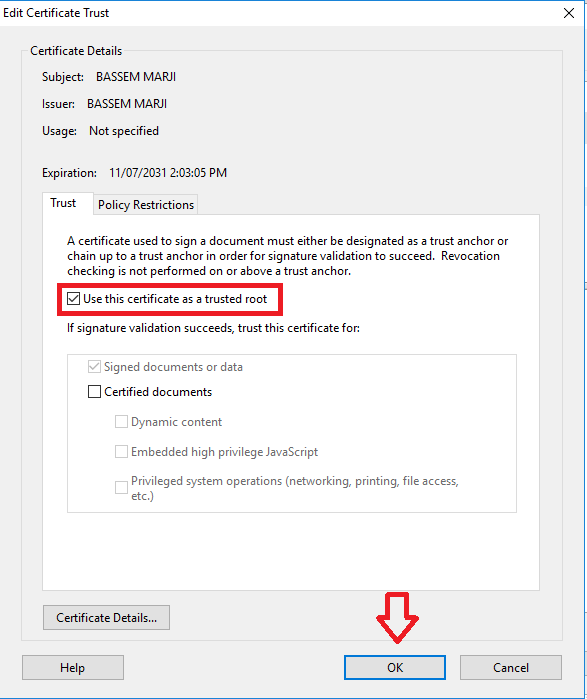
- Select the newly added certificate and press on Edit Trust:
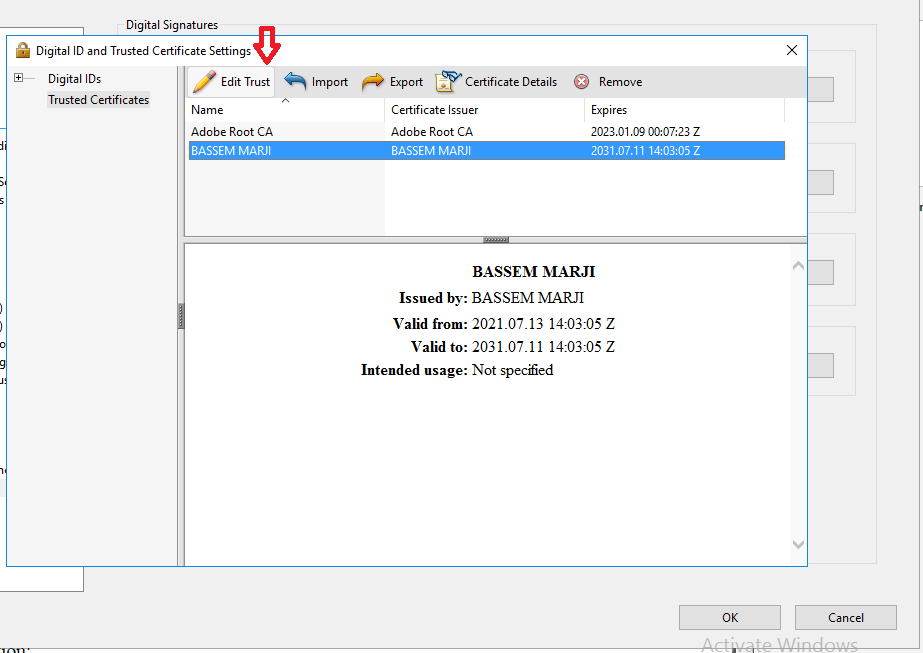
- Enable the checkbox "Use this certificate as a trusted root" and press OK:
Now close and re-open the PDF document:
 Click on the signature field:
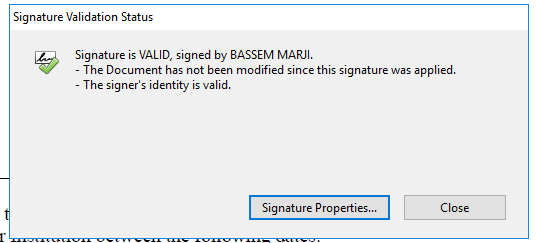
And there you go, it's a valid signature!
Check the full code here.
Finally, for more PDF handling guides on Python, you can check our Practical Python PDF Processing EBook, where we dive deeper into PDF document manipulation with Python, make sure to check it out here if you're interested!
Learn also: How to Use Hashing Algorithms in Python using hashlib.
Happy coding ♥
Liked what you read? You'll love what you can learn from our AI-powered Code Explainer. Check it out!
View Full Code Explain My Code


Got a coding query or need some guidance before you comment? Check out this Python Code Assistant for expert advice and handy tips. It's like having a coding tutor right in your fingertips!