Step up your coding game with AI-powered Code Explainer. Get insights like never before!
In the previous tutorial, we understood the candles prices format (OHLC), as well as learning to use many technical indicators using stockstats library in Python.
In this tutorial, we will learn how to use the fxcmpy wrapper in Python to perform trading operations through the use of FXCM broker on a demo account (virtual money).
For this tutorial, you will need to install:
pip install fxcmpy python-socketioOpening a Demo Account in FXCM Trading Station
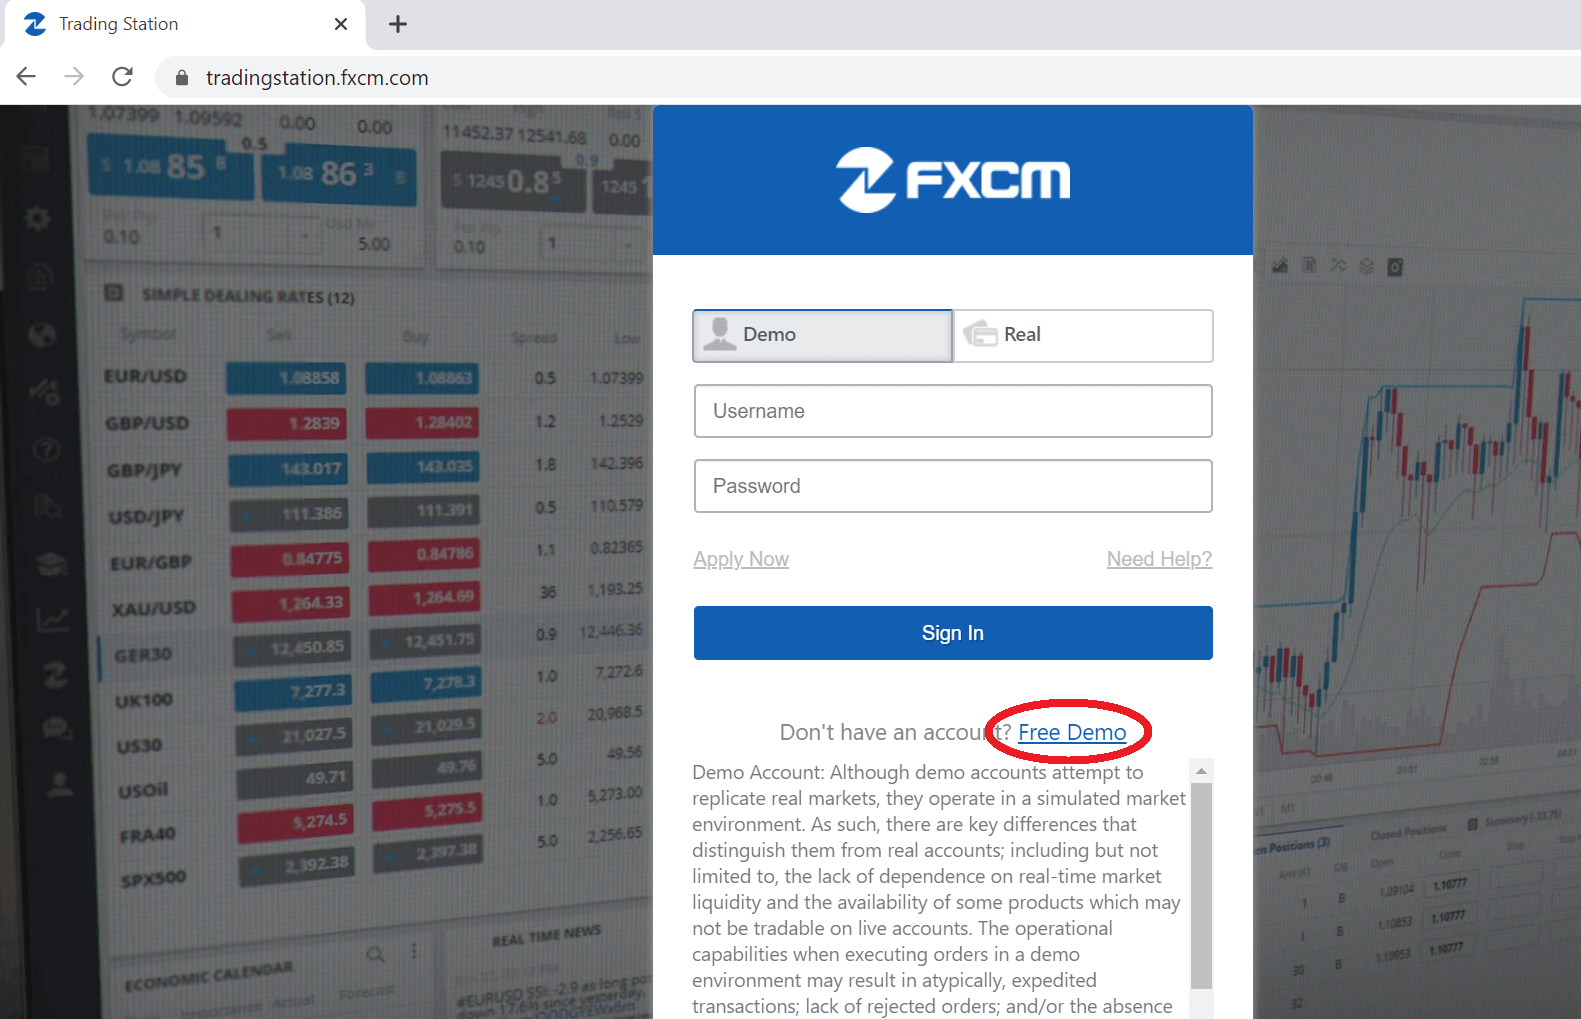
On your favorite browser, head to the FXCM Trading Station, then click on “Free Demo” as shown in the following figure, to create a free demo account:
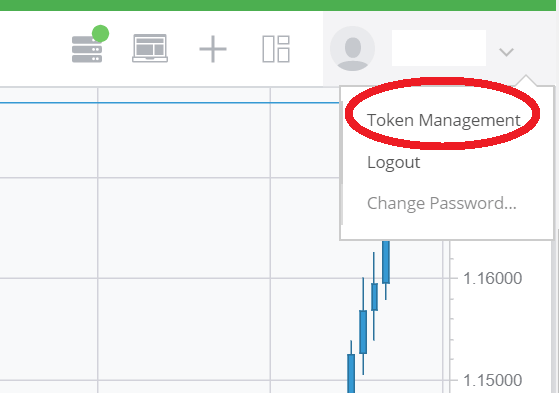
 Once you signed up for a demo account, the next step is to generate an “Access Token“ that we will use in our Python Code later on:
 Connecting to FXCM using fxcmpy
First import fxcmpy class from fxcmpy package:
from fxcmpy import fxcmpyThen you should create an instance of that class while specify the access token and the type of the server (demo in our case). Then call the method connect() to establish the connection, you can check if the connection has been established using the is_connected() method which returns a boolean (True or False).
After that, if you wish to close the connection, consider using close() method.
Note: It is Preferable to wrap all fxcmpy operations in try/except/ block in case the API conncetion get lost for some reason (in most cases, it is a HTTP Exception error and the socket will return None).
# generate this once you create your demo account
# this is fake token, just for demonstration
ACCESS_TOKEN = "8438834e8edaff70ca3db0088a8d6c5c37f51279"

try:
    fxcm_con = fxcmpy(access_token=ACCESS_TOKEN, server="demo")
    print("Is connected:", fxcm_con.is_connected())
except Exception as e:
    print(e)
Basic Trading Operations
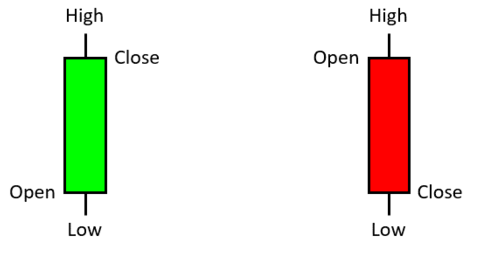
In the stock market, prices are usually presented under the OHLC format (Open, High, Low, Close) which is plotted as a candlesticks chart (check this tutorial for further details).
 We distinguish two types of Trading Operations, Long (Buy) and Short (Sell).
Long Operations work under this formula: gain/loss = Close_Price - Open_Price
Short Operations work under this formula : gain/loss = - ( Close_Price - Open_Price )
From those two formulas we conclude that:
- Long (Buy) Trading operations are used when the trend is positive/bullish (going upward) since in that case the Close_Price > Open_Price and hence the operation will gain money (and lose in the opposite scenario).
- Short (Sell) Trading operations are used when the trend is negative/bearish (going downward) since in that case the Close_Price < Open_Price and hence the operation will gain money (and lose in the opposite scenario).

Choosing between long or short operations all depends on how accurate your financial strategy is, since finding good trading moments using technical indicators and this what defines good financial analysts or what we call as Quants.
To open a long (buy) / short (sell) trade in fxcmpy we use the open_trade() operations and assign values to this attributes:
symbol: of the stock we want to trade in our case it will be "US30" (Dow Jones Market Index).is_buy:Trueif we want a long operation andFalseif we want a short operation.amount: Positive integer value, the bigger the amount, the bigger the Gain/Loss (the higher risk).
fxcm_con.open_trade(symbol="US30",amount=1,is_buy=True,time_in_force="GTC",order_type="AtMarket")Every position is assigned a trade_id that we will be using if we want to close the trade. To get all trade_ids of opened positions we use the method get_open_trade_ids() and close a position with the close_trade() method by specifying the trade_id and the amount.
trade_id = fxcm_con.get_open_trade_ids()[0]
fxcm_con.close_trade(trade_id=trade_id,amount=1)
You can check the trading station to see your opened and closed positions.
Risk Management using Take Profit and Stop Loss
In the previous section, we have learned how to open Buy/Sell operations for a given symbol (in this case, it's US30). However, in such scenario we are required to close those orders by using the method close_trade() manually.
Such strategy may be risky in case the market becomes too volatile (going up/down ward suddenly), it can result to a high gain, but there is also a possibility that it will lead to a high loss.
For this reason, it is recommended sometimes to manage risk using Take Profit and Stop Loss.
- Take Profit: The amount of gain that needs to be reached so that the broker automatically closes the order.
- Stop Loss: The limited amount of loss that, if reached, the broker will automatically closes the order.
In fxcmpy, we can do so by specify two attributes in the open_trade() method.
fxcm_con.open_trade(symbol="US30",amount=1,is_buy=True,time_in_force="GTC",order_type="AtMarket",is_in_pips=True,limit=15,stop=-50)Note: PIP or Percentage In Points, is a unit that represents the smallest price move.
limit attribute is a positive integer value for the take profit amount, whereas stop is the negative integer value for the stop loss amount.
Finally, closing the connection:
fxcm_con.close()Conclusion:
In this tutorial, you have learned:
- The difference between a Long (Buy) and a Short (Sell) Operations.
- How to open simple orders with fxcmpy.
- How to manage risk in your orders by adding the TakeProfit/StopLoss attributes using fxcmpy.
For more details, you can check the official documentation of fxcmpy API.
If you want an in depth course which dives into more details in algorithmic trading, I would suggest you take Learn Algorithmic Trading with Python course, it is recommended by Investopedia, check it out!
Disclaimer: The content of this tutorial is purely explanatory and we are not responsible on how you may use it during live trading with a real account.
Happy Trading ♥
Take the stress out of learning Python. Meet our Python Code Assistant – your new coding buddy. Give it a whirl!
View Full Code Build My Python Code


Got a coding query or need some guidance before you comment? Check out this Python Code Assistant for expert advice and handy tips. It's like having a coding tutor right in your fingertips!