Turn your code into any language with our Code Converter. It's the ultimate tool for multi-language programming. Start converting now!
Financial accounting is mainly all about recording an organization or individual's overall monetary transactions. Each recording is made within each month and will be repeated the following month. This process of financial accounting helps people or organizations to track their spending, on what gains increase or decrease whether it is assets, liabilities, or capital. In this tutorial, I will show you how to build an accounting app and how to use it, by focusing on the important parts which are:
- Django Installation and Setup
- Setting up the Templates and Design
- Creating Models
- Sign In, Sign Up, and Sign out
- Making the Home Page
- Creating Portfolios
- Deleting Portfolios
- How to Journal
- Making Portfolio Journal
- Trial Balance
- Template Designing
- Conclusion
Django has built-in class views to help us make Django views easier. We can also make functional views but in this situation, the Django class-based views is the best option for making this app.
Django Installation and Setup
Before coding, let's have our environment first, best to find a perfect path for it on your terminal.
Let's start by making our app directory folder. I name mine as accounting-app. Inside the accounting-app dir, let's start a Python virtual environment using our terminal:
$ python -m venv envTo start the environment on Windows, type:
.\env\Scripts\activateAnd for Linux and Mac:
$ source env/bin/activateNext, let's install Django
$ pip install djangoTo start a Django project and app in the terminal, type:
# starting a project
$ djangoadmin startproject base .
# starting an app
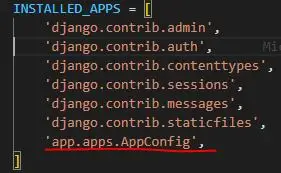
$ python manage.py startapp appAs you see here, the name of our project is base and our app is app. To connect our app with base, we need to configure it. Open base/settings.py and in INSTALLED_APPS, list app.apps.AppConfig:
And to the lowermost part of base/settings.py, add:
LOGIN_URL = 'login'
DATE_INPUT_FORMATS = ['%d-%m-%Y']
This will prevent us from getting errors in our authentication page later and give our app a date format of "Day/Month/Year" instead of the default "Year/Month/Date".
Next, let's connect the base/urls.py to our app/urls.py. In base/urls.py, import include and list our app/urls.py in urlspattern:
# base/urls.py

from django.urls import include

urlpatterns [
    ...,
    path('', include('app.urls')),
]
Now, create urls.py in app directory and type:
# base/urls.py

from django.urls import path

urlpatterns = [

]
We'll use it later to give our Django Views links for accessing them.
Setting up the Templates and Design
For the template directories, create two other directories inside the app directory. The first one should name templates and inside it, create another directory with the same name given to our app name directory. The directory should look like this:
accounting-app/
--app/
  --templates/
    --app/
--base/
Head to app/templates/app/ and create a base.html file. It will serve as the mother file of our templates, so it would be easy for us to do CSS and separate different sections that we also use for the rest of our templates. In base.html, type:
<!-- app/templates/app/base.html -->
<!DOCTYPE html>
<html>
<head>
    <title>{% block title %}{% endblock %}</title>
        <meta charset="utf-8">
    <meta name="viewport" content="width=device-width, initial-scale=1">
    <link href="https://cdn.jsdelivr.net/npm/bootstrap@5.3.0-alpha1/dist/css/bootstrap.min.css" rel="stylesheet" integrity="sha384-GLhlTQ8iRABdZLl6O3oVMWSktQOp6b7In1Zl3/Jr59b6EGGoI1aFkw7cmDA6j6gD" crossorigin="anonymous">
</head>
<body>
    <div>
        <button onclick="window.location.href='/'">Home</button>
        <button onclick="window.location.href='/pfl-create'">Add Portfolio</button>
        <button class="logout" onclick="window.location.href='/logout'">Log out</button>
    </div>
  {% if request.user.is_authenticated %}
      <h1 class="username">{{request.user}}</h1>
      <img src="https://cdn-icons-png.flaticon.com/512/552/552721.png">
  {% else %}
      <a href="{% url 'login' %}">Login</a>
  {% endif %}
  {% block content %}{% endblock %}
</body>
Next, create another file in the same directory and name it auth_base.html. Then type:
<!-- app/templates/app/auth_base.html -->
<!DOCTYPE html>
<html>
<head>
    <title>{% block title %}{% endblock %}</title>
    <meta charset="utf-8">
    <meta name="viewport" content="width=device-width, initial-scale=1">
    <link href="https://cdn.jsdelivr.net/npm/bootstrap@5.3.0-alpha1/dist/css/bootstrap.min.css" rel="stylesheet" integrity="sha384-GLhlTQ8iRABdZLl6O3oVMWSktQOp6b7In1Zl3/Jr59b6EGGoI1aFkw7cmDA6j6gD" crossorigin="anonymous">
</head>
<body>
    <div class="container w-25 p-3 my-5 text-primary-emphasis bg-primary-subtle border border-primary-subtle rounded-3">
        {% block content %}{% endblock %}
    </div>
</body>
</html>
For the designs of our templates, we're gonna use Bootstrap for the styling.
Creating Models
The first thing we need for our app is the model classes. We need two model classes for this app (one for making a portfolio and another one for making transactions for portfolios).
# app/models.py

from django.db import models
from django.contrib.auth.models import User

# Create your models here.

class Portfolio(models.Model):
    user = models.ForeignKey(User, on_delete=models.CASCADE, null=True)
    name = models.CharField(max_length=30)

    def __str__(self):
        return self.name

class Transaction(models.Model):
    journal_list = models.ForeignKey(Portfolio,on_delete=models.CASCADE)
    trans_name = models.CharField(max_length=30)
    trans_type = models.CharField(max_length=3)
    amount = models.IntegerField()
    date = models.DateField()

    def __str__(self):
        return self.trans_name
We have a user fields in our Portfolio to give each portfolio we make an owner. The Transaction model has fields such as; journal_list to identify which portfolio it belongs, trans_name or the formal transaction name of each transaction, trans_type to figure out whether our transaction is 'dbt' (debit) or 'cdt' (credit), amount of the transaction, and date.
Now let's register our models in app/admin.py so we are able to see their content on our admin page:
# app/admin.py
from django.contrib import admin
from .models import Portfolio, Transaction

# Register your models here.
admin.site.register(Portfolio)
admin.site.register(Transaction)
Sign In, Sign Up, and Sign out
In this section, we'll make Django authentication. We want each user to have their own set of portfolios so it's easy for them to find theirs and also to provide privacy for their transactions. So the first two class views we're gonna make our views for Login and Signup. In app/views.py import LoginView and create UserLogin class:
# app/views.py

from django.contrib.auth.views import LoginView

class UserLogin(LoginView):
    template_name = 'app/signin.html'
    fields = '__all__'
    redirect_authenticated_user = True
The LoginView provides us with built-in user authentication. As you notice, the fields are set to '__all__'. It only accesses the 'username' fields and 'password' fields since in our signup-views, we only give it two fields which are the 'username' and 'password' fields.
The redirect_authenticated_user disallows users to access the login page once an account is signed in already. Now that our login view is ready, let's create a template for it:
<!-- app/templates/app/signin.html -->
{% load static %}
<!DOCTYPE html>
<html>
<head>
    <title>Sign in</title>
    <link rel="stylesheet" type="text/css" href="{% static 'app/account-auth.css' %}">
</head>
<body>
    <h1>Log In</h1>
    {% for message in messages %}
        <p>{{message}}</p>
    {% endfor %}
    <form method="post">
        {% csrf_token %}
        <fieldset>
            {{form.as_p}}
        </fieldset>
        <button type="submit" name="signin">Sign in</button>
        <button onclick="location.href = '/signup'" class="nxt-pg">Create your Account</button>
    </form>
</body>
</html>
As you noticed our signin.html and base.html had different CSS files (index.css for base.html and account-auth.css for signin.html. I choose to separate designs for sign-in/sign-up and our app's main contents. We currently don't have a CSS file for this template but it will work.
Now that we have views for log-in, we also have to make a view for the sign-up page. Back to our app/views.py type:
# app/views.py

from django.views.generic.edit import FormView
from django.contrib.auth.forms import UserCreationForm
from django.contrib.auth import login

class UserSignup(FormView):
    template_name = 'app/signup.html'
    form_class = UserCreationForm
    redirect_authenticated_user = True
    success_url = reverse_lazy('pfl-list')

    def form_valid(self, form):
        user = form.save()
        if user is not None:
            login(self.request, user)
        return super(UserSignup, self).form_valid(form)

    def get(self, *args, **kwargs):
        return super(UserSignup, self).get(*args, **kwargs)
Our form_class with the value of UserCreationForm has fields of username and password by default. The success_url sends us directly to a landing page.
The form_valid function saves our user and logging in us into our app automatically once we finished making an account.
For our UserSignup templates:
<!-- app/templates/app/signup.html -->
{% load static %}
<!DOCTYPE html>
<html>
<head>
    <title>Sign Up</title>
    <link rel="stylesheet" type="text/css" href="{% static 'app/account-auth.css' %}">
</head>
<body>
    <h1>Sign Up</h1>
    {% for message in messages %}
        <p>{{message}}</p>
    {% endfor %}
    <form method="post">
        {% csrf_token %}
        <fieldset>
            {{form.as_table}}
        </fieldset>
        <button type="submit" name="signup">Sign Up</button>
        <button onclick="location.href = '/login'" class="nxt-pg">Login your Account</button>
    </form>
</body>
</html>
Now it's time to make link URLs for UserSignup and UserLogin so we can access them in our browser:
# app/urls.py
from .views import UserSignup, UserLogin

urlpatterns = [
    path('signup/', UserSignup.as_view(), name='signup'),
    path('login/', UserLogin.as_view(), name='login'),
]
Now that we have class views for sign-in and sign-up, let's create another view for log-out. The log-out views are way easier to create. In our app/urls.py, import LogOutView and give log-out a URL in urlspattern and on the next page it will redirect.
from django.contrib.auth.views import LogoutView

urlpatterns = [
    ...,
    path('logout/', LogoutView.as_view(next_page='login'), name='logout'),
]
Related: How to Build an Authentication System in Django.
Making the Home Page
# app/views.py
from django.views.generic import View
from django.contrib.auth.models import User
from django.contrib.auth.mixins import LoginRequiredMixin

class PortfolioList(LoginRequiredMixin,View):
    def get(self,request):
        account = User.objects.get(username=request.user)
        context = {'user':account}
        return render(request,'app/home.html',context)
As you noticed, we give our app two arguments which are the View (to use the built-in class-views) and the LoginReqiredMixin (to stop our app from accessing the home page if there's no logged-in account).
Our home page will show us the list of portfolios our user has. The account variable handles accessing the currently authenticated user's objects and then context converts these objects into dictionaries so our HTML template will able to read them. To finish this class, we'll return render(request, 'app/home.html', context) to connect this class with its template and send objects to it.
For our PortfolioList's templates, create home.html file inside app/templates/app/:
<!-- app/templates/app/home.html -->
{% extends "app/base.html" %}
{% block title %}Home{% endblock %}
{% block content %}
    <br><br><h2>MY PORTFOLIO LIST</h2><br>
    <table class="center">
        {% for pfl in user.portfolio_set.all %}
            <tr>
                <td><h3><a href="{% url 'pfl-detail' pfl.id %}">{{pfl.name}}</a><h3></td>
                <td><button class="delete" onclick="window.location.href='/pfl-delete/pk={{pfl.id}}' ">Delete</button></td>
            </tr>
        {% endfor %}
    </table>
{% endblock %}
The home.html uses our base.html by importing it:
{% extends "app/base.html" %}And give its fields respected value of their own, just like what we did in {% block title %}Home{% endblock %}, it will set its page title to 'Home'.
For the block content, we give it the main content of our page. If take a closer look, you can notice we can now iterate the object user which we configure from our PortfolioList view.
For every portfolio name, we coupled them with an a tag which leads us to that portfolio's details, or better we call journal entries. The delete buttons will delete the said portfolio base on its portfolio's id.
And to complete it, let's give it a URL in urls.py:
# app/urls.py
from .views import UserSignup, UserLogin, PortfolioList

urlpatterns = [
    ...,
    path('', PortfolioList.as_view(), name='pfl-list'),
]
Now that we have our landing page, let's add another function in UserSignup and UserLogin so the app will be automatically connected to the home page after logging in or signing up.
The get_success_url will send us to the Home page ('pfl-list') once we're authenticated:
# app/views.py
class UserLogin(LoginView):
    template_name = 'app/signin.html'
    fields = '__all__'
    redirect_authenticated_user = True

    def get_success_url(self):
        return reverse_lazy('pfl-list')
Let's modify the get function in UserSignup to let it send us to the home page once we finished making an account:
# app/views.py
class UserSignup(FormView):
    ...

    def form_valid(self, form):
        ...

    def get(self, *args, **kwargs):
        if self.request.user.is_authenticated:
            return redirect('pfl-list')
        return super(UserSignup, self).get(*args, **kwargs)
Let's try to run our server in the terminal by typing python manage.py runserver in our app directory, and in our browser, type 127.0.0.1:8000 or localhost:8000. This URL will send us to our home page but since there's no user or account authenticated yet, it will send us to the login page.
The Login page should look like this:

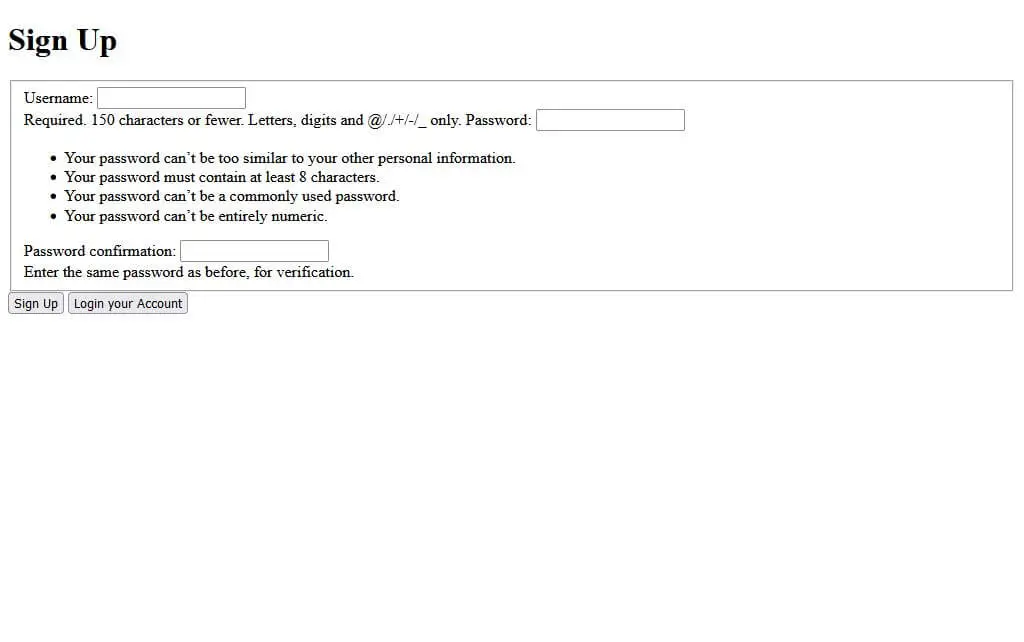
The Signup page should look like this:
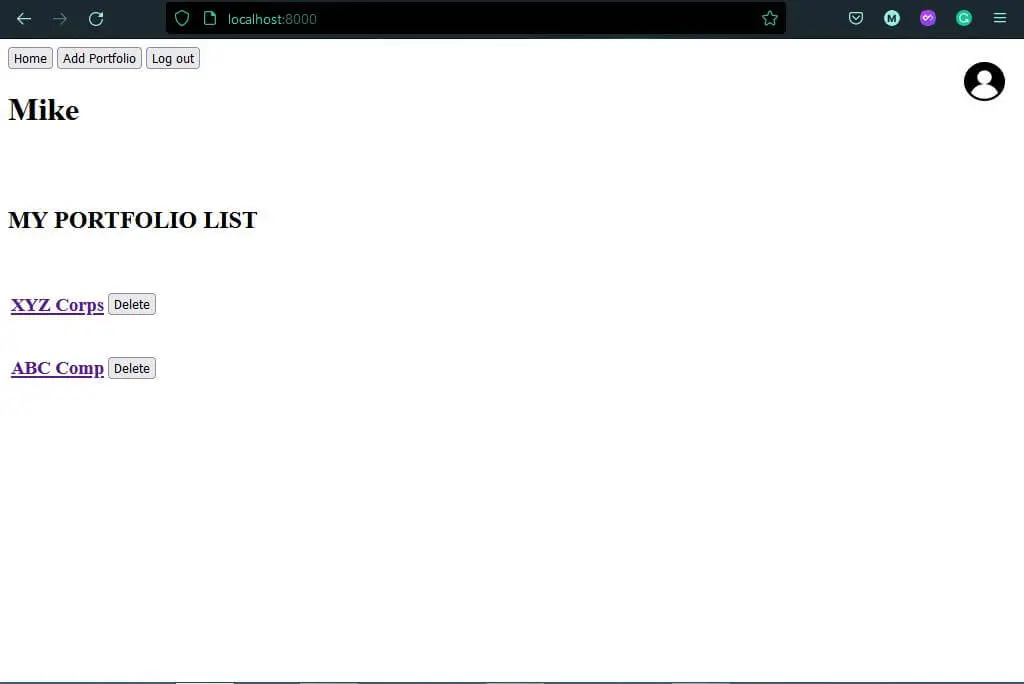
And the home page should look like this:
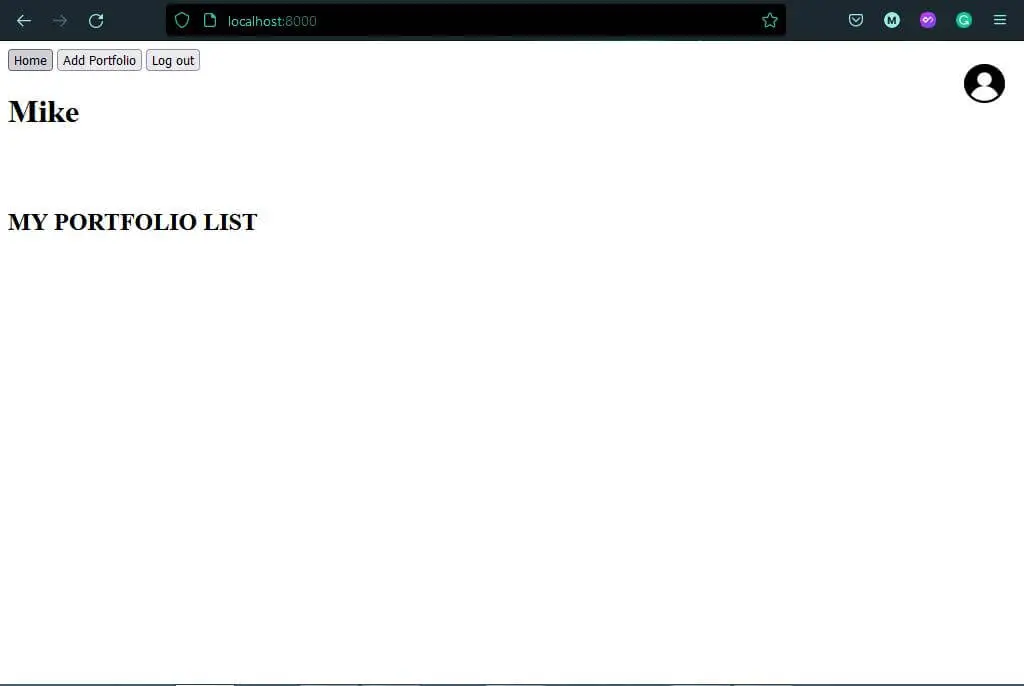
There's nothing here on this page since we currently don't have any portfolio. Now, let's make another class-view for making portfolios.
Creating Portfolios
In app/views.py, let's make a class, we call PortfolioCreate for creating portfolios:
class PortfolioCreate(LoginRequiredMixin,View):
    def get(self,request):
        return render(request,'app/portfolio_create_form.html')

    def post(self,request):
        user = User.objects.get(username=request.user)
        pfl_name = request.POST.get('portfolio_name')
        user.portfolio_set.create(name=pfl_name)
        my_object = user.portfolio_set.get(name=pfl_name).id
        return redirect('pfl-detail', my_object)
As you see in the post() function inline user.portfolio_set.create(name=pfl_name), we create each portfolio through the user instead of doing it directly with the Portfolio model we made. Why? Because if we make a portfolio directly, we're not able to give it a user field and this portfolio will show on other users' accounts.
After we create a portfolio, it will automatically send us to this portfolio's detail by redirecting to the class view with the URL name of 'pfl-detail', and taking my_object as its argument. We currently don't have a class view for that but we'll get to write it along in this tutorial.
Make another HTML file named home.html inside app/templates/app/:
<!-- app/templates/app/portfolio_create_form.html -->
{% extends "app/base.html" %}
{% block title %}Person Create{% endblock %}
{% block content %}
    <br><br><h2>Create New Portfolio</h2><br>
    <form class="opt" method="post" action="">
        {% csrf_token %}
        <input type="textbox" name="portfolio_name" placeholder="Portfolio Name">
        <input type="submit" value="Create">
    </form>
{% endblock %}
And for a final touch in PortfolioCreate, let's give it its own URL in app/urls.py:
# app/urls.py
from .views import PortfolioCreate

urlpatterns = [
    ...,
    path('pfl-create/', PortfolioCreate.as_view(), name='pfl-create'),
]
Now if we go to localhost:8000/pfl-create/, we can see:
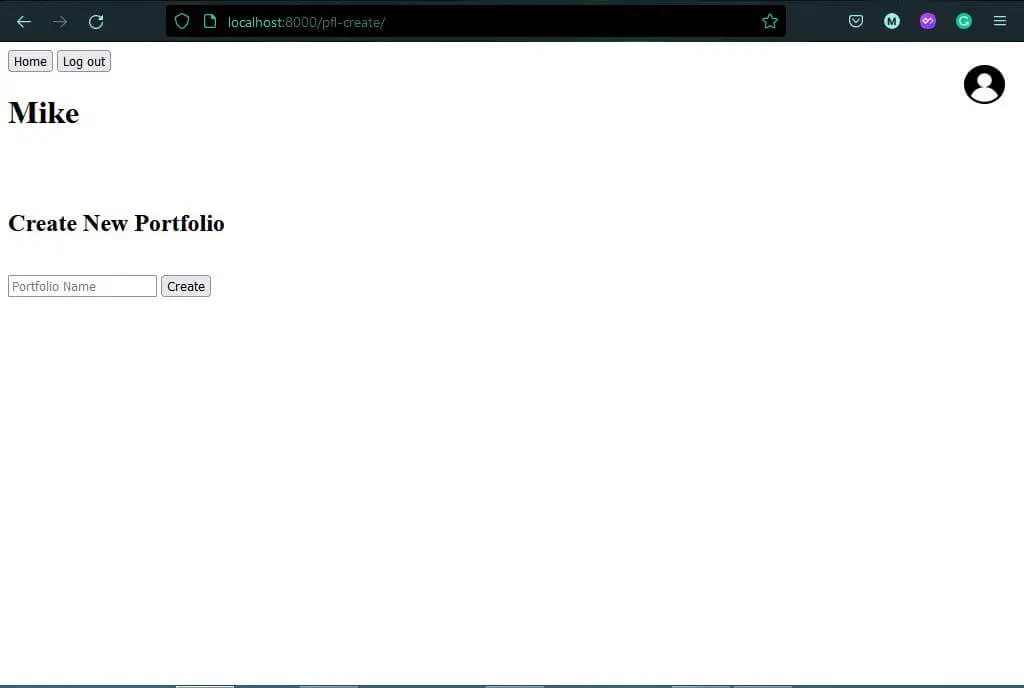
Each portfolio serves as a transaction container for every business/organization/person's transaction. I suggest naming each portfolio after the organization we select to track transactions.
Deleting Portfolios
Back in our app/views.py, create another class-view named PortfolioDelete which we'll use to delete selected portfolio/s. We're gonna use the Django built-in DeleteView for this one:
# app/views.py
from django.views.generic.edit import DeleteView

class PortfolioDelete(LoginRequiredMixin,DeleteView):
    template = 'app/portfolio_confirm_delete.html'
    model = Portfolio
    success_url = reverse_lazy('pfl-list')
Just like other views except for views for authentication, we add a LoginRequiredMixin to this view so we can only access it if we are signed in.
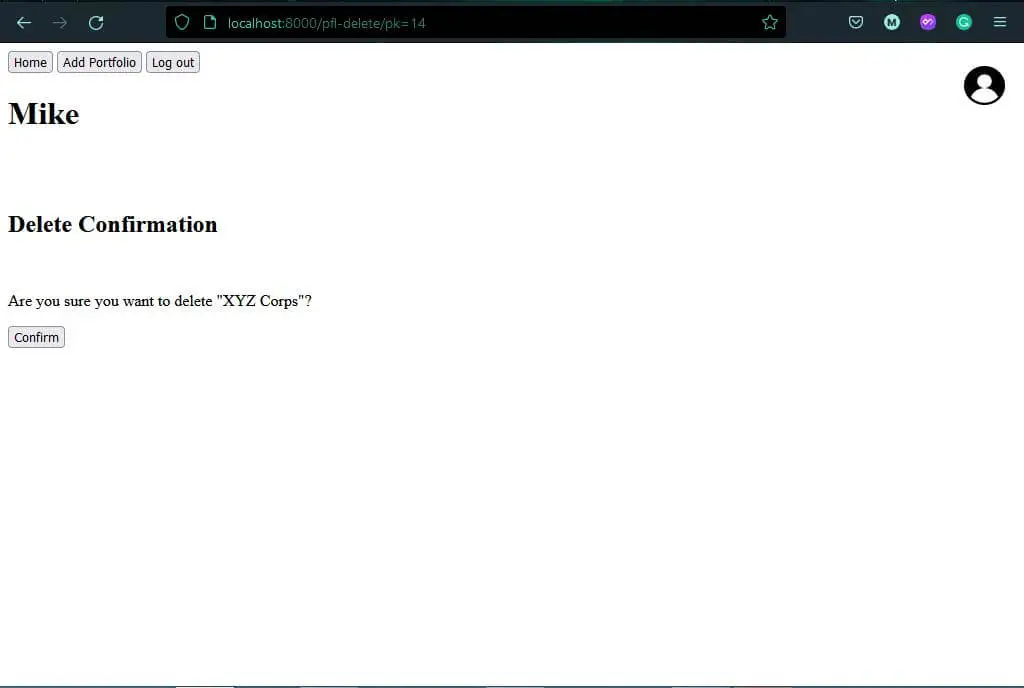
In app/templates/app, create an HTML template portfolio_confirm_delete.html that extends our base.html:
<!-- app/templates/app/portfolio_confirm_delete.html -->
{% extends 'app/base.html' %}
{% block title %}Delete Confirmation{% endblock %}
{% block content %}
    <br><br><h2>Delete Confirmation</h2><br>
    <form class="opt" method="post">
        {% csrf_token %}
        <p>Are you sure you want to delete "{{object}}"?</p>
        <input type="submit" value="Confirm">
    </form>
{% endblock %}
And now for urls.py:
# app/urls.py
from .views import PortfolioDelete
urlpatterns = [
...,
path('pfl-delete/pk=<int:pk>', PortfolioDelete.as_view(), name='pfl-delete'),
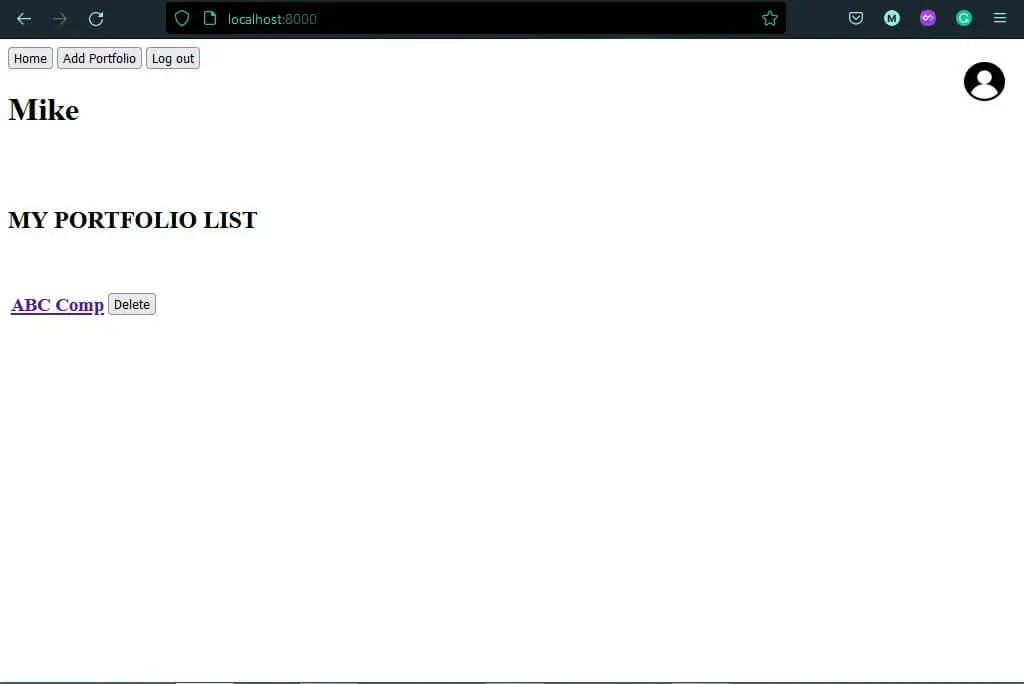
]The main content of this page is the input tag inside the form tag in block content. It serves as confirming button if we really want to delete the chosen portfolio or not. If you hit the confirm button and head back to the Home page, you'll notice it worked:
How to Journal
Increases in assets (such as cash, equipment, furniture, etc) and receivables should be listed on the debit side or debt while increases in liabilities, payables, and capital should be listed on the credit side and vise-versa. Decreases in assets and receivables should be listed on the credit side while decreases in liabilities, payables, and capital should be listed on the cebit side or debt.
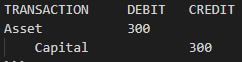
In making journal entries, there's always a debit and credit in each transaction to balance it. Let's say you spent $300 for equipment (asset) in a transaction. Making an increase in assets is also an increase in capital/revenue so it will list in Journal as:
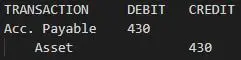
If you pay a debt from accounts payable worth $430 through cash, the transaction will be:
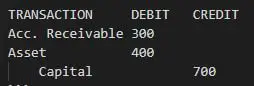
And if you earned $700 from your work and received $400 cash and the $300 will be paid via account, the transaction will be:
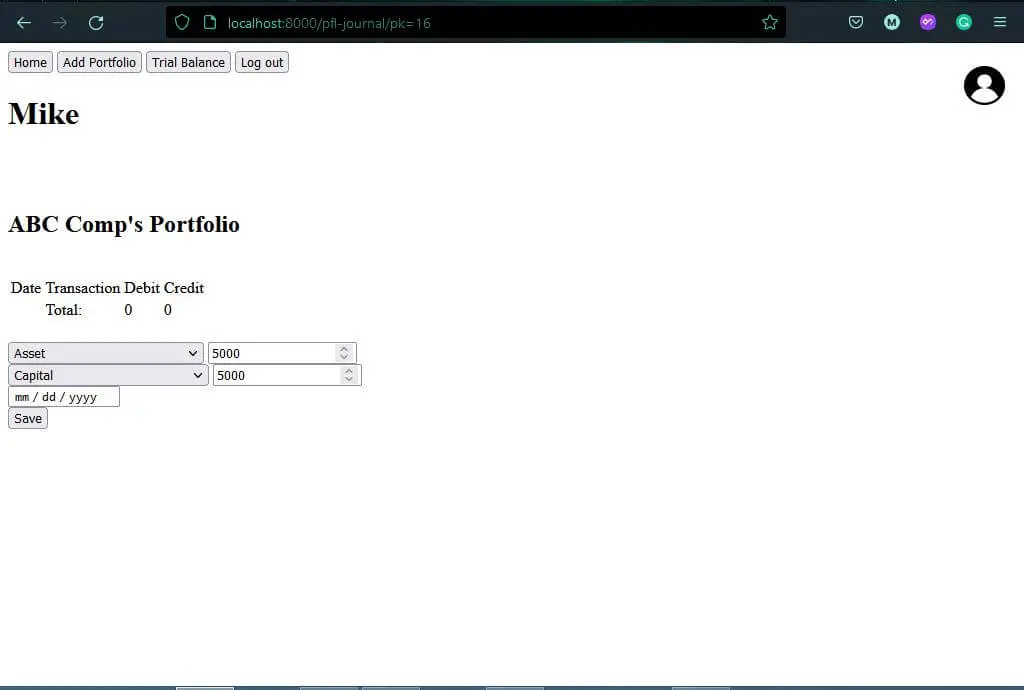
To make this transaction in our app, you can do:
 Note: If you find financial accounting pretty confusing, it's normal. Basics may help you understand more about financial accounting.
Making Portfolio Journal
As I said earlier, a portfolio is just a folder for each transaction we do. Now that we have that folder, let's make a view for making transactions in our portfolio. Create a class named Journal in app/views.py. We're gonna use the built-in DetailView for this one so we can access objects inside our portfolio:
# app/views.py
from django.views.generic.detail import DetailView

class Journal(LoginRequiredMixin,DetailView):
    model = Portfolio
    template_name = 'app/journal.html'
    context_object_name = 'pfl'

    def get(self,*args,**kwargs):
        return super(Journal, self).get(*args,**kwargs)

    def post(self,*args,**kwargs):
        return super(Journal, self).get(*args,**kwargs)
This will access our portfolio transaction contents but does not allow us to add transactions. Let's add a new function in the Journal class named dispatch. We name our class-view functions as request calls by syntax. What the dispatch calls do is allow us to access the data sent in our app (data from post calls), so we can not just access it but also modify it.
    def dispatch(self,request,pk,*args,**kwargs):
        dbt_trans, dbt_amt = request.POST.get('dbt'), request.POST.get('dbt-amt')
        cdt_trans, cdt_amt = request.POST.get('cdt'), request.POST.get('cdt-amt')
        trans_date = request.POST.get('trans-date')
        pfl = self.model.objects.get(id=pk)
        if self.request.POST.get('save'):
            try:
                if dbt_trans and dbt_amt and cdt_trans and cdt_amt != None:
                    dbt_whole_trans = pfl.transaction_set.create(trans_name=dbt_trans, trans_type='dbt', amount=dbt_amt, date=trans_date)
                    cdt_whole_trans = pfl.transaction_set.create(trans_name=cdt_trans, trans_type='cdt', amount=cdt_amt, date=trans_date)
                    dbt_whole_trans.save()
                    cdt_whole_trans.save()
                    print(True)
            except:
                return super(Journal, self).dispatch(request,*args,**kwargs)
        return super(Journal, self).dispatch(request,*args,**kwargs)
Now that we have a dispatch() function, we can finally add transactions inside our journal portfolios. The next thing we have to do is to make a template for it so we can render the transactions we have as journal entries:
<!-- app/templates/app/journal.html -->
{% extends 'app/base.html' %}
{% load app_extras %}
{% block title %}Details{% endblock %}
{% block content %}
    <br><br><h2>{{pfl.name}}'s Portfolio</h2><br>
    <br>
    <form class="opt" method="post" action="">
        {% csrf_token %}
        <select name="dbt">
            <option disabled="" selected="" value="">Select Debit Transaction type</option>
            <option value="asset">Asset</option>
            <option value="liability">Liability</option>
            <option value="capital">Capital</option>
            <option value="accounts receivable">Accounts Receivable</option>
            <option value="accounts payable">Accounts Payable</option>
            <option value="notes receivable">Notes Receivable</option>
            <option value="notes payable">Notes Payable</option>
        </select>
        <input type="number" name="dbt-amt" placeholder="Enter Debit amount...">
        <br>
        <select name="cdt">
            <option disabled="" selected="" value="">Select Credit Transaction type</option>
            <option value="asset">Asset</option>
            <option value="liability">Liability</option>
            <option value="capital">Capital</option>
            <option value="accounts receivable">Accounts Receivable</option>
            <option value="accounts payable">Accounts Payable</option>
            <option value="notes receivable">Notes Receivable</option>
            <option value="notes payable">Notes Payable</option>
        </select>
        <input type="number" name="cdt-amt" placeholder="Enter Credit amount...">
        <br>
        <input type="date" name="trans-date">
        <br>
        <input type="submit" name="save" value="Save">
    </form>
    <button onclick="window.location.href='/pfl-tb/pk={{pfl.id}}'">Trial Balance</button>
{% endblock %}
For every debit we add, there should be a credit to be added as a counterbalance to the transaction. We give both debit and credit a field of transaction types.
Let's add it in urls.py:
# app/urls.py
from .views import Journal
urlpatterns = [
...,
path('pfl-journal/pk=<int:pk>', Journal.as_view(), name='pfl-detail'),
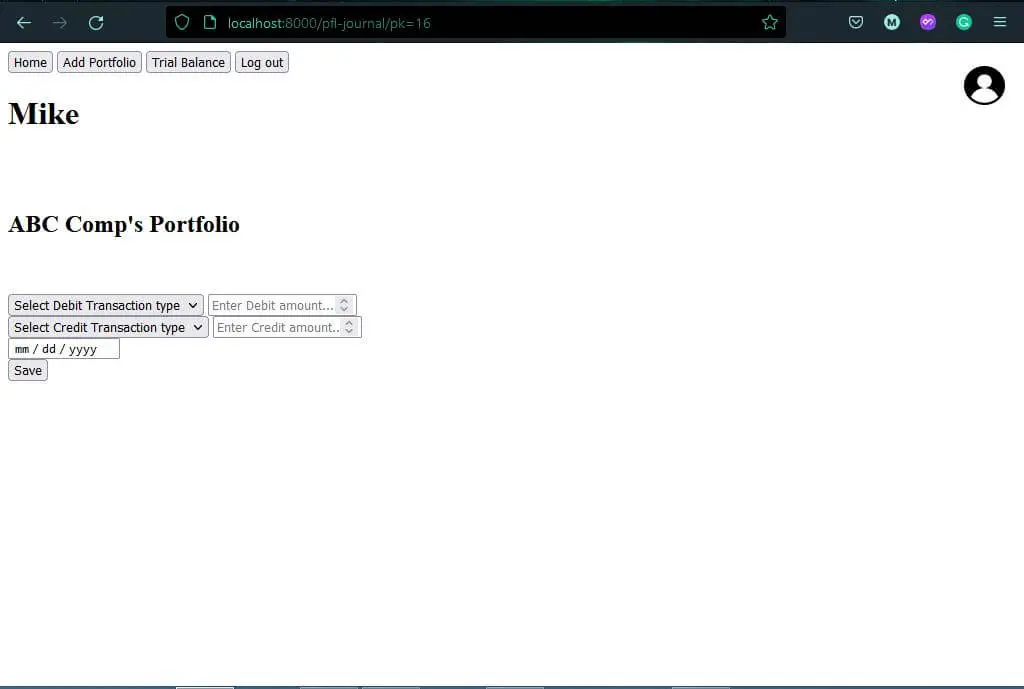
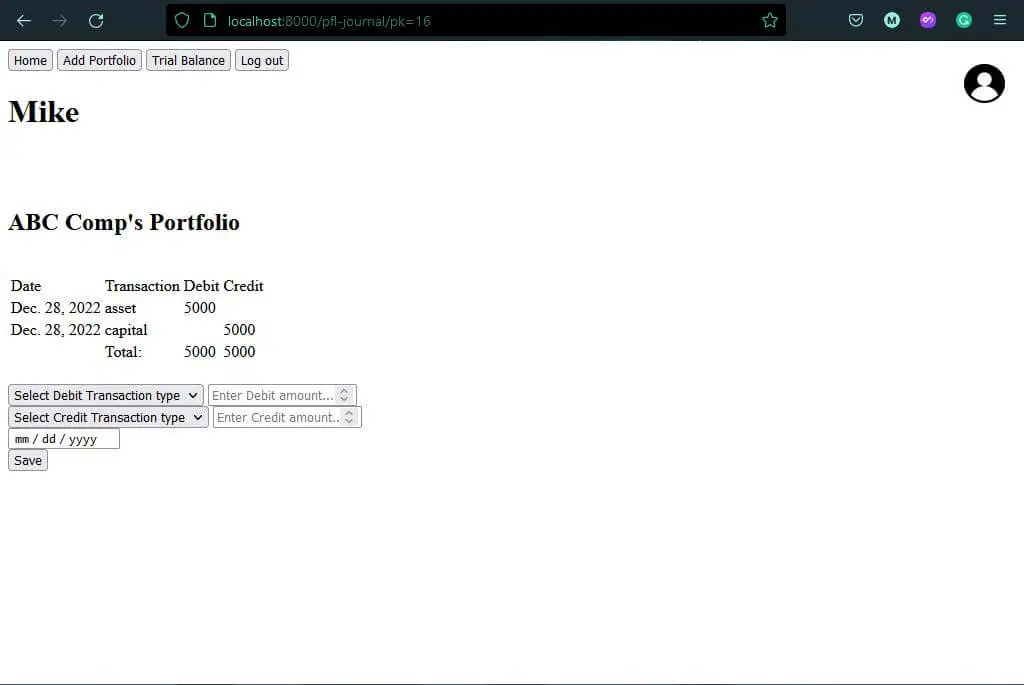
]If we check it in our browser, our journal page looks like this:
We currently don't have a visual representation for our Journal entries. We can directly make a table that represents our Journal entries by accessing our objects but it's a bit of a hustle to do. Instead, let's can create a template extension of Django, a separate function which able to access our objects. This template extension of Django is called templatetags.
What our templatetag do in this app is to access the object and pass its values to our page's table.
Inside the app/ directory, create a templatetags/ directory, and inside it, create a .py file named app_extras.py.
from django import template

register = template.Library()
As you see above, the first thing we should do is import template from Django and register each listed extension we do in register. After that, we can start coding extensions. Let's call our tag journal_table:
@register.simple_tag(takes_context=True)
def journal_table(context, pfl):
    request = context.get('request')
    trans_table = []
    debit_total, credit_total = 0, 0
    for trans in pfl.transaction_set.all():
        if trans.trans_type == 'dbt':
            trans_table.append((trans.date, trans.trans_name, trans.amount, ''))
            debit_total += trans.amount
        else:
            trans_table.append((trans.date, trans.trans_name, '', trans.amount))
            credit_total += trans.amount
    context = {'tbl': trans_table, 'dt': debit_total, 'ct': credit_total}
    return context
The pfl argument we need stands for "Portfolio". What the journal_table() function does is parse the pfl data and deliver it to journal.html, fit the table and prepare for it. The decorator above the journal table, @register.simple_tag(takes_context=True) registers our function to the register variable.
Back to journal.html, create a table inside block content below the Page title:
{% block content %}
    <br><br><h2>{{pfl.name}}'s Portfolio</h2><br>
    {% journal_table pfl as jt %}
    <table class="opt">
        <thead>
            <tr class="tb-shade">
                <td>Date</td>
                <td>Transaction</td>
                <td>Debit</td>
                <td>Credit</td>
            </tr>
        </thead>
        <tbody>
            {% for transaction in jt.tbl %}
                <tr>
                    {% for items in transaction %}
                        <td>{{items}}</td>
                    {% endfor %}
                </tr>
            {% endfor %}
            <tr class="tb-shade">
                <td></td>
                <td>Total:</td>
                <td>{{jt.dt}}</td>
                <td>{{jt.ct}}</td>
            <tr>
        </tbody>
    </table>
    ...
Now if we reload the page, we can finally see a table of Journal Entries.
Trial Balance
Let's start by making two main functions outside the TrialBalance class; the trial_balance_computer function and the t_accounts function:
def trial_balance_computer(pk):
    pfl = Portfolio.objects.get(id=pk)
    trans_total = {}
    tb_table = []
    tb_total = [0, 0]
    for trans in pfl.transaction_set.all():
        if trans.trans_name not in trans_total:
            trans_total[trans.trans_name] = 0
        if trans.trans_type == 'dbt':
            trans_total[trans.trans_name] += trans.amount
        else:
            trans_total[trans.trans_name] -= trans.amount
    for x in trans_total:
        if trans_total[x] > 0:
            tb_table.append((x, trans_total[x], ''))
            tb_total[0] += trans_total[x]
        elif trans_total[x] < 0:
            tb_table.append((x, '', trans_total[x]))
            tb_total[1] += trans_total[x]
    tb_table.append(('Total:', tb_total[0], tb_total[1]))
    return pfl.name, tb_table

def t_accounts(pk):
    pfl = Portfolio.objects.get(id=pk)
    ledger = {}
    for trans in pfl.transaction_set.all():
        if trans.trans_name not in ledger:
            ledger[trans.trans_name] = []
        if trans.trans_type == 'dbt':
            ledger[trans.trans_name].append(trans.amount)
        else:
            ledger[trans.trans_name].append(-trans.amount)
    return ledger
The trial balance is the accounting representation in which all of the debits (positive value, increases) are added and credits (negative values, decreases) are subtracted. In simple words, it's like the adjusted or computed Journal entries.
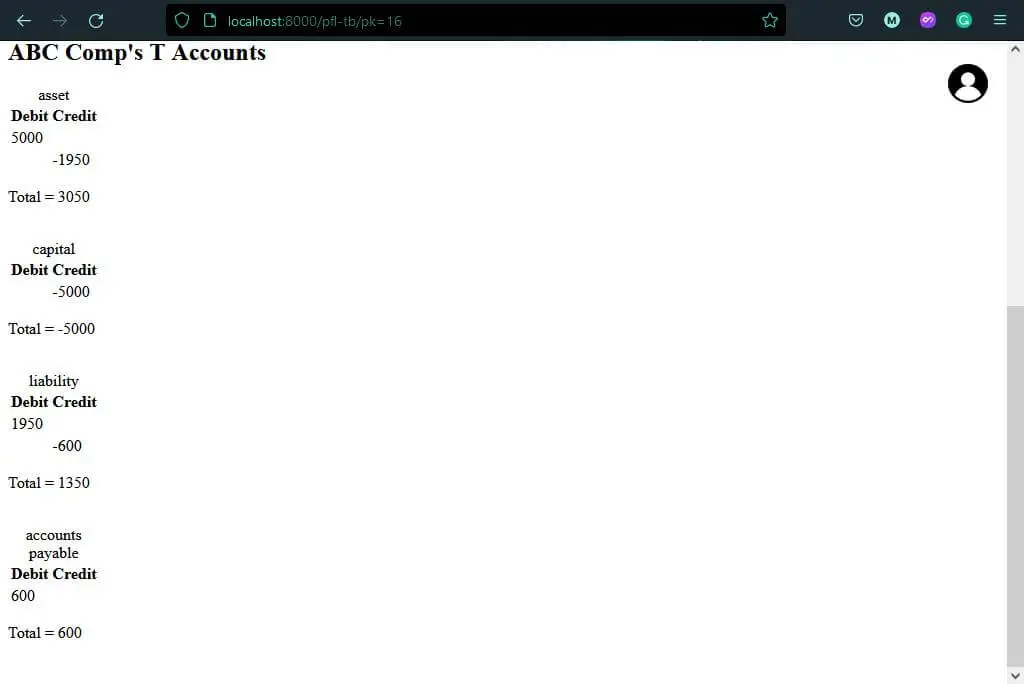
The T-accounts add all the debit transactions and subtract all the credit transactions for each transaction name. For example, we have:
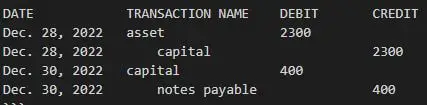
We will have T-accounts computation for assets, capital, and notes payable but let's focus on capital's T-accounts instead of doing all:
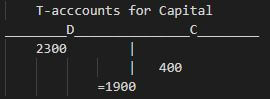
To compute it, sum first each column and then, subtract D (debit) to C (credit). If the answer is positive, it will be listed in the Debit column of our Trial balance and if negative, it will be listed in the Credit column.
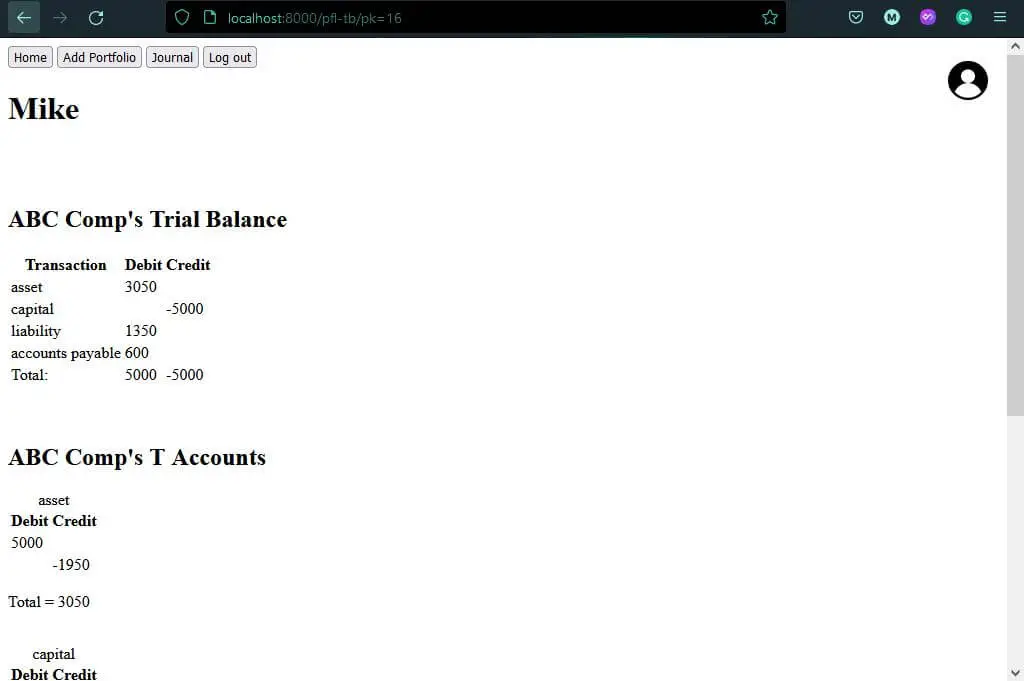
What it looks like in Trial Balance:
![]()
And yes, the Trial balance's contents are all from T-accounts.
The trial_balance_computer() simply accesses the portfolio contents from the database through the models and calculates it. Meanwhile, the t_accounts is a visual representation of the computation of how we end up having that Trial balance. But computing it up straight will do it easier so we just do the t_accounts() function for computation representation and have trial_balance_computer() to compute it up.
For our Trial_Balance class, we are using the default View so we can easily access the functions we just create:
class TrialBalance(LoginRequiredMixin, View):
    def get(self, request, pk):
        tb = trial_balance_computer(pk)
        ta = t_accounts(pk)
        ta_JSON = dumps(ta)
        context = {'pk':pk, 'name':tb[0], 'tb':tb[1], 'ta':ta_JSON}
        return render(request, 'app/trialbalance.html', context)
Moving to our templates, create trialbalance.html inside the app/templates/app/ folder.
{% extends "app/base.html" %}
{% load app_extras %}
{% block title %}Trial Balance{% endblock %}
{% block sidenav %}
    <button onclick="window.location.href='/'">Home</button>
    <button onclick="window.location.href='/pfl-create'">Add Portfolio</button>
    <button onclick="window.location.href='/pfl-journal/pk={{pk}}'">Journal</button>
    <button class="logout" onclick="window.location.href='/logout'">Log out</button>
{% endblock %}
{% block content %}
    <br><br>
    <div id="trial-balance">
        <h2>{{name}}'s Trial Balance</h2>
        <table class="opt">
            <tr class="tb-shade">
                <th>Transaction</th>
                <th>Debit</th>
                <th>Credit</th>
            </tr>
            {% for trans in tb %}
                <tr>
                    {% for item in trans %}
                        <td>{{item}}</td>
                    {% endfor %}
                </tr>
            {% endfor %}
        </table>
    </div>
    <br><br>
    <div class="t-account" id="t-account">
        <h2>{{name}}'s T Accounts</h2>
    </div>
    <script>
        var tAccount = JSON.parse("{{ta|escapejs}}");
        dataNode = document.getElementById('t-account');
        for (const trans in tAccount) {
            var sum = 0;
            const transTable = document.createElement("table");
            const transCaption = document.createElement("caption");
            const transRow = document.createElement("tr");
            const transDb = document.createElement("th");
            const transCd = document.createElement("th");
            transCaption.innerText = trans;
            transDb.innerText = 'Debit';
            transCd.innerText = 'Credit';
            transRow.appendChild(transDb);
            transRow.appendChild(transCd);
            transTable.appendChild(transCaption);
            transTable.appendChild(transRow);
            tAccount[trans].forEach (data => {
                sum = sum + data;
                const tableRow = document.createElement("tr");
                const tableDb = document.createElement("td");
                tableDb.className = "debit"
                const tableCd = document.createElement("td");
                tableCd.className = "credit"
                if (data > 0 ) {
                    tableDb.innerText = data;
                    tableCd.innerText = '';
                }
                else if (data < 0 ) {
                    tableDb.innerText = '';
                    tableCd.innerText = data;
                }
                tableRow.appendChild(tableDb);
                tableRow.appendChild(tableCd);
                transTable.append(tableRow);
            });
            dataNode.appendChild(transTable);
            ttl = document.createElement("p");
            ttl.innerText = `Total = ${sum}`;
            dataNode.appendChild(ttl);
            spc = document.createElement("br");
            dataNode.appendChild(spc);
        }
    </script>
{% endblock %}
This time, I put some Javascript code for dealing with T-accounts representation instead of having another decorator show you another way of parsing objects.
A few more steps to do and were close to finishing this app. Let's add a URL for it:
# app/urls.py
from .views import TrialBalance

urlpatterns = [
    ...,
    path('pfl-tb/pk=<int:pk>', TrialBalance.as_view(), name='trial-balance')
]
Let's check our browser to see our work.
Template Designing
Our app is finished and it's time now to style it. As you remember, we linked the Bootstrap styles in our base.html and auth_base.html which is connected to our templates. Styling them is easier now since some designs are also present in others, as are other elements such as the navbar. To use the Bootstrap styles, use their class name for a specific design. Let's update our templates with proper class designs.
base.html:
<!DOCTYPE html>
<html>
<head>
    <title>{% block title %}{% endblock %}</title>
    <meta charset="utf-8">
    <meta name="viewport" content="width=device-width, initial-scale=1">
    <link href="https://cdn.jsdelivr.net/npm/bootstrap@5.3.0-alpha1/dist/css/bootstrap.min.css" rel="stylesheet" integrity="sha384-GLhlTQ8iRABdZLl6O3oVMWSktQOp6b7In1Zl3/Jr59b6EGGoI1aFkw7cmDA6j6gD" crossorigin="anonymous">
</head>
<body class="mb-3">
    <nav>
        <ul class="nav justify-content-end bg-dark-subtle">
            <li class="nav-item">
                <a class="nav-link active" href="{% url 'pfl-list' %}">Home</a>
            </li>
            <li class="nav-item">
                <a class="nav-link" href="{% url 'pfl-create' %}">Add Portfolio</a>
            </li>
            <li class="nav-item">
                <a class="nav-link" href="{% url 'logout' %}">Log out</a>
            </li>
        </ul>
    </nav>
    <div class="container-fluid">
        <img src="https://cdn-icons-png.flaticon.com/512/552/552721.png" style="height: 25px;width: 25px;">
        <span class="fs-5">{{request.user}}</span>
    </div>
    <div class="container">
        {% block content %}{% endblock %}
    </div>
</body>home.html:
{% extends "app/base.html" %}
{% block title %}Home{% endblock %}
{% block content %}
    <div class="w-50 mx-auto p-3 bg-primary-subtle border border-primary-subtle rounded-3">
        <h2 class="text-center">MY PORTFOLIO LIST</h2>
        <table class="mx-auto">
            {% for pfl in portfolio.portfolio_set.all %}
                <tr>
                    <td class="px-2">
                        <h3>
                            <a class="link link-primary" href="{% url 'pfl-detail' pfl.id %}">{{pfl.name}}</a>
                        </h3>
                    </td>
                    <td>
                        <button class="btn btn-danger" onclick="window.location.href='/pfl-delete/pk={{pfl.id}}' ">Delete</button>
                    </td>
                </tr>
            {% endfor %}
        </table>
    </div>
{% endblock %}portfolio_create_form.html:
{% extends "app/base.html" %}
{% block title %}Portfolio Create{% endblock %}
{% block content %}
    <div class="w-50 mx-auto p-3 bg-primary-subtle border border-primary-subtle rounded-3">
        <h2 class="text-center">Create New Portfolio</h2>
        <form method="post" action="">
            {% csrf_token %}
            <div class="d-grid col-6 mx-auto gap-1">
                <input type="textbox" name="portfolio_name" placeholder="Portfolio Name">
                <input class="btn btn-success" type="submit" value="Create">
            </div>
        </form>
    </div>
{% endblock %}portfolio_confirm_delete.html:
{% extends 'app/base.html' %}
{% block title %}Delete Confirmation{% endblock %}
{% block content %}
    <div class="w-50 mx-auto p-3 bg-primary-subtle border border-primary-subtle rounded-3">
        <h2 class="text-center">Delete Confirmation</h2>
        <form class="opt" method="post">
            {% csrf_token %}
            <p class="text-center">Are you sure you want to delete "{{object}}"?</p>
            <input class="btn btn-danger d-grid col-6 mx-auto" type="submit" value="Confirm">
        </form>
    </div>
{% endblock %}journal.html:
{% extends 'app/base.html' %}
{% load app_extras %}
{% block title %}Details{% endblock %}
{% block content %}
<div class="w-75 mx-auto p-2">
    <h2>{{pfl.name}}'s Portfolio</h2>
    {% journal_table pfl as jt %}
    <div>
        <table class="mx-auto table table-striped border border-primary-subtle">
            <thead>
                <tr class="bg-info">
                    <td>Date</td>
                    <td>Transaction</td>
                    <td>Debit</td>
                    <td>Credit</td>
                </tr>
            </thead>
            <tbody>
                {% for transaction in jt.tbl %}
                    <tr class="bg-secondary-subtle">
                        {% for items in transaction %}
                            <td>{{items}}</td>
                        {% endfor %}
                    </tr>
                {% endfor %}
                <tr class="bg-info-subtle">
                    <td></td>
                    <td>Total:</td>
                    <td>{{jt.dt}}</td>
                    <td>{{jt.ct}}</td>
                </tr>
            </tbody>
        </table>
    </div>
    <form method="post" action="">
        <div class="vstack gap-2">
            {% csrf_token %}
            <div class="input-group">
                <label class="input-group-text" for="inputGroupSelect01">Debit Options</label>
                <select name="dbt" class="form-select" id="inputGroupSelect01">
                    <option disabled="" selected="" value="">Select Debit Transaction type</option>
                    <option value="asset">Asset</option>
                    <option value="liability">Liability</option>
                    <option value="capital">Capital</option>
                    <option value="accounts receivable">Accounts Receivable</option>
                    <option value="accounts payable">Accounts Payable</option>
                    <option value="notes receivable">Notes Receivable</option>
                    <option value="notes payable">Notes Payable</option>
                </select>
            </div>
            <div class="input-group mb">
                <span class="input-group-text">$</span>
            		<input type="number" class="form-control" name="dbt-amt" placeholder="Enter Debit amount...">
                <span class="input-group-text">.00</span>
            </div>
            <div class="input-group">
                <label class="input-group-text" for="inputGroupSelect02">Credit Options</label>
                <select name="cdt" class="form-select" id="inputGroupSelect02">
                    <option disabled="" selected="" value="">Select Credit Transaction type</option>
                    <option value="asset">Asset</option>
                    <option value="liability">Liability</option>
                    <option value="capital">Capital</option>
                    <option value="accounts receivable">Accounts Receivable</option>
                    <option value="accounts payable">Accounts Payable</option>
                    <option value="notes receivable">Notes Receivable</option>
                    <option value="notes payable">Notes Payable</option>
                </select>
            </div>
            <div class="input-group">
                <span class="input-group-text">$</span>
            		<input type="number" class="form-control" name="cdt-amt" placeholder="Enter Credit amount...">
                <span class="input-group-text">.00</span>
            </div>
            <div class="input-group d-grid col-6">
            	<input type="date" name="trans-date">
            </div>
            <div class="d-grid col-8 mx-auto">
                <input class="btn btn-success" type="submit" name="save" value="Save">
            </div>
        </div>
    </form>
    <div class="d-grid col-6 mx-auto mt-4">
        <button class="btn text-primary border-primary-subtle" onclick="window.location.href='/pfl-tb/pk={{pfl.id}}'">Trial Balance</button>
    </div>
</div>
{% endblock %}trialbalance.html:
{% extends "app/base.html" %}
{% load app_extras %}
{% block title %}Trial Balance{% endblock %}
{% block content %}
    <div class="w-75 mx-auto p-2">
        <h2>{{name}}'s Trial Balance</h2>
        <table class="mx-auto table border border-primary-subtle">
            <tr class="bg-info">
                <th>Transaction</th>
                <th>Debit</th>
                <th>Credit</th>
            </tr>
            {% for trans in tb %}
                <tr class="bg-secondary-subtle">
                    {% for item in trans %}
                        <td>{{item}}</td>
                    {% endfor %}
                </tr>
            {% endfor %}
        </table>
        <div class="table table-striped-columns mb-3" id="t-account">
            <h2>{{name}}'s T Accounts</h2>
        </div>
        <div class="d-grid col-6 mx-auto">
            <button class="btn btn-emphasis text-primary border-primary-subtle" onclick="window.location.href='/pfl-journal/pk={{pk}}'">Back to Journal</button>
        </div>
    </div>
    <script>
        var tAccount = JSON.parse("{{ta|escapejs}}");
        dataNode = document.getElementById('t-account');
        for (const trans in tAccount) {
            var sum = 0;
            const transTable = document.createElement("table");
            const transCaption = document.createElement("caption");
            const transRow = document.createElement("tr");
            const transDb = document.createElement("th");
            const transCd = document.createElement("th");
            transTable.classList.add("mx-auto");
            transTable.classList.add("w-50");
            transTable.classList.add("border");
            transTable.classList.add("mb-4");
            transRow.classList.add("bg-info");
            transRow.classList.add("text-center");
            transCaption.innerText = trans;
            transDb.innerText = 'Debit';
            transCd.innerText = 'Credit';
            transRow.appendChild(transDb);
            transRow.appendChild(transCd);
            transTable.appendChild(transCaption);
            transTable.appendChild(transRow);
            tAccount[trans].forEach (data => {
                sum = sum + data;
                const tableRow = document.createElement("tr");
                tableRow.classList.add("text-center");
                const tableDb = document.createElement("td");
                tableDb.className = "debit"
                const tableCd = document.createElement("td");
                tableCd.className = "credit"
                if (data > 0 ) {
                    tableDb.innerText = data;
                    tableCd.innerText = '';
                }
                else if (data < 0 ) {
                    tableDb.innerText = '';
                    tableCd.innerText = data;
                }
                tableRow.appendChild(tableDb);
                tableRow.appendChild(tableCd);
                transTable.append(tableRow);
            });
            const tableEndRow = document.createElement("tr");
            tableEndRow.classList.add("bg-info-subtle");
            const tableEndDb = document.createElement("td");
            tableEndDb.innerText = "Total"
            const tableEndCd = document.createElement("td");
            tableEndCd.innerText = `${sum}`
            tableEndRow.appendChild(tableEndDb);
            tableEndRow.appendChild(tableEndCd);
            transTable.append(tableEndRow);
            dataNode.appendChild(transTable);
        }
    </script>
{% endblock %}auth_base.html:
<!DOCTYPE html>
<html>
<head>
    <title>{% block title %}{% endblock %}</title>
    <meta charset="utf-8">
    <meta name="viewport" content="width=device-width, initial-scale=1">
    <link href="https://cdn.jsdelivr.net/npm/bootstrap@5.3.0-alpha1/dist/css/bootstrap.min.css" rel="stylesheet" integrity="sha384-GLhlTQ8iRABdZLl6O3oVMWSktQOp6b7In1Zl3/Jr59b6EGGoI1aFkw7cmDA6j6gD" crossorigin="anonymous">
</head>
<body>
    <div class="container w-25 p-3 my-5 text-primary-emphasis bg-primary-subtle border border-primary-subtle rounded-3">
        {% block content %}{% endblock %}
    </div>
</body>
</html>signin.html:
{% extends 'app/auth_base.html' %}
{% block title %}Sign in{% endblock %}
{% block content %}
    <h1 class="text-center">Log In</h1>
    {% for message in messages %}
        <p class="callout-warning">{{message}}</p>
    {% endfor %}
    <form method="post" class="mb-1">
        {% csrf_token %}
        {% for field in form %}
            <div class="mb-3">
                <label for="signupField{{forloop.counter}}" class="form-label">{{field.label}}</label>
                <p id="signupField{{forloop.counter}}">{{field}}</p>
            </div>
        {% endfor %}
        <div class="d-grid gap-2">
            <button type="submit" class="btn btn-primary" name="signin">Sign in</button>
        </div>
    </form>
    <div class="d-grid gap-2 col-10 mx-auto">
        <button class="btn btn-secondary" onclick="location.href = '/signup'" class="nxt-pg">Create your Account</button>
    </div>
{% endblock %}signup.html:
{% extends 'app/auth_base.html' %}
{% block title %}Sign up{% endblock %}
{% block content %}
    <h1 class="text-center">Sign Up</h1>
    {% for message in messages %}
        <p class="callout-warning">{{message}}</p>
    {% endfor %}
    <form method="post" class="mb-1">
        {% csrf_token %}
        {% for field in form %}
            <div class="mb-3">
                <label for="signupField{{forloop.counter}}" class="form-label">{{field.label}}</label>
                <p id="signupField{{forloop.counter}}">{{field}}</p>
            </div>
        {% endfor %}
        <div id="passwordHelpBlock" class="form-text mb-3">
            Your password must be 8-20 characters long, contain letters, numbers, and special characters.
        </div>
        <div class="d-grid gap-2">
            <button type="submit" class="btn btn-primary" name="signup">Sign Up</button>
        </div>
    </form>
    <div class="d-grid gap-2 col-10 mx-auto">
        <button  class="btn btn-secondary" onclick="location.href = '/login'" class="nxt-pg">Login your Account</button>
</div>
{% endblock %}
Conclusion
And we're done coding! Here's a video showing the app demo:

You can get the complete project here.
Learn also: How to Build a CRUD Application using Django in Python.
Happy coding ♥
Found the article interesting? You'll love our Python Code Generator! Give AI a chance to do the heavy lifting for you. Check it out!
View Full Code Improve My Code


Got a coding query or need some guidance before you comment? Check out this Python Code Assistant for expert advice and handy tips. It's like having a coding tutor right in your fingertips!