Kickstart your coding journey with our Python Code Assistant. An AI-powered assistant that's always ready to help. Don't miss out!
In this tutorial, we will learn how to find hidden Wi-Fi networks. You may be wondering how this is even possible. I will show you how to achieve that for free. By the way, if you know Wi-Fi stands for Wireless Fidelity, congratulations. If you didn’t, you’re welcome.
Some network administrators unwittingly believe that enabling the "Hidden SSID" feature provides complete protection against discovery by wardrivers or hackers. A "wardriver" is an individual who engages in "wardriving," which is the act of moving around in a vehicle with a Wi-Fi-equipped device (such as a laptop or smartphone) to detect and sometimes exploit Wi-Fi networks. Wardriving is not inherently malicious; it can be done for various reasons, including mapping the locations of Wi-Fi networks, conducting security assessments, or even for hobbyist purposes.
This misconception arises from the assumption that the network becomes invisible when the SSID (Service Set Identifier) is omitted from Beacon frames. In reality, a network with a hidden SSID is not truly concealed; only the SSID itself remains undisclosed in the Beacon frames.
However, the hidden SSID does not guarantee invisibility, as the SSID is still transmitted in other types of Wi-Fi management frames, including probe requests, probe responses, and association requests. An adept attacker can patiently wait for a client to initiate a connection or potentially force a disconnection by sending a spoofed deauthentication (see this tutorial). Upon reconnection, the client will reveal the SSID in at least one of these management frames.
The following Python script captures and logs all Wi-Fi packets, extracting and recording any SSIDs it detects. This information underscores the vulnerability of networks relying solely on hidden SSID as a security measure.
To achieve this - Finding hidden SSIDs, we need a Wireless Adapter that supports monitor mode. A wireless adapter is a hardware device that enables a computer to connect to and communicate with wireless networks. In this context, it captures and processes Wi-Fi packets for network analysis. The wireless adapter is crucial in capturing and processing Wi-Fi packets and extracting SSID information. To be able to run this program successfully, you need one. You can get one here. Please make sure to get one that supports monitor mode.
Now that we understand the concept, let’s see how to implement it in Python. Please note that I am using Python 3 for this program. I will also be running this program with my Kali Linux Virtual Machine. So open up a Python file, name it meaningfully, like view_hidden_ssids.py and follow along.
We’re going to achieve the discussed concepts using Scapy. Scapy is a powerful interactive packet manipulation tool and library in Python, allowing users to craft, send, capture, and dissect network packets for various network-related tasks.
You can install it by running the following command:
$ pip install scapy coloramacolorama is for colored output. Let's import the necessary libraries:
# Operating system functions.
import os
# Import all functions from the scapy library.
from scapy.all import *
# Import Fore from colorama for colored console output, and init for colorama initialization.
from colorama import Fore, init
# Initialize colorama
init()
Next up, we create a set to store unique SSIDs. I implemented this feature because while testing, I noticed that the program kept printing the found SSIDs multiple times like a loop. That’s not very functional as it would fill up our screen unnecessarily. With the set, once it has printed a discovered SSID, it doesn’t print it again.
After that, we create a function to set our wireless adapter to monitor mode. Setting a wireless adapter to monitor mode configures it to capture all wireless traffic within range, enabling the analysis of Wi-Fi packets. The default mode is managed. In this mode, the adapter is set up for normal station operation, connecting to an access point in infrastructure networks. The managed mode cannot achieve the task at hand. This is why we’ll set our wireless adapter to monitor mode.
# Set to store unique SSIDs.
seen_ssids = set()

# Function to set the wireless adapter to monitor mode.
def set_monitor_mode(interface):
   # Bring the interface down.
   os.system(f'ifconfig {interface} down')
   # Set the mode to monitor.
   os.system(f'iwconfig {interface} mode monitor')
   # Bring the interface back up.
   os.system(f'ifconfig {interface} up')
So we're using the iwconfig command, you must have it on your Linux environment. Next, we create another function for packet processing:
# Function to process Wi-Fi packets.
def process_wifi_packet(packet):
   # Check if the packet is a Probe Request, Probe Response, or Association Request.
   if packet.haslayer(Dot11ProbeReq) or packet.haslayer(Dot11ProbeResp) or packet.haslayer(Dot11AssoReq):
       # Extract SSID and BSSID from the packet.
       ssid = packet.info.decode('utf-8', errors='ignore')
       bssid = packet.addr3
       # Check if the SSID is not empty and not in the set of seen SSIDs, and if the BSSID is not the broadcast/multicast address.
       if ssid and ssid not in seen_ssids and bssid.lower() != 'ff:ff:ff:ff:ff:ff':
           # Add the SSID to the set.
           seen_ssids.add(ssid)
           # Print the identified SSID and BSSID in green.
           print(f"{Fore.GREEN}[+] SSID: {ssid} ---->  BSSID: {bssid}")
The process_wifi_packet() function analyzes Wi-Fi packets, specifically focusing on Probe Requests, Probe Responses, and Association Requests, decodes the SSID from the packet to handle non-ASCII characters, gets the BSSID (Basic Service Set Identifier), checks if the SSID is not in a set of seen SSIDs to avoid duplication, adds new SSIDs to the set, and prints the identified SSID and BSSID (MAC Address) in green.
Finally, we create a main function to handle the necessary functionalities:
# Main function.
def main():
   # Define the wireless interface.
   wireless_interface = 'wlan0'
   # Set the wireless adapter to monitor mode.
   set_monitor_mode(wireless_interface)
   # Print a message indicating that sniffing is starting on the specified interface in magenta.
   print(f"{Fore.MAGENTA}[+] Sniffing on interface: {wireless_interface}")
   # Start sniffing Wi-Fi packets on the specified interface, calling process_wifi_packet for each packet, and disabling packet storage
   sniff(iface=wireless_interface, prn=process_wifi_packet, store=0)

# Check if the script is being run as the main program.
if __name__ == "__main__":
   # Call the main function.
   main()
The main() function sets up Wi-Fi packet sniffing on a specified wireless interface wlan0, which is my wireless interface. Run ifconfig to see yours (after connecting your wireless adapter, of course) by first configuring the wireless adapter to monitor mode using the set_monitor_mode() function. It then prints a message indicating the start of packet sniffing on the specified interface in magenta.
Finally, it initiates the packet sniffing process using the sniff() function from Scapy on the specified interface, calling the process_wifi_packet() function for each captured packet, and disabling the storage of captured packets (store=0).
Before you run the code, make sure you have your wireless adapter plugged in. Don’t worry about how to put it in monitor mode, as we already did that automatically in the code.
Before running the code, let me show you a screenshot of the available Wi-Fi networks:
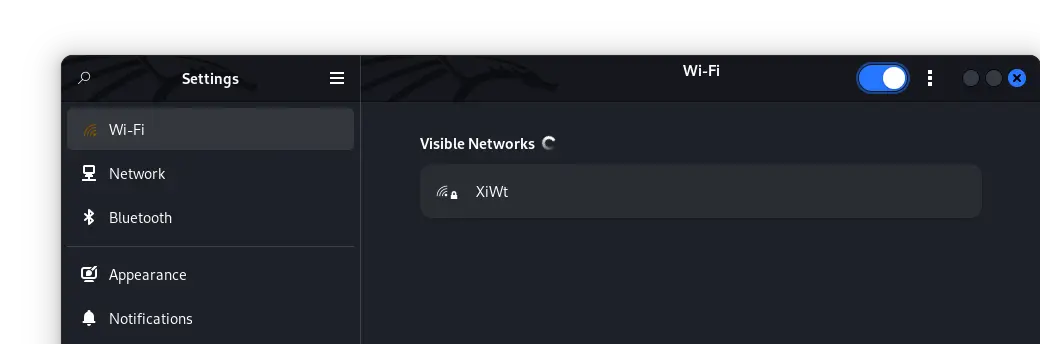 We can see that just one 'available' Wi-Fi network is listed. However, there is more than just one Wi-Fi network. The others have their SSID 'hidden'. Now, let's run our program and uncover the 'hidden' SSIDs:
$ python view_hidden_ssid.pyOur result:
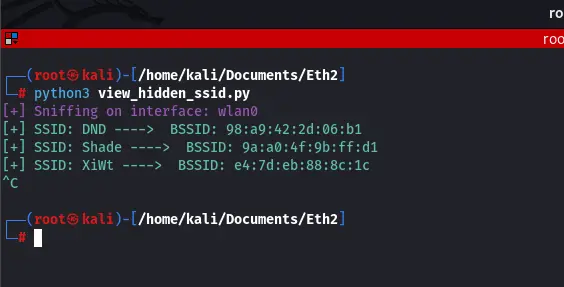 We can clearly see that unlike the result we saw when we searched for available networks on our OS, in our program, we are actually uncovering all SSIDs in the range, including the hidden SSIDs along with respective BSSIDs. Shade and DND are actual networks with their SSIDs hidden by their administrators.
In conclusion, the efficacy of the "security feature" known as Hidden SSID is limited to the absence of connected clients on the network (this means our program won't work if no device is connected to that particular hidden network).
The program, as described, is designed to capture and identify SSIDs from Wi-Fi management frames, specifically focusing on Probe Requests, Probe Responses, and Association Requests. If no active clients are making these requests or associating with the network, the program may not capture any relevant packets, and consequently, it may not display any identified SSIDs.
However, there is an easy fix for that. We can simply force the target device to disconnect from the network. An attacker sending a de-authentication frame to a connected device will force it to disconnect from the network. When the device reconnects, it generates the management frames necessary for the program to identify SSIDs. To learn how to do that, refer to this tutorial. Alternatively, if we have physical access to the target’s device, we can simply disconnect the target and connect it back. I hope you enjoyed implementing this as much as I enjoyed teaching it. Check some relevant tutorials:
- How to Make a DHCP Listener using Scapy in Python
- How to Create Fake Access Points using Scapy in Python
- How to Make a Network Scanner using Scapy in Python
You can get the complete code of this tutorial here.
Happy coding ♥
Liked what you read? You'll love what you can learn from our AI-powered Code Explainer. Check it out!
View Full Code Analyze My Code


Got a coding query or need some guidance before you comment? Check out this Python Code Assistant for expert advice and handy tips. It's like having a coding tutor right in your fingertips!