Kickstart your coding journey with our Python Code Assistant. An AI-powered assistant that's always ready to help. Don't miss out!
Email address verification is a process that involves the confirmation of the authenticity or legitimacy of an email address. Nowadays, businesses are integrating email verification into their day-to-day operations, and this has proved to be more effective as it helps them keep only customers' email addresses that are valid and reachable.
There are tons of email address verification services on the internet, but all these come at a cost, but the good news is that you can build your own tool for this task at no cost with the help of Django and email-validator packages. In this article, you will learn how to build your own web-based email address verifier from the ground up, so with that said, let us dive in!
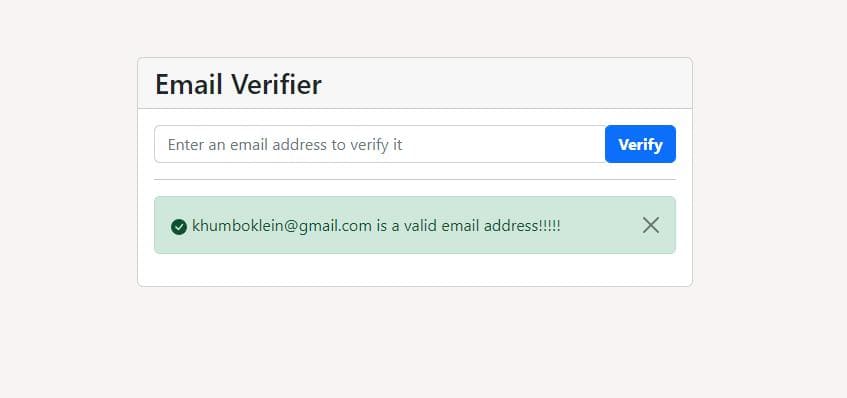
By the end of this article, you will be able to build an application that looks like this:
This is the table of contents:
- Getting Started
- Creating the Main Project and the Application
- Registering the Application in the
settings.pyFile - Creating the Main View for the Application in the
views.pyFile - Configuring the URLs for the Application
- Creating and Rendering Templates
- Verifying Email Addresses
- Conclusion
Getting Started
Let us start by creating a virtual environment for the project; we will use this command:
$ python -m venv projectTo activate the virtual environment, use:
$ .\project\Scripts\activateHaving created and activated the virtual environment, let us now install the required dependencies for this project in it; we will install them in one go, so use:
$ pip install django email-validatorCreating the Main Project and the Application
Now that setting up the project’s environment is taken care of, we should create Django’s main project, now run:
$ django-admin startproject webbased_emailverifierThen cd into the webbased_emailverifier folder, with this command:
$ cd webbased_emailverifierInside the webbased_emailverifier folder, run this command:
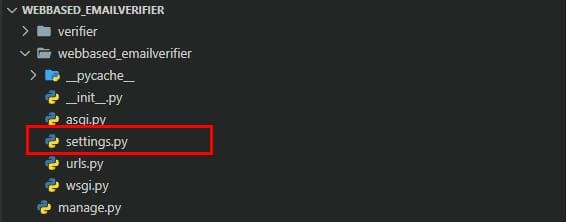
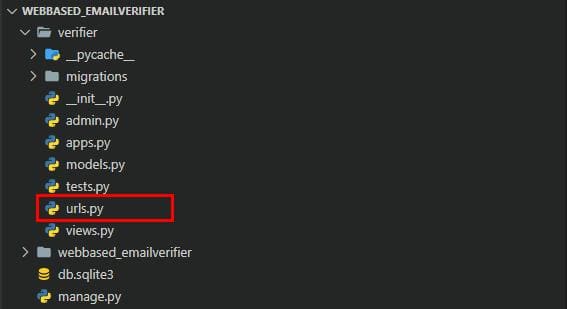
$ python manage.py startapp verifierThis will create the verifier application. After all of this, make sure you have the following folder structure for the project:

The verifier folder is the application, the webbased_emailverifier folder is the main project and the manage.py file is a script that helps us execute the Django administrative commands like the startapp, runserver, etc.
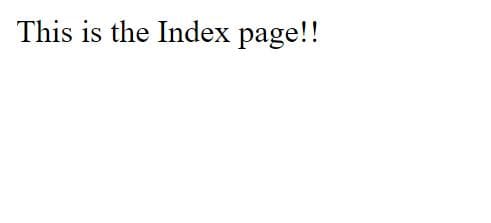
Before we move any further, let us test if Django was installed successfully, to fire up the Django local server, run the command:
$ python manage.py runserverIf the server is running successfully, paste the URL http://127.0.0.1:8000/ in your web browser and make sure you get this output in the browser:
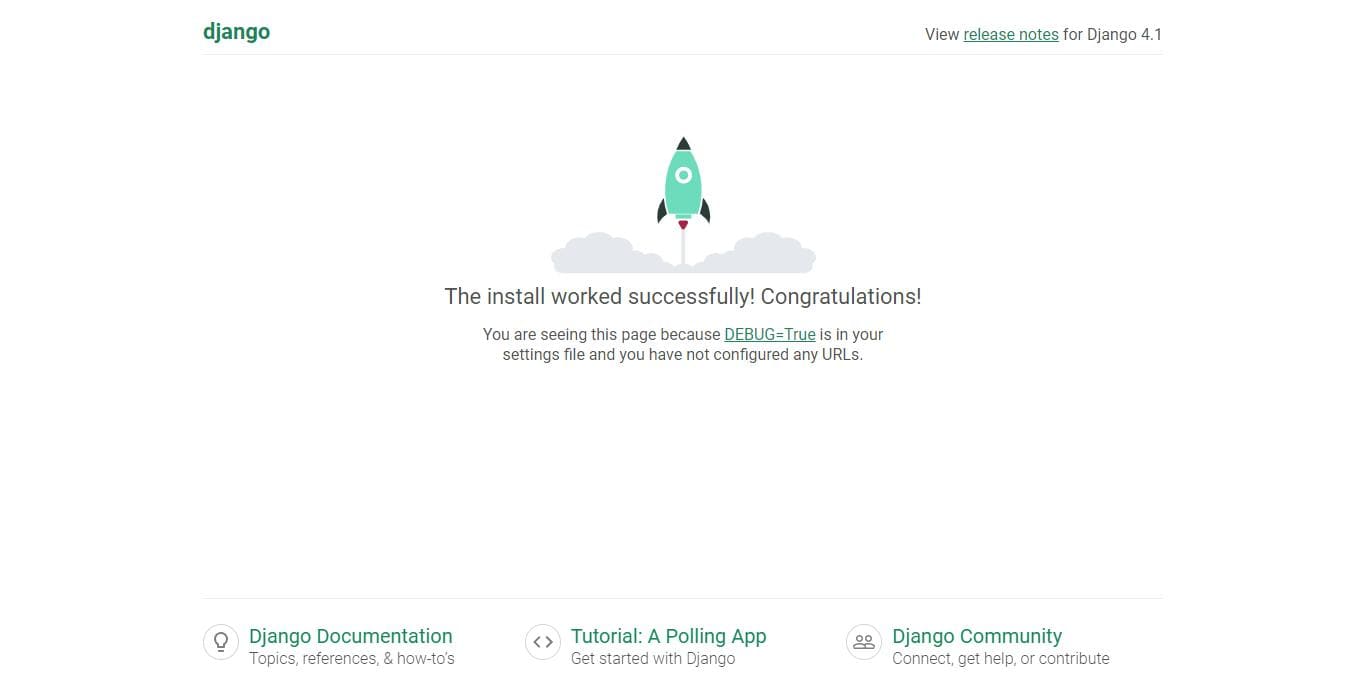
This means Django was installed successfully, and we are good to proceed.
Registering the Application in the settings.py File
Our verifier application is not yet known by the main project, so we must register it. To do that, open the settings.py file located inside the webbased_emailverifier:
And scroll down until you find the INSTALLED_APP list, and edit it so that it looks like this:

# Application definition
INSTALLED_APPS = [
    'django.contrib.admin',
    'django.contrib.auth',
    'django.contrib.contenttypes',
    'django.contrib.sessions',
    'django.contrib.messages',
    'django.contrib.staticfiles',
    # the newly created application
    'verifier',
]
The settings.py file is an important file for the project as it is responsible for all the configurations of the project, so be very careful when editing it because one messed line of code could break the whole project.
Creating the Main View for the Application in the views.py File
Now we will create the view for the application and open the views.py file that is inside the verifier folder:
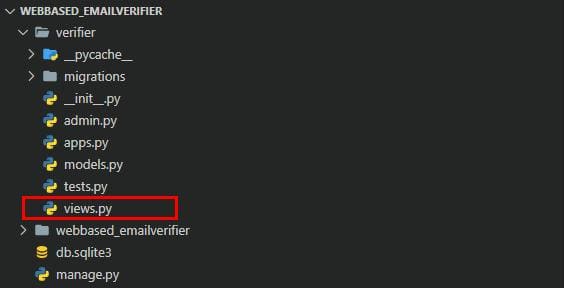
The views.py file handles all the application logic, like capturing and validating data from forms, making API request calls, and authenticating users.
Open it and paste these lines of code:
from django.shortcuts import render
from django.http import HttpResponse

# Create your views here.
def index(request):
    return HttpResponse('This is the Index page!!')
In the code snippet, we are importing HttpResponse() function from django.http, this function is just for echoing responses in the browser to the user. You will get to know more about the render() function later in the article.
Configuring the URLs for the Application
Let us now create the URLs for the application. Create a urls.py file inside the verifier folder as follows:
This file is for registering the application’s views; make sure you name it urls.py not otherwise; this is Django’s convention.
Open it and paste the following code:
# from the current folder import views
from views import index
# importing path from django.urls
from django.urls import path

# this is the list of the app's views
# if the app has several views then it will have several paths
urlpatterns = [
    path('', index, name='home'),
]
In the file, we are importing the index() view from views.py file. After the imports, we create a list called urlpatterns list, which will contain a URL path, and if the application has several views, then the urlpatterns will contain several URL paths. If you notice, the path() function takes three arguments, the actual path as an empty string, the view, and the view’s name.
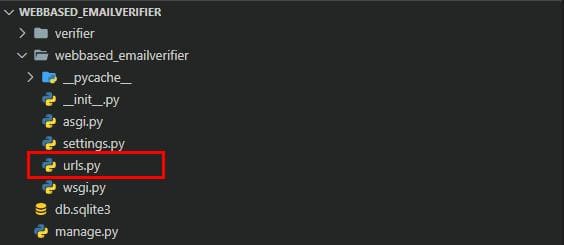
Now let us make the application’s URL known to the project, open the webbased_emailverifier folder and open the urls.py file:
 Something worth mentioning here is the application’s
 urls.py file is not the same as the project’s urls.py file. The urls.py file inside the verifier folder is for registering all the application’s views and the urls.py file inside the webbased_emailverifier folder is for registering all the applications' URLs. If the project has, for example, five applications, then all these applications’ URLs will be registered in the project’s urls.py file.
Open it, and paste this code:
from django.contrib import admin
from django.urls import path, include

urlpatterns = [
    # this points to admin.site urls
    path('admin/', admin.site.urls),
    # this points to verifier urls
    path('', include('verifier.urls')),
]
Let us break down the code a bit so that we are on the same page. We are creating a urlpatterns list with two path() functions, the first one points to the default admin site URLs, and the second one to the verifier application URLs using via the include() function.
It’s now time we test if all the configurations we have made are working. Make sure the server is running; just in case it stopped, restart it. Now in your web browser, go to this URL http://127.0.0.1:8000/; the output will look like this:
Everything seems to be working perfectly.
Creating and Rendering Templates
We will now switch our attention to building the frontend part of the application. We will use HTML and Bootstrap5 for styling purposes. Let us create the templates for the application inside the verifier folder.
Create a folder called templates, and inside this templates folder, create another folder called verifier, this is Django’s way of doing things.
This application will have two templates base.html and the index.html, and they will be located inside the newly created verifier folder:

First of all, open the base.html and paste the following code:
<!DOCTYPE html>
<html lang="en">
<head>
    <meta charset="UTF-8">
    <meta http-equiv="X-UA-Compatible" content="IE=edge">
    <meta name="viewport" content="width=device-width, initial-scale=1.0">
    <title>Web-based Email Verifier</title>
    <link href="https://cdn.jsdelivr.net/npm/bootstrap@5.2.2/dist/css/bootstrap.min.css" rel="stylesheet">
</head>
<body style="background-color:rgb(248, 244, 244)">
    {% block content %}

    {% endblock %}
    <script src="https://cdn.jsdelivr.net/npm/bootstrap@5.2.2/dist/js/bootstrap.bundle.min.js"></script>
</body>
</html>
This is an HTML boilerplate file, with Bootstrap5 CSS and JavaScript added to it via the link and script tags, respectively. JavaScript will add interactivity in the front end.
The index.html template will inherit everything from the base.html template, this is handy as it saves us time because we will not repeat the code, thus making it clean. Open the index.html template and paste this code:
<!-- extends is for inheriting from the base.html -->
{% extends 'verifier/base.html' %}
{% block content %}
<div class="row justify-content-center my-5">
          <div class="col-md-5 mt-4">
              <div class="card">
                  <h3 class="card-header">Email Verifier</h3>
                  <div class="card-body">
                    <form action="." method="POST">
                      {% csrf_token %}
                      <div class="input-group">
                        <input type="text" required class="form-control" name="email-address" placeholder="Enter an email address to verify it">
                        <div class="input-group-append">
                          <button class="btn btn-primary fw-bold" type="submit">
                            Verify
                          </button>
                        </div>
                      </div>
                    </form>
                      <hr>
                      {% if messages %}
                          {% for message in messages %}
                            {% if message.tags == 'success' %}
                              <div class="alert alert-{{ message.tags }} alert-dismissible fade show" role="alert">
                                <svg xmlns="http://www.w3.org/2000/svg" width="16" height="16" fill="currentColor" class="bi bi-check-circle-fill" viewBox="0 0 16 16">
                                  <path d="M16 8A8 8 0 1 1 0 8a8 8 0 0 1 16 0zm-3.97-3.03a.75.75 0 0 0-1.08.022L7.477 9.417 5.384 7.323a.75.75 0 0 0-1.06 1.06L6.97 11.03a.75.75 0 0 0 1.079-.02l3.992-4.99a.75.75 0 0 0-.01-1.05z"/>
                                </svg> {{ email }} is a valid email address!!!!!
                                <button type="button" class="btn-close" data-bs-dismiss="alert" aria-label="Close"></button>
                              </div>
                            {% elif message.tags == 'warning' %}
                              <div class="alert alert-danger alert-dismissible fade show" role="alert">
				{{ email }}
                                <svg xmlns="http://www.w3.org/2000/svg" width="16" height="16" fill="currentColor" class="bi bi-exclamation-triangle-fill" viewBox="0 0 16 16">
                                  <path d="M8.982 1.566a1.13 1.13 0 0 0-1.96 0L.165 13.233c-.457.778.091 1.767.98 1.767h13.713c.889 0 1.438-.99.98-1.767L8.982 1.566zM8 5c.535 0 .954.462.9.995l-.35 3.507a.552.552 0 0 1-1.1 0L7.1 5.995A.905.905 0 0 1 8 5zm.002 6a1 1 0 1 1 0 2 1 1 0 0 1 0-2z"/>
                                </svg> {{ message }}
                                <button type="button" class="btn-close" data-bs-dismiss="alert" aria-label="Close"></button>
                              </div>
                            {% endif %}
                          {% endfor %}
                      {% endif %}
                  </div>
              </div>
          </div>
        </div>
</div>
{% endblock %}
For the index.html template to inherit from the base.html template, we use:
{% extends 'verifier/base.html' %}This template is for displaying the form and email address verification results. Inside the form, we have this code:
{% csrf_token %}Since the form is using the POST method, we are using csrf_token to secure it during submission from any form of malicious attack.
Having created all the templates, it Is now time we render them in the browser, open the views.py file and edit the index() function so that it looks like this:
def index(request):
    return render(request, 'verifier/index.html')
Here we have replaced the HttpResponse() function with the render() function, this function is for rendering templates, and it takes two arguments, the request and the actual template.
Now let us get to see the first look at the application. Visit the default URL again, and if you refresh the page, you will get this result:
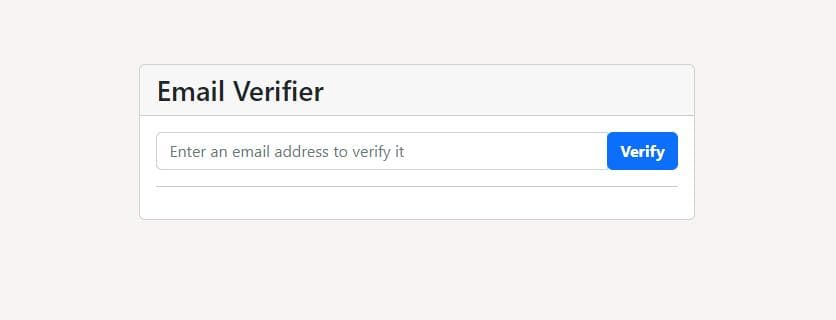
Congratulations on designing the application’s front end!
Verifying Email Addresses
In this final part of the article, we will implement the email address verification functionality. To do that, open the views.py file and make it look like this:
from django.shortcuts import render
# this displays flash messages or notifications
from django.contrib import messages
# importing validate_email and EmailNotValidError
from email_validator import validate_email, EmailNotValidError

# Create your views here.
def index(request):
    # checking if the method is POST
    if request.method == 'POST':
        # getting the email from the form input
        email = request.POST.get('email-address')
        # this is the context
        context = {
                'email': email
            }
        # the try statement for verify/validating the email
        try:
            # validating the actual email address using the validate_email function
            email_object = validate_email(email)
            # creating the message and storing it
            messages.success(request, f'{email} is a valid email address!!')
            # rendering the results to the index page
            return render(request, 'verifier/index.html', context)
        # the except statement will capture EmailNotValidError error
        except EmailNotValidError as e:
            # creating the message and storing it
            messages.warning(request, f'{e}')
            # rendering the error to the index page
            return render(request, 'verifier/index.html', context)
    # this will render when there is no request POST or after every POST request
    return render(request, 'verifier/index.html')
In the code snippet, we are importing the render() function, as usual, we are also importing the built-in Django messages from django.contrib, this is for displaying flash messages or notifications, and finally, we are importing validate_email and EmailNotValidError from email_validator. According to email-validator’s documentation, it states that the library validates that a string is of the form name@example.com.
In the index() function, we are checking if the request sent is POST. If so, then we are retrieving the email from the form data using the request.POST.get(‘email-address’), the email-address is the name given to the email input in the form.
After putting the email in the context, we have a try/except block, in the try statement, we are validating the email address using the validate_email() function, after successful validation, we create a success message and call the render() function. In the except block, we are just catching the EmailNotValidError, we are also creating a message, but this time it is of type warning, and we are calling the render() function again.
Before or after a POST request, we still want to display the form so the render() function after the try/except block will do this for us.
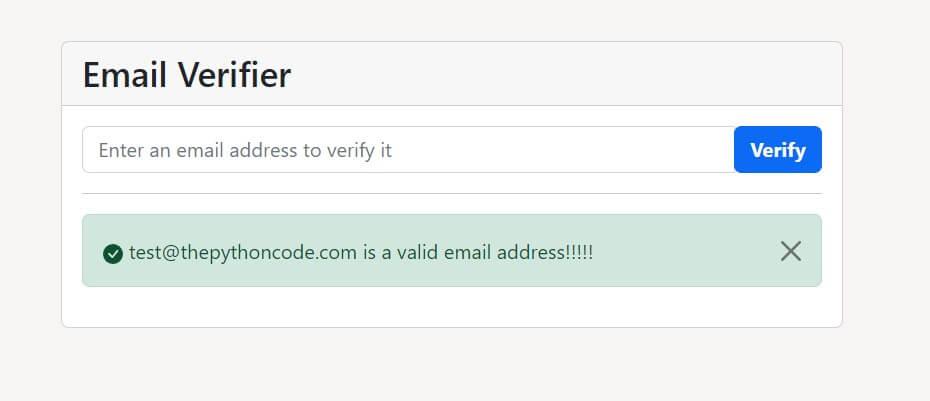
Let us give the application a try, provide a valid email address and verify it by clicking the verify button; the output you will get is this:
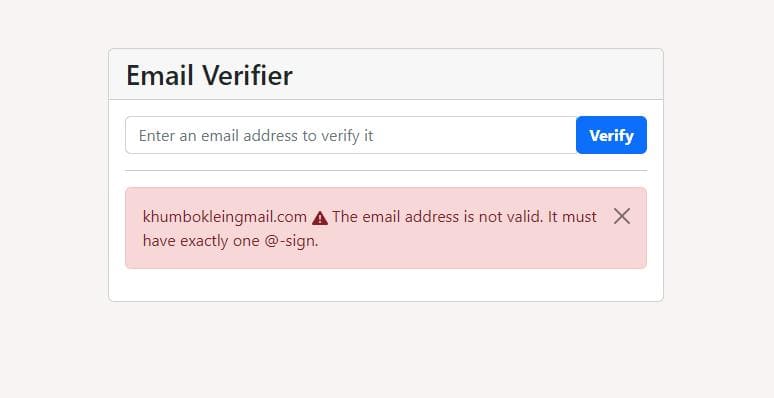
This time try to enter any invalid email address that has no @ symbol; the output will be this:
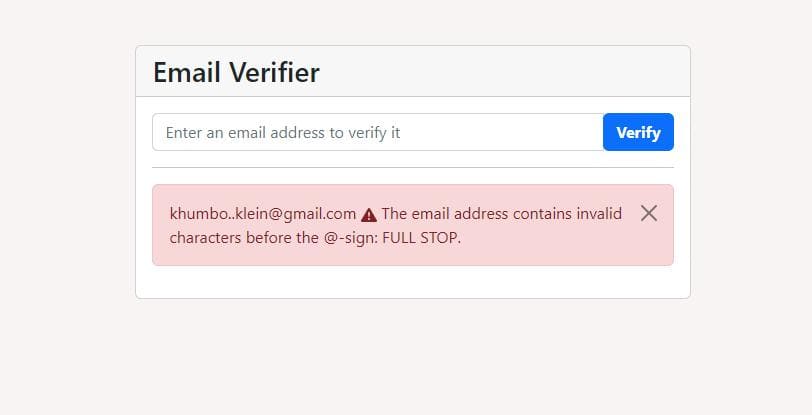
Enter an email address again with invalid characters, for example, an email of this form first..last@example.com; this is the output the application will produce:
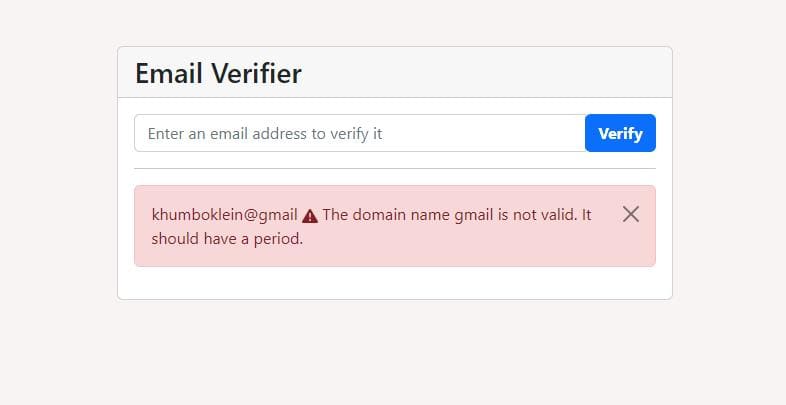
Lastly, enter an email address with an incomplete domain name, for example, name@example; this is the output that you will get:
If you notice, all the alerts have a close button. Clicking this button makes the alerts disappear; this is possible because of the JavaScript that we included in the base.html template, and in the index.html template, we have if statements just below the form for filtering the alerts. Each alert has an icon; for the icons, we are using the svg tags.
Note: The application can catch many errors; this article has not exhausted all of them, but you can try on your own to figure out what they are.
Conclusion
That’s it from this article; we hope there is so much that you have learned and that the knowledge you have gained will be applied in your future Django projects. This article walked you through the process of building a web-based email address verifier using the Django framework and the email-validator package. This can be a useful tool in business to prevent email address abuse and to ensure that only valid email addresses are being used.
You can get the project files here.
Here are some other Django tutorials:
- How to Make a Blog using Django in Python
- How to Make a Todo App using Django in Python
- How to Build an Authentication System in Django
- How to Build a Weather App using Django in Python
- How to Build a CRUD Application using Django in Python
- How to Build an English Dictionary App with Django in Python
Happy coding ♥
Finished reading? Keep the learning going with our AI-powered Code Explainer. Try it now!
View Full Code Switch My Framework


Got a coding query or need some guidance before you comment? Check out this Python Code Assistant for expert advice and handy tips. It's like having a coding tutor right in your fingertips!