Step up your coding game with AI-powered Code Explainer. Get insights like never before!
Introduction
In this tutorial, we will guide you through the process of creating a RESTful API with Flask and Python. Flask is a popular micro-framework for building web applications in Python, and RESTful APIs are a standardized architecture for creating scalable and maintainable web services.
Therefore, we won't build a complete website, which requires rendering HTML templates. Instead, we'll build a typical backend code of a Flask web app.
Prerequisites
Before we begin, ensure that you have the following installed on your system:
- Python 3.x
pip(Python package installer)
Let's get started!
1. Installing Flask and Flask-RESTful
Before we install Flask and its dependencies, let's make a virtual environment and activate it:
$ python -m venv venv
$ source venv/bin/activate # activate it on Linux/macOS
$ \venv\Scripts\activate # activate on Windows
Now we need to install Flask and Flask-RESTful using pip. Open your terminal or command prompt and run the following command:
$ pip install Flask Flask-RESTful2. Creating a Basic Flask Application
Create a new file called app.py and add the following code:
from flask import Flask

app = Flask(__name__)

@app.route('/')
def hello():
    return "Hello, World!"

if __name__ == '__main__':
    app.run(debug=True)
This code sets up a basic Flask application with a single route. Save the file and run the application with the following command:
$ python app.pyNow, open your web browser and visit http://127.0.0.1:5000/. You should see the "Hello, World!" message.
3. Creating a RESTful API with Flask-RESTful
Now that we have a basic Flask application, we can start building our RESTful API. Modify app.py to include the following code:
from flask import Flask, request
from flask_restful import Resource, Api

app = Flask(__name__)
api = Api(app)

class HelloWorld(Resource):
    def get(self):
        return {'message': 'Hello, World!'}

api.add_resource(HelloWorld, '/api')

if __name__ == '__main__':
    app.run(debug=True)
Here, we have created a HelloWorld resource that inherits from Resource and added it to our API under the /api endpoint. The get() method returns a JSON object containing a message.
4. Testing the API
Save the changes to app.py and restart the application. To test the API, you can use tools like curl, Postman, or even your web browser. Open your web browser and visit http://127.0.0.1:5000/api. You should see the following JSON response:
{
    "message": "Hello, World!"
}
5. Expanding the API
Now, let's expand our API to handle more complex operations. Suppose we want to create an API for managing a list of tasks. Update app.py with the following code:
from flask import Flask, request
from flask_restful import Resource, Api

app = Flask(__name__)
api = Api(app)

tasks = []

class TaskList(Resource):
    def get(self):
        return {'tasks': tasks}

    def post(self):
        task = request.get_json()
        tasks.append(task)
        return {'tasks': tasks}

api.add_resource(TaskList, '/tasks')

if __name__ == '__main__':
    app.run(debug=True)
Now, we have a TaskList resource with two methods: get() for retrieving the list of tasks and post() for adding a new task. The list of tasks is maintained in memory as a simple Python list.
6. Using a Real Database (SQLite)
In this step, we will replace the in-memory list with an SQLite database to persist tasks. SQLite is a lightweight, serverless, self-contained database that is easy to set up and use.
First, install the Flask-SQLAlchemy extension to make it easier to work with SQLAlchemy and SQLite:
$ pip install Flask-SQLAlchemy
Update app.py with the following code:
from flask import Flask, request
from flask_restful import Resource, Api
from flask_sqlalchemy import SQLAlchemy

app = Flask(__name__)
app.config['SQLALCHEMY_DATABASE_URI'] = 'sqlite:///tasks.db'
db = SQLAlchemy(app)
api = Api(app)

class Task(db.Model):
    id = db.Column(db.Integer, primary_key=True)
    description = db.Column(db.String(200), nullable=False)

    def __repr__(self):
        return f'Task {self.id}: {self.description}'

db.create_all()

class TaskList(Resource):
    def get(self):
        tasks = Task.query.all()
        task_list = [{'id': task.id, 'description': task.description} for task in tasks]
        return {'tasks': task_list}

    def post(self):
        task_data = request.get_json()
        if not task_data:
            return {'message': 'No input data provided'}, 400
        description = task_data.get('description')
        if not description:
            return {'message': 'Description is required'}, 400
        new_task = Task(description=description)
        db.session.add(new_task)
        db.session.commit()
        return {'message': 'Task added', 'task': {'id': new_task.id, 'description': new_task.description}}

api.add_resource(TaskList, '/tasks')

if __name__ == '__main__':
    app.run(debug=True)
In this updated code, we have added the Flask-SQLAlchemy package and configured it to use an SQLite database file named tasks.db. We created a Task model with a primary key and a description. The db.create_all() function creates the database tables if they don't already exist.
We modified the TaskList resource to interact with the SQLite database. The get() method retrieves all tasks from the database, and the post() method adds a new task to the database, and commits the changes.
When you make a POST request without a valid JSON payload, the API will return an error message with a 400 status code, indicating that the request is incorrect. Additionally, the code checks if the description field is present in the request data and returns an error message if it's missing.
Restart the application and test the API using your preferred tool (e.g., curl, Postman, or web browser). The tasks should now persist between sessions and be stored in the tasks.db SQLite database file.
7. Separating Code into Multiple Files
In real-world applications, it's a good practice to separate your code into multiple files to maintain a clean and organized project structure. This modularity makes your code easier to understand, maintain, and expand.
Here's an example of how you could separate the code from our tutorial into multiple files:
config.py: Store the configuration settings for your application, such as the database URI:SQLALCHEMY_DATABASE_URI = 'sqlite:///tasks.db'models.py: Define your database models and schema:from flask_sqlalchemy import SQLAlchemy db = SQLAlchemy() class Task(db.Model): id = db.Column(db.Integer, primary_key=True) description = db.Column(db.String(200), nullable=False) # nullable=False means that the column cannot be empty def __repr__(self): # This method is used to print the object. return f'Task {self.id}: {self.description}'resources.py: Define your API resources and logic:from flask_restful import Resource from flask import request from models import Task, db class TaskList(Resource): def get(self): # Get all the tasks from the database. tasks = Task.query.all() # Convert the tasks to JSON and return a response. task_list = [{'id': task.id, 'description': task.description} for task in tasks] return {'tasks': task_list} def post(self): # Get the JSON data from the request. task_data = request.get_json() # Check if the data is valid. if not task_data: return {'message': 'No input data provided'}, 400 description = task_data.get('description') if not description: return {'message': 'Description is required'}, 400 # Add the task to the database. new_task = Task(description=description) db.session.add(new_task) # Commit the task to the database. db.session.commit() # Return a message to the user. return {'message': 'Task added', 'task': {'id': new_task.id, 'description': new_task.description}}app.py: Initialize the application, import resources, and define API routes:from flask import Flask from flask_restful import Api from models import db import config from resources import TaskList # Create the Flask application and the Flask-RESTful API manager. app = Flask(__name__) app.config.from_object(config) # Initialize the Flask-SQLAlchemy object. db.init_app(app) # Create the Flask-RESTful API manager. api = Api(app) # Create the endpoints. api.add_resource(TaskList, '/tasks') if __name__ == '__main__': # Create the database tables. with app.app_context(): db.create_all() # Start the Flask development web server. app.run(debug=True)
By separating the code into different files, you can easily manage your application's components and maintain a well-organized project structure. Additionally, this modular approach allows you to reuse code and scale your application more effectively.
After running the app, here's a POST request I did with Postman:
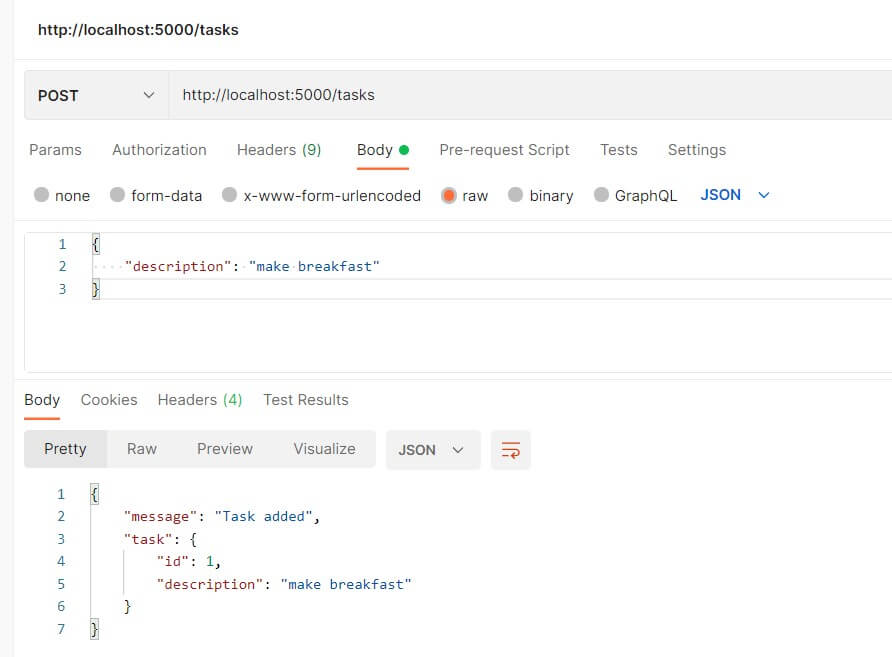
Make sure to choose the POST method. Head to the Body tab, choose raw, and select "JSON" from the dropdown menu to the right of the radio buttons.
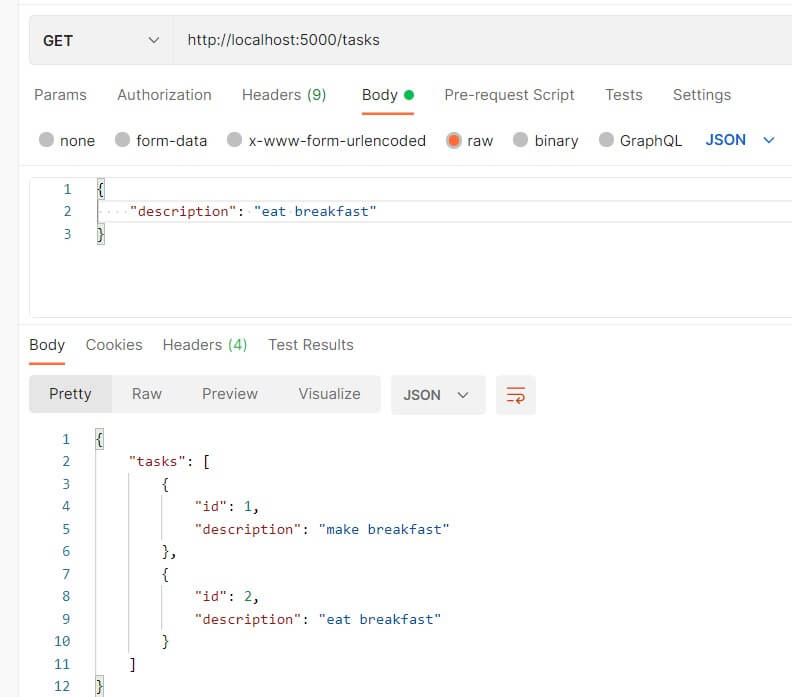
After doing the POST request twice, here's a GET request:
Conclusion
In this tutorial, we demonstrated how to create a RESTful API using Flask, Python, and SQLite. We showed how to use Flask-RESTful to build the API and Flask-SQLAlchemy to persist data in an SQLite database. With this knowledge, you can create more complex and powerful APIs for your applications.
Here are some related tutorials:
- How to Make an Accounting App with Django in Python
- How to Make a Todo App using Django in Python
- How to Build a CRUD App with Flask and SQLAlchemy in Python
Happy coding ♥
Just finished the article? Why not take your Python skills a notch higher with our Python Code Assistant? Check it out!
View Full Code Switch My Framework


Got a coding query or need some guidance before you comment? Check out this Python Code Assistant for expert advice and handy tips. It's like having a coding tutor right in your fingertips!