Struggling with multiple programming languages? No worries. Our Code Converter has got you covered. Give it a go!
Automatic prediction of gender from face images has drawn a lot of attention recently due to its wide application in various facial analysis problems. However, due to the large variations of face images (such as variations in lighting, scale, and occlusion), the existing models are still behind the desired accuracy level, which is necessary for exploiting these models in real-world applications.
The goal of this tutorial is to develop a lightweight command-line-based utility through Python-based modules to automatically detect faces in a static image and predict the gender of the spotted persons using a deep learning-based gender detection model.
Please note that if you want to detect both gender and age in the same code at the same time, check this tutorial for it.
Pre-requisites
The following components come into play:
- OpenCV: is an open-source library for computer vision, machine learning, and image processing. OpenCV supports a wide variety of programming languages like Python, C++, Java and it is used for all sorts of image and video analysis like facial detection and recognition, photo editing, optical character recognition, and a whole heap more. Using OpenCV comes with many benefits among which:
- OpenCV is an open-source library and it is free of cost.
- OpenCV is fast since it is written in C/C++.
- OpenCV supports most Operating Systems such as Windows, Linux, and macOS.
Suggestion: Check our computer vision tutorials for more OpenCV use cases.
- filetype: is a small and dependency-free Python package to infer file and MIME types.
For the purpose of this article, we will use pre-trained Caffe models, one for face detection taken from the face detection tutorial, and another model for age detection. Below is the list of necessary files to include in our project directory:
gender_net.caffemodel: It is the pre-trained model weights for gender detection. You can download it here.deploy_gender.prototxt: is the model architecture for the gender detection model (a plain text file with a JSON-like structure containing all the neural network layer’s definitions). Get it here.res10_300x300_ssd_iter_140000_fp16.caffemodel: The pre-trained model weights for face detection, download here.deploy.prototxt.txt: This is the model architecture for the face detection model, download here.
After downloading the 4 necessary files, put them in the weights folder:
 To get started, let's install OpenCV and NumPy:
$ pip install opencv-python numpyOpen up a new Python file and follow along. First, let's import the necessary modules and initialize the needed variables:
# Import Libraries
import cv2
import numpy as np

# The gender model architecture
# https://drive.google.com/open?id=1W_moLzMlGiELyPxWiYQJ9KFaXroQ_NFQ
GENDER_MODEL = 'weights/deploy_gender.prototxt'
# The gender model pre-trained weights
# https://drive.google.com/open?id=1AW3WduLk1haTVAxHOkVS_BEzel1WXQHP
GENDER_PROTO = 'weights/gender_net.caffemodel'
# Each Caffe Model impose the shape of the input image also image preprocessing is required like mean
# substraction to eliminate the effect of illunination changes
MODEL_MEAN_VALUES = (78.4263377603, 87.7689143744, 114.895847746)
# Represent the gender classes
GENDER_LIST = ['Male', 'Female']
# https://raw.githubusercontent.com/opencv/opencv/master/samples/dnn/face_detector/deploy.prototxt
FACE_PROTO = "weights/deploy.prototxt.txt"
# https://raw.githubusercontent.com/opencv/opencv_3rdparty/dnn_samples_face_detector_20180205_fp16/res10_300x300_ssd_iter_140000_fp16.caffemodel
FACE_MODEL = "weights/res10_300x300_ssd_iter_140000_fp16.caffemodel"
Next, let's load our models:
# load face Caffe model
face_net = cv2.dnn.readNetFromCaffe(FACE_PROTO, FACE_MODEL)
# Load gender prediction model
gender_net = cv2.dnn.readNetFromCaffe(GENDER_MODEL, GENDER_PROTO)
Like the age detection tutorial, before going into detecting gender, we need a way to detect faces, below function is mostly taken from the face detection tutorial:
def get_faces(frame, confidence_threshold=0.5):
    # convert the frame into a blob to be ready for NN input
    blob = cv2.dnn.blobFromImage(frame, 1.0, (300, 300), (104, 177.0, 123.0))
    # set the image as input to the NN
    face_net.setInput(blob)
    # perform inference and get predictions
    output = np.squeeze(face_net.forward())
    # initialize the result list
    faces = []
    # Loop over the faces detected
    for i in range(output.shape[0]):
        confidence = output[i, 2]
        if confidence > confidence_threshold:
            box = output[i, 3:7] * \
                np.array([frame.shape[1], frame.shape[0],
                         frame.shape[1], frame.shape[0]])
            # convert to integers
            start_x, start_y, end_x, end_y = box.astype(np.int)
            # widen the box a little
            start_x, start_y, end_x, end_y = start_x - \
                10, start_y - 10, end_x + 10, end_y + 10
            start_x = 0 if start_x < 0 else start_x
            start_y = 0 if start_y < 0 else start_y
            end_x = 0 if end_x < 0 else end_x
            end_y = 0 if end_y < 0 else end_y
            # append to our list
            faces.append((start_x, start_y, end_x, end_y))
    return faces
Next, making a utility function to display an image:
def display_img(title, img):
    """Displays an image on screen and maintains the output until the user presses a key"""
    # Display Image on screen
    cv2.imshow(title, img)
    # Mantain output until user presses a key
    cv2.waitKey(0)
    # Destroy windows when user presses a key
    cv2.destroyAllWindows()
Next, let's make two utility functions, one for finding the appropriate font size to write in the image, and another for correctly resizing the image:
def get_optimal_font_scale(text, width):
    """Determine the optimal font scale based on the hosting frame width"""
    for scale in reversed(range(0, 60, 1)):
        textSize = cv2.getTextSize(text, fontFace=cv2.FONT_HERSHEY_DUPLEX, fontScale=scale/10, thickness=1)
        new_width = textSize[0][0]
        if (new_width <= width):
            return scale/10
    return 1

# from: https://stackoverflow.com/questions/44650888/resize-an-image-without-distortion-opencv
def image_resize(image, width = None, height = None, inter = cv2.INTER_AREA):
    # initialize the dimensions of the image to be resized and
    # grab the image size
    dim = None
    (h, w) = image.shape[:2]
    # if both the width and height are None, then return the
    # original image
    if width is None and height is None:
        return image
    # check to see if the width is None
    if width is None:
        # calculate the ratio of the height and construct the
        # dimensions
        r = height / float(h)
        dim = (int(w * r), height)
    # otherwise, the height is None
    else:
        # calculate the ratio of the width and construct the
        # dimensions
        r = width / float(w)
        dim = (width, int(h * r))
    # resize the image
    return cv2.resize(image, dim, interpolation = inter)
Now we know how to detect faces, let's make our core function to predict the gender of each face detected:
def predict_gender(input_path: str):
    """Predict the gender of the faces showing in the image"""
    # Read Input Image
    img = cv2.imread(input_path)
    # resize the image, uncomment if you want to resize the image
    # img = cv2.resize(img, (frame_width, frame_height))
    # Take a copy of the initial image and resize it
    frame = img.copy()
    if frame.shape[1] > frame_width:
        frame = image_resize(frame, width=frame_width)
    # predict the faces
    faces = get_faces(frame)
    # Loop over the faces detected
    # for idx, face in enumerate(faces):
    for i, (start_x, start_y, end_x, end_y) in enumerate(faces):
        face_img = frame[start_y: end_y, start_x: end_x]
        # image --> Input image to preprocess before passing it through our dnn for classification.
        # scale factor = After performing mean substraction we can optionally scale the image by some factor. (if 1 -> no scaling)
        # size = The spatial size that the CNN expects. Options are = (224*224, 227*227 or 299*299)
        # mean = mean substraction values to be substracted from every channel of the image.
        # swapRB=OpenCV assumes images in BGR whereas the mean is supplied in RGB. To resolve this we set swapRB to True.
        blob = cv2.dnn.blobFromImage(image=face_img, scalefactor=1.0, size=(
            227, 227), mean=MODEL_MEAN_VALUES, swapRB=False, crop=False)
        # Predict Gender
        gender_net.setInput(blob)
        gender_preds = gender_net.forward()
        i = gender_preds[0].argmax()
        gender = GENDER_LIST[i]
        gender_confidence_score = gender_preds[0][i]
        # Draw the box
        label = "{}-{:.2f}%".format(gender, gender_confidence_score*100)
        print(label)
        yPos = start_y - 15
        while yPos < 15:
            yPos += 15
        # get the font scale for this image size
        optimal_font_scale = get_optimal_font_scale(label,((end_x-start_x)+25))
        box_color = (255, 0, 0) if gender == "Male" else (147, 20, 255)
        cv2.rectangle(frame, (start_x, start_y), (end_x, end_y), box_color, 2)
        # Label processed image
        cv2.putText(frame, label, (start_x, yPos),
                    cv2.FONT_HERSHEY_SIMPLEX, optimal_font_scale, box_color, 2)

        # Display processed image
    display_img("Gender Estimator", frame)
    # uncomment if you want to save the image
    # cv2.imwrite("output.jpg", frame)
    # Cleanup
    cv2.destroyAllWindows()
Mastering YOLO: Build an Automatic Number Plate Recognition System
Building a real-time automatic number plate recognition system using YOLO and OpenCV library in Python
Download EBookHere is the process of the predict_gender() function:
- We read the input image using the
cv2.imread()function. - We resize the image if it's above the
frame_widthvariable, feel free to edit fitting your needs. - We use our previously defined
get_faces()function to detect faces in the image. - We iterate over each face, draw a rectangle around it, and pass it to the gender detection model to perform inference on the gender.
- Finally, we print the gender both in the console and in the image. After that, we simply display the image and save it to disk if we want.
Alright, let's call our function now:
if __name__ == '__main__':
    # Parsing command line arguments entered by user
    import sys
    predict_gender(sys.argv[1])
We simply use the sys module to get the image path from the command line. Let's test this out, I'm testing on this stock image:
$ python predict_gender.py images\\pexels-karolina-grabowska-8526635.jpgHere is the output in the console:
Female-97.36%
Female-98.34%
And the resulting image:
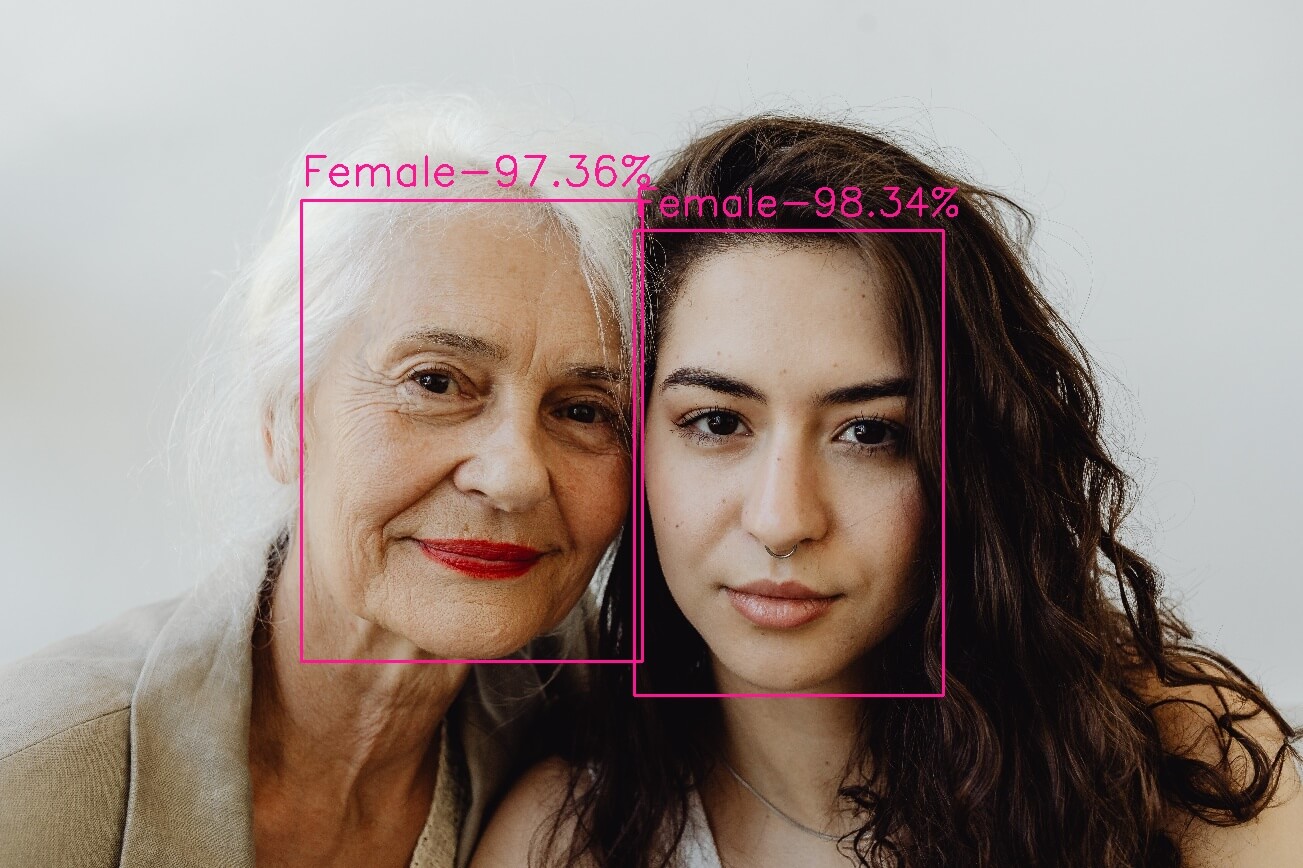 Here is another example:
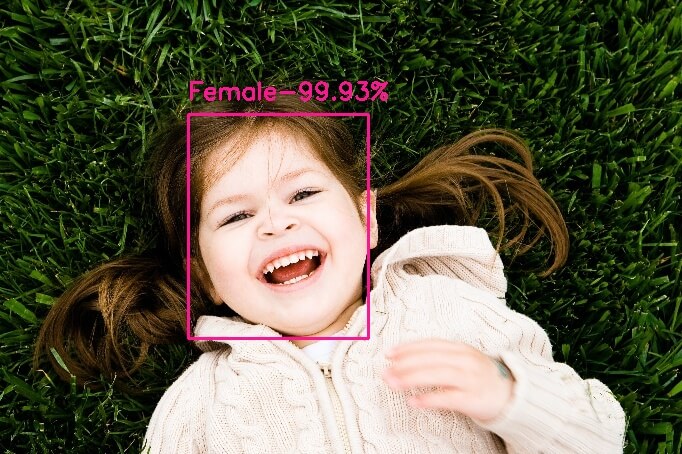
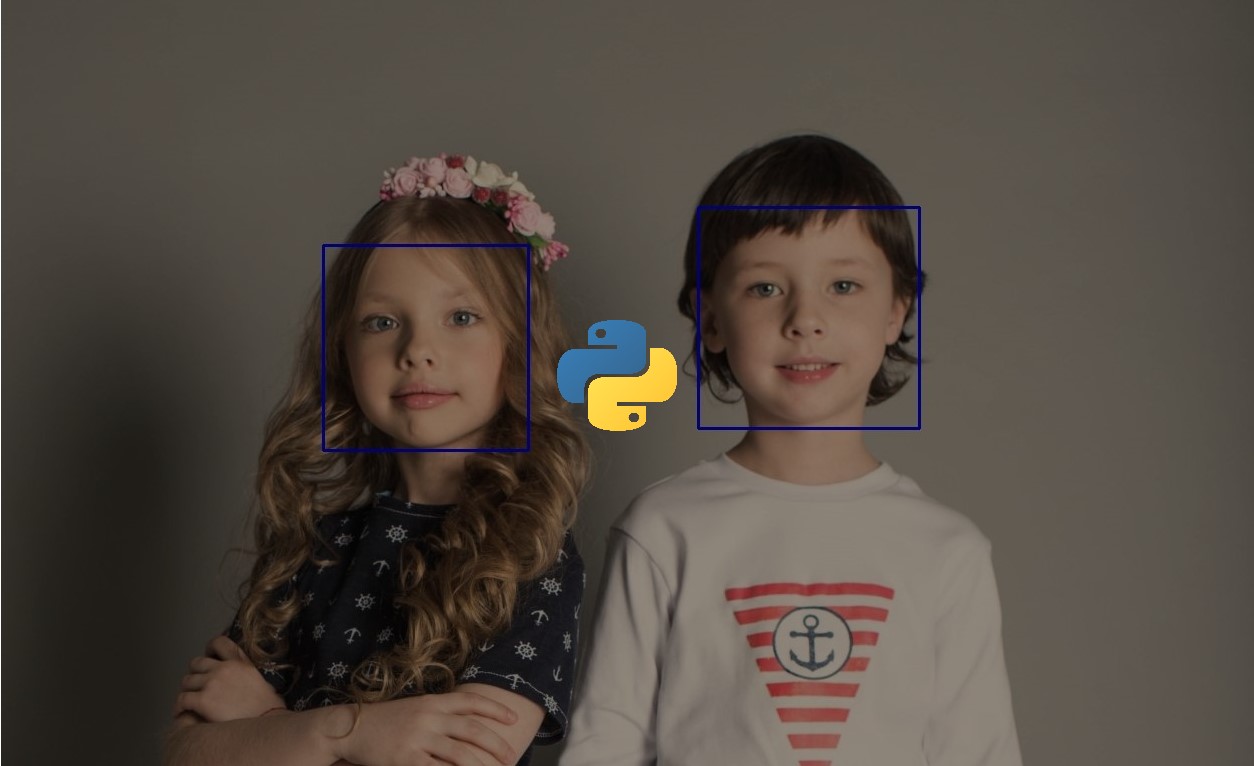
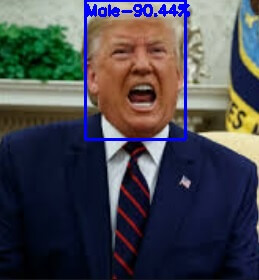 Or this:
 Conclusion
And there you go, now you have a Python code for detecting gender on any image using the OpenCV library. The gender model seems to be accurate.
If you want to use your webcam to detect the gender, look over this code.
Check the full code here.
Learn also: Age Detection using OpenCV in Python.
Happy coding ♥
Let our Code Converter simplify your multi-language projects. It's like having a coding translator at your fingertips. Don't miss out!
View Full Code Convert My Code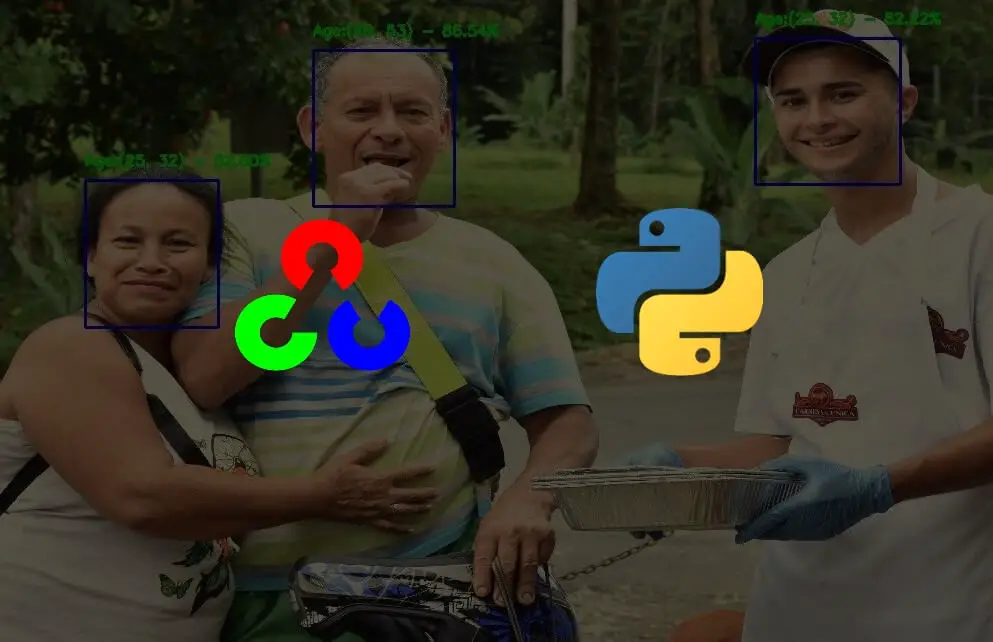


Got a coding query or need some guidance before you comment? Check out this Python Code Assistant for expert advice and handy tips. It's like having a coding tutor right in your fingertips!