Before we get started, have you tried our new Python Code Assistant? It's like having an expert coder at your fingertips. Check it out!
This article will show you how to build a voice recorder GUI application using Tkinter in Python. You will learn how to use powerful excellent libraries to process audio data and how to record and save audio files. By the end of this article, you will have a fully functioning voice recorder application that you can use to record your voice or any other sounds.
Please note that this tutorial is about making a GUI for a voice recorder; if you wish for a quick way to record voice, then this tutorial is for you.
Here is the application that we will build at the end of this article:
 We are going to develop every bit of it from the ground up. So without further ado, let's dive in!
Here is the table of contents:
- Setting up the Environment
- Importing all the Required Modules
- Designing the Graphical User Interface
- Implementing the Record Voice Functionality
- Conclusion
Setting up the Environment
First things first, we will start with setting up the project's environment; we will create a virtual environment, so in your terminal, run the command:
$ python -m venv projectHaving managed to make the virtual environment, we should activate it and run the command:
$ .\project\Scripts\activateNow in this virtual environment, we will install all the required packages for the project. To install these packages, run this command:
$ pip install scipy sounddeviceImporting all the Required Modules
Our next task is to import all the required modules that will be used for this project, create a new Python file, and save it as voice_recorder.py, as good practice, make sure to give your Python files meaningful names.
Open the file and paste the following code:
# importing everything from tkinter
from tkinter import *
# importing the styling module ttk from tkinter
from tkinter import ttk
# importing the message boxes from tkinter
from tkinter.messagebox import showinfo, showerror, askokcancel
# this is for recording the actual voice
import sounddevice
# this is for saving the recorded file to wav file format
from scipy.io.wavfile import write
# threading will help the app's tasks run concurrently
import threading
# importing datetime from datetime to handle dates
from datetime import datetime
# this will handle time
import time
# os module will be used for renaming files
import os
We are first importing everything from tkinter using the asterisk (*), we are then importing the ttk module, which is for styling the widgets (labels, entries, buttons, etc.).
We are also importing the message boxes (showinfo, showerror, askokcancel) from tkinter since the application must alert the user of some error or action. Then comes the sounddevice module. According to the documentation, it is for playing and recording Numpy arrays containing audio signals. After recording, we will have to write the recorded file in a WAV file format, so to do that, we will import write() from scipy.io.wavfile.
We are also importing the threading module; this will help the application run smoothly by running the tasks like running the GUI and recording concurrently. The datetime and time modules are for using dates and times, respectively.
Finally, we are importing the os module; this will help in renaming the recorded files.
Designing the Graphical User Interface
In this section, we will now start the GUI designing process; we will do it at a perfect pace so that we are all on the same page and that you can understand all the concepts involved.
Creating the Main Window and Adding the Window's Icon
Now we will start by creating the main window and adding an icon. This icon will replace the default Tkinter icon, so below the imports, paste these lines of code:
# creates the window using Tk() fucntion
window = Tk()
# creates title for the window
window.title('Voice Recorder')
# the icon for the application, this replaces the default icon
window.iconbitmap(window, 'voice_recorder_icon.ico')
# dimensions and position of the window
window.geometry('500x450+440+180')
# makes the window non-resizable
window.resizable(height=FALSE, width=FALSE)
# this will run the main window infinitely
window.mainloop()
We are creating the main window for the application using Tkinter's built-in class Tk(). To give the title to the window, we are using the title() function.
And to add an icon to the window, we are using the iconbitmap() function, note this takes the window and the actual icon file of format .ico as arguments, and ensure that the icon file is in the same folder as the program file. For the height and width of the window and its position, we are using the geometry() function, with the values 500x450+440+180, 500 and 450 being height and width, and 440 and 180 for positioning the window vertically and horizontally.
To make the main window non-resizable or, in other words, to disable the window's maximize or minimize button, we are using the resizable() function with height and width all set to FALSE.
Finally, to have the main window running infinitely until the user closes it, we are using the mainloop() function.
To test this application, run this command in your terminal:
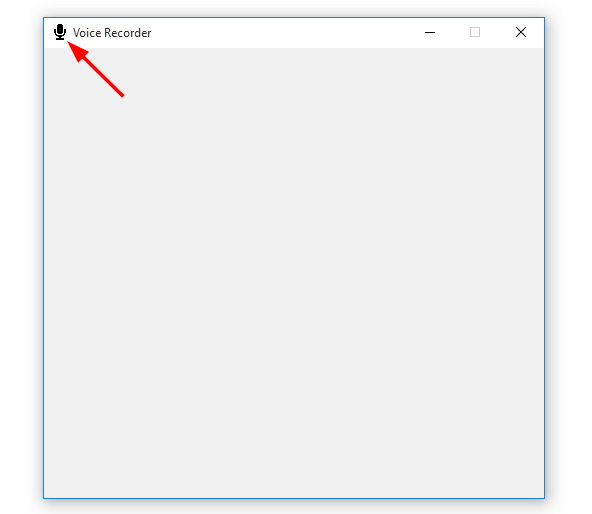
$ python voice_recorder.pyThis is the output that we will get:
 And on the top left corner of the main window, we have the new icon:
 Defining all the Widgets Styles
Before creating the widgets, we should define their styles first. So just below this line of code:
window.resizable(height=FALSE, width=FALSE)Paste this code:
"""Styles for the widgets"""
# style for the label
label_style = ttk.Style()
label_style.configure('TLabel', foreground='#000000', font=('OCR A Extended', 15))
# style for the entry
entry_style = ttk.Style()
entry_style.configure('TEntry', font=('Dotum', 15))
# style for the button
button_style = ttk.Style()
button_style.configure('TButton', foreground='#000000', font='DotumChe')
Here we are creating three style objects using the ttk.Style() class, the style objects are for the widgets we will create in a moment. To configure these styles, we are using the configure() function, which takes the style name; in our case, we have named our styles TEntry, TLabel, and TButton. The font and foreground are the other arguments it takes.
Creating the Canvas and Adding the Logo
Having taken care of the styles, we need now to create the canvas; this will contain all the widgets for the application. Inside this canvas, we will then add the logo. Below the definition of the styles, add this code:
# creates the canvas for containing all the widgets
canvas = Canvas(window, width=500, height=400)
canvas.pack()
# loading the logo
logo = PhotoImage(file='recorder.png')
# creates dimensions of the logo
logo = logo.subsample(2, 2)
# adding the logo to the canvas
canvas.create_image(240, 135, image=logo)
This is what is happening in the code snippet above; we are creating the canvas using the Canvas() function, we are adding this canvas inside the window and giving it a width of 500 and height of 400.
We are then loading the logo and giving it dimensions using the subsample() function, and finally, we add it to the canvas via the create_image() function. For positioning the logo horizontally, we use 240, and vertically we use 135. Make sure the image file used for the logo is located in the same folder as the program file.
With the above code added, this is how the application looks like:
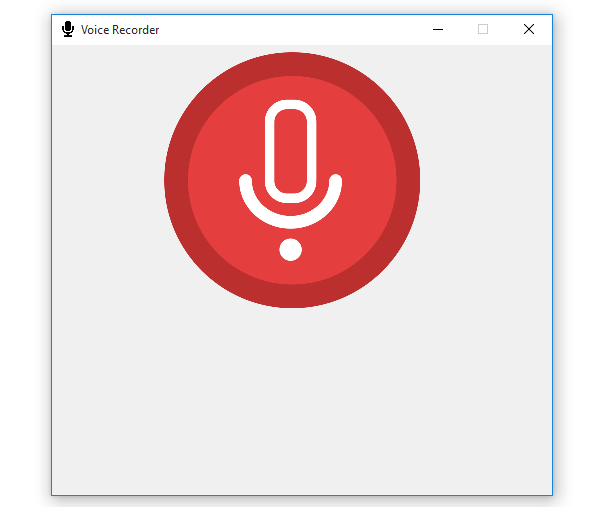
The canvas might not be visible, but this is how it fits inside the main window with the dimensions we have given it:
 Creating the Label and the Entry
Now let's create the first two widgets, the label and the entry; we will place these inside the canvas. Below the logos code, paste this code:
# creating a ttk label
duration_label = ttk.Label(window, text='Enter Recording Duration in Seconds:', style='TLabel')
# creating a ttk entry
duration_entry = ttk.Entry(window, width=76, style='TEntry')
# adding the label to the canvas
canvas.create_window(235, 290, window=duration_label)
# adding the entry to the canvas
canvas.create_window(250, 315, window=duration_entry)
Here we are creating the label and the entry using the ttk.Label() and ttk.Entry() functions. The ttk.Label() takes window, text, and style as arguments, while the ttk.Entry() takes window, width, and style as arguments. After creating these two, we add them to the canvas using the create_window() function.
Running the application, you will get the following output:
 Creating the Progress Label and the Record Button
In this section, we will wrap up the GUI designing process by creating the last two widgets, an empty label that we will use for displaying the recording duration and the button for recording. Right after the entry's code, paste the following code:
# creating the empty label for displaying download progress
progress_label = ttk.Label(window, text='')
# creating the button
record_button = ttk.Button(window, text='Record', style='TButton')
# adding the label to the canvas
canvas.create_window(240, 365, window=progress_label)
# adding the button to the canvas
canvas.create_window(240, 410, window=record_button)
This code creates the label and the button via two functions ttk.Label() and ttk.Button() respectively, with window and text as arguments for the label and window, text, and style as arguments for the button. As usual, after creating these widgets, we are adding them to the canvas via the create_window() function.
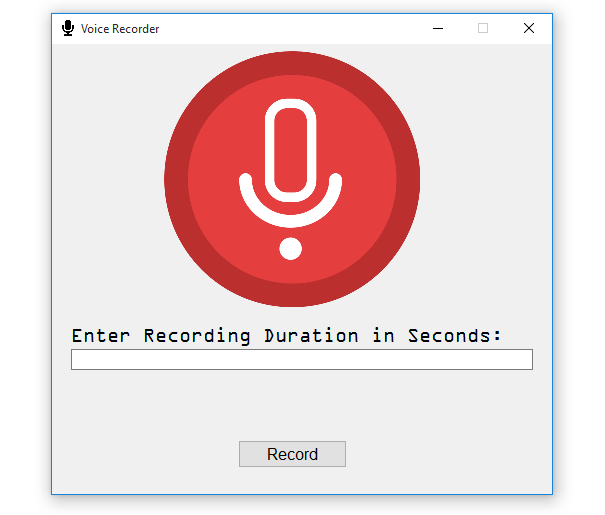
After adding the above code, let's see how the application will look. Run it, and you will get this output:
 We are almost done designing the GUI, but the remaining thing is to make the application interactive when we close it. We want the application to close with the user's confirmation, so below the imports, paste this code:
# the function for closing the main window
def close_window():
    # here we are checking if the value of askokcancel is True
    if askokcancel(title='Close Voice Recorder', message='Are you sure you want to close the Voice Recorder?'):
        # this kills the window
        window.destroy()
We are creating a simple function called close_window() and inside it, we have an if statement for checking if the boolean value of the askokcancel() is True or False. If it's True, we will close it using the destroy() function.
Creating the function is not enough to do all the magic for us; we need to let the window's close button knows which function to trigger when clicked, so below:
window = Tk()Paste this code:
# this will listen to the close window event
window.protocol('WM_DELETE_WINDOW', close_window)
In the code, we have a protocol() function taking two arguments, WM_DELETE_WINDOW and the close_window() function. The whole logic behind this code is that the main window will listen to the close window event initiated by the close button, and once this event is detected, the close_window() function is triggered.
Run the application and click the close button, this is what you will get:
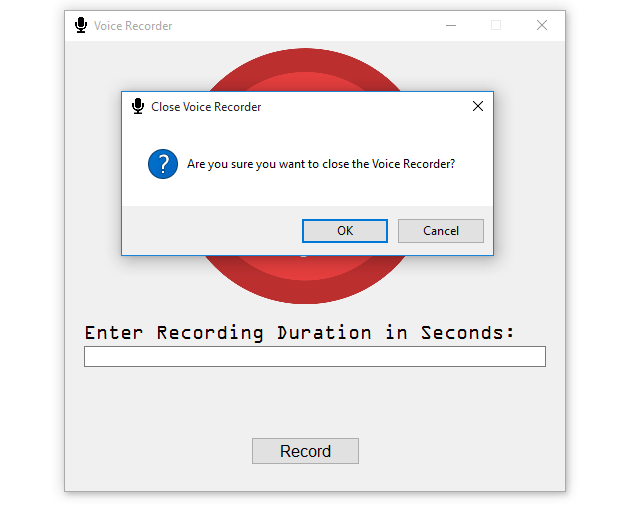 If you click ok, the window will close, and if you click cancel, the window will still be running in the mainloop.
Implementing the Record Voice Functionality
Now that the graphical user interface is taken care of, we need to implement the record voice functionality. We will start by creating the record_voice() function, so below the close_window() function, paste this code:
# function for recording sound
def record_voice():
# the try statement is for
try:
# this is the frequence at which the record will happen
freq = 44100
# getting the recording duration from the entry
duration = int(duration_entry.get())
# calling the recorder via the rec() function
recording = sounddevice.rec(duration*freq, samplerate=freq, channels=2)
# declaring the counter
counter = 0
# the loop is for displaying the recording progress
while counter < duration:
# updating the window
window.update()
# this will help update the window after every 1 second
time.sleep(1)
# incrementing the counter by 1
counter += 1
# displaying the recording duration
progress_label.config(text=str(counter))
# this records audio for the specified duration
sounddevice.wait()
# writing the audio data to recording.wav
write('recording.wav', freq, recording)
# looping through all the files in the current folder
for file in os.listdir():
# checking if the file name is recording.wav
if file == 'recording.wav':
# spliting the base and the extension
base, ext = os.path.splitext(file)
# getting current time
current_time = datetime.now()
# creating a new name for the recorded file
new_name = 'recording-' + str(current_time.hour) + '.' + str(current_time.minute) + '.' + str(current_time.second) + ext
# renaming the file
os.rename(file, new_name)
# display a message when recording is done
showinfo('Recording complete', 'Your recording is complete')
# function for catching all errors
except:
# display a message when an error is caught
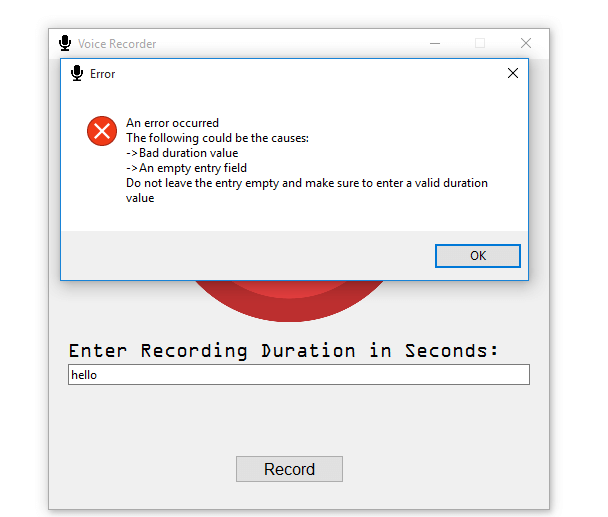
showerror(title='Error', message='An error occurred' \
'\nThe following could ' \
'be the causes:\n->Bad duration value\n->An empty entry field\n' \
'Do not leave the entry empty and make sure to enter a valid duration value')
Let's break the function's code to be on the same page. Inside the function, we have the try/except block, the except statement will catch all the errors and let the user know. Inside the try block, we are declaring the sampling frequency variable called freq, and after that, we get the duration from the entry via the get() function, this duration is always in seconds.
We are then calling the recorder via the sounddevice.rec() function, which takes duration*freq, samplerate and channels as arguments. After that, we declare a counter variable and set it to 0; this will be used for tracking the recording progress.
We also have a while loop that will run only if the counter is less than the duration. Inside this loop, we are updating the window using the update() function which will occur after every second via the time(1). We are incrementing the counter by one and displaying the counter via the progress label's config() function.
Outside the while loop, we are recording the audio via the sounddevice.wait() function, after we are done, we save it using the write() function from the scipy module. The file is saved as recording.wav.
The write() function, after the recording is done, will always save the file as recording.wav, and if we try to record three times, we will not end up with three files but a single recording.wav. This means that the currently recorded file will always overwrite the old one, which is not good because we want to keep all the recorded files.
So in the for loop, we are looping through all the files in the current working folder, then we have an if statement that checks if the file is recording.wav, if the file is recording.wav we will split its base and extension using the os module like this:
base, ext = os.path.splitext(file)After the splitting, we are getting the current time using the datetime.now(), then we generate a new filename by this line of code:
new_name = 'recording-' + str(current_time.hour) + '.' + str(current_time.minute) + '.' + str(current_time.second) + extWe are appending the extension and the strings current_time.hour, current_time.minute, and current_time.second to the base name. To rename the file, we have used:
os.rename(file, new_name)After all this, the program displays a successful message when the recording is complete.
Since the record_voice() function is doing so much that we will not run it directly, but we will run it as a thread via another function. Running the record_voice() function as a thread comes in handy since it will run concurrently with the other tasks performed by the application. Below the record_voice() function, paste this code:
# the function to run record_voice as a thread
def recording_thread():
    # creating the thread whose target is record_voice()
    t1 = threading.Thread(target=record_voice)
    # starting the thread
    t1.start()
About the code snippet, we are creating a function called recording_thread(), in which we create a thread using the Thread() class whose target is the record_voice() function, then we are finally starting the thread.
Now we need to bind this thread function with the Record button, edit the button's code and make it look like this:
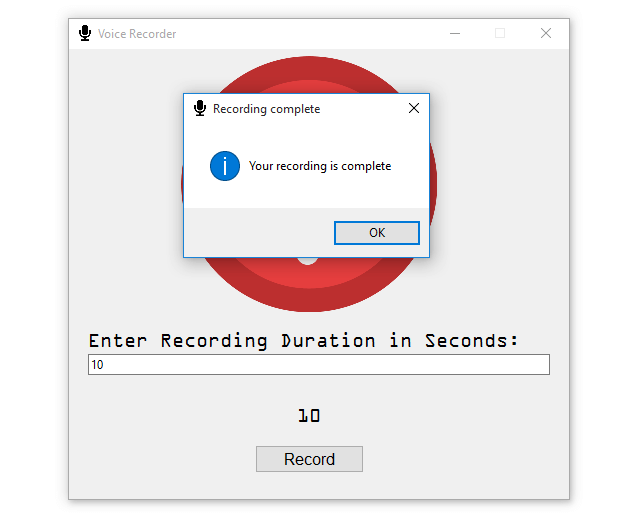
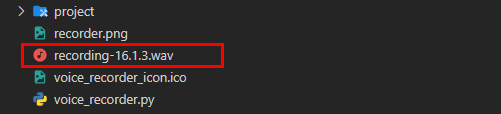
record_button = ttk.Button(window, text='Record', style='TButton', command=recording_thread)We are all set. Let's now do our first recording, we will do a 10-second recording, and this is what you will get:
And if you check in the project's folder, you will see a new file that likes similar to this:
Let's try to do a second recording, you can enter any seconds as duration, and after a successful recording, you will get a new file:
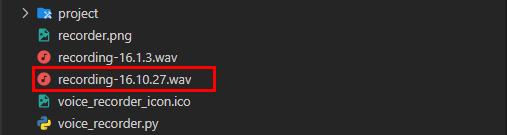
To the file, we are appending the hours, minutes, and seconds of the current time; you can record as many files as you want, and none will be overwritten.
If the user left the entry empty or entered the wrong duration value, this is the output the application would produce:
The application is working as expected. Congratulations on creating your voice recorder application with Python!
Conclusion
That's it from this article; we now hope you have learned many concepts tied to Python and will apply them in future projects!
This article explained how to build a voice recorder application using Python. The first step was to set up the environment and install the required modules. Then, we designed the graphical user interface from the ground up. Finally, we implemented the record voice functionality and tested the application to ensure it worked properly.
You can get the complete code here.
Learn also: How to Make a Rich Text Editor with Tkinter in Python
Happy coding ♥
Just finished the article? Now, boost your next project with our Python Code Generator. Discover a faster, smarter way to code.
View Full Code Assist My Coding


Got a coding query or need some guidance before you comment? Check out this Python Code Assistant for expert advice and handy tips. It's like having a coding tutor right in your fingertips!