Want to code faster? Our Python Code Generator lets you create Python scripts with just a few clicks. Try it now!
Automation is becoming more and more popular every day, and so, popular services and applications nowadays often offer an interface for programmatic use, this interface is what we call an API, or Application Programming Interface, examples of applications offering an API include Google Drive, Google Search and Github.
An API is a set of endpoints any programmer can use to communicate with a service without having to try imitating a user using the application, which is often not possible because of captchas becoming more and more widely used.
When a popular application offers an API, programmers usually write easy-to-use libraries (which act as an abstraction layer to the API, often called wrappers), for a programmer who wants to communicate with the application instead of reading the reference about the API endpoints, it’s more straightforward to just download a library in their programming language of choice, and read its documentation, which is often more idiomatic, and faster to get used to.
In this tutorial, we will see how to write a Telegram Bot in Python, a bot is a user controlled by code, writing a bot can have many applications, for example; automatically responding to client requests.
Telegram offers two APIs, one for creating bots, and one for creating clients, we will be using the first one, documentation for the Bot API can be found here.
We will be using the popular python-telegram-bot wrapper to ease the work for us:
pip3 install python-telegram-botNow, we will need to get an API Key to communicate with the Telegram API, to get one, we need to manually contact @BotFather on Telegram, like so:
 We get a list of commands when we start the discussion; we create the bot with the
 /newbot command, once it's created, we obtain a token to communicate with the bot (in our case, it's hidden in red).
Now we can start writing our bot in Python:
import telegram
import telegram.ext
import re
from random import randint
import logging
logging.basicConfig(level=logging.INFO,
                    format='%(asctime)s - %(name)s - %(levelname)s - %(message)s')

# The API Key we received for our bot
API_KEY = "<INSERT_API_KEY_HERE>"
# Create an updater object with our API Key
updater = telegram.ext.Updater(API_KEY)
# Retrieve the dispatcher, which will be used to add handlers
dispatcher = updater.dispatcher
Notice we added logging in the beginning of the script, and we set the logging level to DEBUG, this will help us understand what's going on with the bot, whether it's running, messages we get from our users, etc. If you're not familiar with logging in Python, check this tutorial.
The dispatcher is the object that will dispatch requests to their handlers, we need to add a conversation handler to it, to describe the way our bot will reply to messages.
The Telegram API allows defining the bot as a finite-state machine, we can handle different events, and change states according to the input of the user, or the type of actions.
For this tutorial, we'll be building the following FSM:
 Execution begins at Start, Welcome will ask the user whether he wants to answer a question, if the response is yes or y, it will send the question, and switch state to Correct if the response is correct. Otherwise, it will loop on Question, each time generating a different question.
Once the response is correct, it'll ask the user if he found the tutorial helpful and go to the end state, which is the final one.
Defining our states:
# Our states, as integers
WELCOME = 0
QUESTION = 1
CANCEL = 2
CORRECT = 3
Now, let's define our handlers:
# The entry function
def start(update_obj, context):
    # send the question, and show the keyboard markup (suggested answers)
    update_obj.message.reply_text("Hello there, do you want to answer a question? (Yes/No)",
        reply_markup=telegram.ReplyKeyboardMarkup([['Yes', 'No']], one_time_keyboard=True)
    )
    # go to the WELCOME state
    return WELCOME

# helper function, generates new numbers and sends the question
def randomize_numbers(update_obj, context):
    # store the numbers in the context
    context.user_data['rand_x'], context.user_data['rand_y'] = randint(0,1000), randint(0, 1000)
    # send the question
    update_obj.message.reply_text(f"Calculate {context.user_data['rand_x']}+{context.user_data['rand_y']}")

# in the WELCOME state, check if the user wants to answer a question
def welcome(update_obj, context):
    if update_obj.message.text.lower() in ['yes', 'y']:
        # send question, and go to the QUESTION state
        randomize_numbers(update_obj, context)
        return QUESTION
    else:
        # go to the CANCEL state
        return CANCEL

# in the QUESTION state
def question(update_obj, context):
    # expected solution
    solution = int(context.user_data['rand_x']) + int(context.user_data['rand_y'])
    # check if the solution was correct
    if solution == int(update_obj.message.text):
        # correct answer, ask the user if he found tutorial helpful, and go to the CORRECT state
        update_obj.message.reply_text("Correct answer!")
        update_obj.message.reply_text("Was this tutorial helpful to you?")
        return CORRECT
    else:
        # wrong answer, reply, send a new question, and loop on the QUESTION state
        update_obj.message.reply_text("Wrong answer :'(")
        # send another random numbers calculation
        randomize_numbers(update_obj, context)
        return QUESTION

# in the CORRECT state
def correct(update_obj, context):
    if update_obj.message.text.lower() in ['yes', 'y']:
        update_obj.message.reply_text("Glad it was useful! ^^")
    else:
        update_obj.message.reply_text("You must be a programming wizard already!")
    # get the user's first name
    first_name = update_obj.message.from_user['first_name']
    update_obj.message.reply_text(f"See you {first_name}!, bye")
    return telegram.ext.ConversationHandler.END

def cancel(update_obj, context):
    # get the user's first name
    first_name = update_obj.message.from_user['first_name']
    update_obj.message.reply_text(
        f"Okay, no question for you then, take care, {first_name}!", reply_markup=telegram.ReplyKeyboardRemove()
    )
    return telegram.ext.ConversationHandler.END
Each function represents a state, now that we defined our handlers, let's add them to our dispatcher, creating a ConversationHandler:
# a regular expression that matches yes or no
yes_no_regex = re.compile(r'^(yes|no|y|n)$', re.IGNORECASE)
# Create our ConversationHandler, with only one state
handler = telegram.ext.ConversationHandler(
      entry_points=[telegram.ext.CommandHandler('start', start)],
      states={
            WELCOME: [telegram.ext.MessageHandler(telegram.ext.Filters.regex(yes_no_regex), welcome)],
            QUESTION: [telegram.ext.MessageHandler(telegram.ext.Filters.regex(r'^\d+$'), question)],
            CANCEL: [telegram.ext.MessageHandler(telegram.ext.Filters.regex(yes_no_regex), cancel)],
            CORRECT: [telegram.ext.MessageHandler(telegram.ext.Filters.regex(yes_no_regex), correct)],
      },
      fallbacks=[telegram.ext.CommandHandler('cancel', cancel)],
      )
# add the handler to the dispatcher
dispatcher.add_handler(handler)
A ConversationHandler is an object that handles conversations, its definition is straightforward, we simply specify the state to start with, by supplying a CommandHandler for the start command.
For other states, we create a MessageHandler for each one, that takes two arguments; a regular expression filter describing what user input should look like to get to each state, and the functions (handlers) defined previously.
Now, we can wait to communicate with users; we just need to call these two methods:
# start polling for updates from Telegram
updater.start_polling()
# block until a signal (like one sent by CTRL+C) is sent
updater.idle()
Going back to the Telegram app, let's test our bot:
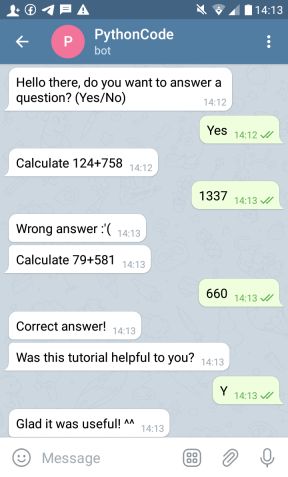
Note that you can start the conversation with /start command.
Conclusion
Telegram offers a very convenient API for developers, allowing them to extend its use beyond end-to-end communication. We've seen through this tutorial how it can be used to implement a bot with multiple states.
I advise you to learn more about the API features it offers, how to handle images and files sent from users, payments, and much more.
Writing Telegram bots was fun, wasn't it? You can use natural language processing and build an AI model for a question-answering chatbot. In fact, check this tutorial where we made a conversational AI chatbot!
Check the full code here.
Learn also: How to Make Facebook Messenger Bot in Python.
Happy Coding ♥
Ready for more? Dive deeper into coding with our AI-powered Code Explainer. Don't miss it!
View Full Code Transform My Code


Got a coding query or need some guidance before you comment? Check out this Python Code Assistant for expert advice and handy tips. It's like having a coding tutor right in your fingertips!