Struggling with multiple programming languages? No worries. Our Code Converter has got you covered. Give it a go!
![]()
Named Entity Recognition (NER) is a typical natural language processing (NLP) task that automatically identifies and recognizes predefined entities in a given text. Entities like person names, organizations, dates and times, and locations are valuable information to extract from unstructured and unlabeled raw text.
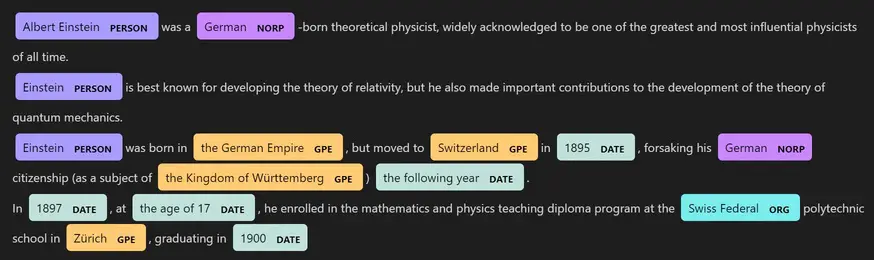
At the end of this tutorial, you will be able to perform named entity recognition on any given English text with HuggingFace Transformers and SpaCy in Python; here's an example of the resulting NER:
SpaCy is an open-source library in Python for advanced NLP. It is built on the latest research and designed to be used in real-world products. We'll be using two NER models on SpaCy, namely the regular en_core_web_sm and the transformer en_core_web_trf. We'll also use spaCy's NER amazing visualizer.
To get started, let's install the required libraries for this tutorial. First, installing transformers:
$ pip install --upgrade transformers sentencepieceNext, we need to install spacy and spacy-transformers. To do that, I've grabbed the latest .whl file from the spacy-models releases for installation:
$ pip install https://github.com/explosion/spacy-models/releases/download/en_core_web_trf-3.2.0/en_core_web_trf-3.2.0-py3-none-any.whlOf course, if you're reading this tutorial in the future, make sure to get the latest release from this page if you encounter any problems regarding the above command.
Next, we have to download the spaCy's en_core_web_sm regular model:
$ python -m spacy download en_core_web_smen_core_web_sm is an English model pipeline optimized for CPU. It is small, with only 13MB in size, and under the MIT license. For larger models, you can use en_core_web_md for medium-sized and en_core_web_lg for the large one.
Once done with the installation, let's get started with the code:
import spacy
from transformers import *
For this tutorial, we'll be performing NER on this text that I've grabbed from Wikipedia:
# sample text from Wikipedia
text = """
Albert Einstein was a German-born theoretical physicist, widely acknowledged to be one of the greatest and most influential physicists of all time.
Einstein is best known for developing the theory of relativity, but he also made important contributions to the development of the theory of quantum mechanics.
Einstein was born in the German Empire, but moved to Switzerland in 1895, forsaking his German citizenship (as a subject of the Kingdom of Württemberg) the following year.
In 1897, at the age of 17, he enrolled in the mathematics and physics teaching diploma program at the Swiss Federal polytechnic school in Zürich, graduating in 1900
"""
NER with Transformers
We'll be using the HuggingFace Transformers' pipeline API for loading the models:
# load BERT model fine-tuned for Named Entity Recognition (NER)
ner = pipeline("ner", model="dslim/bert-base-NER")
We're using a BERT model (bert-base-encased) that was fine-tuned on the CoNLL-2003 Named Entity Recognition dataset. You can use dslim/bert-large-NER for a larger version of this one.
Let's extract the entities for our text using this model:
# perform inference on the transformer model
doc_ner = ner(text)
# print the output
doc_ner
Output:
[{'end': 7,
  'entity': 'B-PER',
  'index': 1,
  'score': 0.99949145,
  'start': 1,
  'word': 'Albert'},
 {'end': 16,
  'entity': 'I-PER',
  'index': 2,
  'score': 0.998417,
  'start': 8,
  'word': 'Einstein'},
 {'end': 29,
  'entity': 'B-MISC',
  'index': 5,
  'score': 0.99211043,
  'start': 23,
  'word': 'German'},
 {'end': 158,
  'entity': 'B-PER',
  'index': 28,
  'score': 0.99736506,
  'start': 150,
  'word': 'Einstein'},
 {'end': 318,
  'entity': 'B-PER',
  'index': 55,
  'score': 0.9977113,
  'start': 310,
  'word': 'Einstein'},
 {'end': 341,
  'entity': 'B-LOC',
  'index': 60,
  'score': 0.50242233,
  'start': 335,
  'word': 'German'},
 {'end': 348,
  'entity': 'I-LOC',
  'index': 61,
  'score': 0.95330054,
  'start': 342,
  'word': 'Empire'},
 {'end': 374,
  'entity': 'B-LOC',
  'index': 66,
  'score': 0.99978524,
  'start': 363,
  'word': 'Switzerland'},
 {'end': 404,
  'entity': 'B-MISC',
  'index': 74,
  'score': 0.9995827,
  'start': 398,
  'word': 'German'},
 {'end': 460,
  'entity': 'B-LOC',
  'index': 84,
  'score': 0.9994709,
  'start': 449,
  'word': 'Württemberg'},
 {'end': 590,
  'entity': 'B-MISC',
  'index': 111,
  'score': 0.9888771,
  'start': 585,
  'word': 'Swiss'},
 {'end': 627,
  'entity': 'B-LOC',
  'index': 119,
  'score': 0.9977405,
  'start': 621,
  'word': 'Zürich'}]
As you can see, the output is a list of dictionaries that has the start and end positions of the entity in the text, the prediction score, the word itself, the index, and the entity name.
The named entities of this datasets are:
O: Outside of a named entity.B-MIS: Beginning of a miscellaneous entity right after another miscellaneous entity.I-MIS: Miscellaneous entity.B-PER: Beginning of a person’s name right after another person’s name.I-PER: Person’s name.B-ORG: The beginning of an organization right after another organization.I-ORG: Organization.B-LOC: Beginning of a location right after another location.I-LOC: Location.
Next, let's make a function that uses spaCy to visualize this Python dictionary:
def get_entities_html(text, ner_result, title=None):
  """Visualize NER with the help of SpaCy"""
  ents = []
  for ent in ner_result:
    e = {}
    # add the start and end positions of the entity
    e["start"] = ent["start"]
    e["end"] = ent["end"]
    # add the score if you want in the label
    # e["label"] = f"{ent["entity"]}-{ent['score']:.2f}"
    e["label"] = ent["entity"]
    if ents and -1 <= ent["start"] - ents[-1]["end"] <= 1 and ents[-1]["label"] == e["label"]:
      # if the current entity is shared with previous entity
      # simply extend the entity end position instead of adding a new one
      ents[-1]["end"] = e["end"]
      continue
    ents.append(e)
  # construct data required for displacy.render() method
  render_data = [
    {
      "text": text,
      "ents": ents,
      "title": title,
    }
  ]
  spacy.displacy.render(render_data, style="ent", manual=True, jupyter=True)
The above function uses the spacy.displacy.render() function to render a named entity extracted text. We use manual=True indicating that's a manual visualization and not a spaCy document. We also set jupyter to True as we're currently on a Juypter notebook or Colab.
The whole purpose of the for loop is to construct a list of dictionaries with the start and end positions, and the entity's label. We also check to see if there are some same entities nearby, so we combine them.
Let's call it:
# get HTML representation of NER of our text
get_entities_html(text, doc_ner)Next, let's load another relatively larger and better model that is based on roberta-large:
# load roberta-large model
ner2 = pipeline("ner", model="xlm-roberta-large-finetuned-conll03-english")
Performing inference:
# perform inference on this model
doc_ner2 = ner2(text)
Visualizing:
# get HTML representation of NER of our text
get_entities_html(text, doc_ner2)As you can see, now it's improved, naming Albert Einstein as a single entity and also the Kingdom of Wurttemberg.
There are a lot of other models that were fine-tuned on the same dataset. Here's yet another one:
# load yet another roberta-large model
ner3 = pipeline("ner", model="Jean-Baptiste/roberta-large-ner-english")
# perform inference on this model
doc_ner3 = ner3(text)
# get HTML representation of NER of our text
get_entities_html(text, doc_ner3)This model, however, only has PER, MISC, LOC, and ORG entities. SpaCy automatically colors the familiar entities.
NER with SpaCy
To perform NER using SpaCy, we must first load the model using spacy.load() function:
# load the English CPU-optimized pipeline
nlp = spacy.load("en_core_web_sm")
We're loading the model we've downloaded. Make sure you download the model you want to use before loading it here. Next, let's generate our document:
# predict the entities
doc = nlp(text)
And then visualizing it:
# display the doc with jupyter mode
spacy.displacy.render(doc, style="ent", jupyter=True)This one looks much better, and there are a lot more entities (18) than the previous ones, namely CARDINAL, DATE, EVENT, FAC, GPE, LANGUAGE, LAW, LOC, MONEY, NORP, ORDINAL, ORG, PERCENT, PERSON, PRODUCT, QUANTITY, TIME, WORK_OF_ART.
However, quantum mechanics was mistakenly labeled as an organization, so let's use the Transformer model that spaCy is offering:
# load the English transformer pipeline (roberta-base) using spaCy
nlp_trf = spacy.load('en_core_web_trf')
Let's perform inference and visualize the text:
# perform inference on the model
doc_trf = nlp_trf(text)
# display the doc with jupyter mode
spacy.displacy.render(doc_trf, style="ent", jupyter=True)This time Swiss Federal was labeled as an organization, even though it wasn't complete (it should be Swiss Federal polytechnic school), and quantum mechanics is no longer an organization.
The en_core_web_trf model performs much better than the previous ones. Check this table that shows each English model offered by spaCy with their size and metrics evaluation of each:
| Model Name | Model Size | Precision | Recall | F-Score |
en_core_web_sm |
13MB | 0.85 | 0.84 | 0.84 |
en_core_web_md |
43MB | 0.85 | 0.84 | 0.85 |
en_core_web_lg |
741MB | 0.86 | 0.85 | 0.85 |
en_core_web_trf |
438MB | 0.90 | 0.90 | 0.90 |
Conclusion
Make sure you try other types of texts and see for yourself if your text confirms the above table! You can check this page on spaCy to see the details of each model.
For other languages, spaCy strives to make these models available for every language globally. You can check this page to see the available models for each language.
Here are some related NLP tutorials that you may find useful:
- Text Generation with Transformers in Python
- How to Paraphrase Text using Transformers in Python
- Speech Recognition using Transformers in Python
- Machine Translation using Transformers in Python
![]()
Happy learning ♥
Liked what you read? You'll love what you can learn from our AI-powered Code Explainer. Check it out!
View Full Code Analyze My Code


Got a coding query or need some guidance before you comment? Check out this Python Code Assistant for expert advice and handy tips. It's like having a coding tutor right in your fingertips!