Welcome! Meet our Python Code Assistant, your new coding buddy. Why wait? Start exploring now!
Introduction
A webhook can be thought of as a type of API that is driven by events rather than requests. Instead of one application making a request to another to receive a response, a webhook is a service that allows one program to send data to another as soon as a particular event takes place.
Webhooks are sometimes referred to as reverse APIs because communication is initiated by the application sending the data rather than the one receiving it. With web services becoming increasingly interconnected, webhooks are seeing more action as a lightweight solution for enabling real-time notifications and data updates without the need to develop a full-scale API.
Webhooks usually act as messengers for smaller data. They help in sending messages, alerts, notifications and real-time information from the server-side application to the client-side application.
Let’s say for instance, you want your application to get notified when tweets that mention a certain account and contain a specific hashtag are published. Instead of your application continuously asking Twitter for new posts meeting these criteria, it makes much more sense for Twitter to send a notification to your application only when such an event takes place.
This is the purpose of a webhook instead of having to repeatedly request the data (polling mechanism), the receiving application can sit back and get what it needs without having to send repeated requests to another system.
Webhooks can open up a lot of possibilities:
- You can use a webhook to connect a payment gateway with your email marketing software so that you send an email to the user whenever a payment bounces.
- You can use webhooks to synchronize customer data in other applications. For example, if a user changes his email address, you can ensure that the change is reflected in your CRM as well.
- You can also use webhooks to send information about events to external databases or data warehouses like Amazon's Redshift, or Google Big Query for further analysis.
Scope
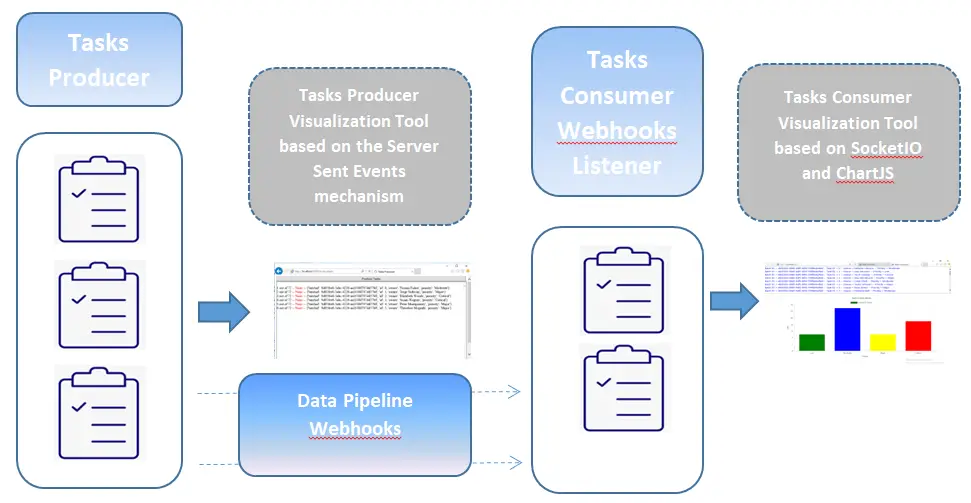
In this tutorial, we will lay the groundwork for a streaming application based on webhooks and encompassing several components:
- A webhooks generator which mimics an internal or an external service emitting tasks to a pre-configured webhook endpoint.
- A webhook listener that receives notification messages for these events/tasks. Once received, these tickets will be rendered and converted into a bar chart that generates valuable insights. Charts reduce the complexity of the data and make it easier to understand for any user.
We will leverage several components like Redis, Flask, SocketIO, and ChartJS to develop nice-looking visualization tool for the aforementioned components.
Process Flowchart
 Pre-requisites
As our requirements stand, the following components come into play:
- Redis is an open source, advanced key-value store and an apt solution for building high-performance, scalable web applications. Redis has three main peculiarities that sets it apart:
- Redis holds its database entirely in the memory, using the disk only for persistance.
- Redis has a relatively rich set of data types when compared to many other key-value data stores.
- Redis can replicate data to any number of slaves.Installing Redis is outside the scope of this tutorial, but you can check this tutorial for installing it on Windows.
- Socket.IO is a JavaScript library for real-time web applications. It enables real-time, bidirectional communication between web clients and servers. It has two parts: a client-side library that runs in the browser and a server-side library.
- Faker is a Python package that generates fake data for you. Whether you need to bootstrap your database, create good looking XML documents, fill-in your persistence to stress test it, or anonymize data taken from a production service, Fake is the right choice for you.
- ChartJS is an open source Javascript library that allows you to draw different types of charts by using the HTML5 canvas element. The HTML5 element gives an easy and powerful way to draw graphics using Javascript. This library supports 8 different types of graphs: lines, bars, doughnuts, pies, radars, polar areas, bubbles and scatters.
- Flask is a micro web framework written in Python.
If this tutorial intrigues you and makes you want to dive into the code immediately, you can check this repository for reviewing the code used in this article.
Related: Asynchronous Tasks with Celery in Python.
Setup
Setting up the package is quite simple and straightforward. Of course you need Python 3 installed on your system and it is highly recommended to setup a virtual environment where we will install the needed libraries:
$ pip install Faker==8.2.0 Flask==1.1.2 Flask-SocketIO==5.0.1 redis==3.5.3 requests==2.25.1At the end of this tutorial, our folder structure will look like the following:
 Let's start writing the actual code. First, let's define the configuration parameters for our application within
 config.py:
#Application configuration File
################################
#Secret key that will be used by Flask for securely signing the session cookie
# and can be used for other security related needs
SECRET_KEY = 'SECRET_KEY'
#######################################
#Minimum Number Of Tasks To Generate
MIN_NBR_TASKS = 1
#Maximum Number Of Tasks To Generate
MAX_NBR_TASKS = 100
#Time to wait when producing tasks
WAIT_TIME = 1
#Webhook endpoint Mapping to the listener
WEBHOOK_RECEIVER_URL = 'http://localhost:5001/consumetasks'
#######################################
#Map to the REDIS Server Port
BROKER_URL = 'redis://localhost:6379'
#######################################
Next, creating an initialization file for our tasks and webhooks producer in init_producer.py:
# init_producer.py
from flask import Flask

#Create a Flask instance
app = Flask(__name__)

#Load Flask configurations from config.py
app.secret_key = app.config['SECRET_KEY']
app.config.from_object("config")
Now let's write code necessary for producing tasks using Faker module:
# tasks_producer.py
import random
from faker.providers import BaseProvider
from faker import Faker
import config
import time
import requests
import json
import uuid

# Define a TaskProvider
class TaskProvider(BaseProvider):
    def task_priority(self):
        severity_levels = [
            'Low', 'Moderate', 'Major', 'Critical'
        ]
        return severity_levels[random.randint(0, len(severity_levels)-1)]


# Create a Faker instance and seeding to have the same results every time we execute the script
# Return data in English
fakeTasks = Faker('en_US')
# Seed the Faker instance to have the same results every time we run the program
fakeTasks.seed_instance(0)
# Assign the TaskProvider to the Faker instance
fakeTasks.add_provider(TaskProvider)

# Generate A Fake Task
def produce_task(batchid, taskid):
    # Message composition
    message = {
        'batchid': batchid, 'id': taskid, 'owner': fakeTasks.unique.name(), 'priority': fakeTasks.task_priority()
        # ,'raised_date':fakeTasks.date_time_this_year()
        # ,'description':fakeTasks.text()
    }
    return message


def send_webhook(msg):
    """
    Send a webhook to a specified URL
    :param msg: task details
    :return:
    """
    try:
        # Post a webhook message
        # default is a function applied to objects that are not serializable = it converts them to str
        resp = requests.post(config.WEBHOOK_RECEIVER_URL, data=json.dumps(
            msg, sort_keys=True, default=str), headers={'Content-Type': 'application/json'}, timeout=1.0)
        # Returns an HTTPError if an error has occurred during the process (used for debugging).
        resp.raise_for_status()
    except requests.exceptions.HTTPError as err:
        #print("An HTTP Error occurred",repr(err))
        pass
    except requests.exceptions.ConnectionError as err:
        #print("An Error Connecting to the API occurred", repr(err))
        pass
    except requests.exceptions.Timeout as err:
        #print("A Timeout Error occurred", repr(err))
        pass
    except requests.exceptions.RequestException as err:
        #print("An Unknown Error occurred", repr(err))
        pass
    except:
        pass
    else:
        return resp.status_code

# Generate A Bunch Of Fake Tasks
def produce_bunch_tasks():
    """
    Generate a Bunch of Fake Tasks
    """
    n = random.randint(config.MIN_NBR_TASKS, config.MAX_NBR_TASKS)
    batchid = str(uuid.uuid4())
    for i in range(n):
        msg = produce_task(batchid, i)
        resp = send_webhook(msg)
        time.sleep(config.WAIT_TIME)
        print(i, "out of ", n, " -- Status", resp, " -- Message = ", msg)
        yield resp, n, msg


if __name__ == "__main__":
    for resp, total, msg in produce_bunch_tasks():
        pass
The above code leverages the Faker module in order to create a stream of fictitious randomized tasks and to send for each produced task a webhook to the endpoint WEBHOOK_RECEIVER_URL previously defined in our configuration file config.py.
The number of tasks generated in each batch will be a random number controlled by the thresholds MIN_NBR_TASKS and MAX_NBR_TASKS defined in config.py.
The webhook JSON message is composed of the following attributes: batchid, taskid, owner and priority.
Each batch of tasks generated will be identified by a unique reference called batchid.
The task priority will be limited to pre-selected options: Low, Moderate, High and Critical.
The primary use of the above code is produce_bunch_tasks() function, which is a generator yielding the following:
- The status of the webhook emitted.
- The total number of tasks produced.
- The webhook message generated.
Before digging further, let's test our tasks_producer.py program:
$ python tasks_producer.pyYou should see an output similar to the following:
 Now let's build our Flask app that emulates a service producing tasks:
#app_producer.py
from flask import Response, render_template
from init_producer import app
import tasks_producer

def stream_template(template_name, **context):
    app.update_template_context(context)
    t = app.jinja_env.get_template(template_name)
    rv = t.stream(context)
    rv.enable_buffering(5)
    return rv

@app.route("/", methods=['GET'])
def index():
    return render_template('producer.html')

@app.route('/producetasks', methods=['POST'])
def producetasks():
    print("producetasks")
    return Response(stream_template('producer.html', data= tasks_producer.produce_bunch_tasks() ))

if __name__ == "__main__":
   app.run(host="localhost",port=5000, debug=True)
Within this flask app, we defined two main routes:
"/": Renders the template web page (producer.html)"/producetasks": Calls the functionproduce_bunch_tasks()and stream the flow of tasks generated to the Flask application.
The server sents Server-Sent Events (SSEs), which are a type of server push mechanism, where a client receives a notification whenever a new event occurs on the server.
Next, we will define the template producer.html file:
<!doctype html>
<html>
  <head>
    <title>Tasks Producer</title>
    <style>
      .content {
        width: 100%;
      }
      .container{
        max-width: none;
      }
    </style>
    <meta name="viewport" content="width=device-width, initial-scale=1.0"/>
  </head>
<body class="container">
    <div class="content">
      <form method='post' id="produceTasksForm" action = "/producetasks">
        <button style="height:20%x;width:100%" type="submit" id="produceTasks">Produce Tasks</button>
      </form>
    </div>
    <div class="content">
        <div id="Messages" class="content" style="height:400px;width:100%; border:2px solid gray; overflow-y:scroll;"></div>
        {% for rsp,total, msg in data: %}
         <script>
            var rsp   = "{{ rsp }}";
            var total = "{{ total }}";
            var msg   = "{{ msg }}";
            var lineidx = "{{ loop.index }}";
            //If the webhook request succeeds color it in blue else in red.
            if (rsp == '200') {
                rsp = rsp.fontcolor("blue");
            }
            else {
                rsp = rsp.fontcolor("red");
            }
            //Add the details of the generated task to the Messages section.
            document.getElementById('Messages').innerHTML += "<br>" + lineidx  + " out of " + total + " -- "+ rsp + " -- " + msg;
        </script>
        {% endfor %}
    </div>
</body>
</html>
Three variables are passed to this template file:
total: representing the total number of tasks produced.status: representing the status of the dispatched webhook.msg: the webhook JSON message.
The template file contains a Javascript enabling to iterate throughout the received stream and to display the webhooks/tasks as they're received.
Now that our program is ready, let's test it out and check the output generated:
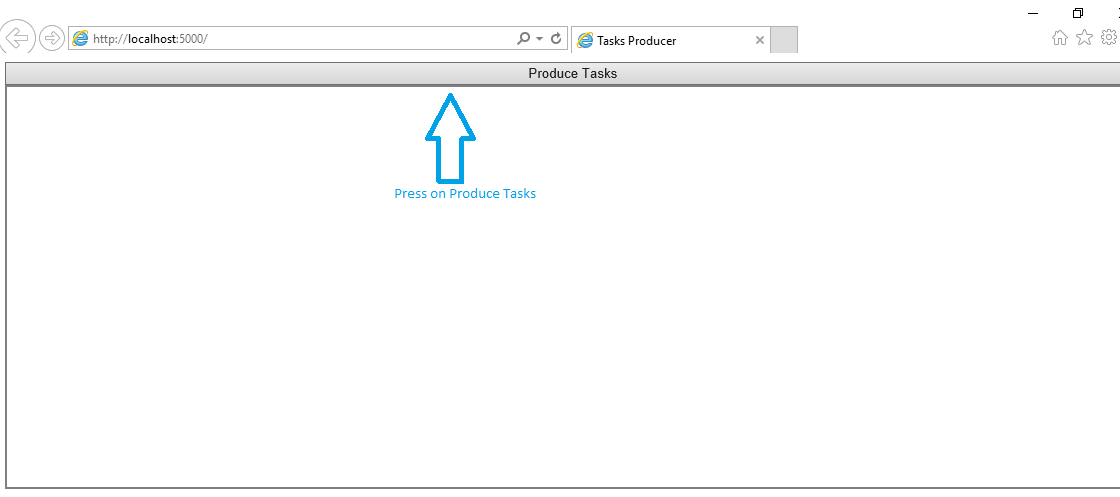
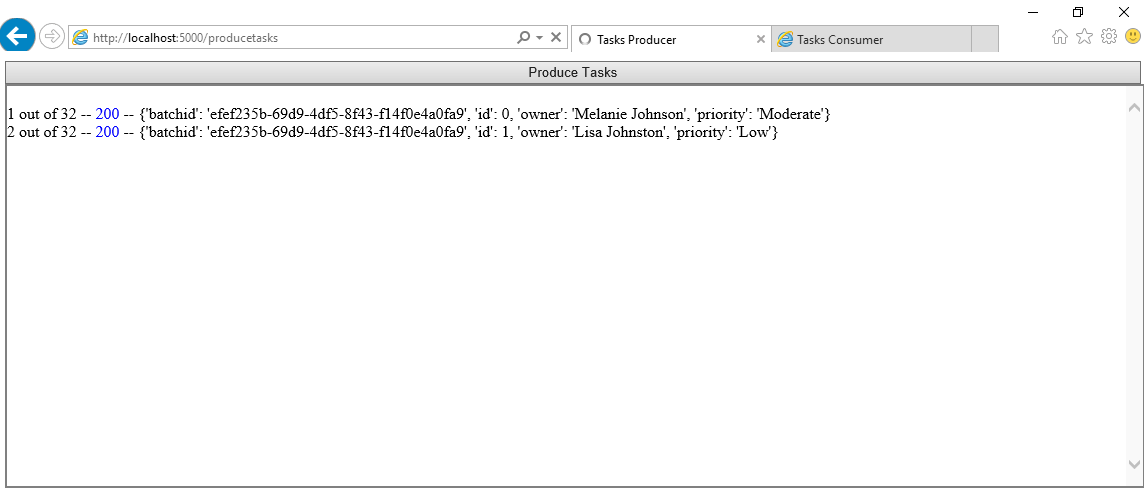
$ python app_producer.pyAccess the link http://localhost:5000 where Flask instance is running, press on the button Produce Tasks and you will see a continuous stream of randomized tasks automatically generated as shown in the following screen:
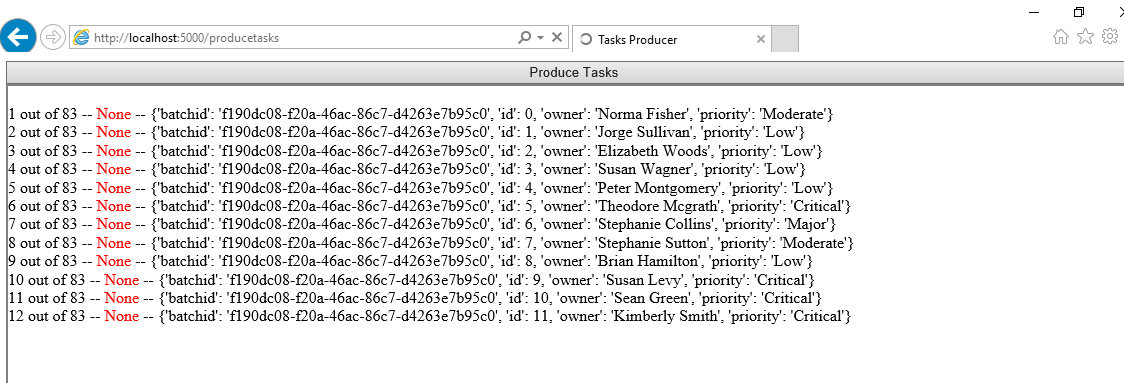 You will notice that the response status of the dispatched webhook is equal to
 None, and displayed in red signaling the failure to reach its destination. Later on when we activate the tasks consumer, you will outline that the response status of the dispatched webhook is equal to 200 and displayed in blue signaling the success to reach the webhook endpoint.
Now, let's create the initialization file for our tasks consumer/handler:
# init_consumer.py
from flask import Flask

#Create a Flask instance
app = Flask(__name__)

#Load Flask configurations from config.py
app.secret_key = app.config['SECRET_KEY']
app.config.from_object("config")

#Setup the Flask SocketIO integration while mapping the Redis Server.
from flask_socketio import SocketIO
socketio = SocketIO(app,logger=True,engineio_logger=True,message_queue=app.config['BROKER_URL'])
Next, let's build a Flask app for handling the dispatched webhooks/tasks. The first step to handling webhooks is to build a custom endpoint. This endpoint needs to expect data through a POST request, and confirm the successful receipt of that data:
#app_consumer.py
from flask import render_template, request,session
from flask_socketio import join_room
from init_consumer import app, socketio
import json
import uuid

#Render the assigned template file
@app.route("/", methods=['GET'])
def index():
    return render_template('consumer.html')

# Sending Message through the websocket
def send_message(event, namespace, room, message):
    # print("Message = ", message)
    socketio.emit(event, message, namespace=namespace, room=room)

# Registers a function to be run before the first request to this instance of the application
# Create a unique session ID and store it within the application configuration file
@app.before_first_request
def initialize_params():
    if not hasattr(app.config,'uid'):
        sid = str(uuid.uuid4())
        app.config['uid'] = sid
        print("initialize_params - Session ID stored =", sid)

# Receive the webhooks and emit websocket events
@app.route('/consumetasks', methods=['POST'])
def consumetasks():
    if request.method == 'POST':
        data = request.json
        if data:
           print("Received Data = ", data)
           roomid =  app.config['uid']
           var = json.dumps(data)
           send_message(event='msg', namespace='/collectHooks', room=roomid, message=var)
    return 'OK'

#Execute on connecting
@socketio.on('connect', namespace='/collectHooks')
def socket_connect():
    # Display message upon connecting to the namespace
    print('Client Connected To NameSpace /collectHooks - ', request.sid)

#Execute on disconnecting
@socketio.on('disconnect', namespace='/collectHooks')
def socket_connect():
    # Display message upon disconnecting from the namespace
    print('Client disconnected From NameSpace /collectHooks - ', request.sid)

#Execute upon joining a specific room
@socketio.on('join_room', namespace='/collectHooks')
def on_room():
    if app.config['uid']:
        room = str(app.config['uid'])
        # Display message upon joining a room specific to the session previously stored.
        print(f"Socket joining room {room}")
        join_room(room)

#Execute upon encountering any error related to the websocket
@socketio.on_error_default
def error_handler(e):
    # Display message on error.
    print(f"socket error: {e}, {str(request.event)}")

#Run using port 5001
if __name__ == "__main__":
    socketio.run(app,host='localhost', port=5001,debug=True)
In brief, we performed the following:
- We added a function
@app.before_first_requestthat ran once before the very first request to the app and is ignored on subsequent requests. Within this function we created a unique session ID and store it within the configuration file, this unique session ID will serve to allocate an exclusive room for each user when dealing with the web socket communication. - We defined a webhook listener in
"/consumetasks"which expects JSON data through POST requests and once received, it emits a web socket event concurrently. - To manage effectively our connection over the web socker:
- We will set the value
/collectHooksfor the namespace (namespaces are used to separate server logic over a single shared connection). - We will assign a dedicated room for each user session (rooms are subdivisions or sub-channels of namespaces).
- We will set the value
After all this build up, let's code the frontend for our web app, create consumer.html in the templates folder and copy the following code:
<!DOCTYPE html>
<html lang="en">
<head>
    <meta charset="UTF-8">
    <title>Tasks Consumer</title>
    <link rel="stylesheet" href="{{url_for('static',filename='css/bootstrap.min.css')}}">
    <link rel="stylesheet" href="{{url_for('static',filename='css/Chart.min.css')}}">
</head>
<body>
    <div class="content">
        <div id="Messages" class="content" style="height:200px;width:100%; border:1px solid gray; overflow-y:scroll;"></div>
    </div>
    <div class="container">
        <div class="row">
            <div class="col-12">
                <div class="card">
                    <div class="card-body">
                        <canvas id="canvas"></canvas>
                    </div>
                </div>
            </div>
        </div>
    </div>
    <!-- import the jquery library -->
    <script src="{{ url_for('static',filename='js/jquery.min.js') }}"></script>
    <!-- import the socket.io library -->
    <script src="{{ url_for('static',filename='js/socket.io.js') }}"></script>
    <!-- import the bootstrap library -->
    <script src="{{ url_for('static',filename='js/bootstrap.min.js') }}"></script>
    <!-- import the Chart library -->
    <script src="{{ url_for('static',filename='js/Chart.min.js') }}"></script>
<script>
      $(document).ready(function(){
        const config = {
            //Type of the chart - Bar Chart
            type: 'bar',
            //Data for our chart
            data: {
                labels: ['Low','Moderate','Major','Critical'],
                datasets: [{
                    label: "Count Of Tasks",
                    //Setting a color for each bar
                    backgroundColor: ['green','blue','yellow','red'],
                    borderColor: 'rgb(255, 99, 132)',
                    data: [0,0,0,0],
                    fill: false,
                }],
            },
            //Configuration options
            options: {
                responsive: true,
                title: {
                    display: true,
                    text: 'Tasks Priority Matrix'
                },
                tooltips: {
                    mode: 'index',
                    intersect: false,
                },
                hover: {
                    mode: 'nearest',
                    intersect: true
                },
                scales: {
                    xAxes: [{
                        display: true,
                        scaleLabel: {
                            display: true,
                            labelString: 'Priority'
                        }
                    }],
                    yAxes: [{
                        display: true
                     ,ticks: {
                            beginAtZero: true
                        }
                       ,scaleLabel: {
                            display: true,
                            labelString: 'Total'
                        }
                    }]
                }
            }
        };
        const context = document.getElementById('canvas').getContext('2d');
        //Creating the bar chart
        const lineChart = new Chart(context, config);
        //Reserved for websocket manipulation
        var namespace='/collectHooks';
        var url = 'http://' + document.domain + ':' + location.port + namespace;
        var socket = io.connect(url);
        //When connecting to the socket join the room
        socket.on('connect', function() {
                              socket.emit('join_room');
                            });
        //When receiving a message
        socket.on('msg' , function(data) {
                            var msg = JSON.parse(data);
                            var newLine = $('<li>'+ 'Batch ID. = ' + msg.batchid + ' -- Task ID. = ' + msg.id + ' -- Owner = ' + msg.owner + ' -- Priority = ' + msg.priority +'</li>');
                            newLine.css("color","blue");
                            $("#Messages").append(newLine);
                            //Retrieve the index of the priority of the received message
                            var lindex = config.data.labels.indexOf(msg.priority);
                            //Increment the value of the priority of the received message
                            config.data.datasets[0].data[lindex] += 1;
                            //Update the chart
                            lineChart.update();
                          });
      });
</script>
</body>
</html>
The above template include the following:
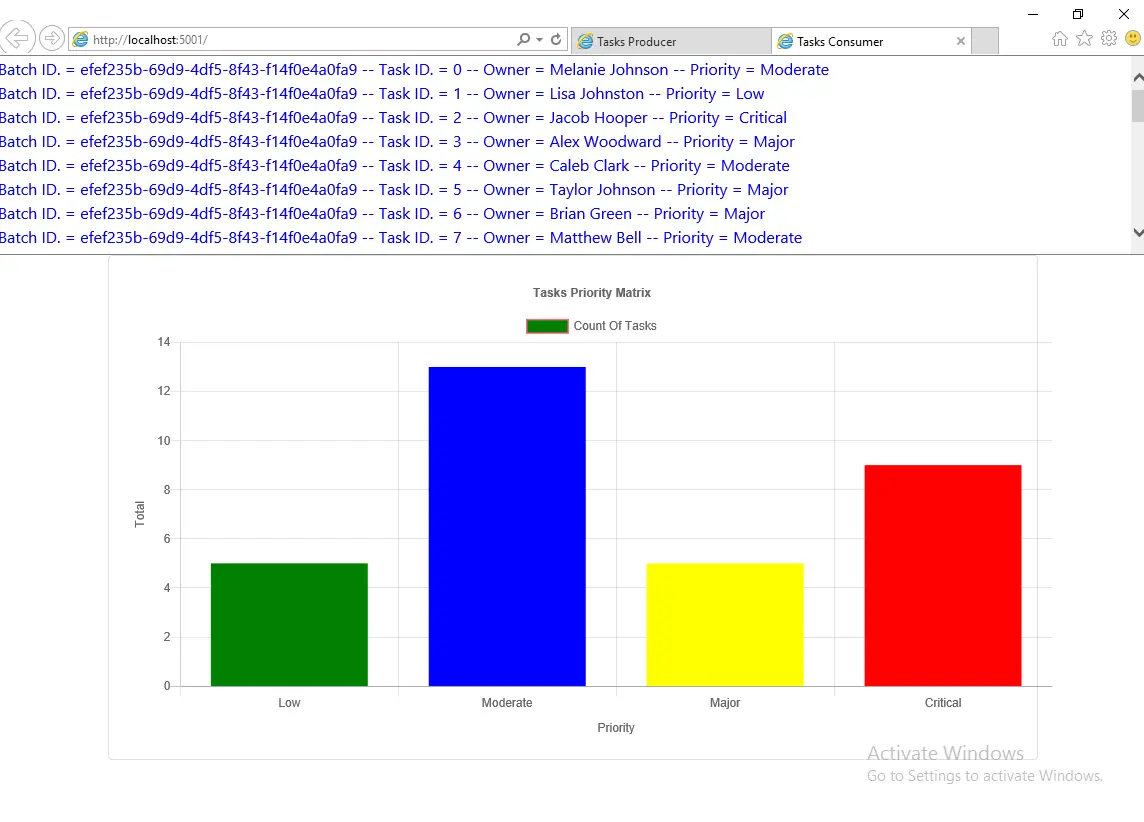
- The section messages display the details of the received tasks or webhooks.
- A bar chart showing the total number of tasks received throughout the web sockets events per priority. The steps performed to build the chart are the following:
- Placing a canvas element where to show the chart.
- Specifying the priority levels in the labels property which indicates the names of the instances you want to compare.
- Initialize a dataset property that defines an array of objects, each of which contains the data we want to compare.
- The bar chart will get updated synchronously whenever a new webhook is transmitted and received throughout the web socket.
Now let's test our program, please proceed as per the following steps:
- Open up a terminal and run the
app_producer.py:$ python app_producer.py - Start the Redis server, make sure the Redis instance is running on TCP port 6479.
- Open up another terminal and run
app_consumer.py:$ python app_consumer.py - Open your browser and access the
http://localhost:5000link to visualize the tasks producer:
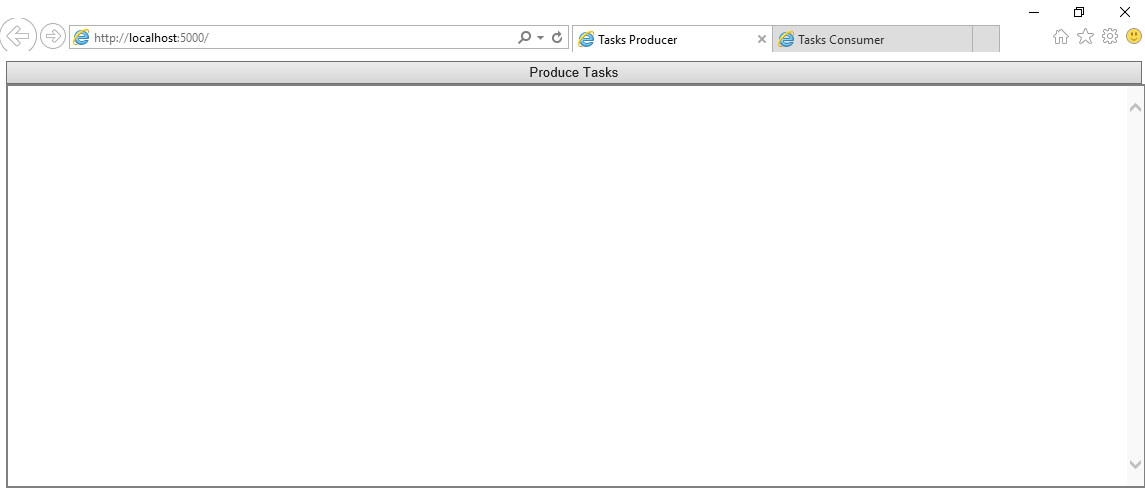 Press on the Produce Tasks button and a batch of tasks will be automatically generated and displayed gradually on the screen as shown below:
 Now open another tab in your browser and access
 http://localhost:5001 in order to visualize the tasks, consumer, the tasks will appear gradually in the messages section, and the bar chart will get updated automatically whenever a webhook is received:
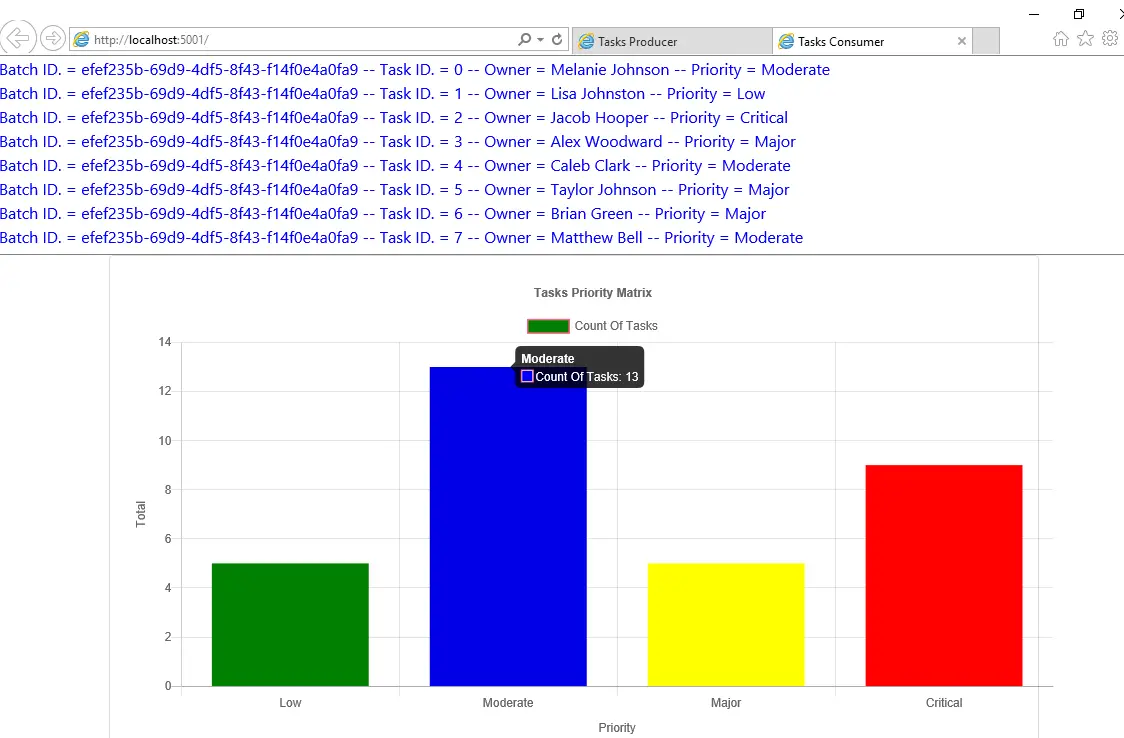
 When hovering the mouse over any of the chart bars, a tooltip showing the total number of tasks is displayed:
Conclusion
Webhooks are an important part of the web and they are becoming more popular. They allow your applications to exchange data instantly and seamlessly.
While webhooks are similar to APIs, they both play different roles, each with its own unique use case. Hopefully, this article has expanded your understanding, and remember that the key to getting the most out of webhooks is to know when they are the right choice for your application.
Learn also: Detecting Fraudulent Transactions in a Streaming App using Kafka in Python
Happy coding ♥
Liked what you read? You'll love what you can learn from our AI-powered Code Explainer. Check it out!
View Full Code Auto-Generate My Code


Got a coding query or need some guidance before you comment? Check out this Python Code Assistant for expert advice and handy tips. It's like having a coding tutor right in your fingertips!