Step up your coding game with AI-powered Code Explainer. Get insights like never before!
Introduction
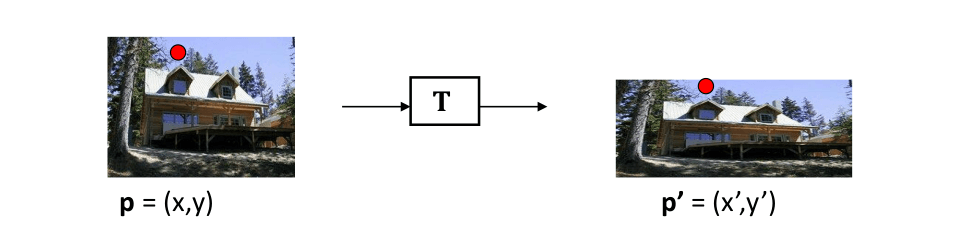
Image transformation is a coordinate changing function, it maps some (x, y) points in one coordinate system to points (x', y') in another coordinate system.
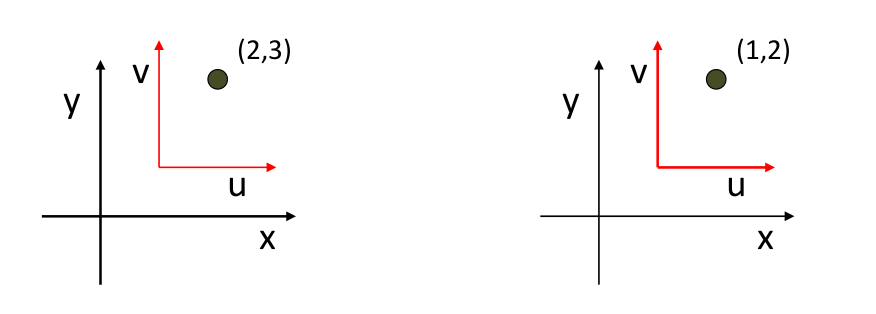
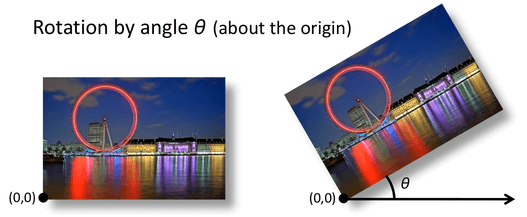
 For example, if we have (2, 3) points in x-y coordinate, and we plot the same point in u-v coordinate, the same point is represented in different ways, as shown in the figure below:
Here is the table of contents:
- The Use of Image Transformation
- Image Translation
- Image Scaling
- Image Shearing
- Image Reflection
- Image Rotation
- Image Cropping
- Conclusion
The Use of Image Transformation
In the image below, the geometric relation between the comic book and the image on the right side is based on the similarity transformation (rotation, translation, and scaling). If we need to train a machine learning model that finds this comic book, then we need to input the image in a different shape and angle.
Image transformation techniques can help us a lot in the preprocessing phase of images in machine learning.
Matrices can represent images. Each value in a matrix is a pixel value at a specific coordinate. Image transformation can be performed using matrix multiplication. Mathematicians have worked out some matrices that can be used to accomplish certain transformation operations.
Image Translation
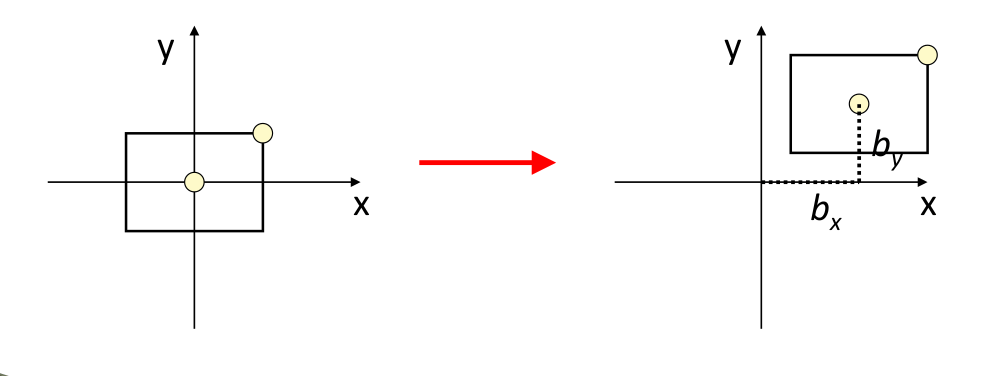
Image translation is the rectilinear shift of an image from one location to another, so the shifting of an object is called translation. The matrix shown below is used for the translation of the image:
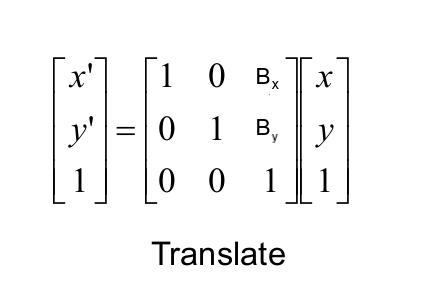 The value of bx defines how much the image will be moved on the x-axis and the value of by determines the movement of the image on the y-axis:
 Now that you understand image translation, let's take a look at the Python code. In OpenCV, there are two built-in functions for performing transformations:
cv2.warpPerspective: takes (3x3) transformation matrix as input.cv2.warpAffine: takes a (2x3) transformation matrix as input.
Both functions take three input parameters:
- The input image.
- Transformation matrix.
- A tuple of the height and width of the image.
In this tutorial, we'll use cv2.warpPerspective() function.
The below code reads an input image (if you want the exact output, get the demo image here and put it in the current working directory), translates it, and shows it:
import numpy as np
import cv2
import matplotlib.pyplot as plt
# read the input image
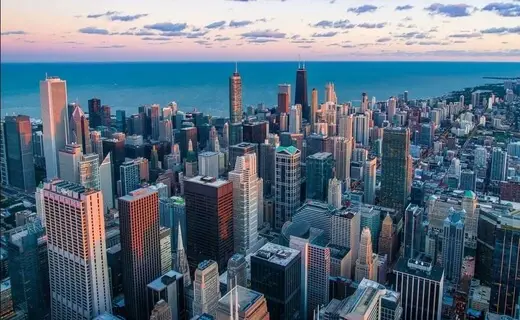
img = cv2.imread("city.jpg")
# convert from BGR to RGB so we can plot using matplotlib
img = cv2.cvtColor(img, cv2.COLOR_BGR2RGB)
# disable x & y axis
plt.axis('off')
# show the image
plt.imshow(img)
plt.show()
# get the image shape
rows, cols, dim = img.shape
# transformation matrix for translation
M = np.float32([[1, 0, 50],
[0, 1, 50],
[0, 0, 1]])
# apply a perspective transformation to the image
translated_img = cv2.warpPerspective(img, M, (cols, rows))
# disable x & y axis
plt.axis('off')
# show the resulting image
plt.imshow(translated_img)
plt.show()
# save the resulting image to disk
plt.imsave("city_translated.jpg", translated_img)Note that we use plt.axis('off') as we do not want to output the axis values, and we show the image using matplotlib's imshow() function.
We also use plt.imsave() function to save the image locally.
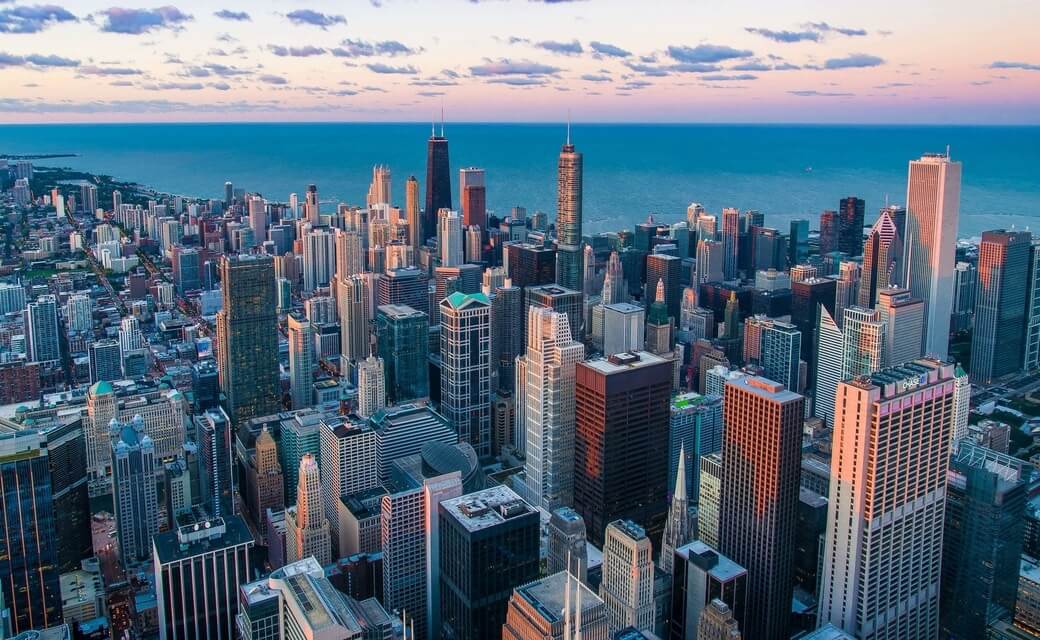
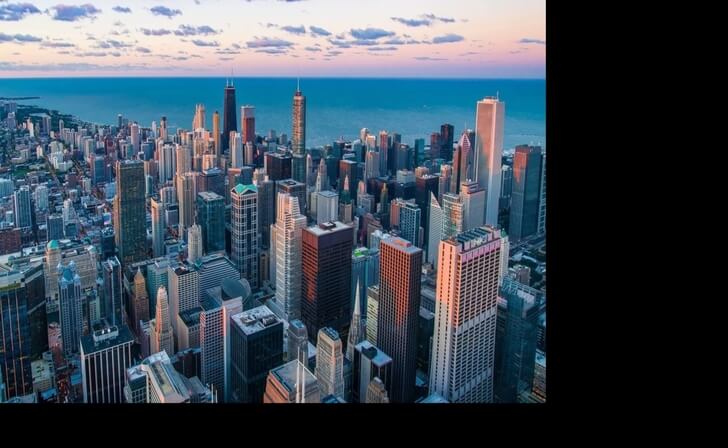
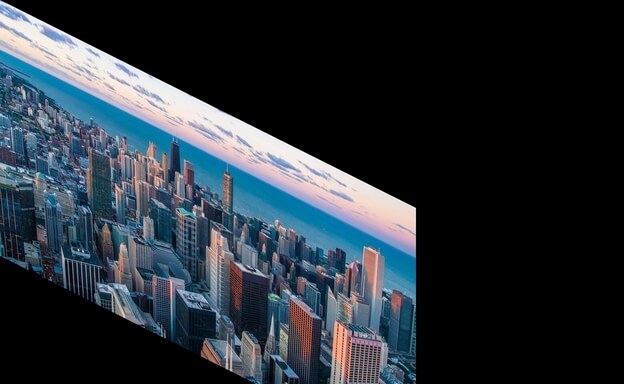
Original image:
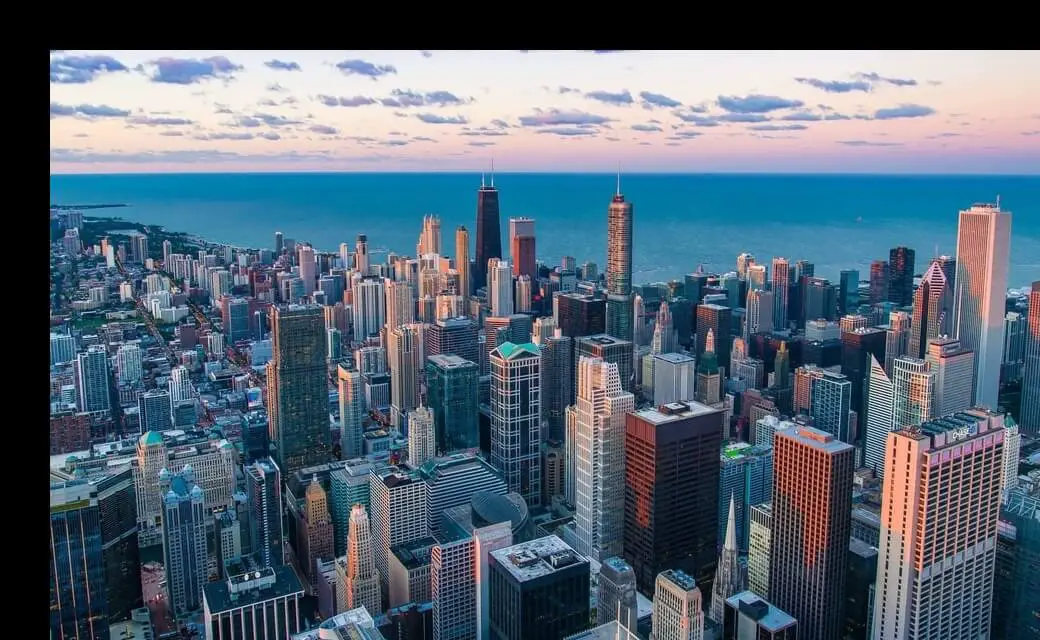
Translated image:
Mastering YOLO: Build an Automatic Number Plate Recognition System
Building a real-time automatic number plate recognition system using YOLO and OpenCV library in Python
Download EBookImage Scaling
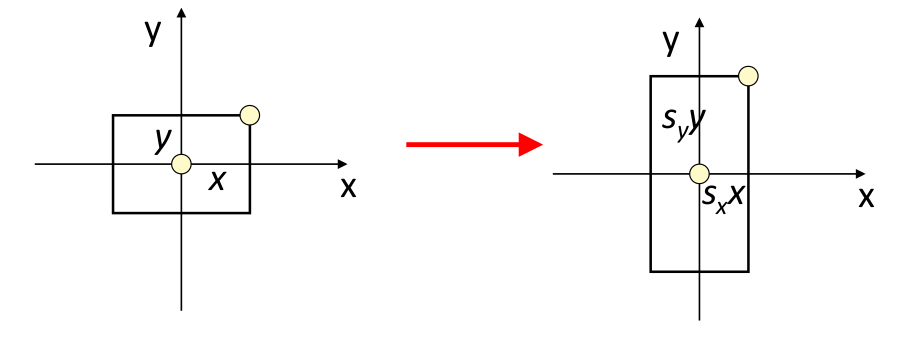
Image scaling is a process used to resize a digital image. OpenCV has a built-in function cv2.resize(), but we will perform transformation using matrix multiplication as previously. The matrix used for scaling is shown below:
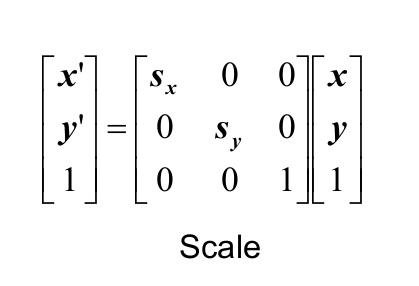 Sx and Sy are the scaling factors for the x-axis and y-axis, respectively.
 The below code is responsible for reading the same image, defining the transformation matrix for scaling, and showing the resulting image:
import numpy as np
import cv2
import matplotlib.pyplot as plt

# read the input image
img = cv2.imread("city.jpg")
# convert from BGR to RGB so we can plot using matplotlib
img = cv2.cvtColor(img, cv2.COLOR_BGR2RGB)
# disable x & y axis
plt.axis('off')
# show the image
plt.imshow(img)
plt.show()
# get the image shape
rows, cols, dim = img.shape
#transformation matrix for Scaling
M = np.float32([[1.5, 0  , 0],
            	[0,   1.8, 0],
            	[0,   0,   1]])
# apply a perspective transformation to the image
scaled_img = cv2.warpPerspective(img,M,(cols*2,rows*2))
# disable x & y axis
plt.axis('off')
# show the resulting image
plt.imshow(scaled_img)
plt.show()
# save the resulting image to disk
plt.imsave("city_scaled.jpg", scaled_img)
Output image:
Note that you can easily remove those black pixels with cropping, we'll cover that in the end of the tutorial.
Read Also: How to Blur Faces in Images using OpenCV in Python.
Image Shearing
Shear mapping is a linear map that displaces each point in a fixed direction, it substitutes every point horizontally or vertically by a specific value in proportion to its x or y coordinates, there are two types of shearing effects.
Shearing in the x-axis Direction
When shearing is done in the x-axis direction, the boundaries of the image that are parallel to the x-axis keep their location, and the edges parallel to the y-axis change their place depending on the shearing factor:
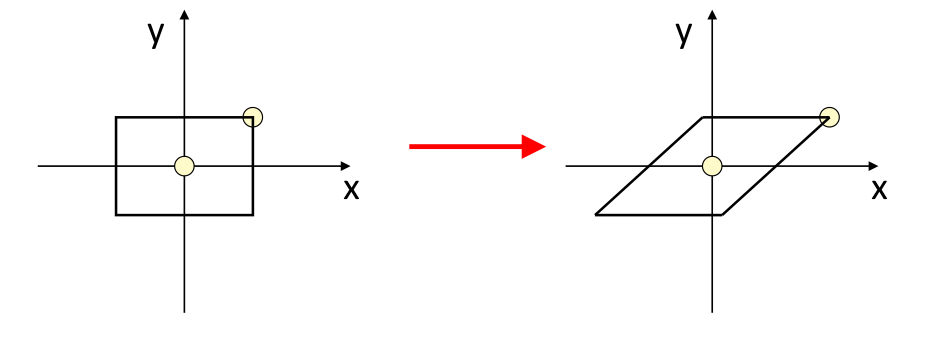
Shearing in the y-axis Direction
When shearing is done in the y-axis direction, the boundaries of the image that are parallel to the y-axis keep their location, and the edges parallel to the x-axis change their place depending on the shearing factor.
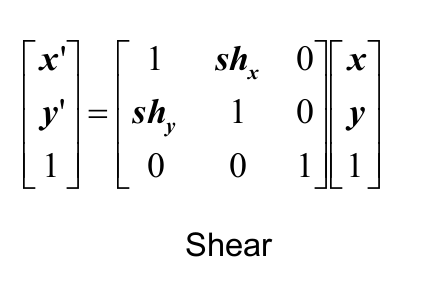
The matrix for shearing is shown in the below figure:
 Below is the code responsible for shearing:
import numpy as np
import cv2
import matplotlib.pyplot as plt
# read the input image
img = cv2.imread("city.jpg")
# convert from BGR to RGB so we can plot using matplotlib
img = cv2.cvtColor(img, cv2.COLOR_BGR2RGB)
# disable x & y axis
plt.axis('off')
# show the image
plt.imshow(img)
plt.show()
# get the image shape
rows, cols, dim = img.shape
# transformation matrix for Shearing
# shearing applied to x-axis
M = np.float32([[1, 0.5, 0],
[0, 1 , 0],
[0, 0 , 1]])
# shearing applied to y-axis
# M = np.float32([[1, 0, 0],
# [0.5, 1, 0],
# [0, 0, 1]])
# apply a perspective transformation to the image
sheared_img = cv2.warpPerspective(img,M,(int(cols*1.5),int(rows*1.5)))
# disable x & y axis
plt.axis('off')
# show the resulting image
plt.imshow(sheared_img)
plt.show()
# save the resulting image to disk
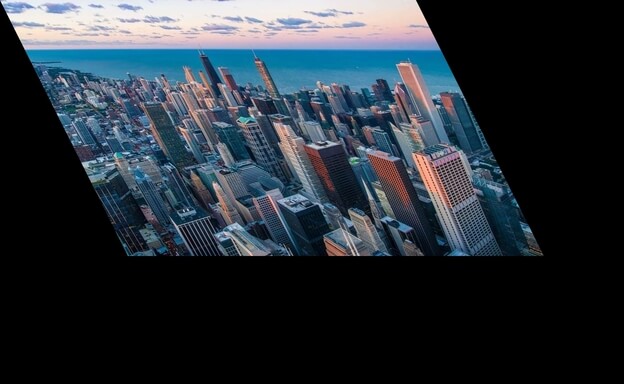
plt.imsave("city_sheared.jpg", sheared_img)The first matrix is shearing applied to the x-axis, if you want the y-axis, then comment the first matrix and uncomment the second one.
X-axis sheared image:
Y-axis sheared image:
Related: Face Detection using OpenCV in Python.
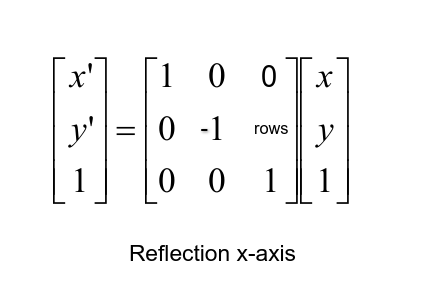
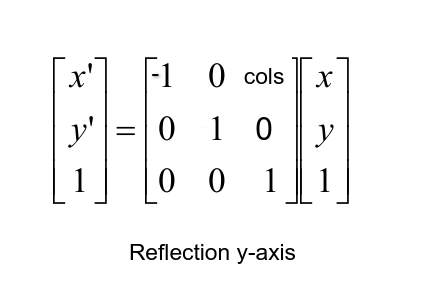
Image Reflection
Image reflection (or mirroring) is useful for flipping an image, it can flip the image vertically as well as horizontally, which is a particular case of scaling. For reflection along the x-axis, we set the value of Sy to -1, and Sx to 1, and vice-versa for the y-axis reflection.
The transformation matrix for reflection is shown below:
 Here is the Python code for reflection:
import numpy as np
import cv2
import matplotlib.pyplot as plt

# read the input image
img = cv2.imread("city.jpg")
# convert from BGR to RGB so we can plot using matplotlib
img = cv2.cvtColor(img, cv2.COLOR_BGR2RGB)
# disable x & y axis
plt.axis('off')
# show the image
plt.imshow(img)
plt.show()
# get the image shape
rows, cols, dim = img.shape
# transformation matrix for x-axis reflection
M = np.float32([[1,  0, 0   ],
                [0, -1, rows],
                [0,  0, 1   ]])
# transformation matrix for y-axis reflection
# M = np.float32([[-1, 0, cols],
#                 [ 0, 1, 0   ],
#                 [ 0, 0, 1   ]])
# apply a perspective transformation to the image
reflected_img = cv2.warpPerspective(img,M,(int(cols),int(rows)))
# disable x & y axis
plt.axis('off')
# show the resulting image
plt.imshow(reflected_img)
plt.show()
# save the resulting image to disk
plt.imsave("city_reflected.jpg", reflected_img)
As previously, this will reflect its x-axis, if you want y-axis reflection, uncomment the second matrix and comment on the first one.
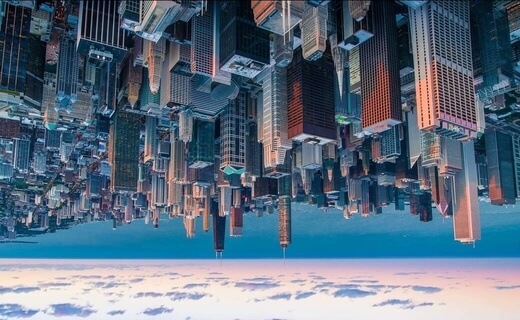
X-axis reflected image:
Y-axis reflected image:
Mastering YOLO: Build an Automatic Number Plate Recognition System
Building a real-time automatic number plate recognition system using YOLO and OpenCV library in Python
Download EBookImage Rotation
Rotation is a concept in mathematics that is a motion of a certain space that preserves at least one point. Image rotation is a common image processing routine with applications in matching, alignment, and other image-based algorithms, it is also extensively in data augmentation, especially when it comes to image classification.
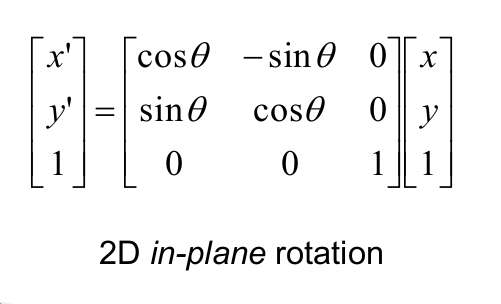
 The transformation matrix of rotation is shown in the below figure, where theta (θ) is the angle of rotation:
 Below is the Python code for image rotation:
import numpy as np
import cv2
import matplotlib.pyplot as plt

# read the input image
img = cv2.imread("city.jpg")
# convert from BGR to RGB so we can plot using matplotlib
img = cv2.cvtColor(img, cv2.COLOR_BGR2RGB)
# disable x & y axis
plt.axis('off')
# show the image
plt.imshow(img)
plt.show()
# get the image shape
rows, cols, dim = img.shape
#angle from degree to radian
angle = np.radians(10)
#transformation matrix for Rotation
M = np.float32([[np.cos(angle), -(np.sin(angle)), 0],
            	[np.sin(angle), np.cos(angle), 0],
            	[0, 0, 1]])
# apply a perspective transformation to the image
rotated_img = cv2.warpPerspective(img, M, (int(cols),int(rows)))
# disable x & y axis
plt.axis('off')
# show the resulting image
plt.imshow(rotated_img)
plt.show()
# save the resulting image to disk
plt.imsave("city_rotated.jpg", rotated_img)
Output image:
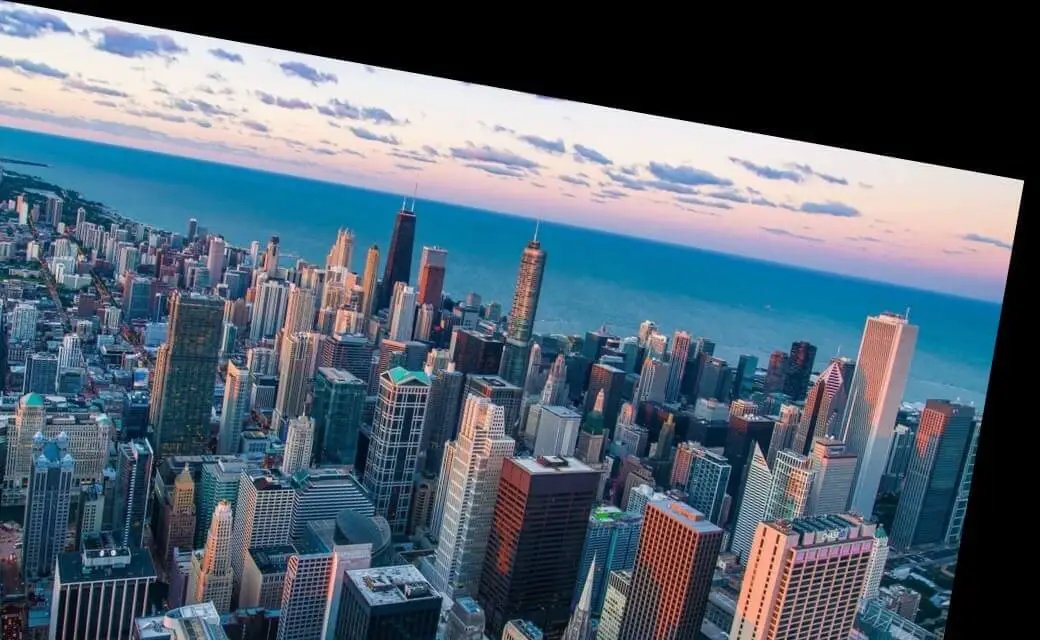 This was rotated by 10° (
np.radians(10)), you're free to edit it as you wish!
Related: How to Perform Edge Detection in Python using OpenCV.
Image Cropping
Image cropping is the removal of unwanted outer areas from an image, a lot of the above examples introduced black pixels, you can easily remove them using cropping. The below code does that:
import numpy as np
import cv2
import matplotlib.pyplot as plt

# read the input image
img = cv2.imread("city.jpg")
# convert from BGR to RGB so we can plot using matplotlib
img = cv2.cvtColor(img, cv2.COLOR_BGR2RGB)
# disable x & y axis
plt.axis('off')
# show the image
plt.imshow(img)
plt.show()
# get 200 pixels from 100 to 300 on both x-axis & y-axis
# change that if you will, just make sure you don't exceed cols & rows
cropped_img = img[100:300, 100:300]
# disable x & y axis
plt.axis('off')
# show the resulting image
plt.imshow(cropped_img)
plt.show()
# save the resulting image to disk
plt.imsave("city_cropped.jpg", cropped_img)
Since OpenCV loads the image as a numpy array, we can crop the image simply by indexing the array, in our case, we chose to get 200 pixels from 100 to 300 on both axes, here is the output image:

Conclusion
In this tutorial, we've covered the basics of image processing and transformation, which are image translation, scaling, shearing, reflection, rotation, and cropping.
You can get all the codes here.
Finally, if you want to dive more into the exciting world of object detection, I suggest you see our comprehensive guide, Mastering YOLO: Build an Automatic Number Plate Recognition System. Whether you're a Python programmer, a hobbyist in computer vision, or a professional developer looking to advance your skills, this book offers a practical, hands-on approach to understanding and implementing YOLO. From setting up your environment to training the model and deploying an ANPR system, this book is a complete roadmap. What's more, it comes with lifetime access to future revisions, source code, and a 30-day money-back guarantee! Elevate your skillset and create real-world solutions with our step-by-step tutorials and clear explanations. Get your digital copy today!
Learn also: How to Detect Shapes in Images in Python using OpenCV.
Happy learning ♥
Save time and energy with our Python Code Generator. Why start from scratch when you can generate? Give it a try!
View Full Code Convert My Code


Got a coding query or need some guidance before you comment? Check out this Python Code Assistant for expert advice and handy tips. It's like having a coding tutor right in your fingertips!